
Beginner’s Guide to Dagger in Android
Beginner’s Guide to Dagger in Android
What is Dagger? Newer developers tend to think it’s a library that simply enables the use of dependency injection — this is false. Dagger2 is just a dependency injection framework that makes DI much easier to implement. In the following article I’m going to walk you through the entire process of setting up Dagger with code examples. I’ll also explain the basic concepts, such as components, modules and subcomponents in order to help you make sense of everything. If you are new to Android development, I’d recommend reading another article I wrote on
This sample project makes use of the Mosby library, which allows for quick setup of the MVP pattern. The most important thing to note is that the presenter(s) is retained across device reconfig. If you do not understand what MVP is, check out this article explaining it
Dagger2 — Something Confusing?


Similar to RxJava, Dagger is often said to come off as being difficult to understand and use. I can admit that when I first tried to learn Dagger, I felt completely lost. I read a lot of tutorials and watched every YouTube video I could find. Slowly but surely, one day it finally clicked. Though hopefully the learning process won’t be as arduous for you with the following article. Just remember to breathe
The Advantages
Dagger really shines in projects with a lot of dependencies. It can be a pain to manually inject every single one of our dependencies into a class when creating it — Dagger can do this for us quite easily. Let’s take a look at the following example of a function which builds a class through constructor injection.
Without Dagger
As you can see, we are manually building out each of the classes dependencies. Not only that, but I am actually hiding a ton of dependency building and initialization through the use of the RetrofitFactory class. It is great that we are using dependency injection — but this solution does have some slight pitfalls Dagger can overcome. Mainly the issue of manually changing the classes dependencies. What if we remove or add a dependency to one of our classes? We would have to come back and make corrections to the constructor initialization ourselves. On top of that, Dagger also helps with dependency scoping. Meaning, if multiple classes use the same dependency, Dagger can make those classes use the same instance instead of initializing a new one — or even retaining dependencies to different lifecycles (ie. dependencies to be kept alive through the entire app, Activity or some other class).
With Dagger
The code we write to return an instance of our class is much more straightforward here. All we are doing is creating an instance of our presenter through our component. You may also notice that we aren’t directly supplying any of our dependencies — except for a Context. Don’t worry if this doesn’t make any sense yet — I am merely showing an advantage Dagger gives us.
Before we dive into an in-depth discussion of Dagger, here’s a crudely drawn diagram of all our modules and component(s) for this project (the one linked above).

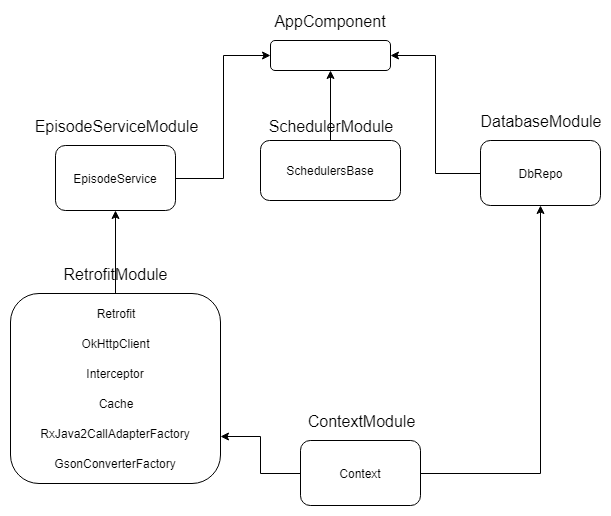
Don’t worry about understanding it now. The diagram should make sense once you have finished reading about components and modules. Now, let’s move on to actually explaining how both of those work in Dagger.
Components & Modules
There are two different pieces of Dagger you will be using a lot of — they are Components and Modules. An easy way to think of these is: Components are the parts that hold dependencies and Modules are responsible for building them.
How Modules Work
Modules are the individual pieces we use to build our dependencies in Dagger. Let’s take a look at how we would build an instance of something that has a lot of dependencies, something like a Retrofit instance.
We first start off by creating a class with the appropriate name and @Module annotation. In this class, we will be creating functions which will provide the necessary dependencies used to be build our Retrofit instance(s). To do this, we will annotate each of these functions with @Provides. It will look something like this:
Every providing function must return a dependency. From there, each of them can further be used within the module for other @Provides functions. Take a look at the parameters in the following function used to build our OkHttpClient.
fun provideHttpClient(interceptor: Interceptor, cache: Cache): OkHttpClient
Where does Interceptor and Cache come from? Since we are providing both of those in our module with provideInterceptor() and provideCache(), Dagger will now automatically use these functions to get the fields needed for other providing functions. As long as we are providing a type(or including a module that provides a type we need) in our module, we can use it to build other providing functions. Otherwise, we would be met with a compile-time error if they weren’t.
Furthermore, we only need to provide dependencies which we will need to inject into one or more of our classes. For example, if we had a constructor or a field that required a Cache or OkHttpClient, it would make sense to include a @Provides function in our module to return that dependency. Otherwise, if we only needed a Retrofit instance in our project, we could rewrite our module like this:
Which individual dependencies you want to provide depends entirely on what your classes will require.
Including Modules
If you look closely at our RetrofitModule, you will see that we are not writing a function to provide a Context, even though our Cache requires one. Why is this? Since we have other modules that will require a Context somewhere in their own dependency graph — we should not directly provide it in our Retrofit module. Instead, we tell RetrofitModule that it will include our ContextModule like so:
This is more or less saving us the trouble of having to write out a @Provides function for a Context in our Retrofit module. Imagine if we had to do this in every module where we needed a Context? It would be a complete pain. On top of that, what if the way we initialized a Context changed in the future at some point? We would have to go through every module and make the correction by hand. An included module is one that will be, or is being, used to build other modules. When we include other modules in this way, we only have to worry about building them in one place.
External Dependencies
I haven’t shown you the code for creating our ContextModule just yet — that’s because it’s a bit different from our RetrofitModule. Here’s how it looks:
Unlike our Retrofit module, this one requires a constructor. Why? Well, since we cannot create an instance of Context out of thin air like our other dependencies, we have to rely on the Android system to make it for us. Dependencies used in modules that we cannot instantiate ourselves are known as external dependencies. With this, every time we create a component which contains a module that requires an external dependency, we will need to create the module and supply it ourselves, as shown below for Context.
How Components Work
In simple terms, a component is what will hold all of our dependencies. We first define them as an interface using @Component.
After creating our component, we must tell it what modules to include. By doing this we are telling Dagger that this component should hold these x dependencies. We can do this like so:
After we include our desired modules, we can go ahead and populate the interface with different functions. These functions are used to tell Dagger how we want our dependencies served. We can have our component do things such as return individual dependencies like this:
Note, we can get any dependency this way — as long as they are returned by a providing function in one of the listed modules.
Or take advantage of field injection:
Or, if using constructor injection, return an instance with all the dependencies already injected:
How you want your dependencies served is entirely up to you and your chosen app architecture. The beauty of components is that we only have to tell Dagger what we want — it will automatically build the required methods to supply the dependencies we created from our providing functions. Once we’ve written out our component’s functions in its interface, we can then build the project. Afterwards, Dagger will create an implementation for us. This implementation class is always preceded with “Dagger”, so in this case, since our interface was AppComponent, the implementation class will be DaggerAppComponent. Once we have that, we can create an instance of it like this:
Remember, since our ContextModule requires an external dependency, we have to create the module ourselves and pass in a Context. Dagger will know how to build out the other modules as long as they do not require any external dependencies. For that reason, we don’t need to add them in our builder() call chain. Once we have our component built, we can begin using it to provide dependencies wherever they are needed.
The @Inject Annotation
Now that we know how to create our components and modules, how do we tell Dagger where to inject all of these dependencies? This is where the @Inject annotation comes in to play. When using Dagger, you will be using either field or constructor injection.
Field Injection
Injectable fields look something like this:
Be sure to do your field injection BEFORE the super.onCreate call.
All we need to do to is annotate the fields we want with @Inject. Dagger will then create and initialize these dependencies for us once we call injectActivity() from our component. Remember, your component will need to include the relevant injection function (and modules) like so:
Constructor Injection
Next up is constructor injection. Instead of annotating our fields with @Inject, we now annotate our constructor, as seen below.
Remember, in Kotlin, when using constructor annotation, the constructor keyword is required.
This is the same basic concept, but all we’re doing now is telling Dagger to supply our dependencies to our constructor. Building an instance of this class can be done from our component, we just need a function signature that returns it.
And now we build it…
That’s all there is to it. Building our component and then calling buildEpisodeListPresenter() returns an instance with all of our constructor dependencies injected. Nice!
Scoping
Now that you know about components, modules and how to inject dependencies, it’s time to move on to the slightly more advanced topic of scoping. As I have demonstrated up until this point, all of our modules are placed within our AppComponent. However, something is a little strange. Currently, whenever we create an instance or inject some fields — Dagger is always creating new instances to build our modules. Take a look at the example below.
This example assumes the existence of component functions responsible for returning individual dependencies.
Below is the output from logcat.
Look at the memory addresses for each matching type — they are all different! This is incredibly wasteful, especially since we are creating expensive objects. How do we tell Dagger to reuse the same instance within a component? This is the problem scoping solves. For every @Provides function in our module(s), we need to tell Dagger that it belongs to a specific scope. To do this, we have to go back to our modules and component — annotating each providing function with a scope along with the component itself. Note however, that we cannot mix and match scopes within a Module or component, they must be the same. This will become clearer later on.
Applying a Scope
For now, let’s go back to our module(s) and annotate each @Provides function with @Singleton. Look at the example below for how we would do this in RetrofitModule and AppComponent.
Now that we have our module and component annotated with @Singleton — what exactly does it do? In simple terms, the instance is now only being created once per scope. You have probably come across other Dagger tutorials and noticed the use of @Singleton everywhere. All we are doing is telling our AppComponent and @Provides functions that they belong to the @Singleton scope. Do not be confused and assume that the use of @Singleton makes each of our instances traditional singletons outside of our AppComponent — @Singleton is just the name of a scope. From now on, each of these providing functions will now return the same instance even when called multiple times.
Once we rebuild our project and create our AppComponent, printing the memory addresses gives us a different result now.
As you can see, each matching dependency now shares the same memory address. This means that the component is reusing the same instances, instead of creating new ones. This is great! Every @Provides function now only creates each instance once. Be sure that you are scoping your providing functions where it makes sense to only have one instance within a component. Note however, when taking advantage of scopes, if we create a new component — all of the matching dependencies within it will be the same instance (address) but they will not be the same as ones in a different instance of the same component. Look at the example below to get a better idea.
Here’s what the output from logcat looks like.
What I explained earlier should now be more clear. Our dependency scopes are working as intended, but the addresses differ in each component. So that means, if we want to share the same instance of a dependency in different parts of our app, we need to create our component in a place where it makes sense. Think of instantiating a database multiple times — it doesn’t make sense to keep creating an instance of our database in Fragments or Activities. It should be bound to the lifecycle of the entire application as it will most likely be used throughout the entire app. Furthermore, what if we have a dependency that should live and die only within the Fragment or Activity lifecycle? This is the exact problem that having multiple components (or subcomponents) solves.
Subcomponents & Dependency Layering
Before we get in to explaining subcomponents, let’s create our own scopes to make things clearer. Since we will have instances bound to the app and, for this specific sample project I linked at the beginning, presenter lifecycles — they will be called @AppScope and @PresenterScope respectfully. I should mention that it is argued that @Singleton should be used for the root scope level. Ultimately, it doesn’t matter too much as long as your root scope is named appropriately.
For the following section, I have included a different branch of the sample project which takes advantage of scopes and dependency layering.
Custom Scopes
As I mentioned earlier, @Singleton is just the name of a scope, a label if you will. Now that we are going to have more than one scope, I find it better to create our own while giving them relevant names. Here’s what the code for defining our @AppScope looks like:
That’s all there is to it. We could actually go ahead and replace @Singleton with @AppScope in all of our modules — the intended behaviour would still be the same. For creating @PresenterScope, just do the same thing with a different class name.
Scoping Dependencies
Now that we have our two custom scopes, let’s analyze what dependencies we’ll need bound to each. If you take a look at both of our presenters in the project, EpisodeListPresenter and EpisodeDetailPresenter, you will notice that only our EpisodeListPresenter requires an instance of EpisodeService while they both share an instance of SchedulersBase and DbRepo. For this reason, it may be a good idea to include EpisodeService in @PresenterScope and the other two dependencies in @AppScope. This way, EpisodeService is only being created when it is required. Here’s a diagram for what our modules and components will look like now: