
Android開發6:Service的使用(簡單音樂播放器的實現)
閱讀目錄
回到頂部前言
啦啦啦~各位好久不見啦~博主最近比較忙,而且最近一次實驗也是剛剛結束~
好了不廢話了,直接進入我們這次的內容~
在這篇博文裡我們將學習Service(服務)的相關知識,學會使用 Service 進行後臺工作, 學會使用 Service 與 Activity 進行通訊,並在此知識基礎上學會使用 MediaPlayer和簡單的多執行緒程式設計、使用 Handle 更新 UI,並設計成功一個簡單的音樂播放器。
是不是很高大上呢~一起來學習~
回到頂部基礎知識
Service作為Android四大元件之一,在每一個應用程式中都扮演著非常重要的角色。它主要用於在後臺處理一些耗時的邏輯,或者去執行某些需要長期執行的任務。必要的時候我們甚至可以在程式退出的情況下,讓Service在後臺繼續保持執行狀態。
所以Service通常被稱為“後臺服務”,其中“後臺”一詞是相對於前臺而言的,具體是指其本身的執行並不依賴於使用者可視的UI介面,因此,從實際業務需求上來理解,Service的適用場景應該具備以下條件:
(1)並不依賴於使用者可視的UI介面(當然,這一條其實也不是絕對的,如前臺Service就是與Notification介面結合使用的);
(2)具有較長時間的執行特性。
1.Service AndroidManifest.xml 宣告
一般而言,從Service的啟動方式上,可以將Service分為Started Service和Bound Service。無論哪種具體的Service啟動型別,都是通過繼承Service基類自定義而來。在使用Service時,要想系統能夠找到此自定義Service,無論哪種型別,都需要在AndroidManifest.xml中宣告,語法格式如下:

<service android:enabled=["true" | "false"]
android:exported=["true" | "false"]
android:icon="drawable resource"
android:isolatedProcess=["true" | "false"]
android:label="string resource"
android:name="string"
android:permission="string"
android:process="string" >
其中,android:name對應Service類名,android:permission是許可權宣告,android:process設定具體的程序名稱。需要注意的是Service能否單獨使用一個程序與其啟動方式有關,本後下面會給出具體說明。其他的屬性此處與其他元件基本相同,不再過多描述。
注:如果自定義Service沒有在AndroidManifest.xml中宣告,當具體使用時,不會像Activity那樣直接崩潰報錯,對於顯式Intent啟動的Service,此時也會給出waring資訊“IllegalArgumentException: Service not registered”,有時候不容易發現忘了宣告而一時定位不到問題。
2.Started Service
Started Service相對比較簡單,通過context.startService(Intent serviceIntent)啟動Service,context.stopService(Intent serviceIntent)停止此Service。當然,在Service內部,也可以通過stopSelf(…)方式停止其本身。
1)Started Service自定義
下面程式碼片段顯示的是一個最基本的Started Service的自定義方式:
public class MyService extends Service {

    public static final String TAG = "MyService";

    @Override
    public IBinder onBind(Intent intent) {
        return null;
    }

    @Override
    public void onCreate() {
        super.onCreate();
        Log.w(TAG, "in onCreate");
    }

    @Override
    public int onStartCommand(Intent intent, int flags, int startId) {
        Log.w(TAG, "in onStartCommand");
        Log.w(TAG, "MyService:" + this);
        String name = intent.getStringExtra("name");
        Log.w(TAG, "name:" + name);
        return START_STICKY;
    }

    @Override
    public void onDestroy() {
        super.onDestroy();
        Log.w(TAG, "in onDestroy");
    }
}
其中,onBind(…)函式是Service基類中的唯一抽象方法,子類都必須重寫實現,此函式的返回值是針對Bound Service型別的Service才有用的,在Started Service型別中,此函式直接返回 null 即可。onCreate(…)、onStartCommand(…)和onDestroy()都是Started Service相應生命週期階段的回撥函式。
2) Started Service使用
public class MainActivity extends Activity {

    public static final String TAG = "MainActivity";

    private Button startServiceBtn;
    private Button stopServideBtn;
    private Button goBtn;

    private Intent serviceIntent;

    @Override
    protected void onCreate(Bundle savedInstanceState) {
        super.onCreate(savedInstanceState);
        setContentView(R.layout.activity_main);

        startServiceBtn = (Button) findViewById(R.id.start_service);
        stopServideBtn = (Button) findViewById(R.id.stop_service);
        goBtn = (Button) findViewById(R.id.go);

        startServiceBtn.setOnClickListener(new View.OnClickListener() {
            @Override
            public void onClick(View v) {
                serviceIntent = new Intent(MainActivity.this, MyService.class);
                startService(serviceIntent);
            }
        });

        stopServideBtn.setOnClickListener(new View.OnClickListener() {
            @Override
            public void onClick(View v) {
                stopService(serviceIntent);
            }
        });

        goBtn.setOnClickListener(new View.OnClickListener() {
            @Override
            public void onClick(View v) {
                Intent intent = new Intent(MainActivity.this, BActivity.class);
                startActivity(intent);
            }
        });

    }

    @Override
    protected void onDestroy() {
        super.onDestroy();
        Log.w(TAG, "in onDestroy");
    }
}
如上程式碼片段。
當Client呼叫startService(Intent serviceIntent)後,如果MyService是第一次啟動,首先會執行 onCreate()回撥,然後再執行onStartCommand(Intent intent, int flags, int startId),當Client再次呼叫startService(Intent serviceIntent),將只執行onStartCommand(Intent intent, int flags, int startId),因為此時Service已經建立了,無需執行onCreate()回撥。無論多少次的startService,只需要一次stopService()即可將此Service終止,執行onDestroy()函式(其實很好理解,因為onDestroy()與onCreate()回撥是相對的)。
下面重點關注下onStartCommand(Intent intent, int flags, int startId)方法。
其中引數flags預設情況下是0,對應的常量名為START_STICKY_COMPATIBILITY。startId是一個唯一的整型,用於表示此次Client執行startService(…)的請求請求標識,在多次startService(…)的情況下,呈現0,1,2….遞增。另外,此函式具有一個int型的返回值,具體的可選值及含義如下:
START_NOT_STICKY:當Service因為記憶體不足而被系統kill後,接下來未來的某個時間內,即使系統記憶體足夠可用,系統也不會嘗試重新建立此Service。除非程式中Client明確再次呼叫startService(…)啟動此Service。
START_STICKY:當Service因為記憶體不足而被系統kill後,接下來未來的某個時間內,當系統記憶體足夠可用的情況下,系統將會嘗試重新建立此Service,一旦建立成功後將回調onStartCommand(…)方法,但其中的Intent將是null,pendingintent除外。
START_REDELIVER_INTENT:與START_STICKY唯一不同的是,回撥onStartCommand(…)方法時,其中的Intent將是非空,將是最後一次呼叫startService(…)中的intent。
START_STICKY_COMPATIBILITY:compatibility version of {@link #START_STICKY} that does not guarantee that {@link #onStartCommand} will be called again after being killed。此值一般不會使用,所以注意前面三種情形就好。
3) Started Service生命週期及程序相關
1.onCreate(Client首次startService(..)) >> onStartCommand >> onStartCommand - optional … >> onDestroy(Client呼叫stopService(..))
注:onStartCommand(..)可以多次被呼叫,onDestroy()與onCreate()想匹配,當用戶強制kill掉程序時,onDestroy()是不會執行的。
2.對於同一型別的Service,Service例項一次永遠只存在一個,而不管Client是否是相同的元件,也不管Client是否處於相同的程序中。
3.Service通過startService(..)啟動Service後,此時Service的生命週期與Client本身的什麼週期是沒有任何關係的,只有Client呼叫stopService(..)或Service本身呼叫stopSelf(..)才能停止此Service。當然,當用戶強制kill掉Service程序或系統因記憶體不足也可能kill掉此Service。
4.Client A 通過startService(..)啟動Service後,可以在其他Client(如Client B、Client C)通過呼叫stopService(..)結束此Service。
5.Client呼叫stopService(..)時,如果當前Service沒有啟動,也不會出現任何報錯或問題,也就是說,stopService(..)無需做當前Service是否有效的判斷。
6.startService(Intent serviceIntent),其中的intent既可以是顯式Intent,也可以是隱式Intent,當Client與Service同處於一個App時,一般推薦使用顯示Intent。當處於不同App時,只能使用隱式Intent。
當Service需要執行在單獨的程序中,AndroidManifest.xml宣告時需要通過android:process指明此程序名稱,當此Service需要對其他App開放時,android:exported屬性值需要設定為true(當然,在有intent-filter時預設值就是true)。
<service
    android:name=".MyService"
    android:exported="true"
    android:process=":MyCorn" >
    <intent-filter>
        <action android:name="com.example.androidtest.myservice" />
    </intent-filter>
</service>
4)Started Service Client與Service通訊相關
當Client呼叫startService(Intent serviceIntent)啟動Service時,Client可以將引數通過Intent直接傳遞給Service。Service執行過程中,如果需要將引數傳遞給Client,一般可以通過藉助於傳送廣播的方式(此時,Client需要註冊此廣播)。
3.Bound Service
相對於Started Service,Bound Service具有更多的知識點。Bound Service的主要特性在於Service的生命週期是依附於Client的生命週期的,當Client不存在時,Bound Service將執行onDestroy,同時通過Service中的Binder物件可以較為方便進行Client-Service通訊。Bound Service一般使用過程如下:
1.自定義Service繼承基類Service,並重寫onBind(Intent intent)方法,此方法中需要返回具體的Binder物件;
2.Client通過實現ServiceConnection介面來自定義ServiceConnection,並通過bindService (Intent service, ServiceConnection sc, int flags)方法將Service繫結到此Client上;
3.自定義的ServiceConnection中實現onServiceConnected(ComponentName name, IBinder binder)方法,獲取Service端Binder例項;
4.通過獲取的Binder例項進行Service端其他公共方法的呼叫,以完成Client-Service通訊;
5.當Client在恰當的生命週期(如onDestroy等)時,此時需要解綁之前已經繫結的Service,通過呼叫函式unbindService(ServiceConnection sc)。
在Bound Service具體使用過程中,根據onBind(Intent intent)方法放回的Binder物件的定義方式不同,又可以將其分為以下三種方式,且每種方式具有不同的特點和適用場景:
1).Extending the Binder class
這是Bound Service中最常見的一種使用方式,也是Bound Service中最簡單的一種。
侷限:Clinet與Service必須同屬於同一個程序,不能實現程序間通訊(IPC)。否則則會出現類似於“android.os.BinderProxy cannot be cast to xxx”錯誤。
下面通過程式碼片段看下具體的使用:
public class MyBindService extends Service {

    public static final String TAG = "MyBindService";

    private MyBinder mBinder = new MyBinder();

    public class MyBinder extends Binder {
        MyBindService getService() {
            return MyBindService.this;
        }
    }

    @Override
    public void onCreate() {
        super.onCreate();
        Log.w(TAG, "in onCreate");
    }

    @Override
    public IBinder onBind(Intent intent) {
        Log.w(TAG, "in onBind");
        return mBinder;
    }

    @Override
    public boolean onUnbind(Intent intent) {
        Log.w(TAG, "in onUnbind");
        return super.onUnbind(intent);
    }

    @Override
    public void onDestroy() {
        super.onDestroy();
        Log.w(TAG, "in onDestroy");
    }
}
public class BActivity extends Activity {

    public static final String TAG = "BActivity";

    private Button bindServiceBtn;
    private Button unbindServiceBtn;

    private Button startIntentService;

    private Intent serviceIntent;

    private ServiceConnection sc = new MyServiceConnection();
    private MyBinder mBinder;
    private MyBindService mBindService;
    private boolean mBound;

    private class MyServiceConnection implements ServiceConnection {

        @Override
        public void onServiceConnected(ComponentName name, IBinder binder) {
            Log.w(TAG, "in MyServiceConnection onServiceConnected");
            mBinder = (MyBinder) binder;
            mBindService = mBinder.getService();

            mBound = true;
        }

        @Override
        public void onServiceDisconnected(ComponentName name) {
            // This is called when the connection with the service has been
            // unexpectedly disconnected -- that is, its process crashed.
            Log.w(TAG, "in MyServiceConnection onServiceDisconnected");
            mBound = false;
        }

    }

    @Override
    protected void onCreate(Bundle savedInstanceState) {
        super.onCreate(savedInstanceState);
        setContentView(R.layout.b);

        bindServiceBtn = (Button) findViewById(R.id.bind_service);
        unbindServiceBtn = (Button) findViewById(R.id.unbind_service);
        startIntentService = (Button) findViewById(R.id.start_intentservice);

        bindServiceBtn.setOnClickListener(new View.OnClickListener() {
            @Override
            public void onClick(View v) {
                Intent intent = new Intent(BActivity.this, MyBindService.class);
                bindService(intent, sc, Context.BIND_AUTO_CREATE);
            }
        });

        unbindServiceBtn.setOnClickListener(new View.OnClickListener() {
            @Override
            public void onClick(View v) {
                excuteUnbindService();
            }
        });

        startIntentService.setOnClickListener(new View.OnClickListener() {
            @Override
            public void onClick(View v) {
                Intent intent = new Intent(BActivity.this, MyIntentService.class);
                startService(intent);
            }
        });

    }

    private void excuteUnbindService() {
        if (mBound) {
            unbindService(sc);
            mBound = false;
        }
    }

    @Override
    protected void onDestroy() {
        super.onDestroy();
        Log.w(TAG, "in onDestroy");
        excuteUnbindService();
    }
}
首次點選bindServiceBtn進行bindService(..)時,依次回撥順序如下:
1 MyBindService(13457): in onCreate
2 MyBindService(13457): in onBind
3 BActivity(13457): in MyServiceConnection onServiceConnected
再次點選bindServiceBtn按鈕時,發現沒有任何輸出,說明MyBindService沒有進行任何回撥。
點選unbindServiceBtn進行unbindService(..)時,回撥順序為:
1 MyBindService(13457): in onUnbind
2 MyBindService(13457): in onDestroy
注:在四大基本元件中,需要注意的的是BroadcastReceiver不能作為Bound Service的Client,因為BroadcastReceiver的生命週期很短,當執行完onReceive(..)回撥時,BroadcastReceiver生命週期完結。而Bound Service又與Client本身的生命週期相關,因此,Android中不允許BroadcastReceiver去bindService(..),當有此類需求時,可以考慮通過startService(..)替代。
4.Service特性
1.Service本身都是執行在其所在程序的主執行緒(如果Service與Clinet同屬於一個程序,則是運行於UI執行緒),但Service一般都是需要進行”長期“操作,所以經常寫法是在自定義Service中處理”長期“操作時需要新建執行緒,以免阻塞UI執行緒或導致ANR;
2.Service一旦建立,需要停止時都需要顯示呼叫相應的方法(Started Service需要呼叫stopService(..)或Service本身呼叫stopSelf(..), Bound Service需要呼叫unbindService(..)),否則對於Started Service將處於一直執行狀態,對於Bound Service,當Client生命週期結束時也將因此問題。也就是說,Service執行完畢後,必須人為的去停止它。
5.IntentService
IntentService是系統提供給我們的一個已經繼承自Service類的特殊類,IntentService特殊性是相對於Service本身的特性而言的:
1.預設直接實現了onBind(..)方法,直接返回null,並定義了抽象方法onHandlerIntent(..),使用者自定義子類時,需要實現此方法;
2.onHandlerIntent(..)主要就是用來處於相應的”長期“任務的,並且已經自動在新的執行緒中,使用者無語自定義新執行緒;
3.當”長期“任務執行完畢後(也就是onHandlerIntent(..)執行完畢後),此IntentService將自動結束,無需人為呼叫方法使其結束;
4.IntentService處於任務時,也是按照佇列的方式一個個去處理,而非真正意義上的多執行緒併發方式。
下面是一個基本的繼承自IntentService的自定義Service:
public class MyIntentService extends IntentService {

    public static final String TAG = "MyIntentService";

    public MyIntentService() {
        super(TAG);
    }

    public MyIntentService(String name) {
        super(name);
    }

    @Override
    protected void onHandleIntent(Intent intent) {
        Log.w(TAG, "in onHandleIntent");
        Log.w(TAG, "thread name:" + Thread.currentThread().getName());
    }

}
6.Service和Activity通訊
上面我們學習了Service的基本用法,啟動Service之後,就可以在onCreate()或onStartCommand()方法裡去執行一些具體的邏輯了。不過這樣的話Service和Activity的關係並不大,只是Activity通知了Service一下:“你可以啟動了。”然後Service就去忙自己的事情了。那麼有沒有什麼辦法能讓它們倆的關聯更多一些呢?比如說在Activity中可以指定讓Service去執行什麼任務。當然可以,只需要讓Activity和Service建立關聯就好了。
觀察MyService中的程式碼,你會發現一直有一個onBind()方法我們都沒有使用到,這個方法其實就是用於和Activity建立關聯的,修改MyService中的程式碼,如下所示:
public class MyService extends Service {

    public static final String TAG = "MyService";

    private MyBinder mBinder = new MyBinder();

    @Override
    public void onCreate() {
        super.onCreate();
        Log.d(TAG, "onCreate() executed");
    }

    @Override
    public int onStartCommand(Intent intent, int flags, int startId) {
        Log.d(TAG, "onStartCommand() executed");
        return super.onStartCommand(intent, flags, startId);
    }

    @Override
    public void onDestroy() {
        super.onDestroy();
        Log.d(TAG, "onDestroy() executed");
    }

    @Override
    public IBinder onBind(Intent intent) {
        return mBinder;
    }

    class MyBinder extends Binder {

        public void startDownload() {
            Log.d("TAG", "startDownload() executed");
            // 執行具體的下載任務
        }

    }

}
回到頂部實驗內容
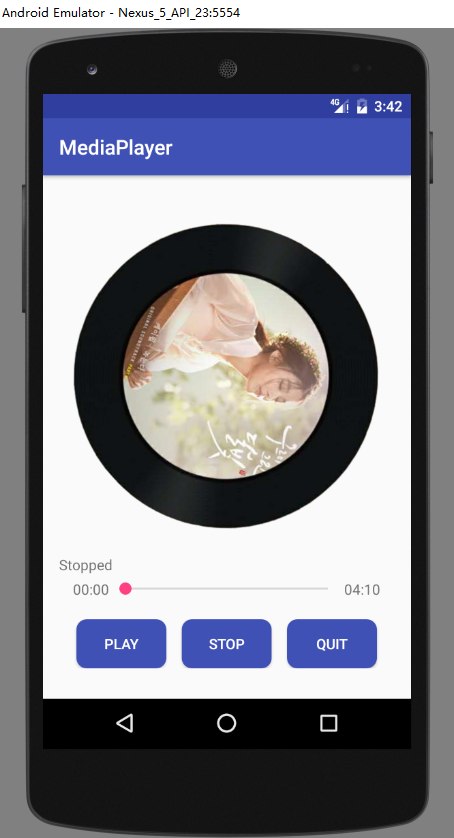
實現一個簡單的播放器,要求功能有:
1. 播放、暫停,停止,退出功能;
2. 後臺播放功能;
3. 進度條顯示播放進度、拖動進度條改變進度功能;
4. 播放時圖片旋轉,顯示當前播放時間功能。
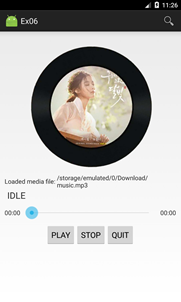

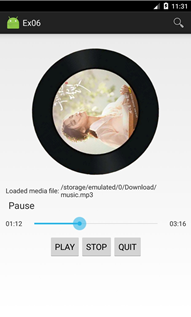

開啟程式主頁面 開始播放 暫停 停止
回到頂部實驗內容相關知識
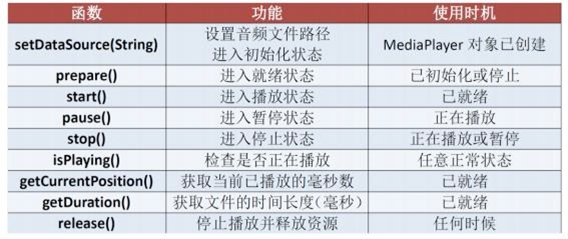
1. MediaPlayer 介紹
常用方法
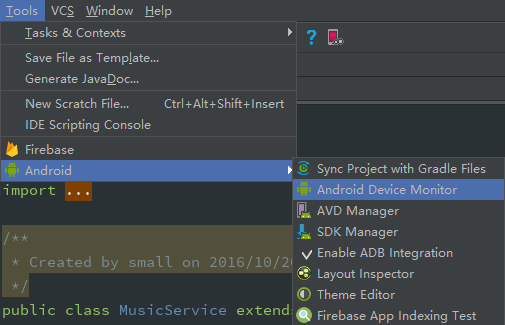
2. 向虛擬機器新增檔案
首先開啟 Android Device Monitor,如下圖:
3.使用 MediaPlayer
建立物件初始化:
注意下獲取的檔案路徑,若是使用模擬器的如下,若是使用自己手機的內建 SD 卡則使 用:Environment.getExternalStorageDirectory() + “/data/music.mp3

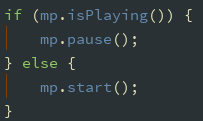
播放/暫停:
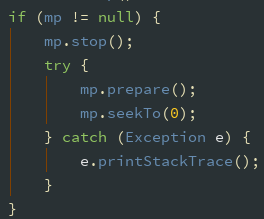
停止:
4.Service 的使用
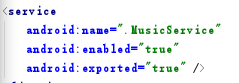
建立 service 類,實現 MediaPlayer 的功能。 注意在 AndroidManifest.xml 檔案裡註冊 Service:

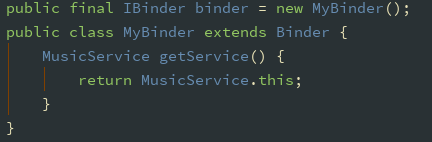
通過 Binder 來保持 Activity 和 Service 的通訊(寫在 service 類):
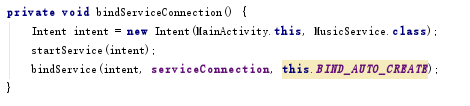
在 Activity 中呼叫 bindService 保持與 Service 的通訊(寫在 activity 類): Activity 啟動時繫結 Service:

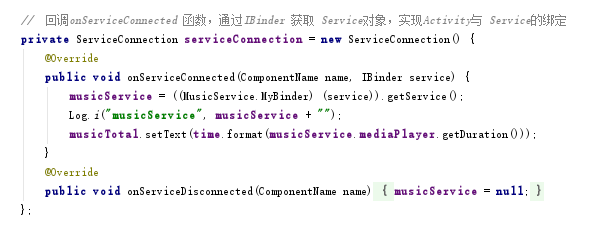
bindService 成功後回撥 onServiceConnected 函式,通過 IBinder 獲取 Service 對 象,實現 Activity 與 Service 的繫結:

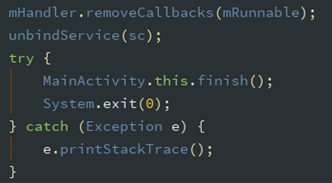
停止服務時,必須解除繫結,寫入退出按鈕中:
此時,在 Activity 的 onCreate 方法中執行上述與 Service 通訊的方法後,即可實現 後臺播放。點選退出按鈕,程式會退出,音樂停止;返回桌面,音樂繼續播放。
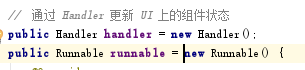
5.Handler的使用
Handler 與 UI 是同一執行緒,這裡可以通過 Handler 更新 UI 上的元件狀態,Handler 有很多方法,這裡使用比較簡便的 post 和 postDelayed 方法。
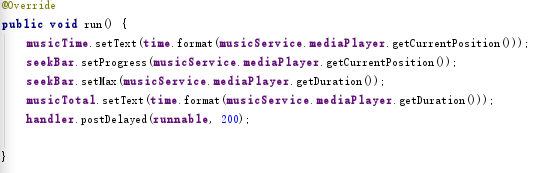
使用 Seekbar 顯示播放進度,設定當前值與最大值:

定義 Handler:run 函式中進行更新 seekbar 的進度在類中定義簡單日期格式,用來顯 示播放的時間,用 time.format 來格式所需要的資料,用來監聽進度條的滑動變化:


實驗過程
本次實驗主要是實現一個音樂播放器,首先開啟Android Device Monitor, 向虛擬機器新增音樂檔案。
建立 service 類,使用 MediaPlayer,建立物件,設定一個布林代數變數作為我們判斷音樂此時狀態的tag,使用setDataSource方法呼叫虛擬裝置中的音樂檔案,並對其進行初始化:

在 AndroidManifest.xml 檔案裡註冊 Service:
並在其中宣告SD卡的讀寫許可權:

通過 Binder 來保持 Activity 和 Service 的通訊(寫在 service 類):

在Activity中呼叫 bindService 保持與 Service 的通訊:
Activity 啟動時繫結 Service。
bindService成功後回撥onServiceConnected 函式,通過IBinder 獲取 Service物件,實現Activity與 Service的繫結:
在Activity中設定按鈕點選事件時我們需要呼叫MediaPlayer中的某些方法,這裡我們先在service類中實現MediaPlayer的功能:

此時,在 Activity 的 onCreate方法中執行上述與 Service 通訊的方法後,即可實現後臺播放。點選退出按鈕,程式會退出,音樂停止;返回桌面,音樂繼續播放。
Handler 與 UI 是同一執行緒,這裡可以通過 Handler 更新 UI 上的元件狀態,通過Handler可以統一進行對UI的管理,因為Handler採用訊息處理的機制。簡單理解就是另一個執行緒傳送一個編號給訊息所在的執行緒,那麼該執行緒的訊息處理程式就會收到該訊息並進行處理,而訊息採用int型別,所以int能夠表示多少種數字就以為著有多少訊息可以給你使用(因為存在系統的訊息,所以可能有一部分被系統的訊息佔有,而不能使用)。Handler有很多方法,這裡使用比較簡便的 post和postDelayed 方法。
定義 Handler:
run 函式中進行更新 seekbar 的進度,在類中定義簡單日期格式,用來顯示播放的時間,用 time.format 來格式所需要的資料,用來監聽進度條的滑動變化(使用 Seekbar 顯示播放進度,設定當前值與最大值,具體事件在onCreate方法中實現):
接下來,我們需要完成各個按鈕的點選事件。在點選事件中,為了完成圖片旋轉以及其實時更新,我們使用animator屬性.我們首先例項化了一個ObjectAnimator,然後設定所需的引數:imageView:需要更改的View,動畫型別,動畫範圍,並在對應的點選事件中引用animator中的一些事件,實現動畫的點選動作:

在點選事件中,主要是實現按鈕文字的變換以及呼叫service中定義好的MediaPlayer事件,並實現動畫的變換:

這裡需要注意的是,在btnPlayOrPause.setOnClickListener中,為了正確實現動畫事件,我們需要設定相應的tag,由tag的變換來控制事件的呼叫:

而且停止服務時,必須解除繫結,寫入btnQuit按鈕中:

最後,在onCreate函式中,我們將定義的各個函式一一實現,即可完成實驗的功能。
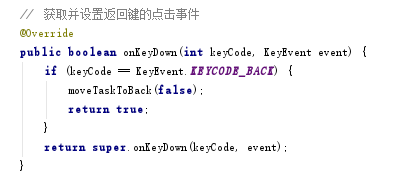
除此之外,為了保證返回後臺(按了返回鍵後)仍能繼續播放,並且開啟應用後Activity中的內容要與音樂當前的狀態對應,我們還需要獲取並設定返回鍵的點選事件:
完成實驗~
回到頂部注意事項
在查詢了一些資料後,解決了這個問題:
android mediaPlayer error (-38,0)出現這個錯誤發現在mediaPlayer.reset()後呼叫了mediaPlayer.getDuration()在沒有給mediaPlayer物件設定資料來源之前,是不能使用getDuration等這些方法的
這時,需要檢查一下在設定MediaPlayer的資料來源時,使用的是那種方式:
1.在初始化MediaPlayer時,通過create方法設定資料來源。則不能寫MediaPlayer.prepare()方法,這時,會報錯。
2.如果是使用MediaPlayer建構函式初始化MediaPlayer,然後通過setDataSource方法設定資料來源時,就需要在start()之前,使用MediaPlayer.prepare()方法,對資料來源進行一次編譯。能夠避免出現(-38,0)這種錯誤。
回到頂部實驗截圖


原始碼下載
原始碼下載點選這裡~
回到頂部注
1、本實驗實驗環境:
作業系統 Windows 10
實驗軟體 Android Studio 2.2.1
虛擬裝置:Nexus_5X
API:23
2、貼程式碼的時候由於插入程式碼框的大小問題,程式碼格式不太嚴整,望見諒~