
Spring啟動RESTful API文件使用Swagger 2
Spring Boot使開發RESTful服務變得非常容易 - 並且使用Swagger可以輕鬆地記錄RESTful服務。
構建後端API層引入了一個全新的領域,超越了僅僅實現端點的挑戰。 您現在有客戶端,現在將使用您的API。 您的客戶需要知道如何與您的API進行互動。 在基於SOAP的Web服務中,您有一個WSDL可以使用。 這為API開發人員提供了一個基於XML的合同,它定義了API。 但是,對於RESTFul Web服務,沒有WSDL。 因此,您的API文件變得更加重要。
API文件應該結構化,使其具有資訊性,簡潔性和易於閱讀。 但是最佳實踐,如何記錄你的API,它的結構,什麼包括和什麼不是是一個不同的主題,我不會在這裡覆蓋。
在本文中,我將介紹如何使用Swagger 2為Spring Boot專案生成REST API文件。
Swagger 2在Spring啟動
Swagger 2是一個開源專案,用於描述和記錄RESTful API。 Swagger 2是語言無關的,可擴充套件到除HTTP之外的新技術和協議。 當前版本定義了一組HTML,JavaScript和CSS資源,以便從符合Swagger的API動態生成文件。 這些檔案由Swagger UI專案捆綁,以在瀏覽器上顯示API。 除了渲染文件,Swagger UI允許其他API開發人員或使用者與API的資源互動,而沒有任何實現邏輯到位。
Swagger 2規範,被稱為
我們將在我們的專案中使用Springfox。
為了引入它,我們需要在我們的Maven POM中有下面的依賴宣告。
<dependency>
    <groupId>io.springfox</groupId>
    <artifactId>springfox-swagger2</artifactId>
    <version>2.6.1</version>
    <scope>compile</scope>
</dependency>
除了Sprinfox,我們還需要Swagger UI。 包含Swagger UI的程式碼是這樣的。
<dependency>
    <groupId>io.springfox</groupId>
    <artifactId>springfox-swagger-ui</artifactId>
    <version>2.6.1</version>
    <scope>compile</scope>
</dependency>
Spring啟動RESTful應用程式
我們的應用程式實現了一組REST端點來管理產品。 我們有一個產品JPA實體和一個名為ProductRepository ,它擴充套件了CrudRepository ,以便針對記憶體中的H2資料庫執行產品的CRUD操作。
服務層由ProductService介面和ProductServiceImpl實現類組成。
Maven POM的應用程式是這樣的。
pom.xml :
<?xml version="1.0" encoding="UTF-8"?>
<project
	xmlns="http://maven.apache.org/POM/4.0.0"
	xmlns:xsi="http://www.w3.org/2001/XMLSchema-instance"
xsi:schemaLocation="http://maven.apache.org/POM/4.0.0 http://maven.apache.org/xsd/maven-4.0.0.xsd">
	<modelVersion>4.0.0</modelVersion>
	<groupId>guru.springframework</groupId>
	<artifactId>spring-boot-web</artifactId>
	<version>0.0.1-SNAPSHOT</version>
	<packaging>jar</packaging>
	<name>Spring Boot Web Application</name>
	<description>Spring Boot Web Application</description>
	<parent>
		<groupId>org.springframework.boot</groupId>
		<artifactId>spring-boot-starter-parent</artifactId>
		<version>1.4.2.RELEASE</version>
		<relativePath/>
		<!-- lookup parent from repository -->
	</parent>
	<properties>
		<project.build.sourceEncoding>UTF-8</project.build.sourceEncoding>
		<java.version>1.8</java.version>
	</properties>
	<dependencies>
		<dependency>
			<groupId>org.springframework.boot</groupId>
			<artifactId>spring-boot-starter-data-rest</artifactId>
		</dependency>
		<dependency>
			<groupId>org.springframework.boot</groupId>
			<artifactId>spring-boot-starter-data-jpa</artifactId>
		</dependency>
		<dependency>
			<groupId>org.springframework.boot</groupId>
			<artifactId>spring-boot-starter-security</artifactId>
		</dependency>
		<dependency>
			<groupId>org.springframework.boot</groupId>
			<artifactId>spring-boot-starter-thymeleaf</artifactId>
		</dependency>
		<dependency>
			<groupId>org.springframework.boot</groupId>
			<artifactId>spring-boot-starter-web</artifactId>
		</dependency>
		<dependency>
			<groupId>com.jayway.jsonpath</groupId>
			<artifactId>json-path</artifactId>
			<scope>test</scope>
		</dependency>
		<dependency>
			<groupId>io.springfox</groupId>
			<artifactId>springfox-swagger-ui</artifactId>
			<version>2.6.1</version>
			<scope>compile</scope>
		</dependency>
		<dependency>
			<groupId>io.springfox</groupId>
			<artifactId>springfox-swagger2</artifactId>
			<version>2.6.1</version>
			<scope>compile</scope>
		</dependency>
		<!--WebJars-->
		<dependency>
			<groupId>com.h2database</groupId>
			<artifactId>h2</artifactId>
		</dependency>
		<dependency>
			<groupId>org.springframework.boot</groupId>
			<artifactId>spring-boot-starter-test</artifactId>
			<scope>test</scope>
		</dependency>
	</dependencies>
	<build>
		<plugins>
			<plugin>
				<groupId>org.springframework.boot</groupId>
				<artifactId>spring-boot-maven-plugin</artifactId>
			</plugin>
		</plugins>
	</build>
</project>
應用程式的控制器ProductController定義REST API端點。 ProductController的程式碼是這樣的:
@RestController
@RequestMapping("/product")
public class ProductController {
    private ProductService productService;
    @Autowired
    public void setProductService(ProductService productService) {
        this.productService = productService;
    }
    @RequestMapping(value = "/list", method= RequestMethod.GET)
    public Iterable list(Model model){
        Iterable productList = productService.listAllProducts();
        return productList;
    }
    @RequestMapping(value = "/show/{id}", method= RequestMethod.GET)
    public Product showProduct(@PathVariable Integer id, Model model){
       Product product = productService.getProductById(id);
        return product;
    }
    @RequestMapping(value = "/add", method = RequestMethod.POST)
    public ResponseEntity saveProduct(@RequestBody Product product){
        productService.saveProduct(product);
        return new ResponseEntity("Product saved successfully", HttpStatus.OK);
    }
    @RequestMapping(value = "/update/{id}", method = RequestMethod.PUT)
    public ResponseEntity updateProduct(@PathVariable Integer id, @RequestBody Product product){
        Product storedProduct = productService.getProductById(id);
        storedProduct.setDescription(product.getDescription());
        storedProduct.setImageUrl(product.getImageUrl());
        storedProduct.setPrice(product.getPrice());
        productService.saveProduct(storedProduct);
        return new ResponseEntity("Product updated successfully", HttpStatus.OK);
    }
    @RequestMapping(value="/delete/{id}", method = RequestMethod.DELETE)
    public ResponseEntity delete(@PathVariable Integer id){
        productService.deleteProduct(id);
        return new ResponseEntity("Product deleted successfully", HttpStatus.OK);
    }
}
在這個控制器中,Spring 4.0中引入的@RestController註釋將ProductController標記為REST API控制器。 在引擎蓋下, @RestController工作作為一個方便的註釋用@Controller和@ResponseBody註釋類。
@RequestMapping類級註釋將請求對映到/product到ProductController類。 方法級別@RequestMapping註釋將Web請求對映到控制器的處理程式方法。
在應用程式中配置Swagger 2
對於我們的應用程式,我們將在Spring Boot配置中建立一個Docket bean,為應用程式配置Swagger 2。 Springfox Docket例項為主要的API配置提供了合理的預設值和方便的配置方法。 我們的Spring Boot配置類,SwaggerConfig就是這樣。@Configuration
@EnableSwagger2
public class SwaggerConfig {
@Bean
public Docket productApi() {
return new Docket(DocumentationType.SWAGGER_2)
.select() .apis(RequestHandlerSelectors.basePackage("guru.springframework.controllers"))
.paths(regex("/product.*"))
.build();
}
}
在此配置類中, @EnableSwagger2註釋在類中啟用Swagger支援。 在Docket bean例項上呼叫的select()方法返回一個ApiSelectorBuilder ,它提供了用於過濾使用String謂詞記錄的控制器和方法的apis()和paths()方法。
在程式碼中, RequestHandlerSelectors.basePackage謂詞匹配guru.springframework.controllers基礎包以過濾API。 傳遞給paths()的regex引數用作附加過濾器,以便僅對以/product開頭的路徑生成文件。
此時,您應該能夠通過啟動應用程式並將瀏覽器指向http:// localhost:8080 / v2 / api-docs來測試配置 。
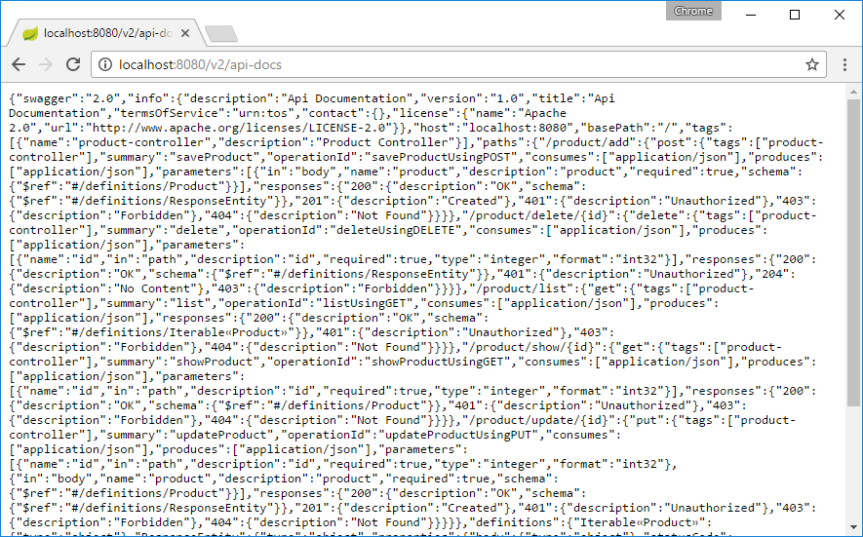
顯然,Swagger 2為我們的端點生成的上述JSON轉儲不是我們想要的。
我們想要的是一些很好的人類可讀的結構化文件,這是Swagger UI接管的地方。
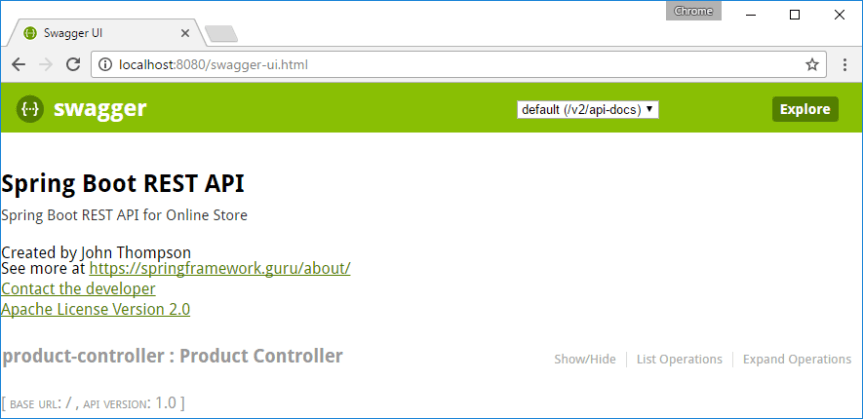
在將瀏覽器指向http:// localhost:8080 / swagger-ui.html時,您將看到由Swagger UI呈現的生成文件,如下所示:

如你所見,Swagger 2使用了合理的預設值來生成ProductController的ProductController 。
然後,Swagger UI包裝一切,為我們提供一個直觀的UI。 這一切都是自動完成的。 我們沒有寫任何程式碼或其他文件來支援Swagger。
自定義Swagger
到目前為止,我們一直在看Swagger文件,因為它開箱即用 - 但Swagger 2有一些偉大的自定義選項。
讓我們開始通過在SwaggerConfig類中提供有關我們的API的資訊來定製Swagger。
SwaggerConfig.java :
package guru.springframework.config;
import org.springframework.context.annotation.Bean;
import org.springframework.context.annotation.Configuration;
import springfox.documentation.builders.RequestHandlerSelectors;
import springfox.documentation.service.ApiInfo;
import springfox.documentation.service.Contact;
import springfox.documentation.spi.DocumentationType;
import springfox.documentation.spring.web.plugins.Docket;
import springfox.documentation.swagger2.annotations.EnableSwagger2;
import static springfox.documentation.builders.PathSelectors.regex;
@Configuration
@EnableSwagger2
public class SwaggerConfig {
    @Bean
    public Docket productApi() {
        return new Docket(DocumentationType.SWAGGER_2)
                .select()
                .apis(RequestHandlerSelectors.basePackage("guru.springframework.controllers"))
                .paths(regex("/product.*"))
                .build()
                .apiInfo(metaData());
    }
    private ApiInfo metaData() {
        ApiInfo apiInfo = new ApiInfo(
                "Spring Boot REST API",
                "Spring Boot REST API for Online Store",
                "1.0",
                "Terms of service",
                new Contact("John Thompson", "https://springframework.guru/about/", "[email protected]"),
               "Apache License Version 2.0",
                "https://www.apache.org/licenses/LICENSE-2.0");
        return apiInfo;
    }
}
在SwaggerConfig類中,我們添加了一個metaData()方法,該方法返回和使用有關我們的API的資訊ApiInfo物件。 第23行用新資訊初始化Docket。
Swagger 2生成的文件現在看起來類似於:
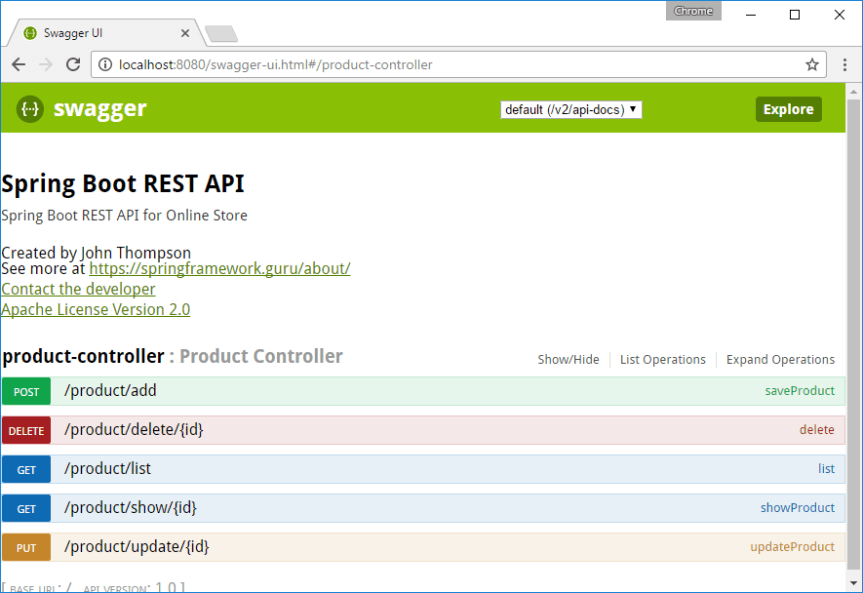
Swagger 2 REST端點的註釋
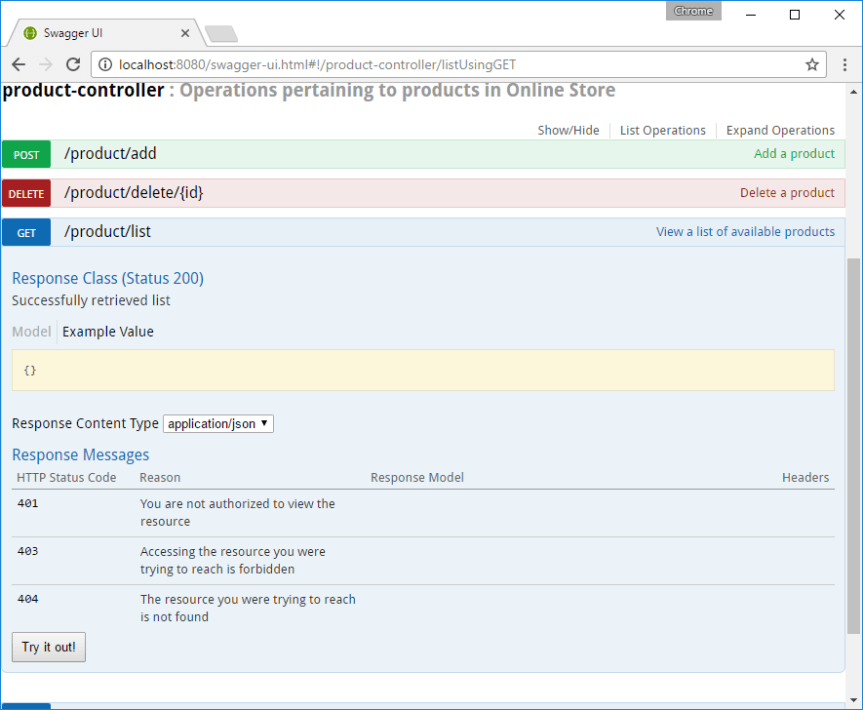
此時,如果單擊產品控制器連結,Swagger UI將顯示我們的操作端點的文件,如下所示:
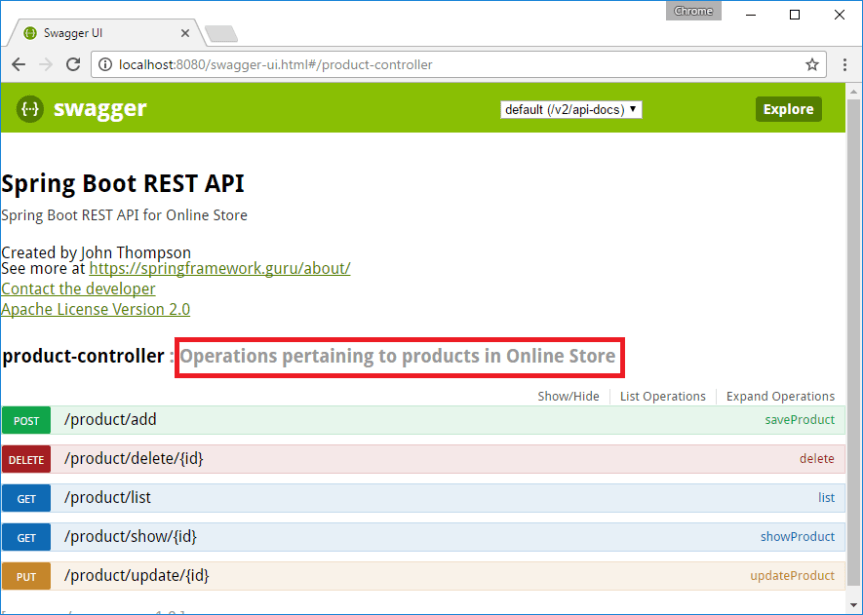
我們可以使用ProductController類上的ProductController來描述我們的API。
@RestController @RequestMapping("/product") @Api(value="onlinestore", description="Operations pertaining to products in Online Store") public class ProductController { Swagger UI生成的文件將反映描述,現在看起來像這樣:
對於每個操作端點,我們可以使用@ApiOperation註釋來描述端點及其響應型別,如下所示:
@ApiOperation(value = "View a list of available products", response = Iterable.class)
@RequestMapping(value = "/list", method= RequestMethod.GET,produces = "application/json")
public Iterable list(Model model){
    Iterable productList = productService.listAllProducts();
    return productList;
}@ApiResponse註釋來記錄其他響應,如下所示。
@ApiOperation(value = "View a list of available products", response = Iterable.class)
@ApiResponses(value = {
        @ApiResponse(code = 200, message = "Successfully retrieved list"),
        @ApiResponse(code = 401, message = "You are not authorized to view the resource"),
        @ApiResponse(code = 403, message = "Accessing the resource you were trying to reach is forbidden"),
        @ApiResponse(code = 404, message = "The resource you were trying to reach is not found")
}
)
@RequestMapping(value = "/list", method= RequestMethod.GET, produces = "application/json")
public Iterable list(Model model){
    Iterable productList = productService.listAllProducts();
    return productList;
}
花了我一些時間的一個未記錄的事情與響應內容型別的價值有關。 Swagger 2生成*/* ,而我期待應用application/json響應內容型別。 只有在更新了@RequestMapping註釋(產生=
"application/json" 之後 , = "application/json"生成所需的值。 帶註釋的ProductController如下。
ProductController.java :
package guru.springframework.controllers;
import guru.springframework.domain.Product;
import guru.springframework.services.ProductService;
import io.swagger.annotations.Api;
import io.swagger.annotations.ApiOperation;
import io.swagger.annotations.ApiResponse;
import io.swagger.annotations.ApiResponses;
import org.springframework.beans.factory.annotation.Autowired;
import org.springframework.http.HttpStatus;
import org.springframework.http.ResponseEntity;
import org.springframework.ui.Model;
import org.springframework.web.bind.annotation.*;
@RestController
@RequestMapping("/product")
@Api(value="onlinestore", description="Operations pertaining to products in Online Store")
public class ProductController {
    private ProductService productService;
    @Autowired
    public void setProductService(ProductService productService) {
        this.productService = productService;
    }
    @ApiOperation(value = "View a list of available products",response = Iterable.class)
    @ApiResponses(value = {
            @ApiResponse(code = 200, message = "Successfully retrieved list"),
            @ApiResponse(code = 401, message = "You are not authorized to view the resource"),
            @ApiResponse(code = 403, message = "Accessing the resource you were trying to reach is forbidden"),
            @ApiResponse(code = 404, message = "The resource you were trying to reach is not found")
    }
    )
    @RequestMapping(value = "/list", method= RequestMethod.GET, produces = "application/json")
    public Iterable<Product> list(Model model){
        Iterable<Product> productList = productService.listAllProducts();
        return productList;
    }
    @ApiOperation(value = "Search a product with an ID",response = Product.class)
    @RequestMapping(value = "/show/{id}", method= RequestMethod.GET, produces = "application/json")
    public Product showProduct(@PathVariable Integer id, Model model){
       Product product = productService.getProductById(id);
        return product;
    }
    @ApiOperation(value = "Add a product")
    @RequestMapping(value = "/add", method = RequestMethod.POST, produces = "application/json")
    public ResponseEntity saveProduct(@RequestBody Product product){
        productService.saveProduct(product);
        return new ResponseEntity("Product saved successfully", HttpStatus.OK);
    }
    @ApiOperation(value = "Update a product")
    @RequestMapping(value = "/update/{id}", method = RequestMethod.PUT, produces = "application/json")
    public ResponseEntity updateProduct(@PathVariable Integer id, @RequestBody Product product){
        Product storedProduct = productService.getProductById(id);
        storedProduct.setDescription(product.getDescription());
        storedProduct.setImageUrl(product.getImageUrl());
        storedProduct.setPrice(product.getPrice());
        productService.saveProduct(storedProduct);
        return new ResponseEntity("Product updated successfully", HttpStatus.OK);
    }
    @ApiOperation(value = "Delete a product")
    @RequestMapping(value="/delete/{id}", method = RequestMethod.DELETE, produces = "application/json")
    public ResponseEntity delete(@PathVariable Integer id){
        productService.deleteProduct(id);
        return new ResponseEntity("Product deleted successfully", HttpStatus.OK);
    }
}
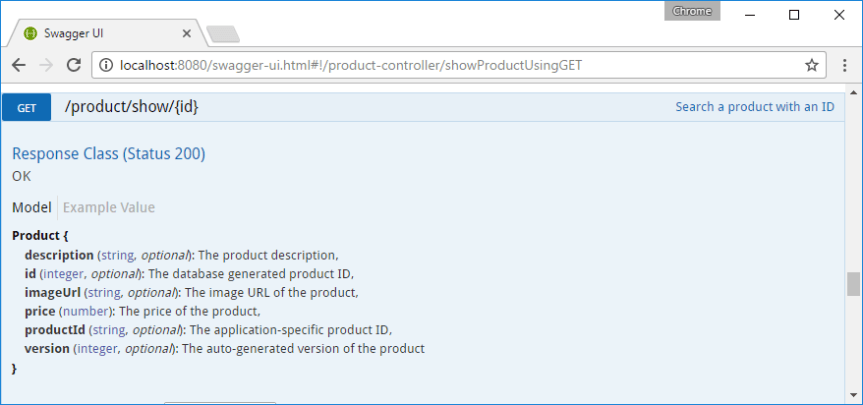
當前文件缺少一件事:產品JPA實體的文件。 我們將為我們的模型生成文件。
Swagger 2註釋模型
您可以使用@ApiModelProperty註釋來描述Product模型的屬性。 使用@ApiModelProperty ,您還可以根據需要記錄屬性。
我們的產品類的程式碼是這樣的。
Product.java :
package guru.springframework.domain;
import io.swagger.annotations.ApiModelProperty;
import javax.persistence.*;
import java.math.BigDecimal;
@Entity
public class Product {
    @Id
    @GeneratedValue(strategy = GenerationType.AUTO)
    @ApiModelProperty(notes = "The database generated product ID")
    private Integer id;
    @Version
    @ApiModelProperty(notes = "The auto-generated version of the product")
    private Integer version;
    @ApiModelProperty(notes = "The application-specific product ID")
    private String productId;
    @ApiModelProperty(notes = "The product description")
    private String description;
    @ApiModelProperty(notes = "The image URL of the product")
    private String imageUrl;
    @ApiModelProperty(notes = "The price of the product", required = true)
    private BigDecimal price;
    public String getDescription() {
        return description;
    }
    public void setDescription(String description) {
        this.description = description;
    }
    public Integer getVersion() {
        return version;
    }
    public void setVersion(Integer version) {
        this.version = version;
    }
    public Integer getId() {
        return id;
    }
    public void setId(Integer id) {
        this.id = id;
    }
    public String getProductId() {
        return productId;
    }
    public void setProductId(String productId) {
        this.productId = productId;
    }
    public String getImageUrl() {
        return imageUrl;
    }
    public void setImageUrl(String imageUrl) {
        this.imageUrl = imageUrl;
    }
    public BigDecimal getPrice() {
        return price;
    }
    public void setPrice(BigDecimal price) {
        this.price = price;
    }
}
總結
除了使用Swagger Core和Swagger UI的REST API文件和演示外,Swagger 2還有許多其他用途,超出了本文的範圍。 我最喜歡的一個是Swagger Editor,一個工具來設計新的API或編輯現有的API。 編輯器視覺化呈現您的Swagger定義,並提供實時錯誤反饋。 另一個是Swagger Codegen ,一個程式碼生成框架,用於構建來自Swagger定義的客戶端SDK,伺服器和文件。
Swagger 2還支援通過JSON和YAML檔案定義Swagger。 如果你想通過在JSON和YAML檔案中外部化它們來避免程式碼庫中特定於實現的程式碼,那麼你應該嘗試一些東西 - 這將在以後的文章中介紹。
相關推薦
Spring啟動RESTful API文件使用Swagger 2
Spring Boot使開發RESTful服務變得非常容易 - 並且使用Swagger可以輕鬆地記錄RESTful服務。 構建後端API層引入了一個全新的領域,超越了僅僅實現端點的挑戰。 您現在有客戶端,現在將使用您的API。 您的客戶需要知道如何與您的API進行互動
第六篇:Spring Boot整合Swagger2構建RESTful API文件
由於Spring Boot有快速開發、便捷部署等特性,所以很大一部分Spring Boot的使用者會用來構建RESTfulAPI。而我們構建RESTfulAPI的目的通常都是由於多終端的原因,這些終端會共用很多底層業務邏輯,因此我們會抽象出這樣一層來同時服務於多個移動端或者Web前端。
Spring boot 使用Swagger2構建RESTful API文件
前言 SwaggerUI可以說是一個非常好用的API文件工具,是前後端分離開發模式下的必備工具、具體實現及部分乾貨知識如下 匯入依賴 <!-- RESTful APIs swagger2 --> <dependency> <
Web Api 2.0中使用Swagger生成Api文件的2個小Tips
當Web Api 2.0使用OAuth2授權時,如何在Swagger中新增Authorization請求頭? Swagger說明文件支援手動呼叫Api, 但是當Api使用OAuth2授權時,由於沒有地方可以輸入授權Token, 導致響應結果一直是401沒有授權。
Spring Boot中使用Swagger2構建強大的RESTful API文件【轉】
由於Spring Boot能夠快速開發、便捷部署等特性,相信有很大一部分Spring Boot的使用者會用來構建RESTful API。而我們構建RESTful API的目的通常都是由於多終端的原因,這些終端會共用很多底層業務邏輯,因此我們會抽象出這樣一層來同時服務於多個移動端或者Web前端。
Spring Boot 中使用 Swagger2 構建 RESTFUL API 文件
由於Spring Boot能夠快速開發、便捷部署等特性,相信有很大一部分Spring Boot的使用者會用來構建RESTful API。而我們構建RESTful API的目的通常都是由於多終端的原因,這些終端會共用很多底層業務邏輯,因此我們會抽象出這樣一層來同時服務於多個移動端或者Web前端。
Spring Boot中使用Swagger2構建強大的RESTful API文件
由於Spring Boot能夠快速開發、便捷部署等特性,相信有很大一部分Spring Boot的使用者會用來構建RESTful API。而我們構建RESTful API的目的通常都是由於多終端的原因,這些終端會共用很多底層業務邏輯,因此我們會抽象出這樣一層來同時服務於多個移動端或者Web前端。 這樣一來,我們
初次嘗試swagger springmvc整合 生成restful api文件
1、maven 所需jar包 <dependency> <groupId>com.mangofactory</groupId> <artifactId>swagger-springmvc<
Swagger2構建強大的RESTful API文件實戰
一 點睛 RESTful API的重磅好夥伴Swagger2,它可以輕鬆的整合到Spring Boot中,並與Spring MVC程式配合組織出強大RESTful API文件。它既可以減少我們建立文件的工作量,同時說明內容又整合入實現程式碼中,讓維護文件和修改程式碼整合為一體,可以
使用swaggo自動生成Restful API文件
Java使用Spring Boot寫Restful API時,可以在程式碼裡用註解來標識API,編譯為Jar包後,執行時Web應用可以直接託管API文件。具體的可以參考這篇文章:使用swagger來做API文件。 那麼golang繫有沒有類似的做法呢? 有是有的,只是沒有springfox的那麼方便就是了
《Spring Cloud Netflix官方文件》2. 服務發現:Eureka伺服器
原文連結 譯者:Acamy 2. 服務發現:Eureka伺服器 2.1 如何建立Eureka伺服器 引用org.springframework.cloud的spring-cloud-starter-eureka-server就可以建立Eureka伺服器。在當前Spring Cloud版本中如何
CNTK API文件翻譯(2)——邏輯迴歸
這篇教程的目標人群是機器學習和CNTK的新手。在這篇教程中,你將訓練一個簡單但是強大的機器學習模型,這個模型被廣泛用於各個行業的應用中。這個訓練可以使用CNTK庫,通過擴充計算資源(CPU、GPU)來推廣到大量的資料集。 介紹 問題: 一個腫瘤醫院提供了
java B2B2C Springboot電子商務平臺原始碼(十)用spring Restdocs建立API文件
這篇文章將帶你瞭解如何用spring官方推薦的restdoc去生成api文件。本文建立一個簡單的springboot工程,將http介面通過Api文件暴露出來。只需要通過 JUnit單元測試和Spring的MockMVC就可以生成文件。 準備工作 你需要15min Jdk 1.8
SpringBoot+Swagger2構建 RESTful API文件報org.thymeleaf.exceptions.TemplateInputException的錯誤
在是使用Swagger2構建RESTful API時,報TemplateInputException錯誤: org.thymeleaf.exceptions.TemplateInputException: Error resolving template "user/getById/1", t
使用swagger2markup和asciidoctor生成美觀的Restful API文件
目前,大家通常都是用Swagger來編寫Rest API文件,使用Swagger註解和Springfox,可以方便的從原始碼生成文件,保持文件和原始碼一致。使用Swagger-ui工具,介面的消費方可以檢視介面定義並從瀏覽器直接呼叫介面。如何實現Swagger和Spr
restful api文件生成器--神器
我現在還不是很懂到底什麼才是restful api,目前理解的大概就是:一種介面,只管拿引數進來,做一系列處理,返回json字串形式的結果。而restful api風格的api文件,就是用來說明這個介面需要傳進什麼引數,每個引數是什麼含義,有什麼要求,經過處理之
【Spring Security OAuth2筆記系列】- 【使用Spring MVC開發RESTful API】 使用swagger自動生成html文件
使用swagger自動生成html文件 本節內容 使用swagger自動生成html文件 使用WireMock快速偽造restful服務 前後分離並行開發的時候(當然不是一個人從前到後都幹那種);那麼提供文件就很有必要了。 光看文件不是那麼的直觀。偽
在Spring中使用Springfox和swagger生成restful風格的API文件
發現一位博主寫的特別棒 強烈推薦參考他的:大牛的網址 由於Spring Boot能夠快速開發、便捷部署等特性,相信有很大一部分Spring Boot的使用者會用來構建RESTful API。而我們構建RESTful API的目的通常都是由於多終端的原因,這些
SpringBoot中使用Swagger生成RestFul規範API文件
j簡單介紹Swagger的作用: Swagger是為了描述一套標準的而且是和語言無關的REST API的規範。對於外部呼叫者來說,只需通過Swagger文件即可清楚Server端提供的服務,而不需去閱讀原始碼或介面文件說明。 官方網站為:http://swagger.io 中文網站:http
Spring boot 整合 swagger生成api文件(轉換成markdown格式)
spring boot 整合 swagger 步驟 1. 匯入jar包 2. 新增配置類 3. 新增介面類 3. 啟動伺服器 4. 訪問UI頁面,可線上測試介面 5. 匯出swagger原始檔 6. 轉換成markdown格式檔案 1,匯入jar包 gradl