
安卓開發學習之014 Button應用詳解(樣式、背景、按鈕單擊、長按、雙擊、多擊事件)
一、Button簡介
按鈕也是繼承自TextView
二、XML定義方法
<Button
            android:id="@+id/button01"
            android:layout_width="wrap_content"
            android:layout_height="wrap_content"
            android:text="Button_Click"/>
id設定按鈕唯一編號
text設定按鈕上顯示的文字
三、設定按鈕背景圖片
使用background屬性設定背景圖片
<!-- 背景設定--> 四、設定樣式
主要是定義按鈕三種狀態下分別對應的背景樣式
預設狀態、獲得焦點(android:state_focused=“true”)、
按下時(android:state_pressed=“true”)
<!-- 使用單一shape定義樣式--> 三個檔案drawable檔案程式碼如下:
1.res/drawable/bg_border.xml
<?xml version="1.0" encoding="utf-8"?>
<shape xmlns:android="http://schemas.android.com/apk/res/android"
       android:shape="rectangle">

    <!-- 圓角 -->
    <corners
        android:radius="10dp"/>
    <!-- 設定圓角半徑 -->

    <!-- 漸變 -->
    <gradient

        android:centerColor="#00ff00"
        android:endColor="#0000ff"
        android:startColor="#ff0000"
        android:type="linear"
        />

    <!-- 間隔 -->
    <padding
        android:bottom="2dp"
        android:left="2dp"
        android:right="2dp"
        android:top="2dp"/>
    <!-- 各方向的間隔 -->

    <!-- 大小 -->
    <size
        android:width="50dp"
        android:height="50dp"/>
    <!-- 寬度和高度 -->

    <!-- 填充 -->
    <!--<solid-->
    <!--android:color="@android:color/white"/>-->
    <!-- 填充的顏色 -->

    <!-- 描邊 -->
    <stroke
        android:width="2dp"
        android:color="#f0f"
        />

</shape>
2.res/drawable/button_selector.xml
<?xml version="1.0" encoding="utf-8"?>
<selector
xmlns:android="http://schemas.android.com/apk/res/android">
<!--按下時樣式-->
<item android:state_pressed="true">
<shape>
<!-- 描邊 -->
<stroke
android:width="2dp"
android:color="#fad3cf"/>
<solid android:color="#87CEFF"/>
<padding
android:bottom="10dp"
android:left="10dp"
android:right="10dp"
android:top="10dp"/>
<!-- 圓角 -->
<corners
android:bottomLeftRadius="10dp"
android:bottomRightRadius="10dp"
android:topLeftRadius="10dp"
android:topRightRadius="10dp"/>
</shape>
</item>
<!-- 獲得焦點時樣式-->
<item android:state_focused="true">
<shape>
<gradient
android:angle="270"
android:centerColor="#00ff00"
android:endColor="#ffc2b7"
android:startColor="#f0f"
android:type="sweep"/>
<stroke
android:width="2dp"
android:color="#dcdcdc"/>
<corners
android:bottomLeftRadius="10dp"
android:bottomRightRadius="10dp"
android:topLeftRadius="10dp"
android:topRightRadius="10dp"/>
<padding
android:bottom="10dp"
android:left="10dp"
android:right="10dp"
android:top="10dp"/>
</shape>
</item>
<!-- 預設樣式-->
<item>
<shape>
<!-- 漸變 -->
<gradient
android:centerColor="#00ff00"
android:endColor="#FFFFFF"
android:startColor="#ff8c00"
android:type="linear"/>
<!-- 描邊 -->
<stroke
android:width="2dp"
android:color="#dcdcdc"
android:dashGap="3dp"
android:dashWidth="5dp"/>
<!-- 圓角 -->
<corners
android:bottomLeftRadius="10dp"
android:bottomRightRadius="10dp"
android:topLeftRadius="10dp"
android:topRightRadius="10dp"/>
<padding
android:bottom="10dp"
android:left="10dp"
android:right="10dp"
android:top="10dp"/>
<!--<solid android:color="#ffc2b7"/>-->
</shape>
</item>
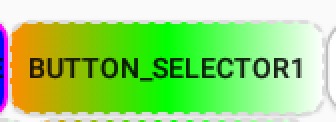
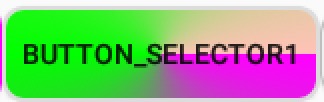
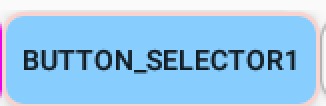
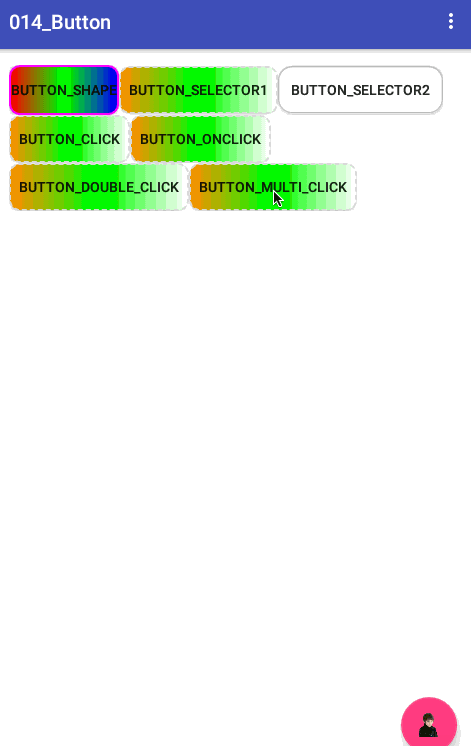
</selector>效果如下:
3.res/drawable/selector_button_start.xml
<?xml version="1.0" encoding="utf-8"?>
<selector xmlns:android="http://schemas.android.com/apk/res/android" >
    <item android:drawable="@mipmap/search_bar_edit_pressed" android:state_pressed="true"/>
    <item android:drawable="@mipmap/button_start_click" android:state_focused="true"/>
    <item android:drawable="@mipmap/search_bar_edit_normal"></item>
</selector>
四、按鈕點選事件的處理方式
按鈕點選有四種處理方法。
第一種是通過onClick屬性,通過這個屬性設定處理點選事件的方法名,在Activity中實現這個方法。
第二種是典型的事件監聽機制setOnClickListener的應用形式,下面詳細說明這四種方法。
1.通過onClick屬性設定處理方法
在XML佈局檔案中設定Button的屬性:
android:onClick=”yourMethodName”
然後在該佈局檔案對應的Acitivity中實現該方法:
需要注意的是這個方法必須符合三個條件:
1.public
2.返回void
3.只有一個引數View,這個View就是被點選的這個控制元件。
也可為多個Button設定同一個方法名,然後在方法內使用switch方法判斷點選的是哪個按鈕
如下:
<Button
            android:layout_width="wrap_content"
            android:layout_height="wrap_content"
            android:background="@drawable/button_selector"
            android:onClick="MyClick"
            android:text="Button_onClick"/>

java程式碼中

    /**
     * 在XML中配置置android:onClick="MyClick"
     * 必須設定為public void
     */

    public void MyClick(View view) {
//        switch (view.getId())
//        {
//           //TODO
//        }
        Toast.makeText(ButtonActivity.this, "android:onClick=\"MyClick\"", Toast.LENGTH_SHORT)
                .show();
    }
2.使用setOnClickListener新增監聽器物件
Button button01 = (Button) findViewById(R.id.button01);
        //短按點選事件監聽

        button01.setOnClickListener(new View.OnClickListener() {
            @Override
            public void onClick(View v) {
                Toast.makeText(ButtonActivity.this, "OnClickListener", Toast.LENGTH_SHORT).show();
            }
        });
此種方法還有幾個變種:
1.自定義類實現OnClickListener介面
//自定義類實現OnClickListener介面
    private MyOnClickListener mOnClickListener = new MyOnClickListener();

    private class MyOnClickListener implements View.OnClickListener {

        @Override
        public void onClick(View v) {
            switch (v.getId()) {
                //TODO
            }
        }
    }
然後呼叫
button01.setOnClickListener(mOnClickListener);
button02.setOnClickListener(mOnClickListener);
此種方法的好處是當多個按鈕要處理的事件邏輯是一樣的話,不用每個按鈕都寫一個setOnClickListener監聽事件,並實現Onclick方法
2.使Activity實現OnClickListener介面,並在Activity中實現Onclick方法
public class ButtonActivity extends AppCompatActivity implements View.OnClickListener{
 @Override
        public void onClick(View v) {
            switch (v.getId()) {
                //TODO
            }
        }
}
3.長按事件監聽
//長按(長按2秒以上)點選事件監聽
        button01.setOnLongClickListener(new View.OnLongClickListener() {
            @Override
            public boolean onLongClick(View v) {
                Toast.makeText(ButtonActivity.this, "OnLongClickListener", Toast.LENGTH_SHORT)
                        .show();
                return true;
            }
        });
五、雙擊事件判定
主要程式碼如下
    private static int DOUBLE_CLICK_TIME = 1000;
    private List<Long> times = new ArrayList<>();
    private Handler mHandler = new Handler();

    private Runnable r;

  /**雙擊事件判斷*/
    private boolean isDoubleClick() {
        if (times.size() == 2) {
            //已經完成了一次雙擊,list可以清空了
            if (times.get(times.size() - 1) - times.get(0) < DOUBLE_CLICK_TIME) {
                times.clear();
                Toast.makeText(ButtonActivity.this, "雙擊", Toast.LENGTH_SHORT).show();
                if (mHandler != null) {
                    if (r != null) {
                        //移除回撥
                        mHandler.removeCallbacks(r);
                        r = null;
                    }
                }
                return true;
            } else {
                //這種情況下,第一次點選的時間已經沒有用處了,第二次就是“第一次”
                times.remove(0);
            }

        }
        //此處可以新增提示
        //showTips();
        r = new Runnable() {
            @Override
            public void run() {
                Toast.makeText(ButtonActivity.this, "單擊", Toast.LENGTH_SHORT).show();
            }
        };
        //DOUBLE_CLICK_TIME時間後提示單擊事件
        mHandler.postDelayed(r, DOUBLE_CLICK_TIME);
        return false;
    }
使用方法:在onClick(View v)方法中呼叫
 Button button02 = (Button) findViewById(R.id.button02);
        button02.setOnClickListener(new View.OnClickListener() {
            @Override
            public void onClick(View v) {
                times.add(SystemClock.uptimeMillis());

                isDoubleClick();

            }
        });
六、多擊事件
 /**多擊事件判斷*/

    private boolean isMultiClick() {
        int size = times.size();

        //處理多擊事件
        if (size > 1) {

            if (times.get(size - 1) - times.get(size - 2) < DOUBLE_CLICK_TIME) {
                Toast.makeText(ButtonActivity.this, size + "連擊", Toast.LENGTH_SHORT).show();
                if (mHandler != null) {
                    if (r != null) {
                        //移除回撥
                        mHandler.removeCallbacks(r);
                    }
                }
                return true;
            } else {
                //這種情況下,以前儲存的點選的時間已經沒有用處了,最後一次就是“第一次”
                long oldtime = times.get(size - 1);
                times.clear();
                times.add(oldtime);
            }

        }
        //此處可以新增提示
        //showTips();
        r = new Runnable() {
            @Override
            public void run() {
                Toast.makeText(ButtonActivity.this,"單擊", Toast.LENGTH_SHORT).show();
            }
        };
        //DOUBLE_CLICK_TIME時間後提示單擊事件
        mHandler.postDelayed(r, DOUBLE_CLICK_TIME);
        return false;
    }
效果如下:
開發工具:Android Studio1.4
SDK: Android 6.0
API 23