
caffe原始碼解析之新增新的Layer(maxout)
本文分為兩部分,先寫一個入門的教程,然後再給出自己新增maxout與NIN的layer的方法
(一)
Here's roughly the process I follow.
- Add a class declaration for your layer to the appropriate one of
common_layers.hpp,data_layers.hpp,loss_layers.hpp,neuron_layers.hpp, orvision_layers.hpp. Include an inline implementation oftypeand the*Blobs()methods to specify blob number requirements. Omit the*_gpudeclarations if you'll only be implementing CPU code. - Implement your layer in
layers/your_layer.cpp.SetUpfor initialization: reading parameters, allocating buffers, etc.Forward_cpufor the function your layer computesBackward_cpufor its gradient
- (Optional) Implement the GPU versions
Forward_gpuandBackward_gpuinlayers/your_layer.cu. - Add your layer to
proto/caffe.proto, updating the next available ID. Also declare parameters, if needed, in this file. - Make your layer createable by adding it to
layer_factory.cpp. - Write tests in
test/test_your_layer.cpp. Usetest/test_gradient_check_util.hppto check that your Forward and Backward implementations are in numerical agreement.
1. 首先確定要新增的layer的型別,是common_layer 還是 data_layer 還是loss_layer, neuron_layer, vision_layer ,這裡的Wtf_Layer肯定是屬vision_layer了,所以開啟vision_layers.hpp 然後複製convolution_layer的相關程式碼,把類名還有建構函式的名字改為WtfLayer,如果沒有用到GPU運算,那麼把裡面的帶GPU的函式都刪掉
2. 將Wtf_layer.cpp 新增到src\caffe\layers資料夾中,程式碼內容複製convolution_layer.cpp 把對應的類名修改(可以搜一下conv關鍵字,然後改為Wtf)
3. 假如有gpu的程式碼就新增響應的Wtf_layer.cu (這裡不添加了)
4. 修改proto/caffe.proto檔案,找到LayerType,新增WTF,並更新ID(新的ID應該是34)。假如說Wtf_Layer有引數,比如Convolution肯定是有引數的,那麼新增WtfParameter類
5. 在layer_factory.cpp中新增響應的程式碼,就是一堆if ... else的那片程式碼
6. 這個可以不做,但是為了結果還是做一個,就是寫一個測試檔案,檢查前向後向傳播的資料是否正確。gradient_check的原理可以參考UFLDL教程的對應章節
之後我會更新我自己寫的maxout_layer的demo,在這立一個flag以鞭策自己完成吧╮(╯▽╰)╭
(二) 如何新增maxout_layer
表示被bengio的maxout給搞鬱悶了,自己擺出一個公式巴拉巴拉說了一堆,結果用到卷積層的maxout卻給的另一種方案,吐槽無力,不過後來又想了下應該是bengio沒表述清楚的問題。
我的maxout的演算法思路是這樣的,首先要確定一個group_size變數,表示最大值是在group_size這樣一個規模的集合下挑選出來的,簡而言之就是給定group_size個數,取最大。確定好group_size變數,然後讓卷積層的output_num變為原來的group_size倍,這樣輸出的featuremap的個數就變為原來的group_size倍,然後以group_size為一組劃分這些featuremap,每組裡面挑出響應最大的點構成一個新的featuremap,這樣就得到了maxout層的輸出。
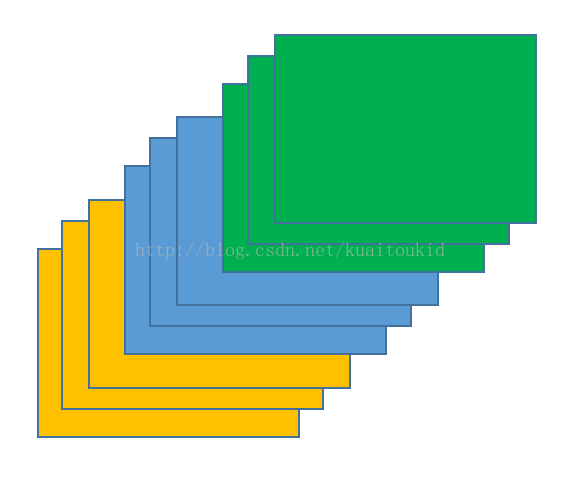
要是還不明白我就拿上面的圖來說一下,上面一共9張圖,相當於卷積層輸出9張featuremap,我們每3個為一組,那麼maxout層輸出9/3=3張featuremap,對於每組featuremaps,比如我們挑出綠色的三張featuremaps,每張大小為w*h,那麼宣告一個新的output_featuremap大小為w*h,遍歷output_featuremap的每個點,要賦的數值為三張綠色featuremap對應點的最大的那個,也就是三個數裡面選最大的,這樣就輸出了一張output_featuremap,剩下的組類似操作。
我覺得到這應該明白maxout的原理跟演算法了吧= =,下面就直接貼程式碼了
新建一個maxout_layer.cpp放到src/caffe/layer資料夾下
- #include <cstdio>
- #include <vector>
- #include "caffe/filler.hpp"
- #include "caffe/layer.hpp"
- #include "caffe/util/im2col.hpp"
- #include "caffe/util/math_functions.hpp"
- #include "caffe/vision_layers.hpp"
- namespace caffe {
- template <typename Dtype>
- void MaxoutLayer<Dtype>::SetUp(const vector<Blob<Dtype>*>& bottom,
- vector<Blob<Dtype>*>* top) {
- Layer<Dtype>::SetUp(bottom, top);
- printf("===============================================================has go into setup !==============================================\n");
- MaxoutParameter maxout_param = this->layer_param_.maxout_param();
- // maxout_size
- //CHECK(!maxout_param.has_num_output())
- // << "maxout size are required.";
- //if (maxout_param.has_num_output()) {
- // num_output_ = maxout_param.num_output();
- //}
- num_output_ = this->layer_param_.maxout_param().num_output();
- CHECK_GT(num_output_, 0) << "output number cannot be zero.";
- // bottom ÊÇFEATURE_MAP
- num_ = bottom[0]->num();
- channels_ = bottom[0]->channels();
- height_ = bottom[0]->height();
- width_ = bottom[0]->width();
- // òËÆÏÂÃæÕâžöif²»»áÅÜœøÈ¥
- // TODO: generalize to handle inputs of different shapes.
- for (int bottom_id = 1; bottom_id < bottom.size(); ++bottom_id) {
- CHECK_EQ(num_, bottom[bottom_id]->num()) << "Inputs must have same num.";
- CHECK_EQ(channels_, bottom[bottom_id]->channels())
- << "Inputs must have same channels.";
- CHECK_EQ(height_, bottom[bottom_id]->height())
- << "Inputs must have same height.";
- CHECK_EQ(width_, bottom[bottom_id]->width())
- << "Inputs must have same width.";
- }
- // Set the parameters ž³Öµ²ÎÊý
- CHECK_EQ(channels_ % num_output_, 0)
- << "Number of channel should be multiples of output number.";
- group_size_ = channels_ / num_output_;
- // Figure out the dimensions for individual gemms. ŒÆËãŸØÕóµÄÐÐÁÐ
- // ÆäʵBengioµÄÂÛÎÄÖжÔÓÚK_µÄŽóС¶šÒåºÜÄ£ºý£¬¶ÔÓÚÍŒÏñœöœöÊÇžøÁËe.g.
- // ҲûÓÐ˵µœµ×ʵŒÊÊDz»ÊÇÕâÃŽ²Ù×÷µÄ£¬ÒòΪÈç¹ûÕæµÄÊÇchannelÖ±œÓœøÐбȜÏ
- // ÄÇÃŽŸÍžúÀíÂ۵Ĺ«ÊœÎǺϵIJ»ºÃ£¬µ«ÊÇÄܹ»œâÊÍÍŒÏñ£¬±ÈÈç˵Äóö×îºÃµÄÒ»²ã
- // ¶øÇÒÍŒÏñžú·ÇÍŒÏñµÄmaxoutµÄ×ö·š²îÌ«¶àÁË°¡¡£ŒÙÈç×öµœŒæÈݵĻ°Ö»ÄÜÈÃÇ°Ò»²ã
- // µÄoutput_numÅäºÏmaxout
- //for (int top_id = 0; top_id < top->size(); ++top_id) {
- (*top)[0]->Reshape(num_, num_output_, height_, width_); // œöœöÊǞıäµÄchannelžöÊý
- max_idx_.Reshape(num_, num_output_, height_, width_);
- //}
- }
- template <typename Dtype>
- Dtype MaxoutLayer<Dtype>::Forward_cpu(const vector<Blob<Dtype>*>& bottom,
- vector<Blob<Dtype>*>* top) {
- int featureSize = height_ * width_;
- Dtype* mask = NULL;
- mask = max_idx_.mutable_cpu_data();
- //printf("1.maxout_forward\n");
- constint top_count = (*top)[0]->count();
- caffe_set(top_count, Dtype(0), mask);
- //printf("2.maxout_forward\n");
- for (int i = 0; i < bottom.size(); ++i) {
- const Dtype* bottom_data = bottom[i]->cpu_data();
- Dtype* top_data = (*top)[i]->mutable_cpu_data();
- for (int n = 0; n < num_; n ++) {
- // È¡µÚnÕÅÍŒÏñ
- for (int o = 0; o < num_output_; o ++) {
- for (int g = 0; g < group_size_; g ++) {
- if (g == 0) {
- for (int h = 0; h < height_; h ++) { // Áœ²ãÑ»·Óеã¶ù†ªàÂ
- for (int w = 0; w < width_; w ++) {
- int index = w + h * width_;
- top_data[index] = bottom_data[index];
- mask[index] = index;
- }
- }
- }
- else {
- for (int h = 0; h < height_; h ++) {
- for (int w = 0; w < width_; w ++) {
- int index0 = w + h * width_;
- int index1 = index0 + g * featureSize;
- if (top_data[index0] < bottom_data[index1]) {
- top_data[index0] = bottom_data[index1];
- mask[index0] = index1;
- }
- }
- }
- }
- }
- bottom_data += featureSize * group_size_;
- top_data += featureSize;
- mask += featureSize;
- }
-
相關推薦
caffe原始碼解析之新增新的Layer(maxout)
本文分為兩部分,先寫一個入門的教程,然後再給出自己新增maxout與NIN的layer的方法 (一) Here's roughly the process I follow. Add a class declaration for your
caffe原始碼解析:層(layer)的註冊與管理
caffe中所有的layer都是類的結構,它們的構造相關的函式都註冊在一個全域性變數g_registry_ 中。 首先這個變數的型別 CreatorRegistry是一個map定義, public: typedef shared_ptr<Layer<Dt
caffe原始碼解析之cblas函式
Y(vetor)←αAX + βY This function multiplies A * X (after transposing A, if needed) and multiplies the resulting matrix by alpha. It then multiplies vector
caffe原始碼解析:insertSplits對 top輸出到多個 Layer的情況進行分割
作用:對 top輸出到多個 Layer的情況進行分割,建立完整的網路結構 重要的引數說明舉例: layer_idx_to_layer_name[i] 記錄各層的名稱,如 [0x00000000] "input" blob_name_to_last_top_idx[“c
Caffe原始碼解析3:Layer
layer這個類可以說是裡面最終的一個基本類了,深度網路呢就是一層一層的layer,相互之間通過blob傳輸資料連線起來。首先layer必須要實現一個forward function,前遞函式當然功能可以自己定義啦,在forward中呢他會從input也就是Layer的bottom,對了caffe裡面網路的
caffe原始碼解析—caffe layer的工作原理理解
caffe是現在運用廣泛的深度學習框架,最近也在閱讀caffe原始碼,將layer的原理個人理解跟大家分享一下。 看完需要點耐心,分析的自認為比較清楚了,程式碼不多。 caffe要實現神經網路的前向以及反向傳播計算需要兩個要素:一個是資料,一個是演算法。 先說資料:caff
Android原始碼解析之應用程式在新的程序中啟動新的Activity的方法和過程分析
轉載自:http://blog.csdn.net/luoshengyang/article/details/6720261 前面我們在分析Activity啟動過程的時候,看到同一個應用程式的Activity一般都是在同一個程序中啟動,事實上,A
Android框架原始碼解析之(四)Picasso
這次要分析的原始碼是 Picasso 2.5.2 ,四年前的版本,用eclipse寫的,但不影響這次我們對其原始碼的分析 地址:https://github.com/square/picasso/tree/picasso-parent-2.5.2 Picasso的簡單使用
Android框架原始碼解析之(三)ButterKnife
注:所有分析基於butterknife:8.4.0 原始碼目錄:https://github.com/JakeWharton/butterknife 其中最主要的3個模組是: Butterknife註解處理器https://github.com/JakeWharton/
Android框架原始碼解析之(二)OKhttp
原始碼在:https://github.com/square/okhttp 包實在是太多了,OKhttp核心在這塊https://github.com/square/okhttp/tree/master/okhttp 直接匯入Android Studio中即可。 基本使用:
Android框架原始碼解析之(一)Volley
前幾天面試CVTE,HR面掛了。讓內部一個學長幫我查看了一下面試官評價,發現二面面試官的評價如下: 廣度OK,但缺乏深究能力,深度與實踐不足 原始碼:只能說流程,細節程式碼不清楚,retrofit和volley都是。 感覺自己一方面:自己面試技巧有待提高吧(框
Android原始碼解析之應用程式資源管理器(Asset Manager)的建立過程分析
轉載自:https://blog.csdn.net/luoshengyang/article/details/8791064 我們分析了Android應用程式資源的編譯和打包過程,最終得到的應用程式資源就與應用程式程式碼一起打包在一個APK檔案中。Android應用程式在執行的過程中,是通過一個
Spring-web原始碼解析之Filter-OncePerRequestFilter
轉自: http://blog.csdn.net/ktlifeng/article/details/50630934 基於4.1.7.RELEASE 我們先看一個filter-mapping的配置
spring原始碼解析之AOP原理
一、準備工作 在這裡我先簡單記錄下如何實現一個aop: AOP:【動態代理】 指在程式執行期間動態的將某段程式碼切入到指定方法指定位置進行執行的程式設計方式; 1、匯入aop模組;Spring AOP:(spring-aspects) 2、定義一個業務邏輯類(
Dubbo原始碼解析之服務端接收訊息
準備 dubbo 版本:2.5.4 服務端接收訊息流程 Handler鏈路 DubboProtocol private ExchangeServer createServer(URL url) { url = url.addParameterIfAbsent("c
Dubbo原始碼解析之服務釋出與註冊
準備 dubbo版本:2.5.4 Spring自定義擴充套件 dubbo 是基於 spring 配置來實現服務釋出,並基於 spring 的擴充套件機制定義了一套自定義標籤,要實現自定義擴充套件, spring 中提供了 NamespaceHandler 、BeanDefinit
caffe原始碼理解之inner_product_layer
原文地址:https://www.cnblogs.com/dupuleng/articles/4312149.html 在caffe中所謂的Inner_Product(IP) 層即fully_connected (fc)layer,為什麼叫ip呢,可能是為了看起來比較優雅吧。。 從CAF
MyBatis原始碼解析之日誌記錄
一 .概述 MyBatis沒有提供日誌的實現類,需要接入第三方的日誌元件,但第三方日誌元件都有各自的Log級別,且各不相同,但MyBatis統一提供了trace、debug、warn、error四個級別; 自動掃描日誌實現,並且第三方日誌外掛載入優先順序如下:slf4J → commonsLoging →
MyBatis原始碼解析之資料來源(含資料庫連線池簡析)
一.概述: 常見的資料來源元件都實現了javax.sql.DataSource介面; MyBatis不但要能整合第三方的資料來源元件,自身也提供了資料來源的實現; 一般情況下,資料來源的初始化過程引數較多,比較複雜; 二.設計模式: 為什麼要使用工廠模式 資料來
Spring原始碼解析之 Spring Security啟動細節和工作模式
分享一下我老師大神的人工智慧教程!零基礎,通俗易懂!http://blog.csdn.net/jiangjunshow 也歡迎大家轉載本篇文章。分享知識,造福人民,實現我們中華民族偉大復興!