
Spring原始碼解析之 Spring Security啟動細節和工作模式
分享一下我老師大神的人工智慧教程!零基礎,通俗易懂!http://blog.csdn.net/jiangjunshow
也歡迎大家轉載本篇文章。分享知識,造福人民,實現我們中華民族偉大復興!
本文基於spring-security 3.1.1的原始碼進行分析。本文原文連線: http://blog.csdn.net/bluishglc/article/details/12709557Spring-Security的啟動載入細節
Spring-Security的啟動和Spring框架的啟動是一致的,都是從載入並解析xml配置檔案開始的,spring通過註冊自己的ServletContextListener:ContextLoaderListener,來監聽ServletContext,一旦ServletContext建立完成,spring就開始載入並解析配置檔案,然後初始化ioc容器了,具體的方法呼叫為:
org.springframework.web.context.ContextLoaderListener#contextInitialized ->org.springframework.web.context.ContextLoader#initWebApplicationContext
到了refresh方法之後,開始進行一系列實質性的動作了,本文關心的兩個重要的動作見下圖註釋。這裡有一點需要明確的是spring的bean解析和建立bean是兩個獨立的過程,在解析時生成的一種叫beandefinition的物件(存放於beanFactory的beanDefinitionMap裡)代表一個將要建立的bean例項的諸多資訊(如bean的class類名,構造引數,是singleton還是prototype等等)用於指導bean的建立。創建出來的bean例項存放於beanFactory的xxxxBeanMap、xxxxSingletonObjects等集合欄位中。
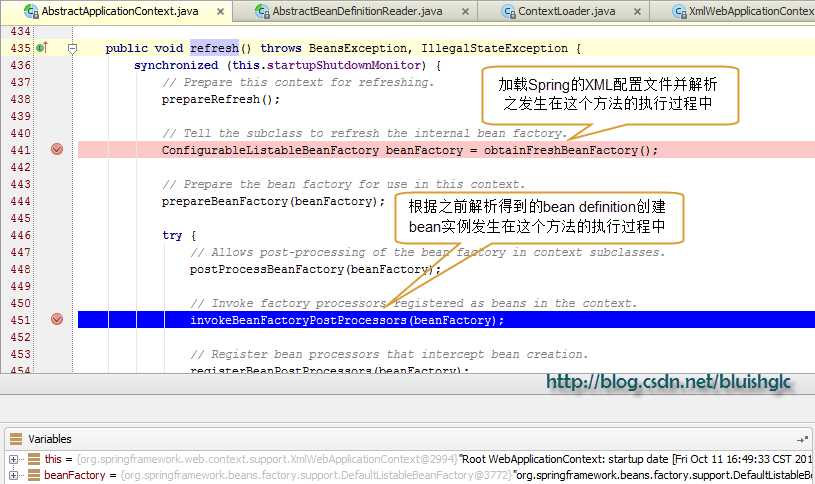
通過下述方法呼叫載入spring security的xml配置檔案
org.springframework.web.context.ContextLoaderListener#contextInitialized ->org.springframework.web.context.ContextLoader#initWebApplicationContext ->org.springframework.web.context.ContextLoader#configureAndRefreshWebApplicationContext ->org.springframework.context.support.AbstractApplicationContext#refresh
->org.springframework.context.support.AbstractApplicationContext#obtainFreshBeanFactory ->org.springframework.context.support.AbstractRefreshableApplicationContext#refreshBeanFactory ->org.springframework.web.context.support.XmlWebApplicationContext#loadBeanDefinitions ->org.springframework.beans.factory.xml.XmlBeanDefinitionReader#loadBeanDefinitions // 自此處開始讀取spring的配置檔案並解析之->org.springframework.beans.factory.xml.XmlBeanDefinitionReader#doLoadBeanDefinitions->org.springframework.beans.factory.xml.XmlBeanDefinitionReader#registerBeanDefinitions->org.springframework.beans.factory.xml.XmlBeanDefinitionReader#createReaderContext->org.springframework.beans.factory.xml.DefaultBeanDefinitionDocumentReader#doRegisterBeanDefinitions->org.springframework.beans.factory.xml.DefaultBeanDefinitionDocumentReader#parseBeanDefinitions->org.springframework.beans.factory.xml.BeanDefinitionParserDelegate#parseCustomElement->org.springframework.security.config.SecurityNamespaceHandler#parse
在org.springframework.beans.factory.xml.BeanDefinitionParserDelegate#parseCustomElement方法中,由於namespaceUri是 http://www.springframework.org/schema/security,所以使用對應的Handler: org.springframework.security.config.SecurityNamespaceHandler來解析配置檔案。我們可以從這個Handler的Parser列表中看來spring security下的所有一級元素對應的parser.
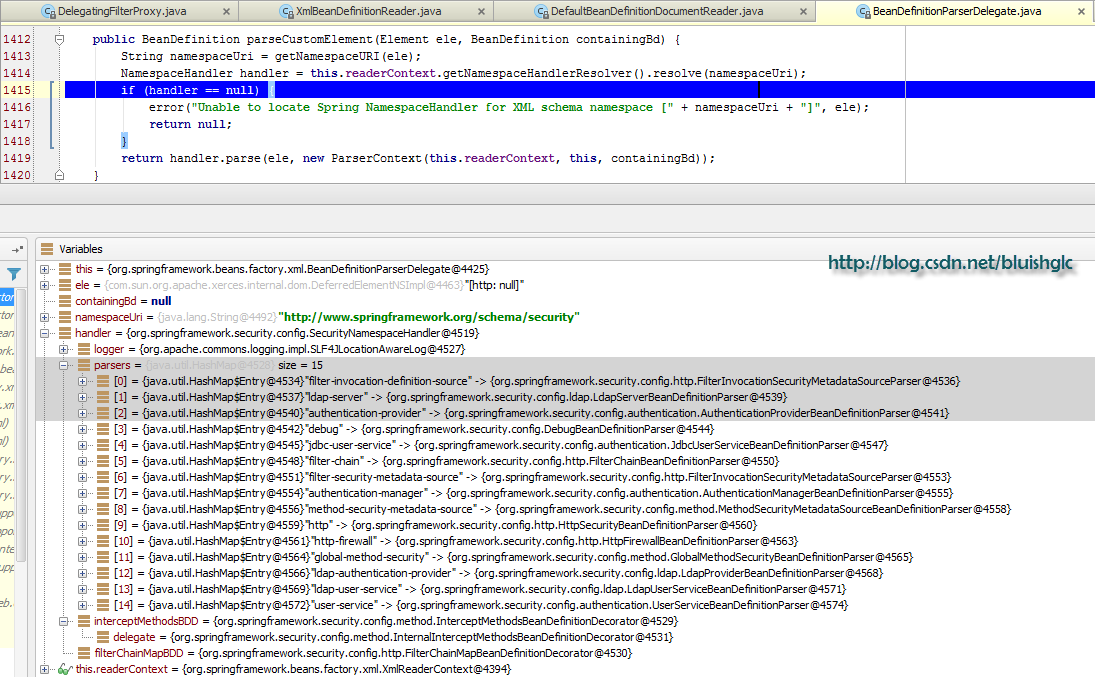
接下來,handler.parse()方法會根據當前的element,找到對應的parser進行解析。在我們的示例中,當前元素是<http/>,所以會使用org.springframework.security.config.http.HttpSecurityBeanDefinitionParser來解析<http/>元素。
org.springframework.security.config.http.HttpSecurityBeanDefinitionParser#parse ->org.springframework.security.config.http.HttpSecurityBeanDefinitionParser#createFilterChain ->org.springframework.security.config.http.HttpSecurityBeanDefinitionParser#createSecurityFilterChainBean
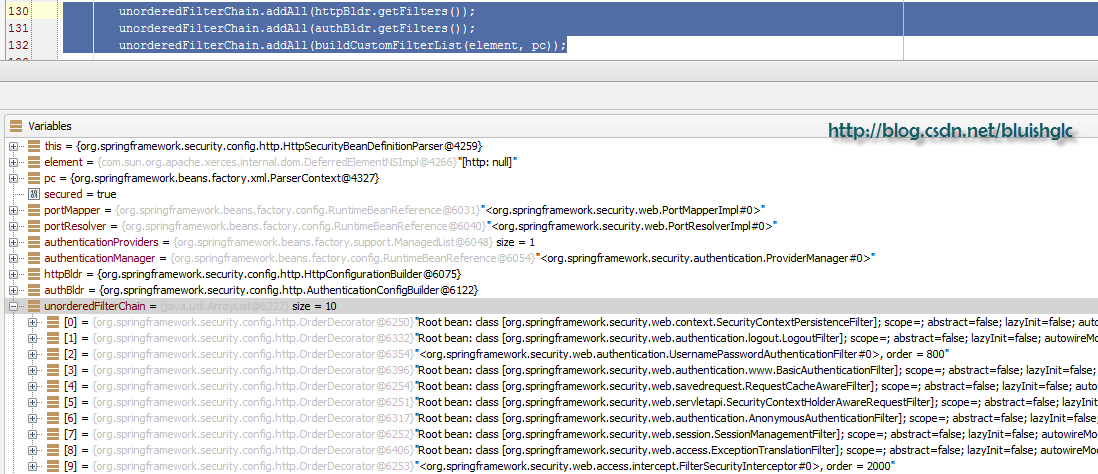
方法org.springframework.security.config.http.HttpSecurityBeanDefinitionParser#createFilterChain的一個重要的動作,那就是根據使用者的配置資訊(這些資訊已經包含在了各種builder中了,也就是程式碼中的HttpConfigurationBuilder httpBldr,AuthenticationConfigBuilder authBldr 等) 建立相關的Filter以及FilterChain(一個org.springframework.security.web.DefaultSecurityFilterChain)自身。不過這個方法建立的Filter和FilterChain都不是對應Class的真實例項,而只是一些place holer(org.springframework.beans.factory.config.RuntimeBeanReference), 到這個方法結束時它們的例項還沒有初始化.
第二個過程:例項化bean
當所有element對應的parser都完成解析之後,就開始建立bean的例項了(包括filter這些inner bean),這個過程發生成在方法org.springframework.context.support.AbstractApplicationContext#invokeBeanFactoryPostProcessors中,至於具體的初始化過程將在專門的一篇文章裡描述,本文不再深究。
Spring-Security的切入點
spring security的整個工作模式是通過Servlet中的Filter機制,建立一個由多種Filter和Interceptor組成的FilterChain來實現的,以下是標準的spring-security嵌入web應用的配置方式:
<filter> <filter-name>springSecurityFilter</filter-name> <filter-class>org.springframework.web.filter.DelegatingFilterProxy</filter-class> <init-param> <param-name>targetBeanName</param-name> <param-value>springSecurityFilterChain</param-value> </init-param> </filter> <filter-mapping> <filter-name>springSecurityFilter</filter-name> <url-pattern>/*</url-pattern> </filter-mapping>這裡配置了一個servlet的filter,這個filter本身並不處理具體的請求,它其實是一個filter chain,它內部包含了一個由多個spring security提供的filter的list,它負責把請求委派給list中的每一個filter進行處理。
這個springSecurityFilterChain的型別是:DefaultSecurityFilterChain,它和它包含的大部分filter都是spring security包提供的類,如前文所述,這些filter例項 都是spring的inner bean,是由spring隱式地初始化並置於容器中管理的。以下就是某種配置下spring建立起來的filter列表:
這裡撿兩個重要的filter說一下:
UsernamePasswordAuthenticationFilter:該filter用於使用者初次登入時驗證使用者身份(authentication)。該filter只在初次認證時存在,一旦認證通過將會從 filter chain中移除。
FilterSecurityInterceptor:當用戶登入成功之後,每次傳送請求都會使用該filter檢查使用者是否已經通過了認證。如果通過了認證,就放行,否則轉向登入頁面。
兩個filter的差別在於: 第一個負責初次登入時的使用者檢查,這個檢查需要根據使用者提供的使用者名稱和密碼去資料庫核對,若存在,將相關資訊封裝在一個Authentication物件中。這個filter可以說是處理初次登入時的authentication工作。而第二個filter則不需要像每個filter每次都去查詢資料庫,它只需要從 security context中檢視當前請求使用者對應的Authentication 物件是否已經存在就可以了,這個filter處理的是登入成功之後的authentication工作。這個filter是需要攔截每次請求的。
給我老師的人工智慧教程打call!http://blog.csdn.net/jiangjunshow
 你好! 這是你第一次使用 **Markdown編輯器** 所展示的歡迎頁。如果你想學習如何使用Markdown編輯器, 可以仔細閱讀這篇文章,瞭解一下Markdown的基本語法知識。
新的改變
我們對Markdown編輯器進行了一些功能拓展與語法支援,除了標準的Markdown編輯器功能,我們增加了如下幾點新功能,幫助你用它寫部落格:
- 全新的介面設計 ,將會帶來全新的寫作體驗;
- 在創作中心設定你喜愛的程式碼高亮樣式,Markdown 將程式碼片顯示選擇的高亮樣式 進行展示;
- 增加了 圖片拖拽 功能,你可以將本地的圖片直接拖拽到編輯區域直接展示;
- 全新的 KaTeX數學公式 語法;
- 增加了支援甘特圖的mermaid語法1 功能;
- 增加了 多螢幕編輯 Markdown文章功能;
- 增加了 焦點寫作模式、預覽模式、簡潔寫作模式、左右區域同步滾輪設定 等功能,功能按鈕位於編輯區域與預覽區域中間;
- 增加了 檢查列表 功能。
功能快捷鍵
撤銷:Ctrl/Command + Z
重做:Ctrl/Command + Y
加粗:Ctrl/Command + B
斜體:Ctrl/Command + I
標題:Ctrl/Command + Shift + H
無序列表:Ctrl/Command + Shift + U
有序列表:Ctrl/Command + Shift + O
檢查列表:Ctrl/Command + Shift + C
插入程式碼:Ctrl/Command + Shift + K
插入連結:Ctrl/Command + Shift + L
插入圖片:Ctrl/Command + Shift + G
合理的建立標題,有助於目錄的生成
直接輸入1次#,並按下space後,將生成1級標題。
輸入2次#,並按下space後,將生成2級標題。
以此類推,我們支援6級標題。有助於使用TOC語法後生成一個完美的目錄。
如何改變文字的樣式
強調文字 強調文字
加粗文字 加粗文字
標記文字
刪除文字
引用文字
H2O is是液體。
210 運算結果是 1024.
插入連結與圖片
連結: link.
圖片: 
帶尺寸的圖片: ![]()
當然,我們為了讓使用者更加便捷,我們增加了圖片拖拽功能。
如何插入一段漂亮的程式碼片
去部落格設定頁面,選擇一款你喜歡的程式碼片高亮樣式,下面展示同樣高亮的 程式碼片.
// An highlighted block var foo = 'bar'; 生成一個適合你的列表
- 專案
- 專案
- 專案
- 專案
- 專案1
- 專案2
- 專案3
- 計劃任務
- 完成任務
建立一個表格
一個簡單的表格是這麼建立的:
| 專案 | Value |
|---|---|
| 電腦 | $1600 |
| 手機 | $12 |
| 導管 | $1 |
設定內容居中、居左、居右
使用:---------:居中
使用:----------居左
使用----------:居右
| 第一列 | 第二列 | 第三列 |
|---|---|---|
| 第一列文字居中 | 第二列文字居右 | 第三列文字居左 |
SmartyPants
SmartyPants將ASCII標點字元轉換為“智慧”印刷標點HTML實體。例如:
| TYPE | ASCII | HTML |
|---|---|---|
| Single backticks | 'Isn't this fun?' |
‘Isn’t this fun?’ |
| Quotes | "Isn't this fun?" |
“Isn’t this fun?” |
| Dashes | -- is en-dash, --- is em-dash |
– is en-dash, — is em-dash |
建立一個自定義列表
- Markdown
- Text-to- HTML conversion tool
- Authors
- John
- Luke
如何建立一個註腳
一個具有註腳的文字。2
註釋也是必不可少的
Markdown將文字轉換為 HTML。
KaTeX數學公式
您可以使用渲染LaTeX數學表示式 KaTeX:
Gamma公式展示 是通過尤拉積分
你可以找到更多關於的資訊 LaTeX 數學表示式here.
新的甘特圖功能,豐富你的文章
gantt
        dateFormat  YYYY-MM-DD
        title Adding GANTT diagram functionality to mermaid
        section 現有任務
        已完成               :done,    des1, 2014-01-06,2014-01-08
        進行中               :active,  des2, 2014-01-09, 3d
        計劃一               :         des3, after des2, 5d
        計劃二               :         des4, after des3, 5d
- 關於 甘特圖 語法,參考 這兒,
UML 圖表
可以使用UML圖表進行渲染。 Mermaid. 例如下面產生的一個序列圖::
這將產生一個流程圖。:
- 關於 Mermaid 語法,參考 這兒,
FLowchart流程圖
我們依舊會支援flowchart的流程圖:
- 關於 Flowchart流程圖 語法,參考 這兒.
匯出與匯入
匯出
如果你想嘗試使用此編輯器, 你可以在此篇文章任意編輯。當你完成了一篇文章的寫作, 在上方工具欄找到 文章匯出 ,生成一個.md檔案或者.html檔案進行本地儲存。
匯入
如果你想載入一篇你寫過的.md檔案或者.html檔案,在上方工具欄可以選擇匯入功能進行對應副檔名的檔案匯入,
繼續你的創作。
註腳的解釋 ↩︎