
Android學習筆記(四)--RecyclerView擴充套件下拉重新整理與左滑刪除
今天在使用QQ的時候就想到製作一個訊息列表的類似效果,可以實現下拉重新整理和左滑刪除效果,於是就抽空試了試。先上效果圖。
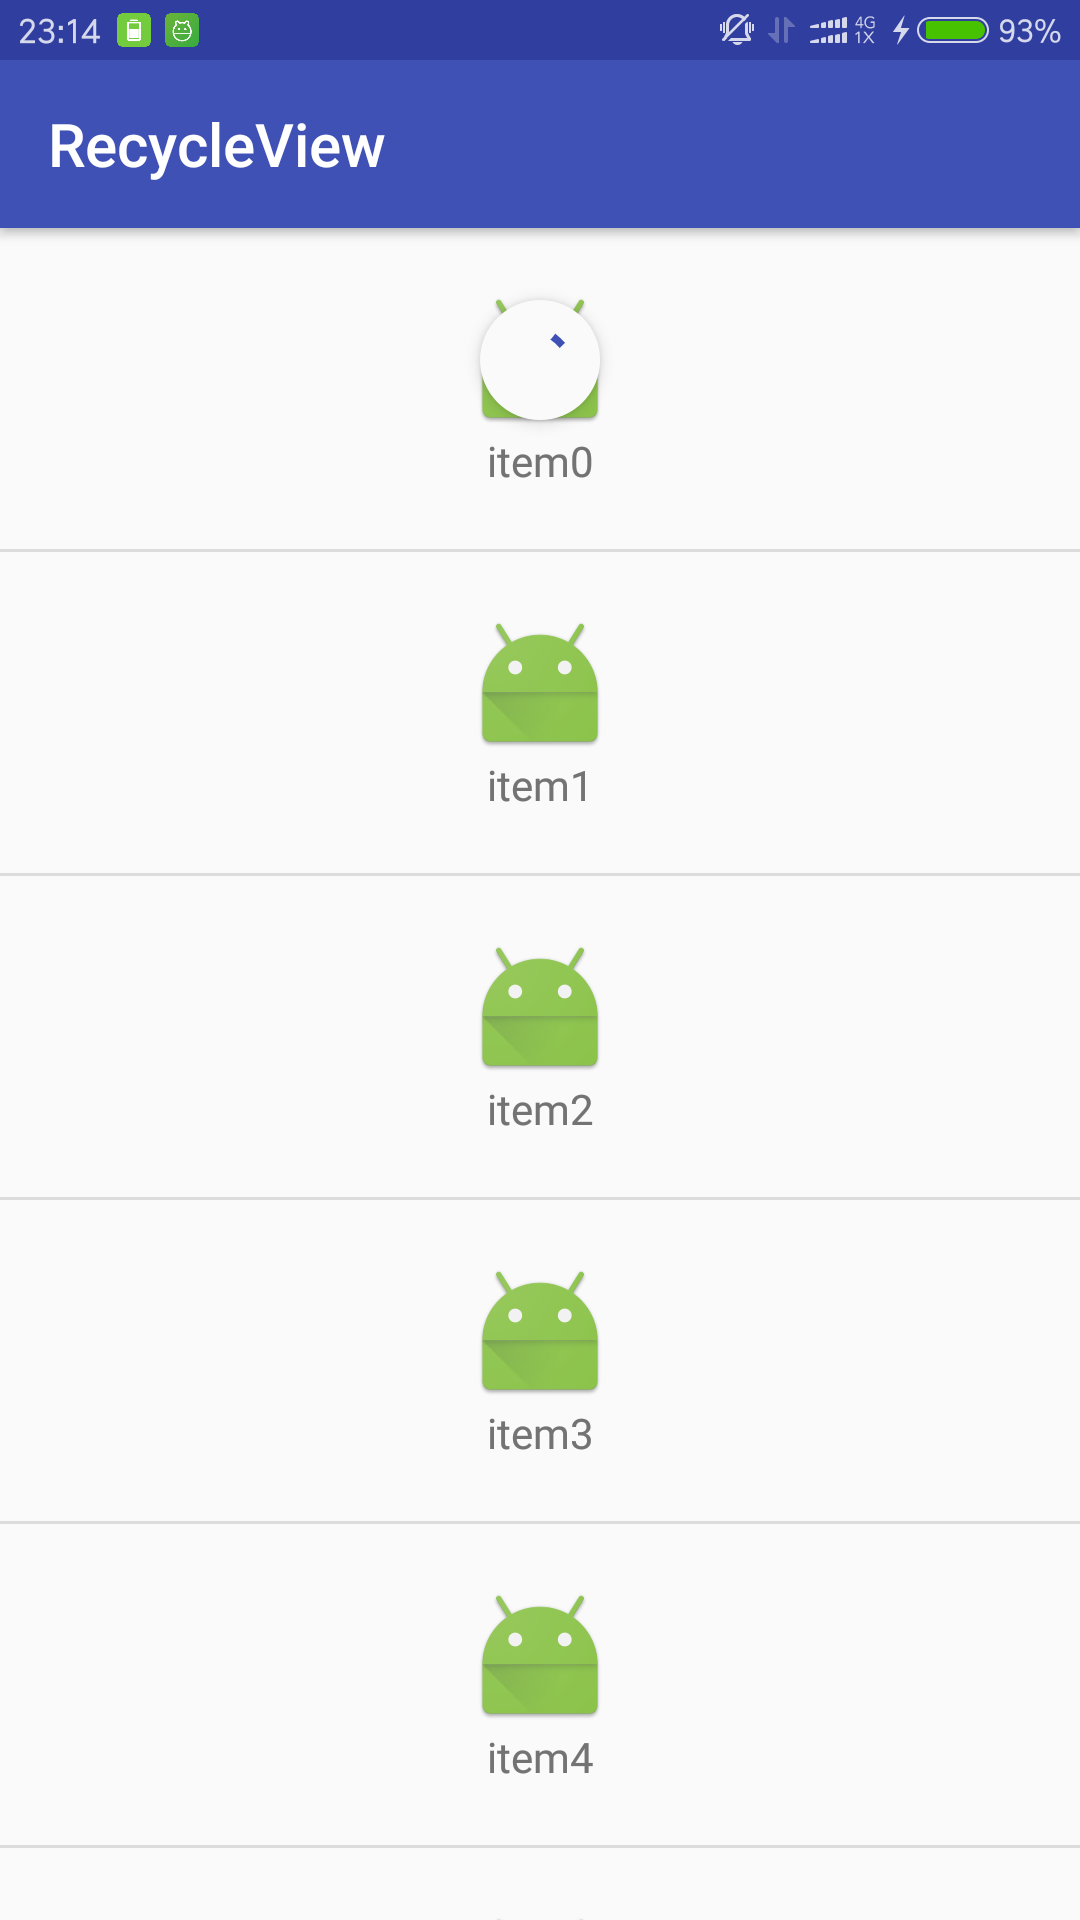
這是正在重新整理的時候。然後就會增添一個item(那個重新整理的圈是會轉的然後還可以變顏色我不會截動圖)。見下圖。

RecyclerView的adpter使用的還是我上篇部落格裡的那個http://blog.csdn.net/callmesp/article/details/52895630
沒有變化。我們先來實現一下下拉重新整理效果。
就是在xml檔案裡面改變了一下,不得不說這種官方提供的空間使用起來簡單粗暴。
<?xml version="1.0" encoding="utf-8" 在最外層嵌套個swipeRefreshLayout,僅此而已是不是很簡單。然後在activity裡面定義一下就可以了。來看一下主活動中改變的部分吧。
swipeRefreshLayout=(SwipeRefreshLayout)findViewById(R.id.swipe_container);
swipeRefreshLayout.setColorSchemeResources 就這麼簡單就完成了。使用了一個Handler().postDelayed來假裝延遲2 second的一個重新整理效果,然後用一個在Adapter中的addData來新增一個item模擬出了重新整理的效果。下面我們看一下左滑重新整理如何實現————-作者先去睡覺明天更。–>滾回來了。。左滑重新整理功能是一個平時實用性很強的功能,我的一開始的想法是偷個懶重寫一個簡單的View然後包在item的外面,然後監聽手勢操作,其它的也都不用更改,結果…..菜的摳腳沒有實現,然後就只能重寫RecyclerView,發現也沒有我想象中的難。其核心就是重寫onTouchEvent。通過對手指滑動的方向、距離、速度的判斷,來決定是否要顯示出刪除按鈕。
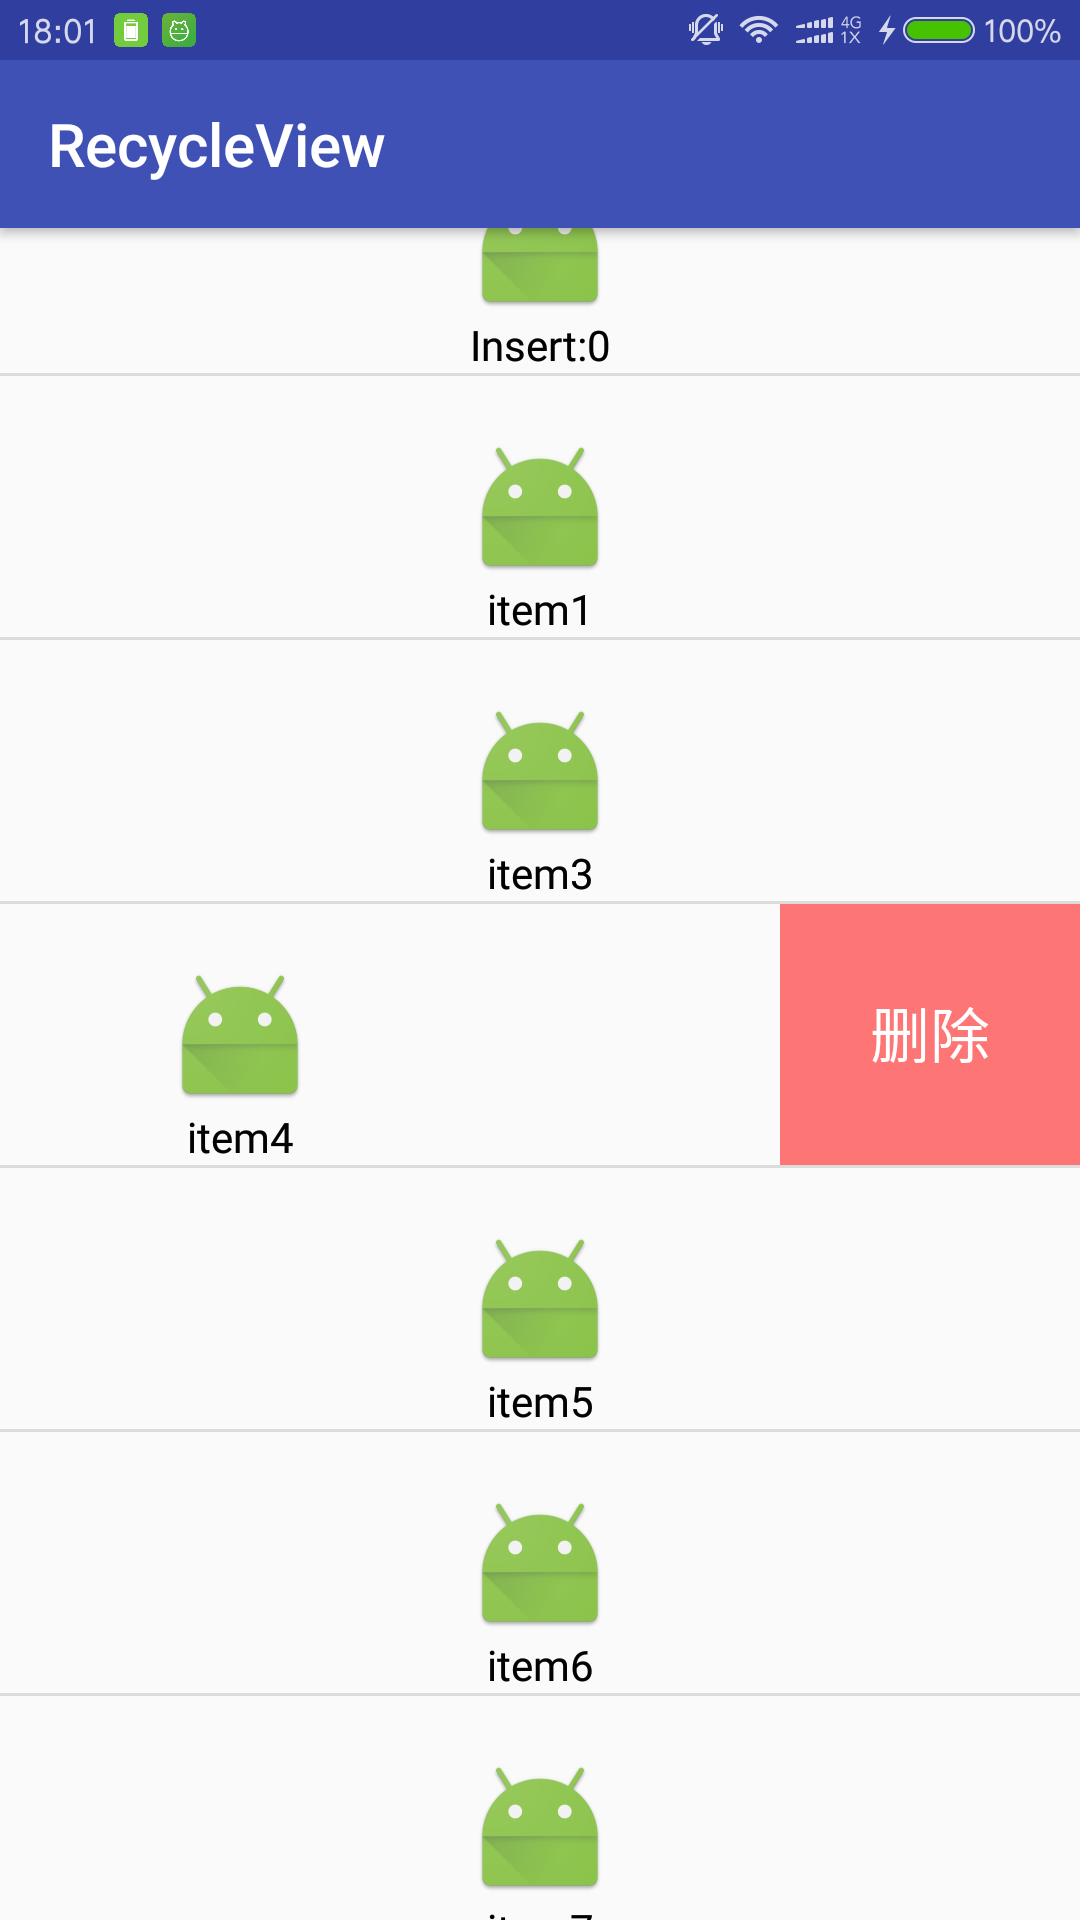
效果圖:
這裡面首先更改了item的佈局檔案如下。
<?xml version="1.0" encoding="utf-8"?>
<RelativeLayout xmlns:android="http://schemas.android.com/apk/res/android"
    android:layout_width="match_parent"
    android:layout_height="match_parent">
        <LinearLayout
            android:id="@+id/item_layout"
            android:layout_width="match_parent"
            android:layout_height="match_parent"
            android:orientation="horizontal">
            <LinearLayout
                android:layout_width="match_parent"
                android:layout_height="wrap_content"
                android:orientation="vertical"
                android:paddingTop="20dp">
                <ImageView
                    android:layout_width="wrap_content"
                    android:layout_height="wrap_content"
                    android:id="@+id/im_item"
                    android:layout_gravity="center"
                    android:background="@mipmap/ic_launcher"/>
                <TextView
                    android:layout_width="match_parent"
                    android:layout_height="wrap_content"
                    android:gravity="center"
                    android:id="@+id/tv_item"
                    android:textColor="#030202"/>
            </LinearLayout>
            <TextView
                android:id="@+id/item_delete"
                android:layout_width="100dp"
                android:layout_height="match_parent"
                android:background="#88ff0000"
                android:gravity="center"
                android:text="刪除"
                android:textColor="#ffffff"
                android:textSize="20sp" >
            </TextView>
        </LinearLayout>

</RelativeLayout>
就是在原本的LinearLayout外面嵌套了一個orientation=horizontal的LinearLayout,然後要把linnearLayout的width設成match_parent,再把總佈局改成RelativeLayout這也相當重要的一部。然後這個TextView就是我們朝思暮想的刪除按鈕了。下面講解一下重寫的ONtouchEvent事件,本來我就是想點播一下,讓同學們自己去嘗試一下的,但總是怕出點狀況..還是貼出所有程式碼吧。
下面貼重寫的RecyclerView,(本來就不太會捕捉觸控事件。。寫起來要了小命)
package com.sp.recycleview;

import android.content.Context;
import android.support.annotation.Nullable;
import android.support.v7.widget.RecyclerView;
import android.util.AttributeSet;
import android.util.Log;
import android.view.MotionEvent;
import android.view.VelocityTracker;
import android.view.View;
import android.view.animation.LinearInterpolator;
import android.widget.LinearLayout;
import android.widget.Scroller;
import android.widget.TextView;

/**
 * Created by my on 2016/10/25.
 */
public class MyRecyclerView extends RecyclerView{
    private Context mcontext;
    private int mLastX,mLastY;
    private int mPosition;
    private LinearLayout mItemLayout;
    private TextView mDelete;
    private int mMaxLength;
    private boolean isDragging;
    private boolean isItemMoving;
    private boolean isStartScroll;
    private int mDeleteBtnState;
    private VelocityTracker mVelocityTracker;
    private Scroller mScroller;
    private OnItemClickListener mListener;
    public MyRecyclerView(Context context){
        this(context,null);}
    public MyRecyclerView(Context context,@Nullable AttributeSet attributeSet){
        this(context,attributeSet,0);
    }
    public MyRecyclerView(Context context,@Nullable AttributeSet attributeSet,int defsytle){
        super(context, attributeSet, defsytle);
        mcontext=context;
        mScroller=new Scroller(context,new LinearInterpolator());
        mVelocityTracker=VelocityTracker.obtain();
    }
    @Override
    public boolean onTouchEvent(MotionEvent e) {
        mVelocityTracker.addMovement(e);

        int x = (int) e.getX();
        int y = (int) e.getY();
        switch (e.getAction()) {
            case MotionEvent.ACTION_DOWN:
                if (mDeleteBtnState == 0) {
                    Log.e("0", "state:0");
                    View view = findChildViewUnder(x, y);
                    if (view == null) {
                        return false;
                    }

                    MyViewHolder viewHolder = (MyViewHolder) getChildViewHolder(view);//獲得view

                    mItemLayout = viewHolder.layout;
                    mPosition = viewHolder.getPosition();

                    mDelete = (TextView) mItemLayout.findViewById(R.id.item_delete);
                    mMaxLength = mDelete.getWidth();
                    mDelete.setOnClickListener(new OnClickListener() {
                        @Override
                        public void onClick(View v) {
                            Log.e("0","mmm:");
                            mListener.onDeleteClick(mPosition);
                            mItemLayout.scrollTo(0, 0);
                            mDeleteBtnState = 0;
                        }
                    });
                } else if (mDeleteBtnState == 3){
                    Log.e("0","state:3");
                    mScroller.startScroll(mItemLayout.getScrollX(), 0, -mMaxLength, 0, 200);
                    invalidate();
                    mDeleteBtnState = 0;
                    return false;
                }else{
                    Log.e("0","state:???");
                    return false;
                }

                break;
            case MotionEvent.ACTION_MOVE:
                int dx = mLastX - x;
                int dy = mLastY - y;

                int scrollX = mItemLayout.getScrollX();
                if (Math.abs(dx) > Math.abs(dy)) {//左邊界檢測
                    isItemMoving = true;
                    if (scrollX + dx <= 0) {
                        mItemLayout.scrollTo(0, 0);
                        return true;
                    } else if (scrollX + dx >= mMaxLength) {//右邊界檢測
                        mItemLayout.scrollTo(mMaxLength, 0);
                        return true;
                    }
                    mItemLayout.scrollBy(dx, 0);//item跟隨手指滑動
                }
                break;
            case MotionEvent.ACTION_UP:
                if (!isItemMoving && !isDragging && mListener != null) {
                    mListener.onClick(mPosition);
                }
                isItemMoving = false;

                mVelocityTracker.computeCurrentVelocity(1000);//計算手指滑動的速度
                float xVelocity = mVelocityTracker.getXVelocity();//水平方向速度(向左為負)
                float yVelocity = mVelocityTracker.getYVelocity();//垂直方向速度

                int deltaX = 0;
                int upScrollX = mItemLayout.getScrollX();

                if (Math.abs(xVelocity) > 100 && Math.abs(xVelocity) > Math.abs(yVelocity)) {
                    if (xVelocity <= -100) {//左滑速度大於100,則刪除按鈕顯示
                        deltaX = mMaxLength - upScrollX;
                        mDeleteBtnState = 2;
                    } else if (xVelocity > 100) {//右滑速度大於100,則刪除按鈕隱藏
                        deltaX = -upScrollX;
                        mDeleteBtnState = 1;
                    }
                } else {
                    if (upScrollX >= mMaxLength / 2) {//item的左滑動距離大於刪除按鈕寬度的一半,則則顯示刪除按鈕
                        deltaX = mMaxLength - upScrollX;
                        mDeleteBtnState = 2;
                    } else if (upScrollX < mMaxLength / 2) {//否則隱藏
                        deltaX = -upScrollX;
                        mDeleteBtnState = 1;
                    }
                }

                //item自動滑動到指定位置
                mScroller.startScroll(upScrollX, 0, deltaX, 0, 200);
                isStartScroll = true;
                invalidate();

                mVelocityTracker.clear();
                break;
        }

        mLastX = x;
        mLastY = y;
        return super.onTouchEvent(e);
    }

    @Override
    public void computeScroll() {
        if (mScroller.computeScrollOffset()) {
            mItemLayout.scrollTo(mScroller.getCurrX(), mScroller.getCurrY());
            invalidate();
        } else if (isStartScroll) {
            isStartScroll = false;
            if (mDeleteBtnState == 1) {
                mDeleteBtnState = 0;
            }

            if (mDeleteBtnState == 2) {
                mDeleteBtnState = 3;
            }
        }
    }

    @Override
    protected void onDetachedFromWindow() {
        mVelocityTracker.recycle();
        super.onDetachedFromWindow();
    }


    public void setOnItemClickListener(OnItemClickListener listener) {
        mListener = listener;
    }
}
對觸控做了巨多的判斷,可能就是因為這個我發現滑動的效率不是很高,以後想到了解決辦法再來寫個2.0
還有要注意既然我們的item新增加了一個TextView所以要在bolder裡面加上
public TextView delete;
delete=(TextView)itemView.findViewById(R.id.item_delete);
還有就是這裡既然有滑動所以肯定是一個LinearLayout整體滑動,所以也要給我們後加上的LinearLayout命名id然後在holder裡面加上它。
public LinearLayout layout;
layout=(LinearLayout)view.findViewById(R.id.item_layout);
最後放一下最後的實現全部功能的MainActivyty吧。
package com.sp.recycleview;

import android.annotation.SuppressLint;
import android.os.Handler;
import android.support.v4.widget.SwipeRefreshLayout;
import android.support.v7.app.AppCompatActivity;
import android.os.Bundle;
import android.support.v7.widget.DefaultItemAnimator;
import android.support.v7.widget.GridLayoutManager;
import android.support.v7.widget.LinearLayoutManager;
import android.support.v7.widget.OrientationHelper;
import android.support.v7.widget.RecyclerView;
import android.support.v7.widget.StaggeredGridLayoutManager;
import android.util.Log;
import android.view.View;
import android.widget.FrameLayout;
import android.widget.Toast;

import java.util.ArrayList;
import java.util.List;

public class MainActivity extends AppCompatActivity {
    private MyRecyclerView recyclerView;
    private List<String> mDatas;
    private MyRecyclerAdapter recycleAdapter;
    private SwipeRefreshLayout swipeRefreshLayout;

    @SuppressLint("NewApi") @Override
    protected void onCreate(Bundle savedInstanceState) {
        super.onCreate(savedInstanceState);
        setContentView(R.layout.activity_main);
        recyclerView = (MyRecyclerView) findViewById(R.id.recyclerview );


        swipeRefreshLayout=(SwipeRefreshLayout)findViewById(R.id.swipe_container);
        swipeRefreshLayout.setColorSchemeResources(R.color.colorAccent,R.color.colorPrimary,R.color.black,R.color.white);
        swipeRefreshLayout.setOnRefreshListener(new SwipeRefreshLayout.OnRefreshListener() {
            @Override
            public void onRefresh() {
                Log.e("0", "正在重新整理");
                new Handler().postDelayed(new Runnable(){
                    @Override
                    public void run() {
                        Log.e("0", "重新整理完成");
                        recycleAdapter.addData(0);
                        swipeRefreshLayout.setRefreshing(false);
                    }
                }, 2000);
            }
        });

        initData();
        recycleAdapter= new MyRecyclerAdapter(this , mDatas );
        LinearLayoutManager layoutManager = new LinearLayoutManager(this);
        GridLayoutManager gridLayoutManager=new GridLayoutManager(this,2);
        StaggeredGridLayoutManager staggeredGridLayoutManager= new StaggeredGridLayoutManager(2, StaggeredGridLayoutManager.VERTICAL);
        //設定佈局管理器
        recyclerView.setLayoutManager(layoutManager);
        //設定為垂直佈局,這也是預設的
        layoutManager.setOrientation(OrientationHelper.VERTICAL);
        //設定Adapter
        recyclerView.setAdapter(recycleAdapter);
        //設定增加或刪除條目的動畫
        recyclerView.setItemAnimator(new DefaultItemAnimator());
        recyclerView.addItemDecoration(new DividerItemDecoration(MainActivity.this, LinearLayoutManager.VERTICAL));
        recyclerView.setOnItemClickListener(new OnItemClickListener() {
            @Override
            public void onClick(int position) {
                Toast.makeText(MainActivity.this, "onClick事件       您點選了第:" + position + "個Item", Toast.LENGTH_SHORT).show();
            }
            @Override
            public void onDeleteClick(int position) {
                recycleAdapter.removeData(position);
            }
        });
    }

    private void initData() {
        mDatas = new ArrayList<String>();
        for ( int i=0; i<55; i++) {
            mDatas.add( "item"+i);
        }
    }
}
差點漏掉了…這個觸控刪除時間還沒有註冊介面.要新增一句
void onDeleteClick(int position);到此為止就實現了下拉重新整理和左滑刪除的全部功能了。樓主先去吃飯,晚上可能還有一篇學習心得。