
七天學會ASP.NET MVC (三)——ASP.Net MVC 資料處理
本文參考自:http://www.codeproject.com/Articles/986730/Learn-MVC-Project-in-days-Day
轉載請註明出處:葡萄城官網,葡萄城為開發者提供專業的開發工具、解決方案和服務,賦能開發者。

第三天我們將學習Asp.Net中資料處理功能,瞭解資料訪問層,EF,以及EF中常用的程式碼實現方式,建立資料訪問層和資料入口,處理Post資料,以及資料驗證等功能。
系列文章
目錄:
資料訪問層
實體框架(EF)簡述
什麼是程式碼優先的方法?
實驗8——在專案中新增資料訪問層
關於實驗8
實驗9——建立資料輸入螢幕
實驗10——獲取服務端或控制器端傳遞的資料。
實驗11——重置及取消按鈕
實驗12——儲存資料。庫記錄並更新表格
實驗13——新增伺服器端驗證
實驗14——自定義伺服器端驗證
結論
資料訪問層
在實際開發中,如果一個專案不包含任何資料庫,那麼這個專案是不完整的,我們在一二節例項中未涉及資料庫,在本節開始,實驗8中講解一個關於資料庫和資料庫層的例項。
本節將使用SQL Server和EF(Entity Framework)建立相關的資料庫及資料庫訪問層。
簡述實體框架(EF)
EF是一種ORM工具,ORM表示物件關聯對映。
在RDMS中,物件稱為表格和列物件,而在.net中(面向物件)稱為類,物件以及屬性。
任何資料驅動的應用實現的方式有兩種:
1. 通過程式碼與資料庫關聯(稱為資料訪問層或資料邏輯層)
2. 通過編寫程式碼將資料庫資料對映到面向物件資料,或反向操作。
ORM是一種能夠自動完成這兩種方式的工具。EF是微軟的ORM工具。
什麼是程式碼優先的方法?
EF提供了三種方式來實現專案:
l 資料庫優先方法——建立資料庫,包含表,列以及表之間的關係等,EF會根據資料庫生成相應的Model類(業務實體)及資料訪問層程式碼。
l 模型優先方法——模型優先指模型類及模型之間的關係是由Model設計人員在VS中手動生成和設計的,EF將模型生成資料訪問層和資料庫。
l 程式碼優先方法
什麼是POCO類?
POCO即Plain Old CLR物件,POCO類就是已經建立的簡單.Net類。在上兩節的例項中,Employee類就是一個簡單的POCO類。
實驗8——新增資料訪問層
1. 建立資料庫
連線SQL SERVER ,建立資料庫 “SalesERPDB”。

2. 建立連線字串(ConnectionString)
開啟Web.Config 檔案,在< Configuration >標籤內新增以下程式碼:
1: <connectionStrings>
2: <add connectionString="Data Source=(local);Initial Catalog=SalesERPDB;Integrated Security=True"
3: name="SalesERPDAL"
4: providerName="System.Data.SqlClient"/>
5: </connectionStrings>
3. 新增EF引用
右擊專案->管理Nuget 包。選擇Entity Framework 並點選安裝。

4. 建立資料訪問層
- 在根目錄下,新建資料夾”Data Access Layer“,並在Data Access Layer資料夾中新建類” SalesERPDAL “
- 在類檔案頂部新增 Using System.Data.Entity程式碼。
- 繼承DbContext類
1: public class SalesERPDAL: DbContext
2: {
3: }
5. 建立Employee類的主鍵
開啟Employee類,輸入using語句
1: using System.ComponentModel.DataAnnotations;
新增Employee的屬性,並使用Key 關鍵字標識主鍵。
public class Employee
{
    [Key]
    public int EmployeeId  { get; set; }
    public string FirstName { get; set; }
    public string LastName { get; set; }
    public int Salary { get; set; }
}
6. 定義對映關係
在SalesERPDAL類檔案輸入using語句。
1: using WebApplication1.Models;
在 SalesERPDAL 類中重寫 OnModelCreating方法,程式碼如下:
1: protected override void OnModelCreating(DbModelBuilder modelBuilder)
2: {
3: modelBuilder.Entity<employee>().ToTable("TblEmployee");
4: base.OnModelCreating(modelBuilder);
5: }
6: </employee>
注意:上述程式碼中提到“TblEmployee”是表名稱,是執行時自動生成的。
7. 在資料庫中新增新屬性Employee
在 SalesERPDAL 類中新增新屬性 Employee。
1: public DbSet<employee> Employees{get;set;}
2: </employee>
DbSet表示資料庫中能夠被查詢的所有Employee
8. 改變業務層程式碼,並從資料庫中獲取資料
開啟 EmployeeBusinessLayer 類,輸入Using 語句。
1: using WebApplication1.DataAccessLayer;
修改GetEmployees 方法:
1: public List<employee> GetEmployees()
2: {
3: SalesERPDAL salesDal = new SalesERPDAL();
4: return salesDal.Employees.ToList();
5: }
6: </employee>
9. 執行並測試
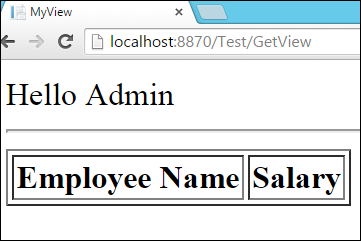
右擊,檢視並沒有任何Employee的表格,檢視資料庫檔案,我們會看到 TblEmployee 表

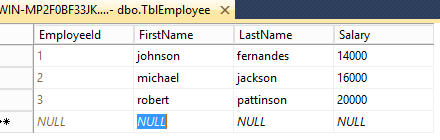
10. 插入測試資料
在TblEmployee 中插入一些測試資料
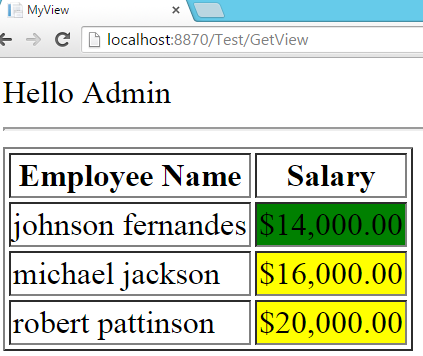
11. 執行程式
關於實驗8
什麼是資料集?
DbSet資料集是資料庫方面的概念 ,指資料庫中可以查詢的實體的集合。當執行Linq 查詢時,Dbset物件能夠將查詢內部轉換,並觸發資料庫。
在本例項中,資料集是Employees,是所有Employee的實體的集合。當每次需要訪問Employees時,會獲取“TblEmployee”的所有記錄,並轉換為Employee物件,返回Employee物件集。
如何連線資料訪問層和資料庫?
資料訪問層和資料庫之間的對映通過名稱實現的,在實驗8中,ConnectionString(連線字串)的名稱和資料訪問層的類名稱是相同的,都是SalesERPDAL,因此會自動實現對映。
連線字串的名稱可以改變嗎?
可以改變,在實驗8中,在資料訪問層中定義了建構函式,如下:
1: public SalesERPDAL():base("NewName")
2: {
3: }
實驗8已經完成,相信大家已經瞭解基本的原理和操作,接下來我們將做一些改變,使得每件事情都變得有組織有意義:
1. 重新命名
- 將“TestController”改成 “EmployeeController”
- GetView的行為方法改為Index
- Views資料夾目錄下的Test 資料夾改成Employee
- MyView的View 改為“Index”
2. 刪除EmployeeListViewModel 的 UserName 屬性
3. 刪除View中的 UserName
開啟 Views/Employee.Index.cshtml View ,刪除 UserName ,即刪除以下程式碼:
1: Hello @Model.UserName
2: <hr />
4. 修改 EmployeeController 中的 Index方法
根據以下程式碼修改Index 方法,執行時URL會變成 “…./Employee/Index”:
public ActionResult Index()
{
    ……
    ……
    ……
    employeeListViewModel.Employees = empViewModels;
    //employeeListViewModel.UserName = "Admin";-->Remove this line -->Change1
    return View("Index", employeeListViewModel);//-->Change View Name -->Change 2
}
實驗 9——建立資料入口(Data Entry Screen)
1. 新建 action 方法
在 EmployeeController 中新建 “AddNew”action 方法:
1: public ActionResult AddNew()
2: {
3: return View("CreateEmployee");
4: }
2. 建立 View
在View/Employee目錄下 新建 View 命名為:CreateEmployee。
1: @{
2: Layout = null;
3: }
4: <!DOCTYPE html>
5: <html>
6: <head>
7: <meta name="viewport" content="width=device-width" />
8: <title>CreateEmployee</title>
9: </head>
10: <body>
11: <div>
12: <form action="/Employee/SaveEmployee" method="post">
13: First Name: <input type="text" id="TxtFName" name="FirstName" value="" /><br />
14: Last Name: <input type="text" id="TxtLName" name="LastName" value="" /><br />
15: Salary: <input type="text" id="TxtSalary" name="Salary" value="" /><br />
16: <input type="submit" name="BtnSave" value="Save Employee" />
17: <input type="button" name="BtnReset" value="Reset" />
18: </form>
19: </div>
20: </body>
21: </html>
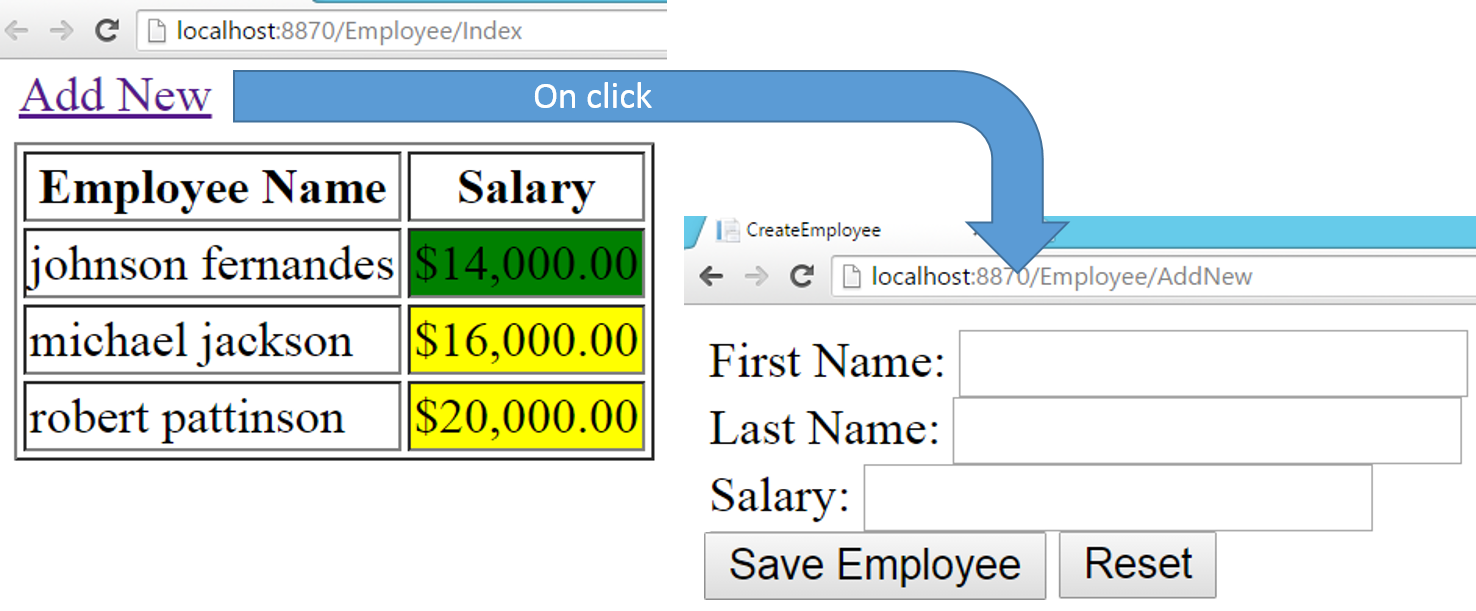
3. 建立Index View的連結
開啟 Index.cshtml 檔案,新增指向 AddNew action方法的連結
1: <ahref="/Employee/AddNew">Add New</a>
4. 執行
關於實驗9
使用Form 標籤的作用是什麼?
在系列文章第一講中,我們已經知道,Web程式設計模式不是事件驅動的程式設計模式,是請求響應模式。終端使用者會產生髮送請求。Form標籤是HTML中產生請求的一種方式,Form標籤內部的提交按鈕只要一被點選,請求會被髮送到相關的action 屬性。
Form標籤中方法屬性是什麼?
方法屬性決定了請求型別。有四種請求型別:get,post,put以及delete.
- Get: 當需要獲取資料時使用。
- Post: 當需要新建一些事物時使用。
- Put: 當需要更新資料時使用。
- Delete:需要刪除資料時使用。
使用Form 標籤來生成請求,與通過瀏覽器位址列或超連結來生成請求,有什麼區別?
使用Form標籤生成請求時,所有有關輸入的控制元件值會隨著請求一起傳送。
輸入的值是怎樣傳送到伺服器端的?
當請求型別是Get,Put或Delete時,值會通過查詢語句傳送,當請求是Post型別,值會通過Post資料傳送。
使用輸入控制元件名的作用是什麼?
所有輸入控制元件的值將隨著請求一起傳送。同一時間可能會接收到多個值,為了區分發送到所有值為每個值附加一個Key,這個Key在這裡就是名稱屬性。
名稱和 Id的作用是否相同?
不相同,名稱屬性是HTML內部使用的,當請求被髮送時,然而 ID屬性是在JavaScript中開發人員為了實現一些動態功能而呼叫的。
“input type=submit” 和 “input type=button”的區別是什麼?
提交按鈕在給伺服器傳送請求而專門使用的,而簡單的按鈕是執行一些自定義的客戶端行為而使用的。按鈕不會自己做任何事情。
實驗10——在伺服器端(或Controller)獲取Post資料
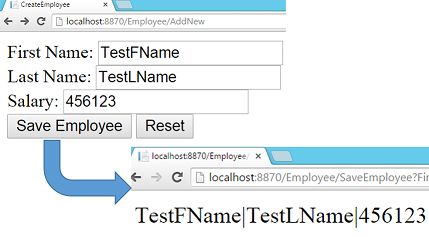
1. 建立 SaveEmployee action 方法
在 Employee控制器中建立 名為 ”SaveEmployee“ action 方法:
1: public string SaveEmployee(Employee e)
2: {
3: return e.FirstName + "|"+ e.LastName+"|"+e.Salary;
4: }
2. 執行
關於實驗10
action 方法內部的Textbox 值是如何更新 Employee 物件的?
在 Asp.Net MVC中有個 Model Binder的概念:
- 無論請求是否由帶參的action方法生成,Model Binder都會自動執行。
- Model Binder會通過方法的元引數迭代,然後會和接收到引數名稱做對比。如果匹配,則響應接收的資料,並分配給引數。
- 在Model Binder迭代完成之後,將類引數的每個屬性名稱與接收的資料做對比,如果匹配,則響應接收的資料,並分配給引數。
如果兩個引數是相關聯的會發生什麼狀況,如引數”Employee e“和 “string FirstName”?
FirstName會被元 First Name變數和 e.FirstName 屬性更新。
Model Binder是組合的關係嗎?
是,在實驗 9 中都是根據控制元件名稱執行的。
例如:
Customer 類和 Address 類:
1: public class Customer
2: {
3: public string FName{get;set;}
4: public Address address{get;set;}
5: }
6: public class Address
7: {
8: public string CityName{get;set;}
9: public string StateName{get;set;}
10: }
Html 程式碼
1: ...
2: ...
3: ...
4: <input type="text" name="FName">
5: <input type="text" name="address.CityName">
6: <input type="text" name="address.StateName">
7: ...
8: ...
9: ...
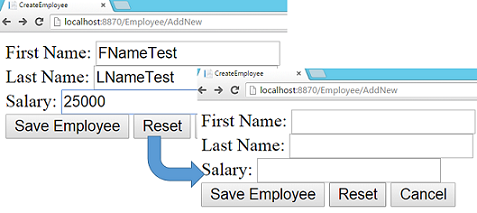
實驗11——重置按鈕和取消按鈕
1. 新增重置和取消按鈕
1: ...
2:
3: ...
4:
5: ...
6:
7: <input type="submit" name="BtnSubmit” value="Save Employee" />
8:
9: <input type="button" name="BtnReset" value="Reset" onclick="ResetForm();" />
10:
11: <input type="submit" name="BtnSubmit" value="Cancel" />
2. 定義 ResetForm 函式
在Html的頭部分新增指令碼標籤,並編寫JavaScript 函式 命名為”ResetForm“如下:
1: <script>
2: function ResetForm() {
3: document.getElementById('TxtFName').value = "";
4: document.getElementById('TxtLName').value = "";
5: document.getElementById('TxtSalary').value = "";
6: }
7: </script>
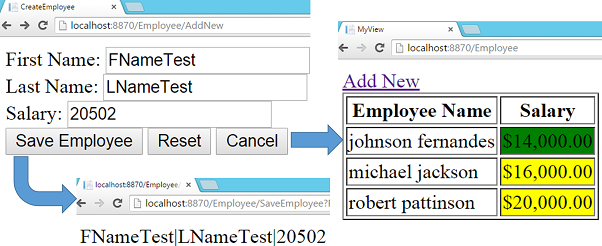
3. 在 EmplyeeController 的 SaveEmployee 方法中實現取消按鈕的點選功能
修改SaveEmployee 方法:
1: public ActionResult SaveEmployee(Employee e, string BtnSubmit)
2: {
3: switch (BtnSubmit)
4: {
5: case "Save Employee":
6: return Content(e.FirstName + "|" + e.LastName + "|" + e.Salary);
7: case "Cancel":
8: return RedirectToAction("Index");
9: }
10: return new EmptyResult();
11: }
4. 執行
5. 測試重置功能
6. 測試儲存和取消功能
關於實驗11
在實驗11中為什麼將儲存和取消按鈕設定為同名?
在日常使用中,點選提交按鈕之後,請求會被髮送到伺服器端,所有輸入控制元件的值都將被髮送。提交按鈕也是輸入按鈕的一種。因此提交按鈕的值也會被髮送。
當儲存按鈕被點選時,儲存按鈕的值也會隨著請求被髮送到伺服器端,當點選取消按鈕時,取消按鈕的值”取消“會隨著請求傳送。
在Action 方法中,Model Binder 將維護這些工作。會根據接收到的值更新引數值。
實現多重提交按鈕有沒有其他可用的方法?
事實上,有很多可實現的方法。以下會介紹三種方法。
1. 隱藏 Form 元素
- 在View中建立一個隱藏form元素
1: <form action="/Employee/CancelSave" id="CancelForm" method="get" style="display:none">
2:
3: </form>
- 將提交按鈕改為正常按鈕,並且使用JavaScript指令碼程式碼:
1: <input type="button" name="BtnSubmit" value="Cancel" onclick="document.getElementById('CancelForm').submit()" />2. 使用JavaScript 動態的修改URL
1: <form action="" method="post" id="EmployeeForm" >
2: ...
3: ...
4: <input type="submit" name="BtnSubmit" value="Save Employee" onclick="document.getElementById('EmployeeForm').action = '/Employee/SaveEmployee'" />
5: ...
6: <input type="submit" name="BtnSubmit" value="Cancel" onclick="document.getElementById('EmployeeForm').action = '/Employee/CancelSave'" />
7: </form>
3. Ajax
使用常規輸入按鈕來代替提交按鈕,並且點選時使用jQuery或任何其他庫來產生純Ajax請求。
為什麼在實現重置功能時,不使用 input type=reset ?
因為輸入型別type=reset 不是清晰的值,僅設定了控制元件的預設值。如:
1: <input type="text" name="FName" value="Sukesh">
在該例項中控制元件值為:Sukesh,如果使用type=reset來實現重置功能,當重置按鈕被點選時,textbox的值會被設定為”Sukesh“。
如果控制元件名稱與類屬性名稱不匹配會發生什麼情況?
首先來看一段HTML程式碼:
1: First Name: <input type="text" id="TxtFName" name="FName" value="" /><br />
2: Last Name: <input type="text" id="TxtLName" name="LName" value="" /><br />
3: Salary: <input type="text" id="TxtSalary" name="Salary" value="" /><br />
Model 類包含屬性名稱如FirstName, LastName 和 Salary。由於預設的Model Binder在該片段內不會發生作用。
我們會給出三種解決方案
- 內部action 方法,獲取請求中的post資料。Form 語法和手動構建Model物件:
1: public ActionResult SaveEmployee()
2: {
3: Employee e = new Employee();
4: e.FirstName = Request.Form["FName"];
5: e.LastName = Request.Form["LName"];
6: e.Salary = int.Parse(Request.Form["Salary"])
7: ...
8: ...
9: }
- 使用引數名稱和手動建立Model物件:
1: public ActionResult SaveEmployee(string FName, string LName, int Salary)
2: {
3: Employee e = new Employee();
4: e.FirstName = FName;
5: e.LastName = LName;
6: e.Salary = Salary;
7: ...
8: ...
9: }
- 建立自定義 Model Binder ,代替預設的Model Binder:
1. 建立自定義Model Binder
1: public class MyEmployeeModelBinder : DefaultModelBinder
2: {
3: protected override object CreateModel(ControllerContext controllerContext, ModelBindingContext bindingContext, Type modelType)
4: {
5: Employee e = new Employee();
6: e.FirstName = controllerContext.RequestContext.HttpContext.Request.Form["FName"];
7: e.LastName = controllerContext.RequestContext.HttpContext.Request.Form["LName"];
8: e.Salary = int.Parse(controllerContext.RequestContext.HttpContext.Request.Form["Salary"]);
9: return e;
10: }
11: }
2. 替換預設的 Model Binder
1: public ActionResult SaveEmployee([ModelBinder(typeof(MyEmployeeModelBinder))]Employee e, string BtnSubmit)
2: {
3: ......
RedirectToAction 函式的功能?
RedirectToAction 生成 RedirectToRouteResult 如ViewResult 和 ContentResult,RedirectToRouteResult是 ActionResult的孩子節點,表示間接響應,當瀏覽器接收到RedirectToRouteResult,新Action 方法產生新的請求。
EmptyResult是什麼?
是ActionResult的一個孩子節點,當瀏覽器接收到 EmptyResult,作為響應,它會顯示空白螢幕,表示無結果。在本實驗中不會發生EmptyResult。
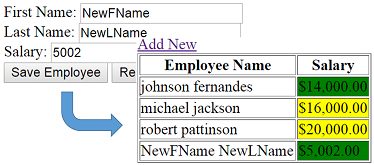
實驗12——儲存資料庫記錄,更新表格
1. 在EmployeeBusinessLayer 中建立 SaveEmployee,如下:
1: public Employee SaveEmployee(Employee e)
2: {
3: SalesERPDAL salesDal = new SalesERPDAL();
4: salesDal.Employees.Add(e);
5: salesDal.SaveChanges();
6: return e;
7: }
2. 修改 SaveEmployee 的Action 方法
在 EmployeeController 中修改 SaveEmployee ation方法 程式碼如下:
1: public ActionResult SaveEmployee(Employee e, string BtnSubmit)
2: {
3: switch (BtnSubmit)
4: {
5: case "Save Employee":
6: EmployeeBusinessLayer empBal = new EmployeeBusinessLayer();
7: empBal.SaveEmployee(e);
8: return RedirectToAction("Index");
9: case "Cancel":
10: return RedirectToAction("Index");
11: }
12: return new EmptyResult();
13: }
3.執行
實驗 13——新增伺服器端驗證
在實驗10中已經瞭解了Model Binder的基本功能,再來了解一下:
- Model Binder使用 post資料更新 Employee物件
- 但是這不僅僅執行Model Binder的。Model Binder需要更新Model State。Model State封裝了 Model狀態。
- ModelState包含屬性IsValid ,該屬性表示 Model 是否成功更新。如果任何伺服器端驗證失敗,Model將不更新。
ModelState儲存驗證錯誤的詳情。
如:ModelState[“FirstName”],表示將包含所有與First Name相關的錯誤。
儲存接收的值(Post 資料或查詢字串的值)
在Asp.net MVC,將使用 DataAnnotations來執行伺服器端的驗證。
在我們瞭解Data Annotation之前先來了解一些Model Binder知識:
使用元資料型別時,Model Binder 是如何工作的?
當Action方法包含元型別引數,Model Binder會與引數名稱對比。
- 當匹配成功時,響應接收的資料會被分配給引數。
- 匹配不成功時,引數會設定為預設值,例如,如果是字串型別則被設定為null,如果是整型則設定為0.
- 由於資料型別未匹配異常的丟擲,不會進行值分配。
當引數是類時,Model Binder 是如何工作的?
當引數為類,Model Binder將通過檢索類所有的屬性,將接收的資料與類屬性名稱比較。
當匹配成功時:
如果接收的值是空,則會將空值分配給屬性,如果無法執行空值分配,會設定預設值,ModelState.IsValid將設定為fasle。
如果空值分配成功,會考慮值是否合法,ModelState.IsValid將設定為fasle。
如果匹配不成功,引數會被設定為預設值。在本實驗中ModelState.IsValid不會受影響。
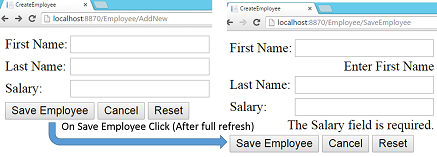
1. 使用 DataAnnotations 裝飾屬性
1: public class Employee
2: {
3: ...
4: ...
5: [Required(ErrorMessage="Enter First Name")]
6: public string FirstName { get; set; }
7:
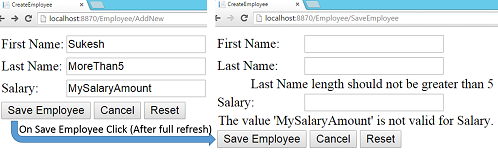
8: [StringLength(5,ErrorMessage="Last Name length should not be greater than 5")]
9: public string LastName { get; set; }
10: ...
11: ...
12: }
2. 修改 SaveEmployee 方法
1: public ActionResult SaveEmployee(Employee e, string BtnSubmit)
2: {
3: switch (BtnSubmit)
4: {
5: case "Save Employee":
6: if (ModelState.IsValid)
7: {
8: EmployeeBusinessLayer empBal = new EmployeeBusinessLayer();
9: empBal.SaveEmployee(e);
10: return RedirectToAction("Index");
11: }
12: else
13: {
14: return View("CreateEmployee ");
15: }
16: case "Cancel":
17: return RedirectToAction("Index");
18: }
19: return new EmptyResult();
20: }
3. 在View中顯示錯誤,修改 Views/Index/CreateEmployee.cshtml 程式碼,使用Table標籤如下:
1: <table>
2: <tr>
3: <td>
4: First Name:
5: </td>
6: <td>
7: <input type="text" id="TxtFName" name="FirstName" value="" />
8: </td>
9: </tr>
10: <tr>
11: <td colspan="2" align="right">
12: @Html.ValidationMessage("FirstName")
13: </td>
14: </tr>
15: <tr>
16: <td>
17: Last Name:
18: </td>
19: <td>
20: <input type="text" id="TxtLName" name="LastName" value="" />
21: </td>
22: </tr>
23: <tr>
24: <td colspan="2" align="right">
25: @Html.ValidationMessage("LastName")
26: </td>
27: </tr>
28:
29: <tr>
30: <td>
31: Salary:
32: </td>
33: <td>
34: <input type="text" id="TxtSalary" name="Salary" value="" />
35: </td>
36: </tr>
37: <tr>
38: <td colspan="2" align="right">
39: @Html.ValidationMessage("Salary")
40: </td>
41: </tr>
42:
43: <tr>
44: <td colspan="2">
45: <input type="submit" name="BtnSubmit" value="Save Employee" />
46: <input type="submit" name="BtnSubmit" value="Cancel" />
47: <input type="button" name="BtnReset" value="Reset" onclick="ResetForm();" />
48: </td>
49: </tr>
50: </table>
4. 執行測試
導航到“Employee/AddNew” 方法,執行測試。
測試1。
測試2
注意:可能會出現以下錯誤:
“The model backing the 'SalesERPDAL' context has changed since the database was created. Consider using Code First Migrations to update the database.”
為了解決上述錯誤,在Global.asax檔案中在 Application_Start後新增以下語句:
1: Database.SetInitializer(new DropCreateDatabaseIfModelChanges<SalesERPDAL>());
注意: 使用Database類需要引用 “System.Data.Entity”名稱空間
關於實驗13
@Html.ValidationMessage是什麼意思?
- @符號表示是Razor程式碼
- Html是HtmlHelper類的例項。
- ValidationMessage是HtmlHelper類的函式,用來表示錯誤資訊。
ValidationMessage 函式是如何工作的?
ValidationMessage 是執行時執行的函式。如之前討論的,ModelBinder更新ModelState。ValidationMessage根據關鍵字顯示ModelState表示的錯誤資訊。
如果我們需要可空的整數域,該怎麼做?
1: public int? Salary{get;set;}
UpdateModel 和 TryUpdateModel 方法之間的區別是什麼?
TryUpdateModel 與UpdateModel 幾乎是相同的,有點略微差別。
如果Model調整失敗,UpdateModel會丟擲異常。就不會使用UpdateModel的 ModelState.IsValid屬性。
TryUpdateModel是將函式引數與Employee物件保持相同,如果更新失敗,ModelState.IsValid會設定為False值。
客戶端驗證是什麼?
客戶端驗證是手動執行的,除非使用HTML 幫助類。我們將在下一節介紹HTML 幫助類。
實驗14——自定義伺服器端驗證
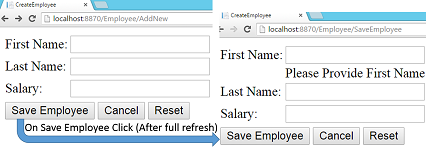
1. 建立自定義驗證
新建類,並命名為FirstNameValidation,程式碼如下:
1: public class FirstNameValidation:ValidationAttribute
2: {
3: protected override ValidationResult IsValid(object value, ValidationContext validationContext)
4: {
5: if (value == null) // Checking for Empty Value
6: {
7: return new ValidationResult("Please Provide First Name");
8: }
9: else
10: {
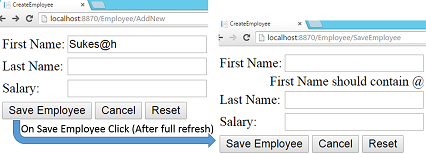
11: if (value.ToString().Contains("@"))
12: {
13: return new ValidationResult("First Name should contain @");
14: }
15: }
16: return ValidationResult.Success;
17: }
18: }
2. 附加到First Name
開啟Employee類,刪除FirstName的預設的Required屬性,新增FirstNameValidation,程式碼如下:
1: [FirstNameValidation]
2: public string FirstName { get; set; }
3. 執行
導航到Employee/AddNew
測試1:
測試2:
結論
本節主要講解了資料訪問層相關的知識,如資料驗證,資料更新,資料處理,form表單的使用等。
在下一章,我們主要講述以下內容:
- 實現客戶端驗證
- 理解HTML 幫助類
- 實現認證功能
- 給部分View新增頁尾
- 使用母版頁建立統一的佈局
- 自定義請求過濾器
資料處理是MVC學習中比較重要的部分,在完成本節學習的同時,你是否對MVC的理解又進了一步?知識能夠幫助我們更好的進行MVC開發,開發工具一樣能夠大幅度提升開發效率。使用 這款輕量級控制元件,在效率大幅提高的同時,還能滿足使用者的所有需求。
相關閱讀: