
Swagger-API文件生成框架的基本使用
使用工具、框架的目的就是為了開發過程簡潔方便或者是達到更強大的功能效果。在目前網際網路開發發展的趨勢下,由於技術更加深度化、細化,前後端分離開發成為必不可少的一個環節,而後端和前端開發人員之間唯一的橋樑便是API文件,也就是介面文件。
平時開發中大部分介面開發都會由開發者或者特定人員手寫介面文件。而文件也會隨著專案迭代不停更新,由此需要不停有人員維護API文件的內容。消耗時間同時也需要消耗人力資源。由此原因我有了接觸和了解一些API文件生成工具的機會。
瞭解到了部分的API工具,首先的話是RAP,這個專案好像是阿里開發的,github地址為:https://github.com/thx/RAP這裡的話最後還是選擇了swagger,以下先介紹下swagger這個工具
1.swagger
1.1 官網

    https://swagger.io/
1.2 簡述
Swagger專案是由Dilip Krishnan和Adrian Kelly等人維護開發的一個為Spring Web MVC 專案提供方法文件的一個框架。該框架最主要的功能是將Controller的方法進行視覺化的展現,像方法註釋,方法引數,方法返回值等都提供了相應的使用者介面,尤其是對JSON引數的支援。同時可以結合swagger-ui可以對使用者介面進行不同程度的定製,也可以對方法進行一個簡單的測試。
Swagger API框架,用於管理專案中API介面,屬當前最流行的API介面管理工具。 Swagger是一個開源框架(Web框架),功能強大,UI介面漂亮,支援線上測試!
Swagger的目標是對REST API定義一個標準的和語言無關的介面,可讓人和計算機無需訪問原始碼、文件或網路流量監測就可以發現和理解服務的能力。當通過Swagger進行正確定義,使用者可以理解遠端服務並使用最少實現邏輯與遠端服務進行互動。與為底層程式設計所實現的介面類似,Swagger消除了呼叫服務時可能會有的猜測。
Swagger是一組開源專案,主要專案如下:
Swagger-tools:提供各種與Swagger進行整合和互動的工具。例如模式檢驗、Swagger 1.2文件轉換成Swagger 2.0文件等功能。
Swagger-core: 用於Java/Scala的的Swagger實現。與JAX-RS(Jersey、Resteasy、CXF…)、Servlets和Play框架進行整合。
Swagger-js: 用於JavaScript的Swagger實現。
Swagger-node-express: Swagger模組,用於node.js的Express web應用框架。
Swagger-ui:一個無依賴的HTML、JS和CSS集合,可以為Swagger相容API動態生成優雅文件。
Swagger-codegen:一個模板驅動引擎,通過分析使用者Swagger資源宣告以各種語言生成客戶端程式碼。
Swagger-editor:可讓使用者在瀏覽器裡以YAML格式編輯Swagger API規範並實時預覽文件。可以生成有效的Swagger JSON描述,並用於所有Swagger工具(程式碼生成、文件等等)中。
2.swagger使用
在嘗試使用swagger的過程中碰到了一些問題,看到了一些網友部落格都講的很不錯,在下面會列出來以供大家一起學習。

在各種部落格中,spring-web專案整合swagger主要看到的有兩種方式,這裡先介紹我目前使用的這種
2.1 第一種方式:
2.1.1 首先構建一個spring-web專案

2.1.2 pom引用
pom.xml
<dependency>
    <groupId>io.springfox</groupId>
    <artifactId>springfox-swagger2</artifactId>
    <version>2.7.0</version>
</dependency>
<dependency>
    <groupId>com.fasterxml.jackson.core</groupId>
    <artifactId>jackson-databind</artifactId>
    <version>2.6.5</version>
</dependency>
2.1.3 SpringfoxConfig 配置swagger
SpringfoxConfig
import org.springframework.context.annotation.Bean;
import org.springframework.context.annotation.ComponentScan;
import org.springframework.context.annotation.Configuration;
import springfox.documentation.builders.ApiInfoBuilder;
import springfox.documentation.builders.PathSelectors;
import springfox.documentation.builders.RequestHandlerSelectors;
import springfox.documentation.service.ApiInfo;
import springfox.documentation.service.Contact;
import springfox.documentation.spi.DocumentationType;
import springfox.documentation.spring.web.plugins.Docket;
import springfox.documentation.swagger2.annotations.EnableSwagger2;

/**
 * Swagger2 Config
 *
 * @author hzk
 */
@Configuration
@EnableSwagger2
@ComponentScan("com.ithzk.swagger.controller")
public class SpringfoxConfig {

    @Bean
    public Docket createRestApi() {
        return new Docket(DocumentationType.SWAGGER_2)
                .apiInfo(apiInfo())
                .select()
                .apis(RequestHandlerSelectors.basePackage("com.ithzk.swagger.controller"))
                .paths(PathSelectors.any())
                .build();
    }

    private ApiInfo apiInfo() {
        Contact contact = new Contact("HuZeKun", "", "[email protected]");
        return new ApiInfoBuilder()
                .title("Swagger 1.x API介面文件")
                .description("")
                .contact(contact)
                .version("1.0.0")
                .build();
    }
}
2.1.4 接下來就可以編寫介面並且加上相應註解
BusinessController
import com.ithzk.swagger.entity.dto.GoodsDto;
import com.ithzk.swagger.entity.req.GoodsReq;
import io.swagger.annotations.Api;
import io.swagger.annotations.ApiOperation;
import io.swagger.annotations.ApiParam;
import org.springframework.http.MediaType;
import org.springframework.stereotype.Controller;
import org.springframework.validation.BindingResult;
import org.springframework.web.bind.annotation.RequestMapping;
import org.springframework.web.bind.annotation.RequestMethod;

import javax.validation.Valid;
import java.io.PrintWriter;

/**
 * 業務介面
 * @author hzk
 * @date 2018/4/19
 */
@Controller
@RequestMapping("api/business/")
@Api(value="商業化介面",tags = "介面資訊",description = "商業相關介面")
public class BusinessController {

    @RequestMapping(value = "goods_info", method = RequestMethod.GET, produces = MediaType.APPLICATION_JSON_VALUE)
    @ApiOperation(value = "獲取商品資訊", httpMethod = "GET",response = GoodsDto.class)
    public GoodsDto getDeskTopInfo(PrintWriter out, @Valid @ApiParam(value = "params", required = true) GoodsReq req, BindingResult bindingResult) throws Exception {
        GoodsDto goodsDto = new GoodsDto();
        if (bindingResult.hasErrors()) {
            goodsDto.setGoodsId(2);
            goodsDto.setGoodsName("上好佳");
        } else {
            goodsDto.setGoodsId(1);
            goodsDto.setGoodsName("浪味仙");
        }
        return  goodsDto;
    }
}
BaseInfoRequest
import io.swagger.annotations.ApiParam;

import javax.validation.constraints.NotNull;
import javax.validation.constraints.Pattern;

public class BaseInfoRequest {

    @ApiParam(name = "version", value = "介面版本號", defaultValue = "1.0", required = true, allowableValues = "1.0")
    @Pattern(regexp = "1.0", message = "version filed must equal 1.0")
    protected String version;

    @ApiParam(name = "format", value = "介面響應格式[json,jsonp]", required = true, defaultValue = "json", allowableValues = "json,jsonp")
    @NotNull
    protected String format;

    public String getVersion() {
        return version;
    }

    public void setVersion(String version) {
        this.version = version;
    }

    public String getFormat() {
        return format;
    }

    public void setFormat(String format) {
        this.format = format;
    }

    @Override
    public String toString() {
        return "BaseInfoRequest{" +
                "version='" + version + '\'' +
                ", format='" + format + '\'' +
                '}';
    }
}
GoodsReq
import com.ithzk.entity.req.base.BaseInfoRequest;
import io.swagger.annotations.ApiParam;

import javax.validation.constraints.NotNull;

/**
 * 商品請求相關
 * @author hzk
 * @date 2018/4/19
 */
public class GoodsReq extends BaseInfoRequest {

    @ApiParam(name = "goodsType", value = "商品類別", required = true)
    @NotNull
    private Integer goodsType;

    public Integer getGoodsType() {
        return goodsType;
    }

    public void setGoodsType(Integer goodsType) {
        this.goodsType = goodsType;
    }

    @Override
    public String toString() {
        return "GoodsReq{" +
                "goodsType=" + goodsType +
                '}';
    }
}
GoodsDto
import com.alibaba.fastjson.annotation.JSONType;
import io.swagger.annotations.ApiModel;
import io.swagger.annotations.ApiModelProperty;

/**
 * 商品相關
 * @author hzk
 * @date 2018/4/19
 */
@JSONType(orders={"goodsId","goodsName"})
@ApiModel(value = "goods",description = "商品資訊")
public class GoodsDto {

    @ApiModelProperty(value = "商品ID",name = "goods_id")
    private Integer goodsId;

    @ApiModelProperty(value = "商品名稱",name = "goods_name")
    private String goodsName;

    public Integer getGoodsId() {
        return goodsId;
    }

    public void setGoodsId(Integer goodsId) {
        this.goodsId = goodsId;
    }

    public String getGoodsName() {
        return goodsName;
    }

    public void setGoodsName(String goodsName) {
        this.goodsName = goodsName;
    }

    @Override
    public String toString() {
        return "GoodsDto{" +
                "goodsId=" + goodsId +
                ", goodsName='" + goodsName + '\'' +
                '}';
    }
}
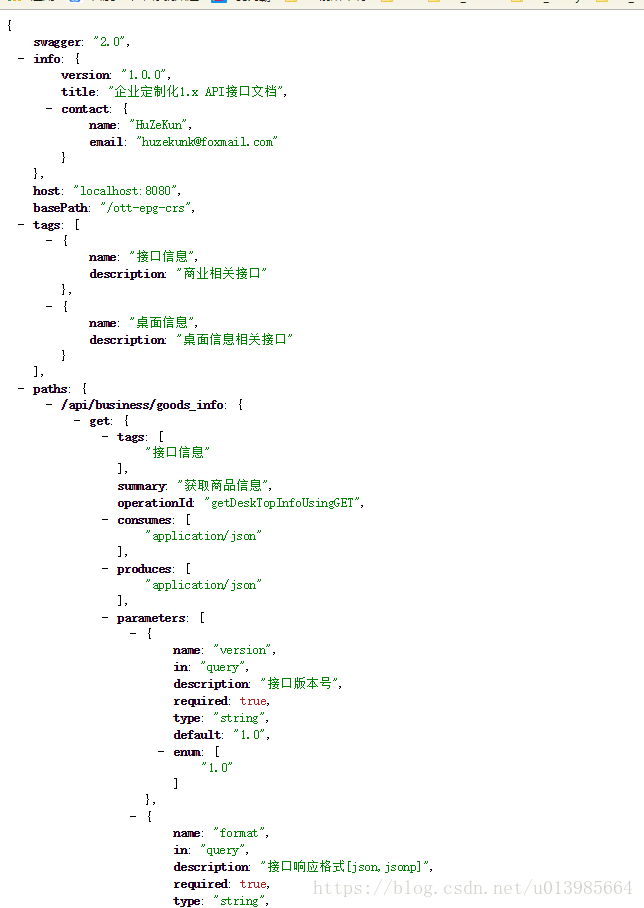
2.1.5 此時啟動專案,訪問專案basePath/v2/api-docs會展現以下格式生成的資料則成功
2.1.6 引入swagger-ui
pom.xml
<dependency>
<groupId>io.springfox</groupId>
<artifactId>springfox-swagger-ui</artifactId>
<version>2.8.0</version>
</dependency>
2.1.7 啟動專案訪問basePath/swagger-ui.html即可
在這一步,我本地出現以下問題,嘗試了幾種解決方式,但是暫時未解決,以後解決了會補上解決方式
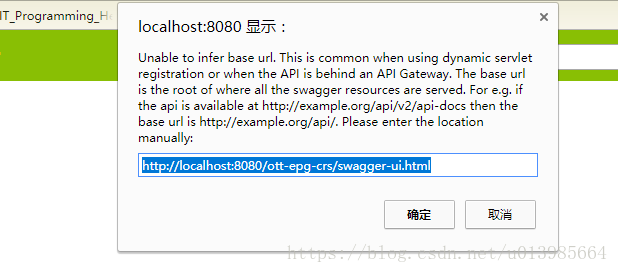
在此暫時通過其他伺服器部署好的swagger-ui來訪問當前專案生成的資料
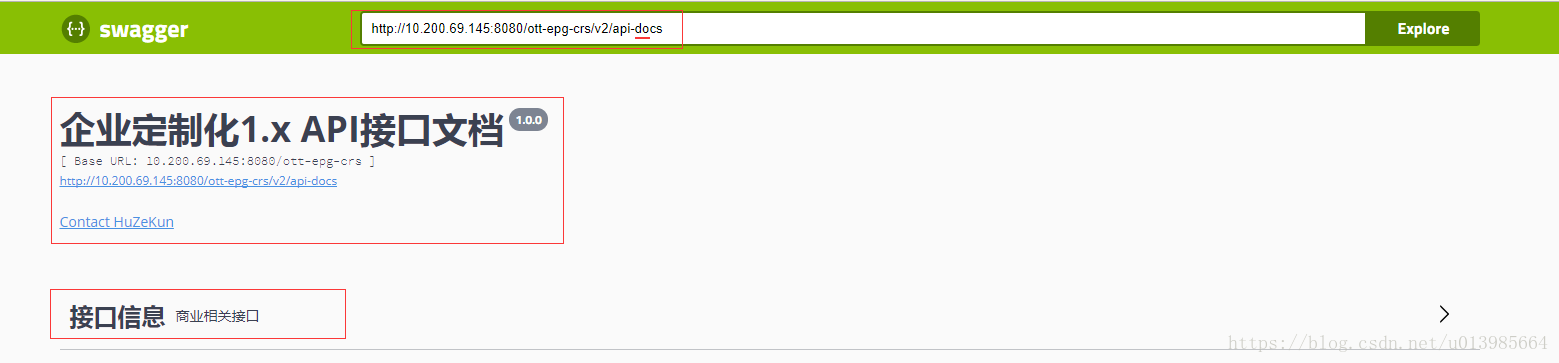
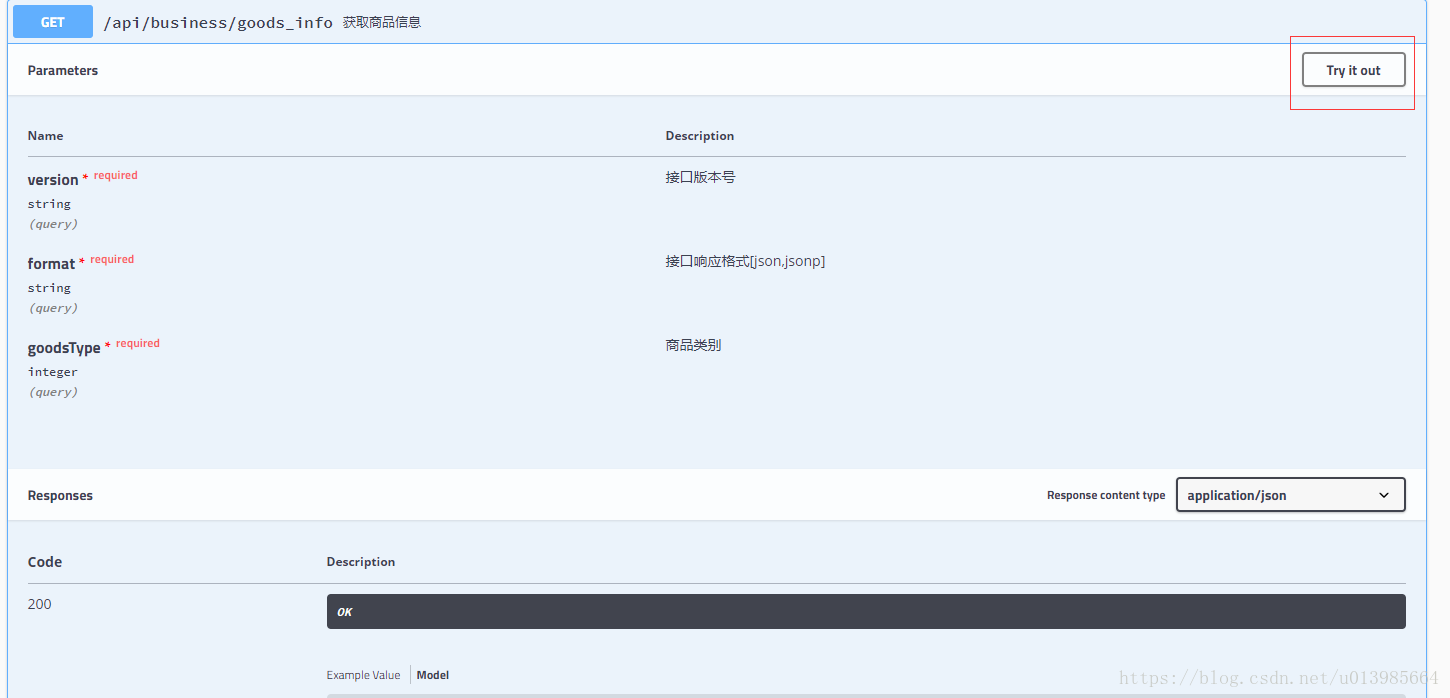
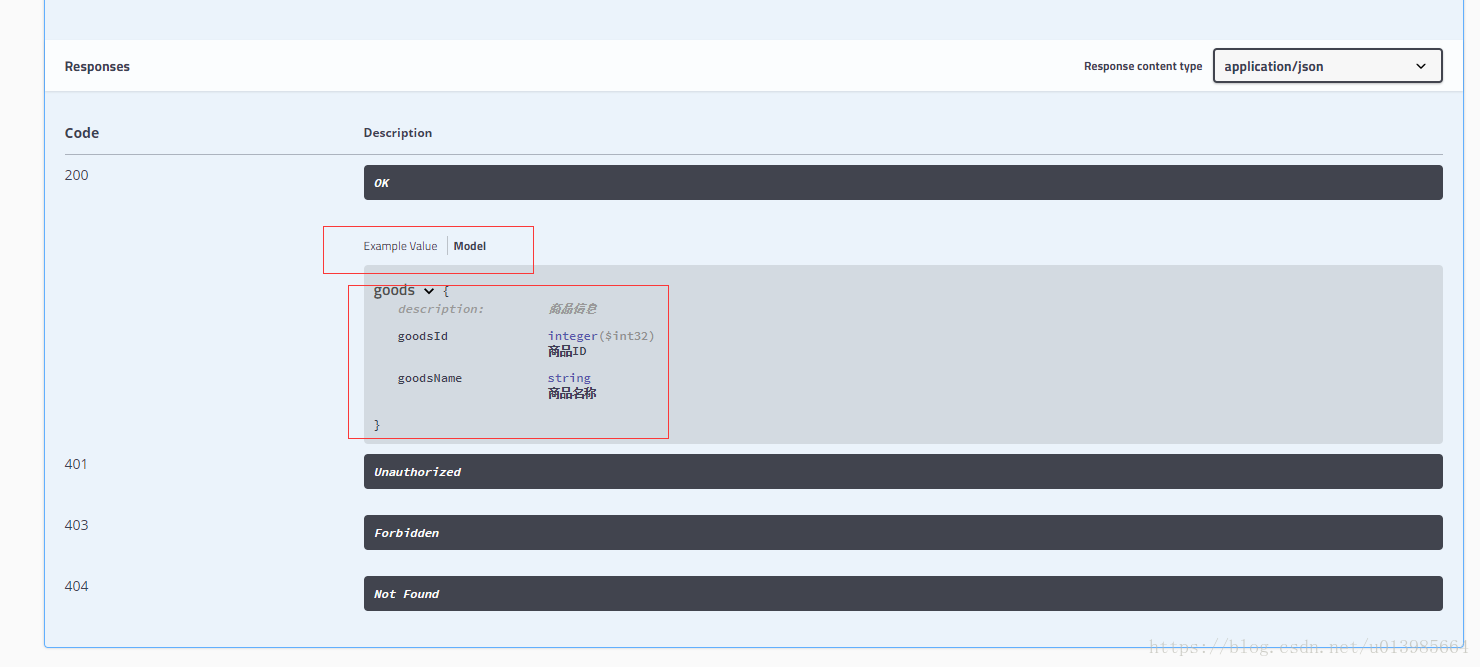
通過點選圖上Try it out可以訪問並測試介面功能,至此就完成了swagger的嵌入
2.2 第二種方式
再介紹一下第二種方式

2.2.1 同理構建一個spring-web專案

2.2.2 pom引入
pom.xml
    <dependency>
      <groupId>com.mangofactory</groupId>
      <artifactId>swagger-springmvc</artifactId>
      <version>1.0.2</version>
    </dependency>
    <dependency>
      <groupId>com.mangofactory</groupId>
      <artifactId>swagger-models</artifactId>
      <version>1.0.2</version>
    </dependency>
    <dependency>
      <groupId>com.wordnik</groupId>
      <artifactId>swagger-annotations</artifactId>
      <version>1.3.11</version>
    </dependency>
    <!-- swagger-springmvc dependencies -->
    <dependency>
      <groupId>com.google.guava</groupId>
      <artifactId>guava</artifactId>
      <version>15.0</version>
    </dependency>

    <dependency>
      <groupId>com.fasterxml.jackson.core</groupId>
      <artifactId>jackson-annotations</artifactId>
      <version>2.4.4</version>
    </dependency>
    <dependency>
      <groupId>com.fasterxml.jackson.core</groupId>
      <artifactId>jackson-databind</artifactId>
      <version>2.4.4</version>
    </dependency>
    <dependency>
      <groupId>com.fasterxml.jackson.core</groupId>
      <artifactId>jackson-core</artifactId>
      <version>2.4.4</version>
    </dependency>
    <dependency>
      <groupId>com.fasterxml</groupId>
      <artifactId>classmate</artifactId>
      <version>1.1.0</version>
    </dependency>
2.2.3 SwaggerConfig 配置swagger
SwaggerConfig
package com.swagger.config;
import com.mangofactory.swagger.configuration.SpringSwaggerConfig;
import com.mangofactory.swagger.models.dto.ApiInfo;
import com.mangofactory.swagger.plugin.EnableSwagger;
import com.mangofactory.swagger.plugin.SwaggerSpringMvcPlugin;
import org.springframework.beans.factory.annotation.Autowired;
import org.springframework.context.annotation.Bean;
import org.springframework.context.annotation.ComponentScan;
import org.springframework.context.annotation.Configuration;
@Configuration
@EnableSwagger
@ComponentScan("com.swagger.controller") //啟用元件掃描
public class SwaggerConfig {
private SpringSwaggerConfig springSwaggerConfig;
/**
* Required to autowire SpringSwaggerConfig
*/
@Autowired
public void setSpringSwaggerConfig(SpringSwaggerConfig springSwaggerConfig)
{
this.springSwaggerConfig = springSwaggerConfig;
}
/**
* Every SwaggerSpringMvcPlugin bean is picked up by the swagger-mvc
* framework - allowing for multiple swagger groups i.e. same code base
* multiple swagger resource listings.
*/
@Bean
public SwaggerSpringMvcPlugin customImplementation()
{
return new SwaggerSpringMvcPlugin(this.springSwaggerConfig)
.apiInfo(apiInfo())
.includePatterns(".*?");
}
private ApiInfo apiInfo()
{
ApiInfo apiInfo = new ApiInfo(
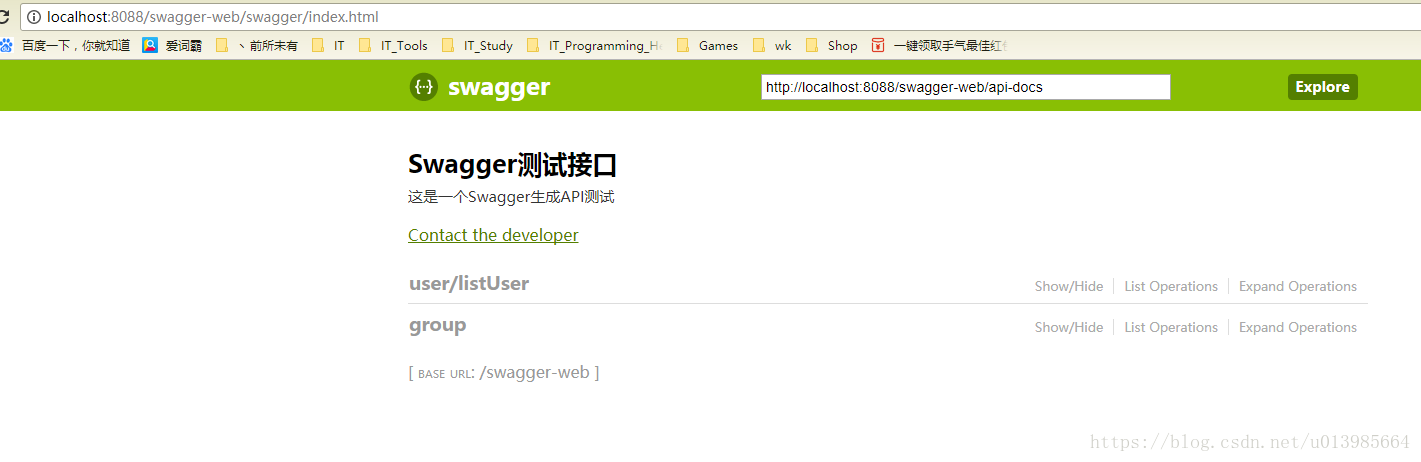
"Swagger測試介面",
"這是一個Swagger生成API測試",
"My Apps API terms of service",
"[email protected]",
"My Apps API Licence Type",
"My Apps API License URL");
return apiInfo;
}
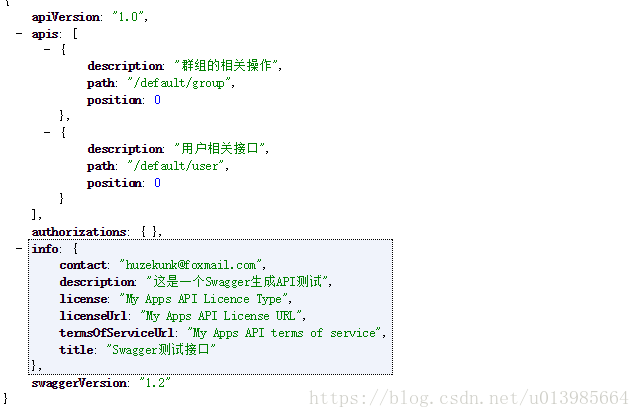
}2.2.4 其他Controller和Entity同理,構建完成啟動即可
有些還不是很明白的是這種方式生成的地址是basUrl/api-docs,應該是對這個還不是很熟悉,之後如果有機會深入會繼續記錄分享給大家
    將該介面放至開始伺服器無法讀取介面資訊
    所以嘗試使用原始方式搭建一個swagger-ui

2.2.5 spring.xml
<mvc:resources mapping="/swagger/**" location="/swagger/"/>
<!--未初始化此類會導致SwaggerConfig無法注入成功-->
<bean class="com.mangofactory.swagger.configuration.SpringSwaggerConfig" />
<bean class="com.swagger.config.SwaggerConfig"/>
2.2.6 搭建swagger-ui
下載 swagger-ui
https://github.com/swagger-api/swagger-ui/tree/v2.2.10
解壓下載後的檔案,將裡面dist資料夾下內容放置專案中
2.2.7 修改index.html內容
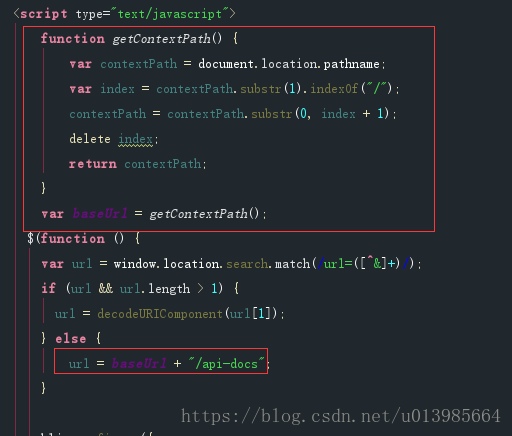
2.2.8 訪問swagger-ui

    訪問專案下swagger中index.html,發現也可以達到效果
3.總結
總結下這次初步學習swagger,確實踩了很多坑,有些問題從網上找到的解決方法在自己這裡也不管用。總結一下其實如果專案多,單獨搭建一個提供檢視介面文件的swagger-ui專案,其他專案主要負責生成對應資料格式檔案,還是很方便的。有些小夥伴專案嵌入swagger可能會遇到一些小問題,比如生成的文件格式資料、或者原始方式引用swagger-ui被過濾器攔截導致介面生成資料無法讀取成功等等。總結一下學習技術還是要靜下心來,心越亂離成功越遠。下面列一些學習過程中看到的不錯的部落格推薦給大家,分享給大家一起學習,這應該也是博主寫部落格的其中一個目的吧。
相關部落格推薦: