
SpringMVC+Spring+Mybatis整合應用(3)
1. 實現圖片上傳
需求:在使用者註冊頁面實現上傳圖片作為使用者頭像
1. springmvc中對多部件型別請求資料解析:在頁面form中提交enctype="multipart/form-data"的資料時,需要springmvc對multipart型別的資料進行解析。在springmvc.xml中配置multipart型別解析器。
	<bean id="multipartResolver" class="org.springframework.web.multipart.commons.CommonsMultipartResolver">
<!--指定上傳檔案的最大空間為10mb-->
		<property name="maxUploadSize">
			<value>1048576</value>
		</property>
<!--上傳檔案的編碼格式為utf-8-->
		<property name="defaultEncoding">
			<value>utf-8</value>
		</property>
	</bean>
2. 加入上傳圖片的jar,上邊的解析內部使用下邊的jar進行圖片上傳。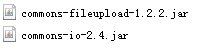
3. 在tomcat伺服器中建立圖片虛擬目錄用於儲存圖片:通過圖形化介面建立,


Document base就表示本地路徑,而path就表示瀏覽器訪問路徑;也可以直接修改tomcat的配置:在conf/server.xml檔案,新增虛擬目錄 :
![]()
注意:在圖片虛擬目錄 中,一定將圖片目錄分級建立(提高i/o效能),一般我們採用按日期(年、月、日)進行分級建立。
3. jsp頁面中對上傳圖片程式碼編寫:主要有三個要編寫的地方,form表單的enctype="multipart/form-data"和method="post"兩個屬性,以及<input type="file" name="">標籤上傳檔案
<!DOCTYPE HTML PUBLIC "-//W3C//DTD HTML 4.01 Transitional//EN">
<html>
  <head>
    <base href="<%=basePath%>">

    <title>註冊頁面</title>

	<meta http-equiv="pragma" content="no-cache">
	<meta http-equiv="cache-control" content="no-cache">
	<meta http-equiv="expires" content="0">
	<meta http-equiv="keywords" content="keyword1,keyword2,keyword3">
	<meta http-equiv="description" content="This is my page">
  </head>
  <body>
<!--enctype="multipart/form-data"和method="post"這兩個配置必須有,multipart/form-data表示上傳多部件型別的資料,必須為post請求方式是因為post請求方式能傳送包含檔案的資料請求-->
    <form action="/user_manage/user/regist.do" enctype="multipart/form-data" method="post">
	   	<div>請輸入名稱:<input type="text" name="userName"></div>
    	<div>請輸入密碼:<input type="password" name="userPassword"></div>
    	<div>請輸入年齡:<input type="text" name="userAge"></div>
    	<div>請輸入地址:<input type="text" name="userAddress"></div>
    	<div>請輸入手機:<input type="text" name="userTelephone"></div>
<!--主要通過<input type="file" name="">標籤上傳檔案,不一定是圖片-->
    	<div>請選擇一張圖片作為頭像:<input type="file" name="img"></div>
    	<div><input type="submit" value="註冊"></div>
    </form>
  </body>
</html>
4. 服務端controller方法接收圖片檔案:接收的檔案會繫結為org.springframework.web.multipart.MultipartFile型別的物件形參,也就是說,傳送的檔案會儲存在MultipartFile物件中,繫結規則和簡單型別引數的繫結一樣,形參名和請求中的key值相同
	@RequestMapping("/regist")
	public String userRegist(MultipartFile img,@Validated(value={validatorGroup1.class}) User user,BindingResult result,Model model){
		String picPath=uploadPicture(img);//呼叫下面的方法,儲存圖片並返回該圖片的訪問地址
		user.setUserImage(picPath);//將圖片的訪問地址儲存到User物件中
		userservice.insertUser(user);
		model.addAttribute("userAccount", user.getUserAccount());
		return "login";
	}

public class User {
    private Integer userAccount;
    private String userName;
    private String userPassword;
    private Integer userAge;
    private String userAddress;
    private String userTelephone;
//新增圖片路徑屬性
    private String userImage;
//省略get/set方法
}
5. 將接收的檔案傳送到圖片伺服器的虛擬目錄中:
	//儲存圖片到伺服器中,並生成該圖片的訪問路徑
private static String uploadPicture(MultipartFile uploadFile){
		String oldFileName=uploadFile.getOriginalFilename();//獲取初始檔名
		String fileSuffix=oldFileName.substring(oldFileName.lastIndexOf("."));//獲取檔案型別字尾
		String newFileName=UUID.randomUUID().toString();//新圖片名稱的生成有多種方式,只需保證不重複即可

		//本地伺服器中存放圖片所在資料夾的物理路徑
		String path="D:\\develop\\upload\\";
        //拼接本地存放的完整路徑
		File newPicture=new File(path+newFileName+fileSuffix);
		try {
            //將圖片儲存在該路徑下
			uploadFile.transferTo(newPicture);
		} catch (Exception e) {
			// TODO Auto-generated catch block
			e.printStackTrace();
		}
        //返回完整的虛擬路徑
		return "http://localhost:8081/pic/"+newFileName+fileSuffix;
	}
6. 在上面的上傳圖片實現中,圖片上傳後會儲存在執行應用系統的伺服器中,但如果是應用系統分散式部署環境下圖片引用會出現問題,而且圖片的上傳下載會給伺服器增加額外的壓力
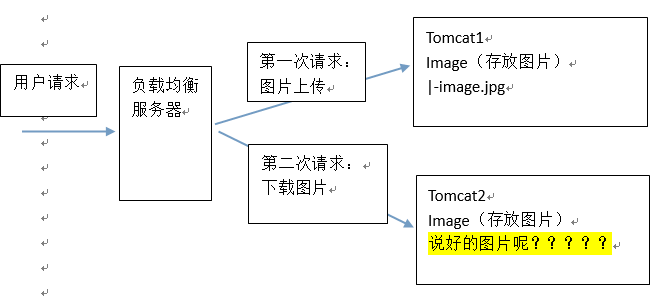
所以在實際開發中會採取分散式部署,儲存使用者上傳下載檔案的伺服器不會和系統應用部署的伺服器處於同一臺伺服器,而是分開部署的,這時就需要一些網路傳輸程式碼來進行兩個伺服器之間的資料上傳與下載,一般採用FTP協議。這裡不做具體實現

2. SpringMVC中實現json格式資料互動
1. 客戶端與服務端的json資料互動過程:
- 客戶端向服務端傳送請求,請求中帶有一些資料:一般來說,如果不進行特殊設定,提交的資料格式都為key/value格式的,比如form表單提交的字串資料,請求中表示資料內容型別的請求頭值為 contentType=application/x-www-form-urlen;但如果傳送的資料為json格式,那麼就需要設定請求頭contentType=application/json
- 服務端接受資料:如果請求中的資料格式型別是key/value,那麼只需要按照一些引數繫結規則即可通過Controller中的方法引數進行接收處理;但如果是接收一個json格式的字串資料,如果想要將該字串轉為Java中的物件(簡單型別、pojo型別),那麼就需要@RequestBody註解
- 服務端向客戶端頁面響應json格式資料:必須通過@ResponseBody將java物件轉成json串輸出,在客戶端頁面中對該json串進行解析
2. 如果是請求的資料格式為json、響應的資料格式也為json,在前端頁面中需要將請求的內容轉成json,不太方便,所以常用請求的資料格式為key/value、響應的資料格式為json。
3. 使用json的原因就在於:json資料格式在介面呼叫中、html頁面中較常用,json格式簡單,解析方便。比如Ajax非同步資料互動時常用json、還有最重要JSONP跨域請求資料資源
4. 簡單使用示例:
- 首先必須匯入json與java物件轉換的相關jar包

- 定義一個html頁面,通過jQuery框架中的ajax方法提交json資料,並接受返回響應的json資料
<!DOCTYPE HTML PUBLIC "-//W3C//DTD HTML 4.01 Transitional//EN"> <html> <head> <title>test page</title> <meta http-equiv="pragma" content="no-cache"> <meta http-equiv="cache-control" content="no-cache"> <meta http-equiv="expires" content="0"> <meta http-equiv="keywords" content="keyword1,keyword2,keyword3"> <meta http-equiv="description" content="This is my page"> <script type="text/javascript" src="../js/jquery-1.4.4.min.js"></script> <script type="text/javascript"> //設定提交的資料格式為json,即請求頭contentType=application/json,接收json資料 function requestJson(){ $.ajax({ type:'post', url:'http://localhost:8081/user_manage/requestJson', contentType:'application/json;charset=utf-8', data:'{userAccount:"123456",userName="123",userPassword="123456"}', success:function(data){ alert(data); }, error:function(){ alert("請求失敗"); } }); } //預設提交的資料格式為key/value,即請求頭contentType=application/x-www-form-urlen,接收json資料 function requestKeyValue(){ $.ajax({ type:'post', url:'http://localhost:8081/user_manage/requestKeyValue', data:"userAccount=123456&userName=123&userPassword=123456", success:function(data){ alert(data); }, error:function(){ alert("請求失敗"); } }); } </script> </head> <body> <button onclick="requestJson()">提交json資料</button> <button onclick="requestKeyValue()">提交key/value資料</button> </body> </html> - Controller方法中接受json資料並繫結到一個pojo物件中,響應json資料
	@RequestMapping("/requestJson")
	@ResponseBody//該註解就會把返回的物件user轉為json字串,而@RequestBody會把json字串繫結到user形參中
	public User JsonTest1(@RequestBody User user){
		user.setUserPassword("12345678");
		return user;
	}

	@RequestMapping("/requestKeyValue")
	@ResponseBody
	public User JsonTest2(User user){
		user.setUserPassword("12345678");
		return user;
	}
3. SpringMVC對RESTful格式請求路徑的支援
1. 何為RESTful格式路徑:
- 不使用RESTful格式的請求路徑:比如https://my.oschina.net/ProgramerLife/blog/write/draft?id=2275002
- 使用RESTful格式的請求路徑:則為https://my.oschina.net/ProgramerLife/blog/write/draft/2275002
- 也就是將引數寫在請求路徑中,在服務端通過請求路徑提取引數,而不是把引數放在請求體中,作為請求引數傳送給服務端
2. 實現一個需求作為示例:在使用者管理介面,實現刪除使用者
2. 首先要在web.xml中配置好用於接收RESTful格式請求路徑的前端控制器:
	<!-- RESTful風格的路徑配置 -->
	<servlet>
		<servlet-name>RESTful</servlet-name>
		<servlet-class>org.springframework.web.servlet.DispatcherServlet</servlet-class>
		<!--SpringMVC載入的配置檔案,這裡是springweb應用上下文 -->
		<init-param>
			<param-name>contextConfigLocation</param-name>
			<param-value>classpath:conf/springMVC.xml</param-value>
		</init-param>
		<load-on-startup>1</load-on-startup>
	</servlet>
	<servlet-mapping>
		<servlet-name>RESTful</servlet-name>
		<url-pattern>/</url-pattern>
	</servlet-mapping>
2. 請求路徑為:http://localhost:8081/user_manage/delete/1/20/1000000001
3. 服務端Controller方法:page表示該使用者資訊所在的頁數,rows表示每頁最大顯示的使用者資訊數量,userAccount表示使用者賬號
	@RequestMapping("/delete/{page}/{rows}/{userAccount}")
    @ResponseBody
	public String deleteUser(@PathVariable(value="page") int page,
			@PathVariable(value="userAccount") int userAccount,
			@PathVariable(value="rows") int rows){
		userService.deleteUser(userAccount);
		DataGridResult users=userService.findUserList(page, rows);
		return users;
}- @RequestMapping("/delete/{page}/{rows}/{userAccount}"):在@RequestMapping後所寫的路徑中,用{xxx}表示請求路徑中哪幾部分代表請求引數,也就是{xxx}相當於佔位符
- @PathVariable(value="page") int page:@PathVariable該註解用於Controller方法中用於接收請求引數的形參之前,表示將請求URL中的模板變數對映到功能處理方法的引數上。如果形參名和{xxx}中的值相同,@PathVariable則不用指定(value="page")來對映在路徑中的資料
4. RESTful格式請求路徑所帶來的問題:配置前端控制器的url-parttern中指定/,對靜態資源的解析出現問題,因為此時前端控制器對於靜態資源的請求路徑也會攔截並在控制器對映器中尋找對應的Controller,而此時是無法尋找到對應的Controller的,所以會報404
5. 解決RESTful格式請求路徑對靜態資源的解析出現的問題:
- 在Spring3.*版本中,可以在SpringMVC的配置檔案新增對靜態資源的對映,比如
<mvc:resources location="/WEB-INF/js/" mapping="/js/**"/>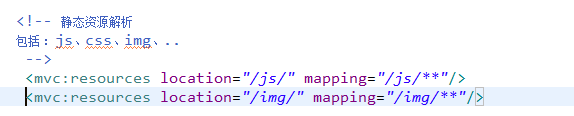
- 而在Spring4.*版本以上,不能使用上面的resources,可以在SpringMVC的配置檔案新增另一行配置:
<mvc:default-servlet-handler/>但是該配置必須保證靜態資原始檔在webapp目錄下,而通過resources配置的可以將靜態資源放在WEB-INF目錄下

4. SpringMVC 攔截器
1. 自定義攔截器:實現org.springframework.web.servlet.HandlerInterceptor介面即可
import javax.servlet.http.HttpServletRequest;
import javax.servlet.http.HttpServletResponse;
import org.springframework.web.servlet.HandlerInterceptor;
import org.springframework.web.servlet.ModelAndView;
//定義攔截器,實現HandlerInterceptor介面。介面中提供三個方法。
public class HandlerInterceptor1 implements HandlerInterceptor {
	//進入 Handler(即Controller)方法之前執行
	//用於身份認證、身份授權
	//比如身份認證,如果認證通過表示當前使用者沒有登陸,需要此方法攔截不再向下執行
	@Override
	public boolean preHandle(HttpServletRequest request,
			HttpServletResponse response, Object handler) throws Exception {
		//return false表示攔截,不向下執行
		//return true表示放行
		return false;
	}
	//進入Handler方法之後,返回modelAndView之前執行
	//應用場景從modelAndView出發:將公用的模型資料(比如選單導航)在這裡傳到檢視,也可以在這裡統一指定檢視
	@Override
	public void postHandle(HttpServletRequest request,
			HttpServletResponse response, Object handler,
			ModelAndView modelAndView) throws Exception {
	}
	//完成執行Handler後執行此方法
	//應用場景:統一異常處理,統一日誌處理
	@Override
	public void afterCompletion(HttpServletRequest request,
			HttpServletResponse response, Object handler, Exception ex)
			throws Exception {
	}
}
2. 配置全域性攔截器:springmvc配置全域性的攔截器,springmvc框架將配置的攔截器注入到每個處理器對映器中,springmvc攔截器針對HandlerMapping(處理器對映器)進行攔截設定,或者說會將攔截器配置到處理器對映器中,如果某個請求路徑該HandlerMapping對映成功(找到對應的Handler),那麼會先被攔截器進行攔截處理,在處理器返回響應之前在進行一次處理。在SpringMVC的配置檔案(springmvc.xml)中新增如下配置
	<!-- 如果配置多個攔截器,在mvc:interceptors中新增多個mvc:interceptor即可 -->
	<mvc:interceptors>
		<mvc:interceptor>
			<!-- 攔截器類 -->
			<bean class="user_manage.interceptor.HandlerInterceptor1"></bean>
			<!-- 攔截器攔截的請求路徑,/**表示攔截所有的url -->
			<mvc:mapping path="/**"/>
		</mvc:interceptor>
		<mvc:interceptor>
			<!-- 攔截器類 -->
			<bean class="user_manage.interceptor.HandlerInterceptor2"></bean>
			<!-- 攔截器攔截的請求路徑,/**表示攔截所有的url -->
			<mvc:mapping path="/**"/>
		</mvc:interceptor>
	</mvc:interceptors>
3. 攔截器執行順序:如果配置了多個攔截器,那麼就按照配置中所寫攔截器的順序來依次進行攔截,只有前一個攔截器對請求放行之後,後一個攔截器才能繼續攔截。
4. 攔截器使用例項:登入認證攔截,除了登入請求和註冊請求之外,其他請求必須通過登入認證攔截器攔截
public class LoginInterceptor implements HandlerInterceptor {


	//進入 Handler方法之前執行
	//用於身份認證、身份授權
	//比如身份認證,如果認證通過表示當前使用者沒有登陸,需要此方法攔截不再向下執行
	@Override
	public boolean preHandle(HttpServletRequest request,
			HttpServletResponse response, Object handler) throws Exception {

		//獲取請求的url
		String url = request.getRequestURI();
		//判斷url是否是公開 地址(實際使用時將公開 地址配置配置檔案中)
		//這裡公開地址是登陸提交的地址
		if(url.indexOf("login")>=0){
			//如果是登陸請求的路徑地址,放行
			return true;
		}

		//判斷session
		HttpSession session  = request.getSession();
		//從session中取出使用者身份資訊
		String username = (String) session.getAttribute("username");

		if(username != null){
			//身份存在,放行
			return true;
		}

		//執行這裡表示使用者身份需要認證,跳轉登陸頁面
		request.getRequestDispatcher("/WEB-INF/jsp/login.jsp").forward(request, response);

		//return false表示攔截,不向下執行
		//return true表示放行
		return false;
	}