
SpringMVC+Spring+Mybatis整合應用(2)
1. 包裝型別pojo物件中pojo屬性引數繫結
1. 對於屬性都是簡單型別的pojo類
如果需要將請求中的引數繫結到該pojo物件形參中,只需要保證請求中攜帶的key/value格式的引數中的key值與pojo類中的屬性名相同即可,SpringMVC會自動將請求中的引數繫結或者說注入到pojo物件的屬性中,比如
    <form action="user/regist.do">
    	<div>請輸入名稱:<input type="text" name="userName"></div>
    	<div>請輸入密碼:<input type="password" name="userPassword"></div>
    	<div>請輸入年齡:<input type="text" name="userAge"></div>
    	<div>請輸入地址:<input type="text" name="userAddress"></div>
    	<div>請輸入手機:<input type="text" name="userTelephone"></div>
    	<div><input type="submit" value="註冊"></div>
    </form>
public class User {
    private Integer userAccount;
    private String userName;
    private String userPassword;
    private Integer userAge;
    private String userAddress;
    private String userTelephone;
//省略每個屬性的get/set方法
}
@Controller @RequestMapping("/user") public class UserController { @RequestMapping("/regist") public String userRegist(User user){ return "login"; } }
2. 如果形參是一個pojo類,而且該pojo類中的某個屬性也是一個pojo類
同樣以上面的註冊為例
public class UserVo {
	private User user;
	public User getUser() {
		return user;
	}
	public void setUser(User user) {
		this.user = user;
	}
}

@Controller
@RequestMapping("/user")
public class UserController {

	@RequestMapping("/regist")
	public String userRegist(UserVo user){
		return "login";
	}

}
    <form action="user/regist.do">
    	<div>請輸入名稱:<input type="text" name="user.userName"></div>
    	<div>請輸入密碼:<input type="password" name="user.userPassword"></div>
    	<div>請輸入年齡:<input type="text" name="user.userAge"></div>
    	<div>請輸入地址:<input type="text" name="user.userAddress"></div>
    	<div>請輸入手機:<input type="text" name="user.userTelephone"></div>
    	<div><input type="submit" value="註冊"></div>
    </form>
可以看出,只需要保證請求引數的key值為繫結的目標pojo物件中的 屬性名.屬性名.屬性名···即可
2. 集合型別引數繫結
1. 如果要繫結的controller方法的形參是一個數組:
- 在Jsp頁面中的寫法
<form action=""> <input type="checkbox" name="arr" value="1"> <input type="checkbox" name="arr" value="2"> <input type="checkbox" name="arr" value="3"> <!-- 多個checkbox,name屬性的值相同 --> </form> -
在controller方法中的形參
	@RequestMapping("uri")
	public String toPage(int[] arr){
		return "";
	}
和簡單型別引數繫結類似,保證請求中的key/value資料的key值與形參名相同即可
2. 如果繫結List型別的引數:
- 在controller方法中的形參
//繫結的pojo型別
public class User {
    private Integer userAccount;
    private String userName;
    private String userPassword;
    private Integer userAge;
    private String userAddress;
    private String userTelephone;
//省略get/set方法
}
public class UserVo {
	//將請求中引數對應的pojo集合放在另一個包裝類中作為屬性
	private List<User> users;
	public List<User> getUsers() {
		return users;
	}
	public void setUsers(List<User> users) {
		this.users = users;
	}
}
//controller方法的形參
	@RequestMapping("uri")
	public String test(UserVo uservo){
		return page;
	}
使用List接收頁面提交的批量資料會被繫結為list<pojo>型別的資料,但不能直接通過list<pojo>形參進行接收,而是通過另一個包裝pojo接收,在包裝pojo中定義list<pojo>屬性
- 在jsp頁面中的寫法:name屬性值的寫法應為包裝pojo中 list<pojo>型別屬性的屬性名[下標(從0開始)].屬性名.屬性名···
    <form action="">
    	<div>
    		<input type="text" name="users[0].userAccount" value="">
    		<input type="text" name="users[0].userName" value="">
    		<input type="text" name="users[0].userPassword" value="">
    		<input type="text" name="users[0].userAge" value="">
    		<input type="text" name="users[0].userAddress" value="">
    		<input type="text" name="users[0].userTelephone" value="">
    	</div>
    	<div>
    		<input type="text" name="users[1].userAccount" value="">
    		<input type="text" name="users[1].userName" value="">
    		<input type="text" name="users[1].userPassword" value="">
    		<input type="text" name="users[1].userAge" value="">
    		<input type="text" name="users[1].userAddress" value="">
    		<input type="text" name="users[1].userTelephone" value="">
    	</div>
    	<div>
    		<input type="text" name="users[2].userAccount" value="">
    		<input type="text" name="users[2].userName" value="">
    		<input type="text" name="users[2].userPassword" value="">
    		<input type="text" name="users[2].userAge" value="">
    		<input type="text" name="users[2].userAddress" value="">
    		<input type="text" name="users[2].userTelephone" value="">
    	</div>
    </form>
3. 服務端資料校驗
1. 專案中,通常使用較多是前端的校驗,比如頁面中js校驗。對於安全要求較高點建議在服務端進行校驗。
2. 服務端校驗:
- 控制層conroller:校驗頁面請求傳送的引數的合法性。在服務端控制層conroller校驗,不區分客戶端型別(瀏覽器、手機客戶端、遠端呼叫)
- 業務層service(使用較多):主要校驗關鍵業務引數,僅限於service介面中使用的引數
- 持久層dao:一般是不校驗的。
3. 簡單開發應用:SpringMVC主要使用Hibernate的校驗框架(和hibernate沒有任何關係)。校驗思路就是頁面提交請求的引數,請求到controller方法中,使用validation進行校驗。如果校驗出錯,將錯誤資訊展示到頁面。
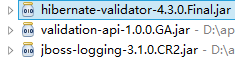
- 準備環境:匯入相關jar包,
- 修改SpringMVC的配置檔案,將校驗器配置到處理器介面卡中
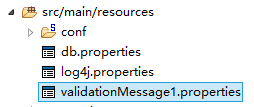
<mvc:annotation-driven validator="validator"></mvc:annotation-driven> <!-- 配置校驗器 --> <bean id="validator" class="org.springframework.validation.beanvalidation.LocalValidatorFactoryBean"> <!-- 配置第三方提供的校驗器類 :Hibernate校驗器類--> <property name="providerClass" value="org.hibernate.validator.HibernateValidator"></property> <!-- 指定校驗使用的資原始檔,在檔案中配置校驗錯誤資訊檔案源 --> <property name="validationMessageSource" ref="messageSource"></property> </bean> <!-- 配置校驗資訊錯誤檔案源,可以配置多個 --> <bean id="messageSource" class="org.springframework.context.support.ReloadableResourceBundleMessageSource"> <property name="basename"> <list> <!-- 會自動解析為當前類路徑下,名為validationMessage1.properties的檔案 --> <value>classpath:validationMessage1</value> </list> </property> <!-- 指定解析檔案的編碼格式 --> <property name="fileEncodings" value="utf-8"></property> <!-- 指定對資原始檔內容的快取時間,單位為秒 --> <property name="cacheSeconds" value="120"></property> </bean> - 在pojo類中新增校驗規則
package user_manage.pojo; import javax.validation.constraints.NotNull; import javax.validation.constraints.Size; public class User { //驗證正則表示式,regexp寫正則表示式 @Pattern(regexp="[0-9]{10}",message="{User.userAccount.pattern.error}") private Integer userAccount; //校驗非空 @NotNull(message="{User.userName.null.error}") private String userName; //校驗密碼長度必須大於6且小於16個字元長度 //min指定最小長度,max指定最大長度,message指定校驗出錯時顯示的資訊 @Size(min=6,max=16,message="{User.userPassword.length.error}") private String userPassword; private Integer userAge; private String userAddress; private String userTelephone; private String userImage; //省略get/set方法 } - 編寫校驗錯誤資訊檔案:

- 在Controller方法中捕捉校驗錯誤資訊:
在需要校驗的pojo形參前邊新增@Validated,在需要校驗的pojo後邊新增BindingResult Result接收校驗出錯資訊
注意:@Validated和BindingResult bindingResult是配對出現(一個@Validated對應一個BindingResult ),並且形參順序是固定的(一前一後)。@RequestMapping("/") public String userLogin(@Validated User user,BindingResult result){ //可以通過BindingResult物件獲取到所有的錯誤資訊,並且可以通過該物件將錯誤資訊傳送到客戶端頁面 List<ObjectError> errors=result.getAllErrors(); for(ObjectError error:errors){ System.out.println(error.getDefaultMessage()); } model.addAttribute("errors", result); return "login"; }
4. 分組校驗:在pojo中定義校驗規則,而pojo是被多個 controller所共用,當不同的controller方法對同一個pojo進行校驗,每個controller方法可能會需要需要不同的校驗規則。可以定義多個校驗分組(其實是一個java介面),分組中定義有哪些規則,每個controller方法使用不同的校驗分組
- 定義校驗器分組
public interface validatorGroup1 { //不需要定義任何方法,只用定義一個介面即可,該介面就表示一個校驗器分組 } public interface validatorGroup2 { //不需要定義任何方法,只用定義一個介面即可,該介面就表示一個校驗器分組 } //將User類中的校驗規則分到到validatorGroup1分組中,通過groups指定,可以寫多個分組 public class User { //驗證正則表示式,regexp寫正則表示式,groups表示將該校驗規則新增到validatorGroup1和validatorGroup2兩個分組中 @Pattern(regexp="[0-9]{10}",message="{User.userAccount.pattern.error}",groups={validatorGroup1.class,validatorGroup2.class}) private Integer userAccount; //校驗非空 @NotNull(message="{User.userName.null.error}",groups={validatorGroup1.class}) private String userName; //校驗密碼長度必須大於6且小於16個字元長度 //min指定最小長度,max指定最大長度,message指定校驗出錯時顯示的資訊 @Size(min=6,max=16,message="{User.userPassword.length.error}",groups={validatorGroup1.class}) private String userPassword; private Integer userAge; private String userAddress; private String userTelephone; //省略get/set方法 } - 在controller方法中通過校驗分組進行校驗:@Validated(value={validatorGroup1.class}),通過value指定使用哪個分組中的校驗規則,可以指定多個分組
	@RequestMapping("/")
	public String userLogin1(@Validated(value={validatorGroup1.class}) User user,BindingResult result){
        //可以通過BindingResult物件獲取到所有的錯誤資訊,並且可以通過該物件將錯誤資訊傳送到客戶端頁面
		List<ObjectError> errors=result.getAllErrors();
		for(ObjectError error:errors){
			System.out.println(error.getDefaultMessage());
		}
		model.addAttribute("errors", result);
		return "login";
	}

	@RequestMapping("/")
	public String userLogin2(@Validated(value={validatorGroup2.class}) User user,BindingResult result){
        //可以通過BindingResult物件獲取到所有的錯誤資訊,並且可以通過該物件將錯誤資訊傳送到客戶端頁面
		List<ObjectError> errors=result.getAllErrors();
		for(ObjectError error:errors){
			System.out.println(error.getDefaultMessage());
		}
		model.addAttribute("errors", result);
		return "login";
	}
4. 異常處理
1. 處理思路:系統中異常包括兩類,預期異常和執行時異常RuntimeException,前者通過捕獲異常從而獲取異常資訊,後者主要通過規範程式碼開發、測試通過手段減少執行時異常的發生。系統的dao、service、controller出現都通過throws Exception向上丟擲,最後由springmvc前端控制器交由異常處理器進行異常處理,springmvc提供全域性異常處理器(一個系統只有一個異常處理器)進行統一異常處理。如下圖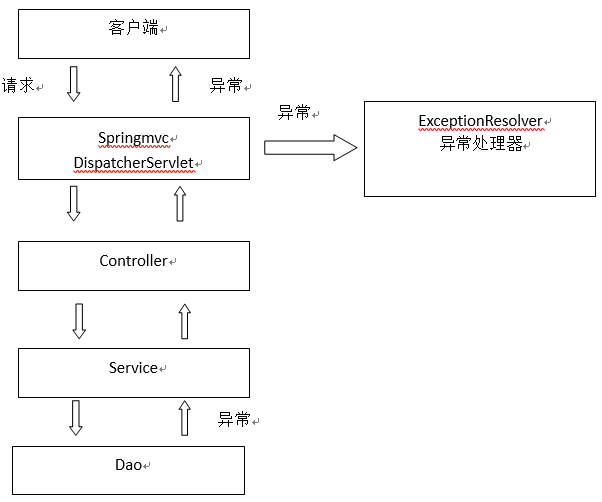
2. 自定義異常類,該類會針對程式中預期可能會出現的異常,會丟擲此類異常
public class MyException extends Exception {
	private String message;
	public MyException(String message) {
		super(message);
		this.message = message;
	}
	public String getMessage() {
		return message;
	}

	public void setMessage(String message) {
		this.message = message;
	}
}
3. 定義全域性異常處理器,系統遇到異常,在程式中手動丟擲,dao拋給service、service給controller、controller拋給前端控制器,前端控制器呼叫全域性異常處理器。全域性異常處理器處理思路:解析出異常型別;如果該 異常型別是系統 自定義的異常,直接取出異常資訊,在錯誤頁面展示;如果該 異常型別不是系統 自定義的異常,構造一個自定義的異常型別(資訊為“未知錯誤”)。springmvc提供一個HandlerExceptionResolver介面,定義全域性異常處理器必須實現該介面
public class MyHandlerExceptionResolver implements HandlerExceptionResolver {
	@Override
	public ModelAndView resolveException(HttpServletRequest request, HttpServletResponse response, Object handler,
			Exception ex) {
//		handler就是處理器介面卡要執行的Handler物件(也就是Controller中的方法)
//		解析出異常型別
//		如果該 異常型別是系統 自定義的異常,直接取出異常資訊,在錯誤頁面展示
		MyException myException = null;
		if(ex instanceof MyException){
			myException = (MyException)ex;
		}else{
			myException = new MyException("未知錯誤");
		}
		//錯誤資訊
		String message = myException.getMessage();
		ModelAndView modelAndView = new ModelAndView();
		//將錯誤資訊傳到頁面
		modelAndView.addObject("message", message);
		//指向錯誤頁面
		modelAndView.setViewName("error");
		return modelAndView;
	}
}
4. 顯示錯誤資訊的頁面:

5. 在SpringMVC的配置檔案springmvc.xml配置全域性異常處理器:
<!--只要實現了HandlerExceptionResolver介面並掃描到SpringMVC應用容器中,就是全域性異常處理器-->
<bean class="user_manage.exception.MyHandlerExceptionResolver"></bean>
6. 測試:只需要在service層或controller層中任意一處需要手動丟擲自定義的MyException異常。如果是程式中手動丟擲的異常,在錯誤頁面中顯示自定義的異常資訊;如果不是手動丟擲異常說明是一個執行時異常,在錯誤頁面只顯示“未知錯誤”。如果與業務功能相關的異常,建議在service中丟擲異常。與業務功能沒有關係的異常,建議在controller中丟擲。
5. 資料回顯
1. 資料回顯指從頁面提交請求資料後,如果請求不符合要求或者出現錯誤,將剛才提交的資料回顯到剛才的提交頁面。
2. 實現方法:請求中攜帶的資料通常通過Controller中的方法形參接收
-
springmvc預設對pojo資料進行回顯。pojo資料傳入controller方法後,springmvc自動將pojo資料放到request域,然後向指定的jsp頁面中傳送該請求,在jsp頁面中顯示資料,使用@ModelAttribute指定pojo回顯到頁面在request中的key,不一定是用來回顯到原頁面
@RequestMapping("/update") //ModelAttribute通過該註解就可以將繫結到pojo形參的資料回顯到指定的頁面中,括號內指定回顯到jsp中的key值 public String userUpdate(@ModelAttribute("user") User user){ //指定返回的jsp頁面名 return "user"; } - 實際上@ModelAttribute就相當於通過Model形參或返回ModelAndView物件來向指定的jsp頁面中傳送該請求,在jsp頁面中顯示資料
//通過Model實現
	@RequestMapping("/update")
	public String userUpdate(User user,Model model){
		model.addAttribute("userdata", user);
		return "user";
	}

//通過ModelAndView實現
	@RequestMapping("/update")
	public ModelAndView userUpdate(User user,Model model){
		ModelAndView mv=new ModelAndView();
		mv.addObject("userdata", user);
		mv.setViewName("user");
		return "user";
	}