
java生成簡單驗證碼圖片
概要
最近項目需要用java實現輸出隨機驗證碼圖片到前臺,正好有機會接觸下java的繪圖類,完成需求後也有時間做個總結,寫篇隨筆記錄下也希望能幫助到有同樣需求的人!
需求流程圖
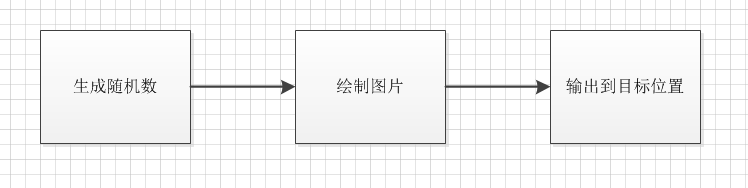
1.生成隨機數
在java中生成隨機數無非就是調用Random的api,但為了後續更好的實用,應該分成多種組合以適應需求的變化,應將生成隨機數的個數和類型組合還有排除字符抽取成參數,這個也比較簡單,沒有什麽難度,就直接貼上代碼
1 /** 2 * 生成隨機驗證碼 3 * @param type 類型 4 * @param length 長度 5 * @paramexChars 排除的字符 6 * @return 7 */ 8 public static String getRandomCode(int type,int length,String exChars){ 9 case TYPE_NUM_CHAR://數字+(大小寫)字母 10 while(i<length){ 11 int t=random.nextInt(123); 12 if((t>=97||(t>=65&&t<=90)||(t>=48&&t<=57))&&(exChars==null||exChars.indexOf((char)t)<0)){ 13 sb.append((char)t); 14 i++; 15 } 16 } 17 break; 18 19 }
2.繪制圖片
繪制圖片是重點也是難點,老實說我之前都沒用過BufferedImage、Graphics、Color等對象,都是從度娘處腦補並結合帖子寫出來的輸出圖片
1)創建BufferedImage對象
如果把BufferedImage比作是畫板,那麽Graphics就是畫紙,這樣比較好理解,後續的操作都是在這畫紙上進行的
1     BufferedImage image = new BufferedImage(width,height,BufferedImage.TYPE_INT_RGB);
2     Graphics g = image.getGraphics();
3     //隨機操作對象
4     Random r=new Random();
2)繪制背景
Graphics有個setColor()方法,可理解為畫筆,在繪制任何東西前要選好畫筆,即顏色,然後調用fillRect()進行輪廓的繪制,後續的繪制範圍不會超過這個輪廓
1         g.setColor(backColor==null?getRandomColor():backColor);
2         g.fillRect(0,0,width,height);
3)繪制幹擾線
調用drawLine畫直線,繪制不超過interLine條幹擾線
 1       if(interLine>0){
 3             int x=r.nextInt(4),y=0;
 4             int x1=width-r.nextInt(4),y1=0;
 5             for(int i=0;i<interLine;i++){
 6                 g.setColor(lineColor==null?getRandomColor():lineColor);
 7                 y=r.nextInt(height-r.nextInt(4));
 8                 y1=r.nextInt(height-r.nextInt(4));
 9                 g.drawLine(x,y,x1,y1);
10             }
11         }
4)寫驗證碼
寫驗證碼時調用drawString()方法,為了不整整齊齊而且重疊的寫,應將每個字符的高度和水平位置隨機,重點在於每繪制完一個字符後,需將畫筆的水平坐標往右邊移動一定的位置,這裏我用了依據寬度浮動,可不必照搬這裏的,有合適的算法就行
 1      int fsize=(int)(height*0.8);//字體大小為圖片高度的80%
 2         int fx=0;
 3         int fy=fsize;
 4         g.setFont(new Font(Font.SANS_SERIF,Font.PLAIN,fsize));
 5         //寫字符
 6         for(int i=0;i<textCode.length();i++){
 7             fy=randomLocation?(int)((Math.random()*0.3+0.6)*height):fy;//每個字符高低是否隨機
 8             g.setColor(foreColor==null?getRandomColor():foreColor);
 9             g.drawString(textCode.charAt(i)+"",fx,fy);
10             fx+=(width / textCode.length()) * (Math.random() * 0.3 + 0.8); //依據寬度浮動
11        }
5)扭曲圖片
圖片的扭曲就是將圖片水平和垂直按不同比例平移,copyArea()方法簡單明了,直接是復制區域,也是同個意識
 1      //扭曲圖片
 2          shearX(g, width, height, backColor);
 3          shearY(g, width, height, backColor);
 4          private static void shearX(Graphics g, int w1, int h1, Color color) {
 5          Random random=new Random();
 6          int period = 2;
 7
 8          boolean borderGap = true;
 9          int frames = 1;
10         int phase = random.nextInt(2);
11
12         for (int i = 0; i < h1; i++) {
13             double d = (double) (period >> 1)* Math.sin((double) i / (double) period
14           + (2.2831853071795862D * (double) phase)/ (double) frames);
15             g.copyArea(0, i, w1, 1, (int) d, 0);
16             if (borderGap) {
17                 g.setColor(color);
18                 g.drawLine((int) d, i, 0, i);
19                 g.drawLine((int) d + w1, i, w1, i);
20             }
21         }
22
23     }
24
25     private static void shearY(Graphics g, int w1, int h1, Color color) {
26         Random random=new Random();
27         int period = random.nextInt(40) + 10; // 50;
28
29         boolean borderGap = true;
30         int frames = 20;
31         int phase = random.nextInt(2);
32         for (int i = 0; i < w1; i++) {
33             double d = (double) (period >> 1)
34                     * Math.sin((double) i / (double) period
35                             + (2.2831853071795862D * (double) phase)/ (double) frames);
36             g.copyArea(i, 0, 1, h1, 0, (int) d);
37             if (borderGap) {
38                 g.setColor(color);
39                 g.drawLine(i, (int) d, i, 0);
40                 g.drawLine(i, (int) d + h1, i, h1);
41             }
42
43         }
44
45     }
6)添加噪點
噪點的添加實質上就是在畫紙上沒有規律的點點點...,所以用隨機顏色隨機位置來執行image.setRGB()方法最合適了
1      float yawpRate = 0.05f;// 噪聲率
2         int area = (int) (yawpRate * width * height);//噪點數量
3         for (int i = 0; i < area; i++) {
4             int xxx = r.nextInt(width);
5             int yyy = r.nextInt(height);
6             int rgb = getRandomColor().getRGB();
7             image.setRGB(xxx, yyy, rgb);
8         }
7)封筆
以上一切畫完之後,下一步就是封筆了,思來想去這樣表達最合適,繪制完之後就是放好筆,收起畫紙,這裏就是返回BufferedImage對象
1         g.dispose();
2         return image;
輸出目標位置
1)輸出文件
這裏寫了一個簡單的測試類,將圖片輸出成文件
 1 public static void main(String[] args) {
 2         String randomCode = CodeUtils.getRandomCode(CodeUtils.TYPE_NUM_CHAR, 4, null);
 3         System.out.println(randomCode);
 4         BufferedImage imageFromCode = ImageUtils.getImageFromCode(randomCode, 100, 50, 3, true, Color.WHITE, Color.BLACK, null);
 5          try {
 6             File file = new File("d:/test01.jpg");
 7             ImageIO.write(imageFromCode,"jpg",file);
 8             System.out.println("成功保存到:"+file.getAbsolutePath());
 9         } catch (IOException e) {
10             System.out.println("保存失敗");
11             e.printStackTrace();
12         }
13
14     }
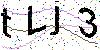
效果圖:
2)輸出流
輸出到流中也是用到和到文件中的方法,根據業務保存到目標位置即可
 1     public static void outputStream(HttpServletRequest request,HttpServletResponse response){
 2         try {
 3             // 設置瀏覽器不緩存本頁
 4             response.addHeader("Pragma", "no-cache");
 5             response.addHeader("Cache-Control", "no-cache");
 6             response.addHeader("Expires", "0");
 7             // 生成驗證碼,寫入用戶session
 8             String verifyCode = CodeUtils.getRandomCode(CodeUtils.TYPE_NUM_CHAR, 4, null);
 9             request.getSession().setAttribute("imageVerify", verifyCode);
10             // 輸出驗證碼給客戶端
11             response.setContentType("image/jpeg");
12             BufferedImage bim = ImageUtils
13                     .getImageFromCode(verifyCode, 47, 18, 3, true,
14                             Color.WHITE, Color.BLACK, null);
15             ImageIO.write(bim, "JPEG", response.getOutputStream());
16
17         } catch (Exception e) {
18         }
19         return null;
20     }
總結
也沒有比較深入的去分析繪制類,只是簡單的把實現的代碼貼出來下面貼出生成隨機數和繪制圖片的工具類,有需求可以通過調整位置參數來實現自己要的效果
隨機數工具類


  1 package veritfcode;
  2
  3 import java.util.Random;
  4
  5 public class CodeUtils {
  6
  7     public static final int TYPE_ONLYNUM = 1; //純數字
  8
  9     public static final int TYPE_NUM_CHAR = 2; //數字+(大小寫)字母
 10
 11     public static final int TYPE_ONLYCHAR = 3; //純(大小寫)字母
 12
 13     public static final int TYPE_LOWERCASE_LETTER = 4; //純(小寫)字母
 14
 15     public static final int TYPE_UPPERCASE_LETTERS = 5; //純(大寫)字母
 16
 17     public static final int TYPE_NUM_LOWER = 6; //數字 + 小寫字母
 18
 19     public static final int TYPE_NUM_UPPER = 7; //數字 + 大寫字母
 20
 21     /**
 22      * 生成隨機驗證碼
 23      * @param type  類型
 24      * @param length   長度
 25      * @param exChars  排除的字符
 26      * @return
 27      */
 28     public static String getRandomCode(int type,int length,String exChars){
 29         if(length<=0||type<0)return "";
 30         StringBuffer sb = new StringBuffer();
 31         Random random = new Random();
 32         int i=0;
 33         switch (type) {
 34         case TYPE_ONLYNUM://純數字
 35             while(i<length){
 36                  int t=random.nextInt(10);
 37                  if(exChars==null||exChars.indexOf(t+"")<0){//排除特殊字符
 38                      sb.append(t);
 39                      i++;
 40                  }
 41             }
 42             break;
 43         case TYPE_NUM_CHAR://數字+(大小寫)字母
 44             while(i<length){
 45                 int t=random.nextInt(123);
 46                 if((t>=97||(t>=65&&t<=90)||(t>=48&&t<=57))&&(exChars==null||exChars.indexOf((char)t)<0)){
 47                     sb.append((char)t);
 48                     i++;
 49                 }
 50             }
 51             break;
 52         case TYPE_ONLYCHAR://純(大小寫)字母
 53             while(i<length){
 54                  int t=random.nextInt(123);
 55                  if((t>=97||(t>=65&&t<=90))&&(exChars==null||exChars.indexOf((char)t)<0)){
 56                     sb.append((char)t);
 57                     i++;
 58                  }
 59             }
 60             break;
 61         case TYPE_LOWERCASE_LETTER://純(小寫)字母
 62             while(i<length){
 63                  int t=random.nextInt(123);
 64                     if((t>=97)&&(exChars==null||exChars.indexOf((char)t)<0)){
 65                         sb.append((char)t);
 66                         i++;
 67                     }
 68             }
 69             break;
 70         case TYPE_UPPERCASE_LETTERS://純(大寫)字母
 71             while(i<length){
 72                  int t=random.nextInt(123);
 73                  if((t>=97||(t>=65&&t<=90))&&(exChars==null||exChars.indexOf((char)t)<0)){
 74                     sb.append((char)t);
 75                     i++;
 76                  }
 77             }
 78             break;
 79         case TYPE_NUM_UPPER: //數字 + 大寫字母
 80             while(i<length){
 81                 int t=random.nextInt(91);
 82                 if((t>=65||(t>=48&&t<=57))&&(exChars==null||exChars.indexOf((char)t)<0)){
 83                     sb.append((char)t);
 84                     i++;
 85                 }
 86             }
 87             break;
 88
 89         case TYPE_NUM_LOWER: //數字 + 小寫字母
 90             while(i<length){
 91                 int t=random.nextInt(123);
 92                 if((t>=97||(t>=48&&t<=57))&&(exChars==null||exChars.indexOf((char)t)<0)){
 93                     sb.append((char)t);
 94                     i++;
 95                 }
 96             }
 97             break;
 98         default:
 99             break;
100         }
101         return sb.toString();
102     }
103 }
View Code
繪制圖片工具類(代碼太長,分三部分粘貼)
第一部分
public class ImageUtils {
     /**
     * 參數說明
     * @param textCode 文本驗證碼
     * @param width 圖片寬度
     * @param height 圖片高度
     * @param interLine 圖片中幹擾線的條數
     * @param randomLocation 每個字符的高低位置是否隨機
     * @param backColor 圖片顏色,若為null,則采用隨機顏色
     * @param foreColor 字體顏色,若為null,則采用隨機顏色
     * @param lineColor 幹擾線顏色,若為null,則采用隨機顏色
     * @return 圖片緩存對象
     */
    public static BufferedImage getImageFromCode(String textCode,int width,int height,int interLine,boolean randomLocation,Color backColor,Color foreColor,Color lineColor){
        BufferedImage image = new BufferedImage(width,height,BufferedImage.TYPE_INT_RGB);
        Graphics g = image.getGraphics();
        //畫背景圖
        g.setColor(backColor==null?getRandomColor():backColor);
        g.fillRect(0,0,width,height);


        //畫幹擾線
        Random r=new Random();
        if(interLine>0){
            int x=r.nextInt(4),y=0;
            int x1=width-r.nextInt(4),y1=0;
            for(int i=0;i<interLine;i++){
                g.setColor(lineColor==null?getRandomColor():lineColor);
                y=r.nextInt(height-r.nextInt(4));
                y1=r.nextInt(height-r.nextInt(4));
                g.drawLine(x,y,x1,y1);
            }
        }

        //寫驗證碼
        int fsize=(int)(height*0.8);//字體大小為圖片高度的80%
        int fx=0;
        int fy=fsize;
        g.setFont(new Font(Font.SANS_SERIF,Font.PLAIN,fsize));
        //寫字符
        for(int i=0;i<textCode.length();i++){
            fy=randomLocation?(int)((Math.random()*0.3+0.6)*height):fy;//每個字符高低是否隨機
            g.setColor(foreColor==null?getRandomColor():foreColor);
            g.drawString(textCode.charAt(i)+"",fx,fy);
            fx+=(width / textCode.length()) * (Math.random() * 0.3 + 0.8); //依據寬度浮動
        }
View Code
第二部分
 1 //扭曲圖片
 2         shearX(g, width, height, backColor);
 3         shearY(g, width, height, backColor);
 4
 5         // 添加噪點
 6         float yawpRate = 0.05f;// 噪聲率
 7         int area = (int) (yawpRate * width * height);//噪點數量
 8         for (int i = 0; i < area; i++) {
 9             int xxx = r.nextInt(width);
10             int yyy = r.nextInt(height);
11             int rgb = getRandomColor().getRGB();
12             image.setRGB(xxx, yyy, rgb);
13         }
14         g.dispose();
15         return image;
16
17     }
18
19      /**
20      * 產生隨機顏色
21      * @return
22      */
23     private static Color getRandomColor(){
24         Random r=new Random();
25         Color c=new Color(r.nextInt(256),r.nextInt(256),r.nextInt(256));
26         return c;
27     }
View Code
第三部分
 1  private static void shearX(Graphics g, int w1, int h1, Color color) {
 2         Random random=new Random();
 3         int period = 2;
 4
 5         boolean borderGap = true;
 6         int frames = 1;
 7         int phase = random.nextInt(2);
 8
 9         for (int i = 0; i < h1; i++) {
10             double d = (double) (period >> 1)
11                     * Math.sin((double) i / (double) period
12                             + (2.2831853071795862D * (double) phase)
13                             / (double) frames);
14             g.copyArea(0, i, w1, 1, (int) d, 0);
15             if (borderGap) {
16                 g.setColor(color);
17                 g.drawLine((int) d, i, 0, i);
18                 g.drawLine((int) d + w1, i, w1, i);
19             }
20         }
21
22     }
23
24     private static void shearY(Graphics g, int w1, int h1, Color color) {
25         Random random=new Random();
26         int period = random.nextInt(40) + 10; // 50;
27
28         boolean borderGap = true;
29         int frames = 20;
30         int phase = random.nextInt(2);
31         for (int i = 0; i < w1; i++) {
32             double d = (double) (period >> 1)
33                     * Math.sin((double) i / (double) period
34                             + (2.2831853071795862D * (double) phase)
35                             / (double) frames);
36             g.copyArea(i, 0, 1, h1, 0, (int) d);
37             if (borderGap) {
38                 g.setColor(color);
39                 g.drawLine(i, (int) d, i, 0);
40                 g.drawLine(i, (int) d + h1, i, h1);
41             }
42
43         }
44
45     }
46 }
View Code
java生成簡單驗證碼圖片