
學習搭建 Consul 服務發現與服務網格-有豐富的示例和圖片
阿新 • • 發佈:2020-11-21
[TOC]
## 第一部分:Consul 基礎
### 1,Consul 介紹
官網文件描述:Consul 是一個網路工具,提供功能齊全的服務網格和服務發現。
它可以做什麼:自動化網路配置,發現服務並啟用跨任何雲或執行時的安全連線。
那麼,我們對 Consul 的理解,就是服務網格、服務發現,官網文件說的這兩個特徵,到底是啥意思?跨什麼雲?
下面,我們將通過實踐操作,逐漸瞭解 Consul,搭建出一個真實的 Consul 服務來體驗。
### 2,安裝 Consul
兩臺伺服器上都需要安裝 Consul,具體步驟可以參考下面的說明。
#### Ubuntu/Debian 系統
```shell
# 新增 GPG key
curl -fsSL https://apt.releases.hashicorp.com/gpg | sudo apt-key add -
# 新增 倉庫
# 如果執行後提示 apt-add-repository: command not found
# 可先安裝: apt-get install software-properties-common
sudo apt-add-repository "deb [arch=amd64] https://apt.releases.hashicorp.com $(lsb_release -cs) main"
# 更新源以及安裝 consul
sudo apt-get update && sudo apt-get install consul
```
#### Centos/RHEL 系統
```shell
# 使用 yum-config-manager 管理倉庫
sudo yum install -y yum-utils
# 連線倉庫
sudo yum-config-manager --add-repo https://rpm.releases.hashicorp.com/RHEL/hashicorp.repo
# 安裝
sudo yum -y install consul
```
#### 檢查安裝
可輸入 `consul` 檢查是否安裝成功,如果有資訊輸出即說明安裝成功。
```shell
root@50skbjiynxyxkcfh:~# consul
Usage: consul [--version] [--help] []
Available commands are:
acl Interact with Consul's ACLs
agent Runs a Consul agent
catalog Interact with the catalog
config Interact with Consul's Centralized Configurations
connect Interact with Consul Connect
debug Records a debugging archive for operators
event Fire a new event
exec Executes a command on Consul nodes
... ...
```
### 3,執行 Consul Agent
文章一般都會說一個 Consul 服務或者一個 Consul 例項,官網文件稱為 Agent,這個要記住。為了避免誤解,本文提到的代理指 proxy,一般使用 proxy 和 agent 單詞說明。
Agent 可以以伺服器模式(server mode)或客戶端模式(client mode)執行,多個Agent 組成一個 Consul datacenter,每個 Consul datacenter 至少有一個 Agent 屬於 伺服器模式。
官方不建議單伺服器部署。
#### 啟動 agent
前面說到過,agent 表示一個 Consul 例項。
因為現在處於探索實踐階段,為了避免各種加密安全問題等,我們需要使用 `-dev` 引數,以開發模式啟動。
```shell
# $> consul agent
# Runs a Consul agent
consul agent -dev
```
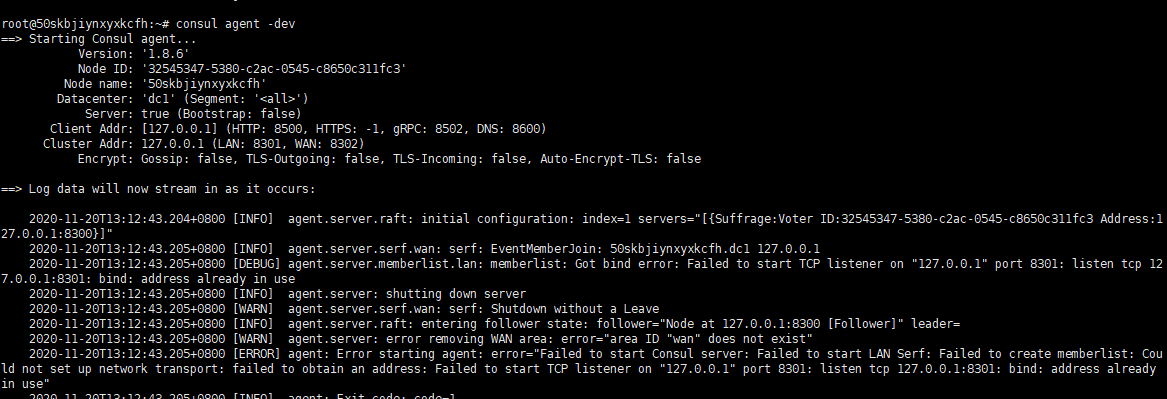
執行這個命令後,consul 會被啟動起來,並且佔用終端。
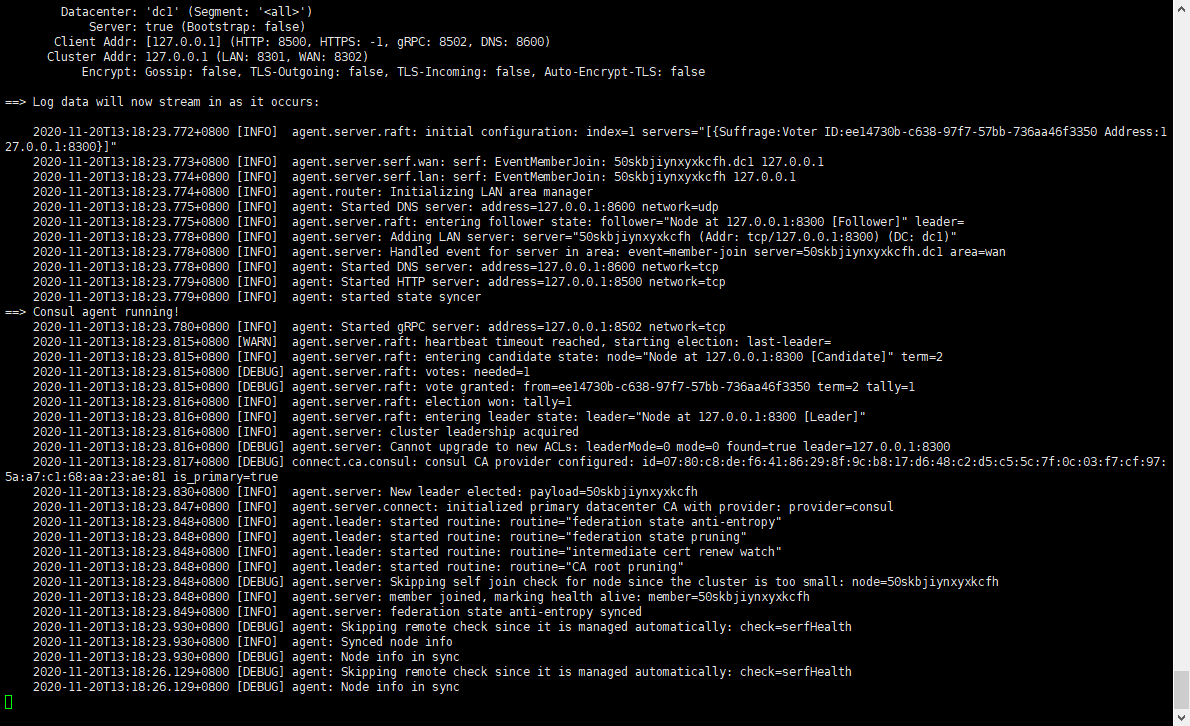
啟動過程中注意留意資訊,如果啟動失敗,需要自行根據提示解決問題。如埠衝突:
#### 發現數據中心成員
執行 `consul members` 命令可以發現數據中心成員。
```
root@50skbjiynxyxkcfh:~# consul members
Node Address Status Type Build Protocol DC Segment
50skbjiynxyxkcfh 172.31.0.6:8301 alive client 0.5.2 2 dc1
```
意思是檢查當前 Consul 服務的成員組成,目前是單伺服器,所以只有一個成員。
這裡不需要留意有什麼用途,只要記得這個命令就行,後面我們會使用到這個命令檢視資訊。
#### 檢視 UI
假如伺服器 IP 是 172.31.0.6 ,則可以通過 http://172.31.0.6:8500 訪問 consul 的 UI服務(http apis)。
### 4,在 Consul Service Discovery 中註冊服務
本小節將介紹 Consul 中的一些網路知識,埠與dns的說明;
然後通過例項講解如何定義服務以及註冊服務到 Consul 中 -- Consul 服務發現。
#### 埠
這裡先說明一些 Consul 的埠。
官網文件:Before running Consul, you should ensure the following bind ports are accessible.
翻譯:在執行 Consul 之前,需要確保以下埠都是可以訪問的。
文件地址:[https://www.consul.io/docs/install/ports.html](https://www.consul.io/docs/install/ports.html)
對於一些重要的配置,要檢視**官方文件原版**,別百度,很多文章只是機器翻譯或者 copy 命令,會讓你進坑的。
| Use | Default Ports |
| :----------------------------------------------------------- | :--------------- |
| DNS: The DNS server (TCP and UDP) | 8600 |
| HTTP: The HTTP API (TCP Only) | 8500 |
| HTTPS: The HTTPs API | disabled (8501)* |
| gRPC: The gRPC API | disabled (8502)* |
| LAN Serf: The Serf LAN port (TCP and UDP) | 8301 |
| Wan Serf: The Serf WAN port (TCP and UDP) | 8302 |
| server: Server RPC address (TCP Only) | 8300 |
| Sidecar Proxy Min: Inclusive min port number to use for automatically assigned sidecar service registrations. | 21000 |
| Sidecar Proxy Max: Inclusive max port number to use for automatically assigned sidecar service registrations. | 21255 |
*For `HTTPS` and `gRPC` the ports specified in the table are recommendations.
* 8500(http)、8501(https)、8502(gRPC) 三個介面可以通過遠端請求呼叫相關的服務,或者直接訪問。
* 8501,8502 兩個埠都是 disabled,所以我們可以先看一下 8500 埠的作用,其他埠後面慢慢用到再解釋。
開啟你的瀏覽器,訪問 `http://{你的ip}:8500`,會發現跳到了一個 UI 介面。
* 如果要檢視埠被哪個程序佔用,可以使用 ` lsof -i:8081` 命令,8081 是要查詢的埠。
#### 定義服務
本小節講解如何通過配置檔案以及命令形式,定義服務並向 Consul 註冊服務。
開啟或新建(如果不存在) `/etc/consul.d` 目錄,後面使用此目錄作為 Consul 配置檔案的存放位置。
在目錄中新建一個 web.json 檔案,用於定義服務。
```shell
touch web.json
```
編輯檔案,修改其內容為:
```csharp
{
"service": {
"name": "web",
"tags": [
"rails"
],
"port": 8080
}
}
```
埠可自由設定;這裡定義了一個名稱為 web 的服務,其埠為 8080。
#### 使用配置啟動服務
我們定義配置目錄和配置檔案後,可以使用配置檔案重新啟動節點:
```csharp
consul agent -dev -enable-script-checks -config-dir=/etc/consul.d
```
`-enable-script-checks` 可以開啟配置檔案檢查,增強安全性,因為配置檔案可以啟用指令碼,導致可能會引入一個遠端執行漏洞。當然,本文的實踐步驟還用不上,這裡先預熱。
如無意外,會提示以下資訊:
```
2020/11/21 10:09:25 [INFO] agent: Synced service "web"
2020/11/21 10:09:25 [DEBUG] agent: Node info in sync
2020/11/21 10:09:25 [DEBUG] agent: Service "web" in sync
2020/11/21 10:09:25 [DEBUG] agent: Node info in sync
```
#### 如何重新載入配置檔案
如果你修改了配置檔案,可以使用命令讓 Consul 重新載入配置檔案,而無需重啟。
```shell
$ consul reload
Configuration reload triggered
```
### 5,查詢服務
我們將服務新增到 Consul 後,可以使用 DNS介面 或 HTTP API 對其進行查詢,其它應用可以通過 Consul 網路介面查詢到 Consul 提供了什麼服務,這就是服務發現(不知道我的理解對不對)。
#### 通過 HTTP API
通過 Consul HttpAPI 服務,我們可以查詢到服務列表,其 URL 為 `/v1/catalog/service/web` 。
通過命令查詢:
```
curl http://localhost:8500/v1/catalog/service/web
```
也可以使用瀏覽器訪問。
返回的 json 中列出了所有服務節點,以及每個服務例項的資訊、狀態,根據 json 資訊,可以發現服務。
當你發現服務後,可以通過 json 中的資訊,獲取服務的 ip 和埠,這樣就可以正式連線到這個服務了。
#### 通過 UI 查詢
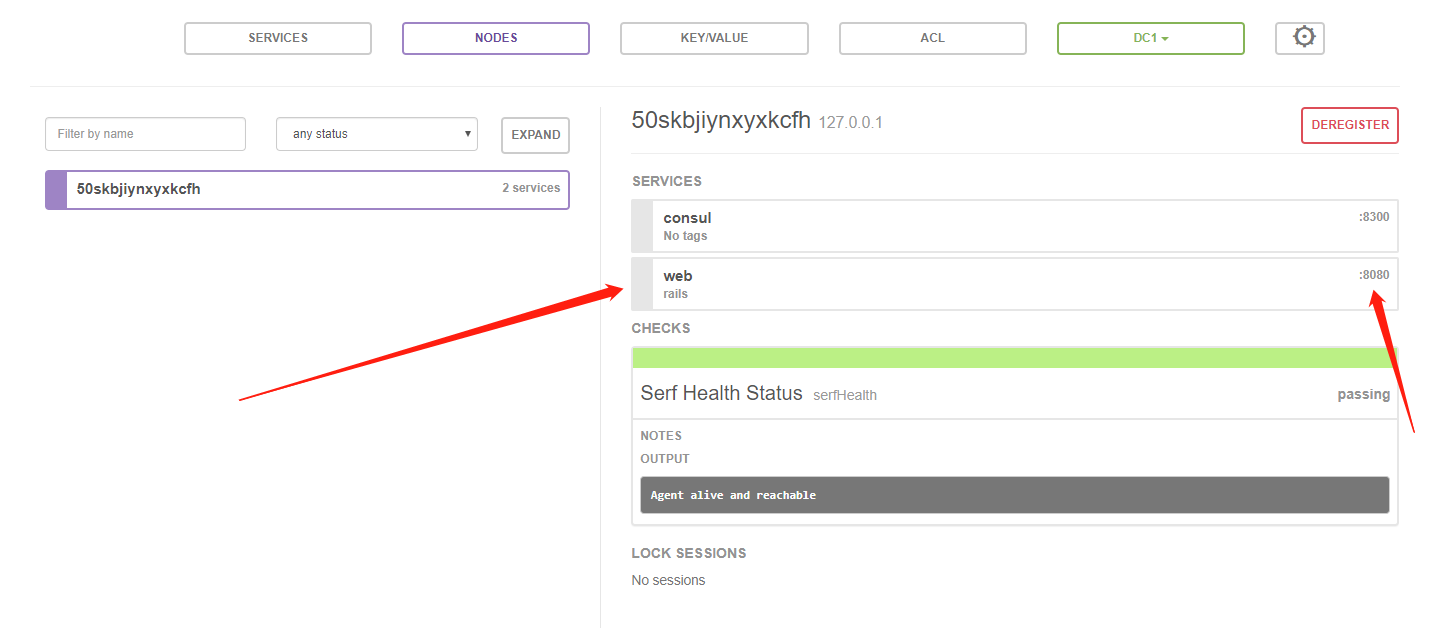
訪問 `http://{你的ip}:8500` ,在 UI 上會發現註冊了一個叫 web 的服務。
### 6,DNS 知識與查詢
#### 基礎知識
Linux 中,dig 命令用於查詢一個域名的 DNS 資訊,使用示例:
```shell
dig baidu.com
```
```
... ...
baidu.com. 375 IN A 220.181.38.148
baidu.com. 375 IN A 39.156.69.79
... ...
```
DNS 查詢的標準埠號是 53,通過這個埠號,可以向 DNS 伺服器查詢更多的域名資訊。
DNS 有 A 記錄(解析到 IP)、CNAME(別名,解析到域名)等型別,有興趣的話自行查詢資料瞭解。
dig 命令請參考 https://linux.die.net/man/1/dig
dig 的其中一個查詢格式為:
```
dig [@server] [-p {port}] [name]
```
`dig @127.0.0.1 -p 8600` 是指定 8600 埠作為 DNS 服務查詢的埠;name 名稱則表示要指定查詢的資源名稱。
記住這個查詢格式。
#### 通過 DNS 查詢 Consul 服務資訊
前面已經註冊了 web 服務,那麼 如何通過 Consul 的 DNS 介面(8600埠)查詢 web 服務的資訊?
可在在預設主機上執行:
```shell
dig @127.0.0.1 -p 8600 web.service.consul
```
關於 dig 命令,前面已經講解了,`web.service.consul` 就是 `[name]` 部分。 Consul 會將註冊的服務名稱加上 `.service.consul` 做為命名。
那麼,查詢這個 DNS 有啥用?這裡先記下來,後面我們繼續搗鼓。
#### 小結
目前我們已經學會使用 命令註冊服務,但是因為只是 “配置” 了一下,web(8080埠)服務,壓根不存在真正的服務。後面我們將通過部署真實的 web 服務,然後註冊到 Consul 中。
### 7,將資料儲存在Consul KV 中
開啟你的 Consul UI 介面,如圖:

你可以通過 UI 介面建立鍵值資料,也可以通過命令列形式 CURD 鍵值資料。命令列示例如下:
增加或修改:
```
consul kv put {key} {value}
```
獲取值:
```
consul kv get {key}
```
刪除鍵:
```
consul kv delete {key}
```
示例:
```
consul kv put name 痴者工良
```
## 第二部分:深入 Consul
本章內容介紹如何使用 Consul Service Mesh 連線服務、代理服務;建立資料中心,部署多個例項;
### 8,Consul Service Mesh
#### 瞭解 Consul Service Mesh
Consul Service Mesh 是通過基於身份的授權、L7流量管理和服務對服務加密,為現代應用程式網路和安全性建立一致的平臺。
它有什麼用處?
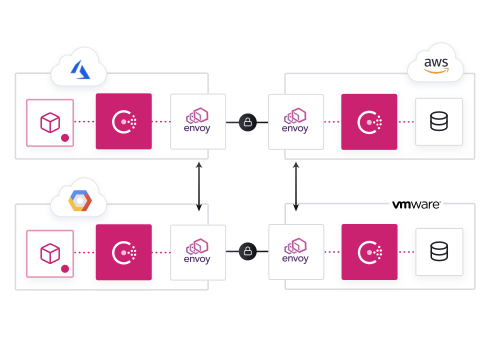
例如,在多個叢集和環境之間聯合領事,建立一個全球服務網格。跨平臺一致地應用策略和安全。如下圖所示:
筆者注:[envoy](https://www.envoyproxy.io/) 是第三方開源邊緣和服務代理,並不是 Consul 的功能,Consul 自帶的是 Consul connect。
[Consul Service Mesh](https://www.consul.io/use-cases/multi-platform-service-mesh) 應用場景可參考:[https://www.consul.io/use-cases/multi-platform-service-mesh](https://www.consul.io/use-cases/multi-platform-service-mesh)
Consul Service Mesh 可以通過代理將多臺伺服器中的服務關聯起來,使得其能夠通過專用網路相互訪問。
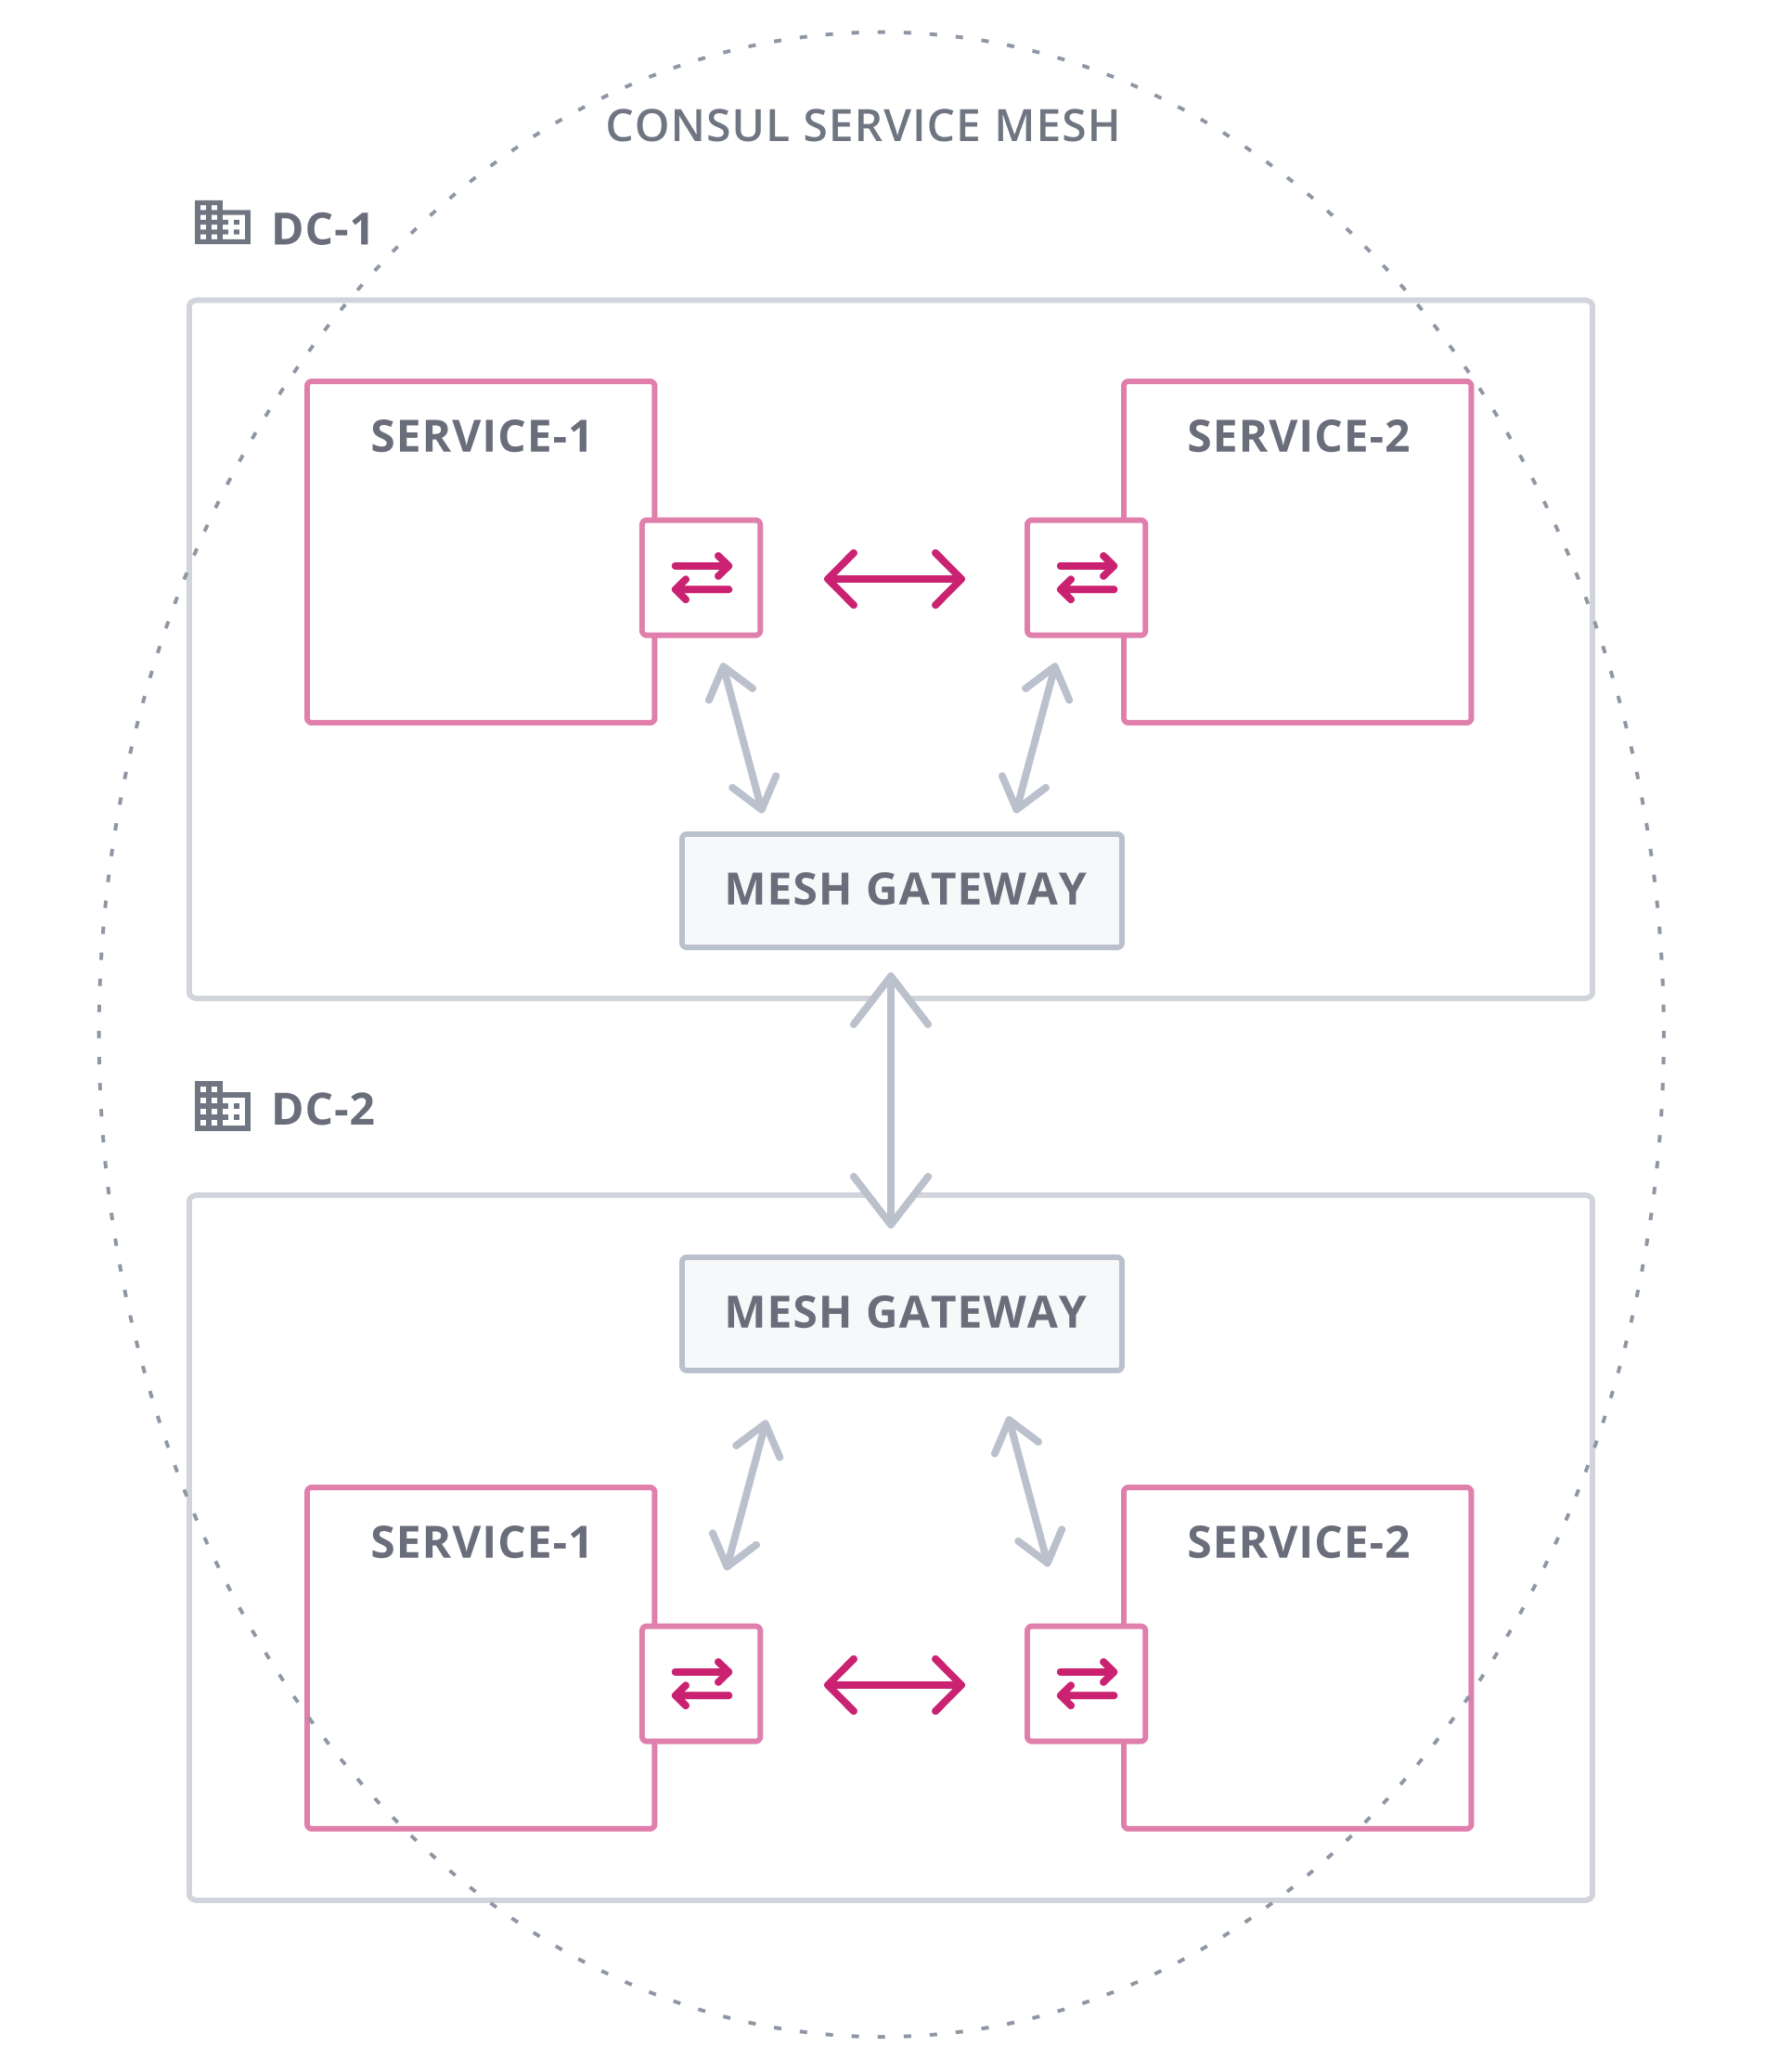
詳細請點選 [https://www.consul.io/docs/connect/gateways/mesh-gateway](https://www.consul.io/docs/connect/gateways/mesh-gateway)
#### 部署真實服務
在 Consul 官網文件,使用了 socat 來演示一個服務,並註冊到 Consul 中,,筆者覺得過於麻煩,這裡筆者為了更好地學習 Consul ,使用 rust 編寫了一個輕量的 web 服務,Windows 大小 4MB,Linux 下 8MB,無需安裝任何依賴。
建議讀者使用筆者寫的這個 Web demo 作為真實服務部署,這個 demo 已開源,下載地址:
https://github.com/whuanles/consulweb/releases
下載檔案完畢後,上傳到伺服器空目錄中。
為了自定義繫結 web 服務地址,需要新建一個 option.txt 檔案,其內容如下:
```
0.0.0.0:8081
```
快速建立檔案命令:
```
echo "0.0.0.0:8081" > option.txt
```
Web 服務支援部署靜態檔案,你可以新建靜態網頁檔案如 index.html,放到程式目錄下,然後通過繫結的 ip 和埠即可訪問。
記得給 web 賦予許可權:
```
chmod +x web
```
執行 `./web` 啟動 web 服務,執行 `nohup ./web &` 後臺 執行 web 服務。
這樣我們就有一個真實的 web 服務了,大家可以使用瀏覽器訪問測試。
#### 真實註冊服務
使用筆者或者自定義編寫的服務後,需要將這個服務註冊到 Consul 中。
在 /etc/consul.d 目錄,新建 `realweb.json` 檔案。
```json
{
"service": {
"name": "realweb",
"port": 8081,
"connect": {
"sidecar_service": {}
}
}
}
```
然後執行 `consul reload` 重新載入配置檔案。
#### 註冊代理
為啥要註冊代理呢?
前面經過實踐,我們已經學會了註冊服務以及服務發現,一開始介紹 Consul 時,我們還看到 “Consul 提供功能強大的 服務網格”、“安全的連線” 等,那麼我們通過這裡的步驟(代理),就是體會 Consul 的這個特徵功能。
前面已經註冊了 `realweb` 這個服務,現在我們開啟代理,在新的終端視窗,執行:
```shell
consul connect proxy -sidecar-for realweb
```

可以看到,Consul 使用 21000 埠來代理 realweb 服務。
這個代理功能稱為 Consul Connect。
但是這個埠是不能訪問的,其基本結構如下:
```
源 代理後
------------------ ------------------
|8081 <---> 21000| <----> |21001 <---> 9191|
------------------ ------------------
```
8081(源) 和 9191(代理的埠) 都可以訪問,21000 和 21001 都是屬於橋接埠,不能訪問。
#### 代理服務
前面註冊 realweb 代理服務後(`8081 <---> 21000`),我們開始對其進行代理(`21001 <---> 9191`)。
這裡的代理,是通過 Consul Service Mesh 使用 Sidecar 代理將**服務相互連線**,這種功能就叫 **服務網格**。
```
源 代理後
-------------------------- --------------------------
|8081 <-----------> 21000| <--------> |21001 <-----------> 9191|
| Consul Connect | Sidecar | Consul Connect |
-------------------------- --------------------------
```
為了實現代理,需要建立新的配置檔案,註冊服務。
新建一個終端視窗,在 `/etc/consul.d/` 目錄新建一個 proxyweb.json 檔案。
其內容如下:
```json
{
"service": {
"name": "proxyweb",
"connect": {
"sidecar_service": {
"proxy": {
"upstreams": [
{
"destination_name": "realweb",
"local_bind_port": 9191
}
]
}
}
}
}
}
```
可以將 Connect 代理的每個上游配置為通過網狀閘道器進行路由。`local_bind_port` 表示代理服務後,使用哪個埠作為代理埠。
繫結的代理埠可能是以下幾種情況(這裡直接搬文件):
- [`local`](https://www.consul.io/docs/connect/gateways/mesh-gateway#local)-在這種模式下,Connect代理建立與同一資料中心中執行的閘道器的出站連線。然後,該閘道器負責確保將資料轉發到目標資料中心中的閘道器。
- [`remote`](https://www.consul.io/docs/connect/gateways/mesh-gateway#remote)-在此模式下,Connect代理建立與目標資料中心中執行的閘道器的出站連線。然後,該閘道器將資料轉發到最終目標服務。
- [`none`](https://www.consul.io/docs/connect/gateways/mesh-gateway#none) -在此模式下,不使用閘道器,並且Connect代理將其出站連線直接連線到目標服務。
建立配置完畢後(註冊服務),執行 `consul reload` 重新載入配置檔案。
然後執行命令開始代理服務。
```shell
consul connect proxy -sidecar-for proxyweb
```
#### 驗證代理
建立代理完畢後,我們檢查代理是否正常。
新建一個終端視窗,執行訪問目錄:
```
curl http://127.0.0.1:9191
```
```
root@50skbjiynxyxkcfh:~# curl http://127.0.0.1:9191
記得給筆者 痴者工良 點一下贊喲~~~ ``` 原本 `realweb` 服務暴露的埠為 `8081`,然後建立一個叫 proxyweb 的代理,其埠變成 `9191`,之後我們可以使用 `9191` 來訪問這個 `realweb` 服務。 下圖是從[官網](https://learn.hashicorp.com/tutorials/consul/service-mesh-with-envoy-proxy)淘過來的,大家可以根據圖片理解一下 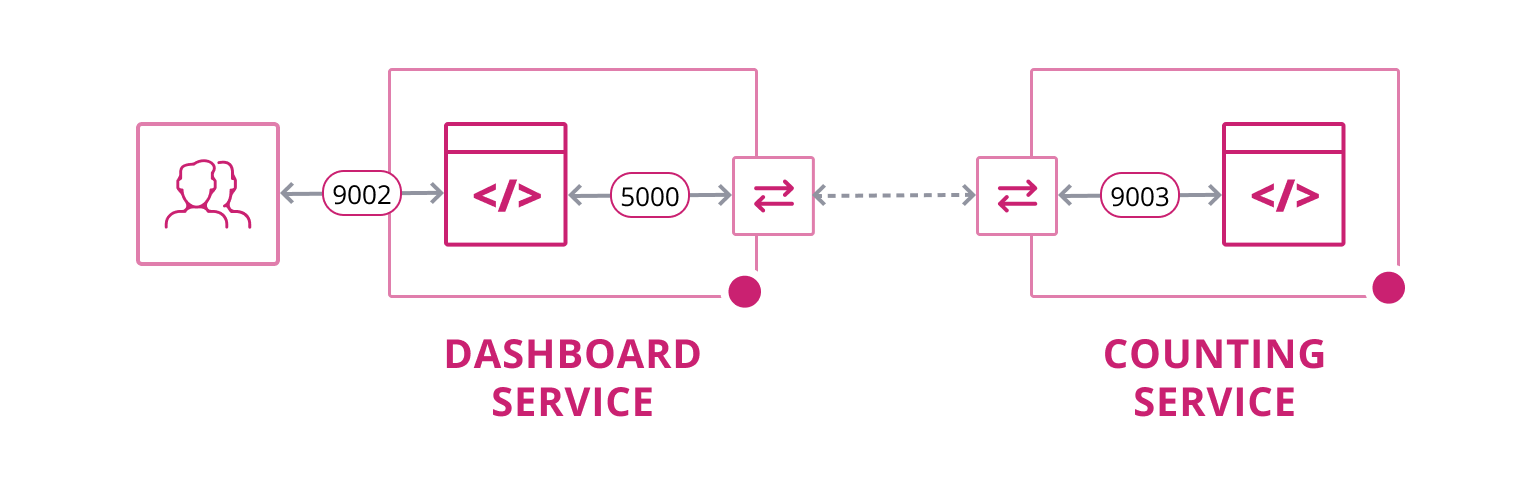 假如搭建了一個微服務,其中一臺主機有個服務是 redis,埠是 9003,你會把 redis 暴露到公網上麼?肯定不能呀,於是通過代理功能,將 redis 服務代理到另一臺 web 伺服器,埠變成 5000,web 程式可以訪問 redis 服務,但是外界不能訪問。 然後 web 提供 9002 埠給使用者,使用者可以訪問 web 網頁服務。 #### UI 介面檢視 開啟 Consul 介面,可以看到代理服務。 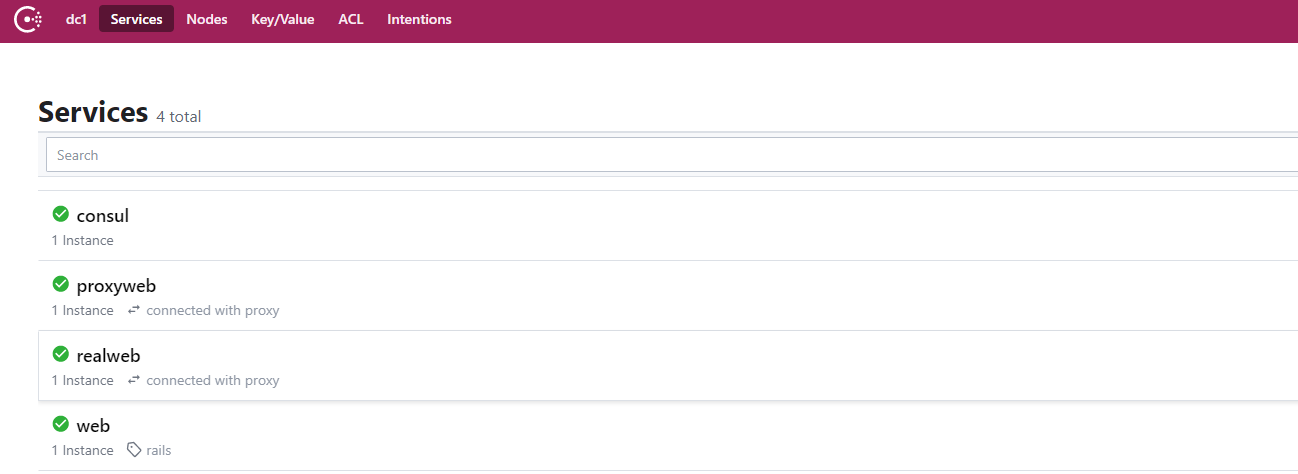 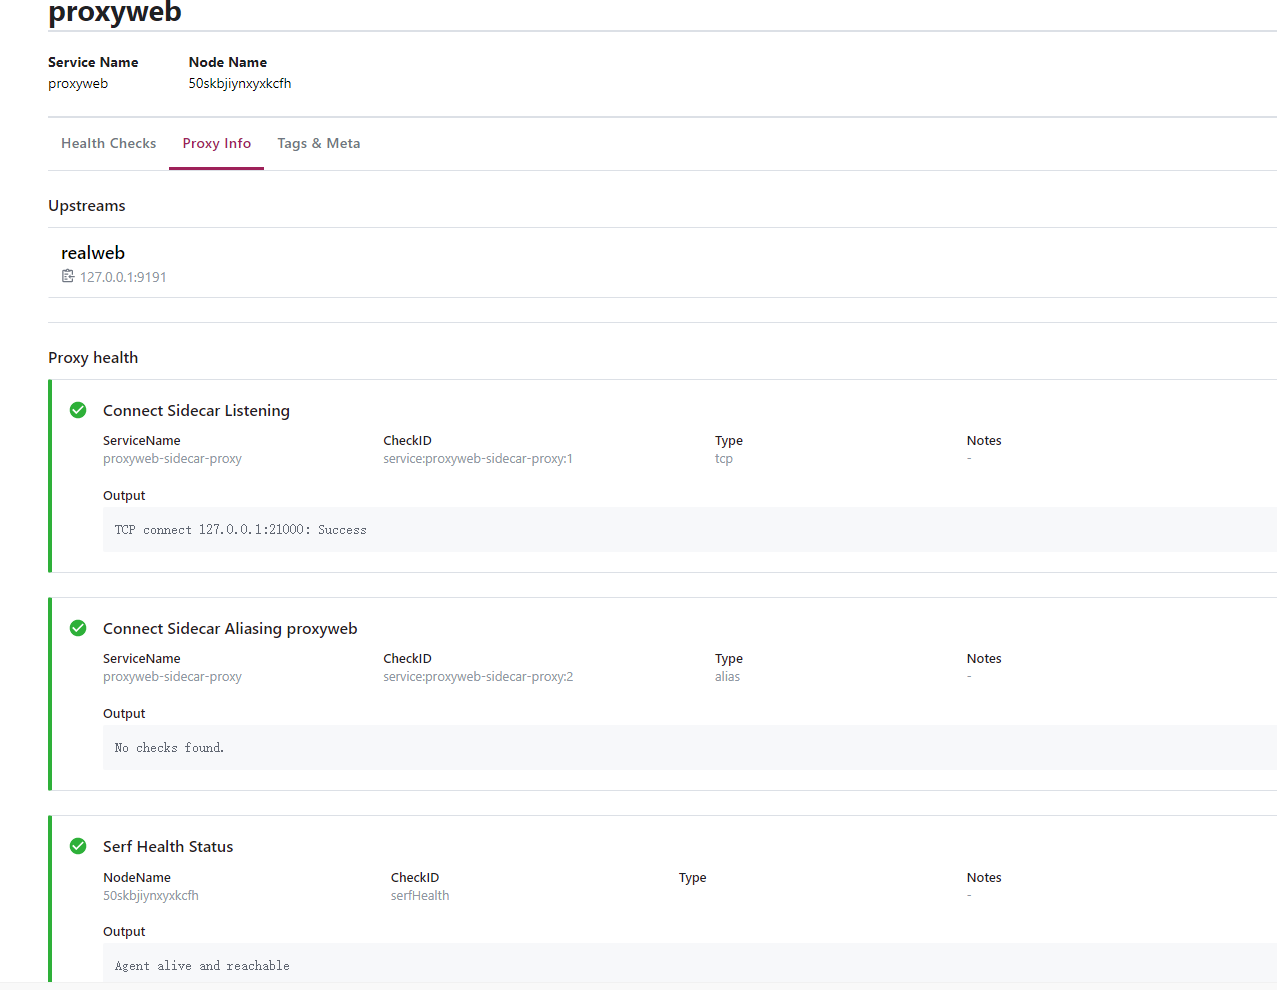 ### 9,Consul 叢集/資料中心 本章內容將介紹如何將兩臺伺服器的 Agent 關聯起來,建立資料中心。 #### 開始準備 這裡需要兩臺伺服器才行,當然官方文件提供了使用虛擬機器的方法部署另一個系統,但是這裡不提倡,還是老老實實搞兩臺伺服器實際,不然你學啥叢集和微服務。。。 在 Linux 快速部署虛擬機器:https://learn.hashicorp.com/tutorials/consul/get-started-create-datacenter?in=consul/getting-started 切換到副伺服器/虛擬機器中,按照前面第二小節的安裝教程,安裝 consul。 在 **主伺服器**上,停止 Consul,並關閉其它終端視窗,只留一個終端視窗就行。 ``` root@50skbjiynxyxkcfh:~# top | grep consul 32318 root 20 0 785168 66096 49008 S 1.3 3.2 13:52.93 consul root@50skbjiynxyxkcfh:~# kill 32318 ``` #### 啟動 Consul 中心 在主伺服器中執行以下命令,啟動 Consul 例項。 ```shell # -bind 填寫子網ip或公網ip,另一臺伺服器可以訪問的ip consul agent \ -dev -server \ -bootstrap-expect=1 \ -node=agent-one \ -bind=172.31.0.6 \ -data-dir=/tmp/consul \ -config-dir=/etc/consul.d ``` - [`server`](https://learn.hashicorp.com/tutorials/consul/get-started-create-datacenter?in=consul/getting-started#server)-提供此標誌表示您希望代理以伺服器模式啟動。 - [`-bootstrap-expect`](https://learn.hashicorp.com/tutorials/consul/get-started-create-datacenter?in=consul/getting-started#bootstrap-expect)-這告訴 Consul datacenter 總共應該有多少臺伺服器。 - [`-node`](https://learn.hashicorp.com/tutorials/consul/get-started-create-datacenter?in=consul/getting-started#node)-資料中心中的每個節點必須具有唯一的名稱。 - [`-bind`](https://learn.hashicorp.com/tutorials/consul/get-started-create-datacenter?in=consul/getting-started#bind)-這是該代理將偵聽其他 Consul 成員進行通訊的地址。填子網ip或公網ip。 - [`data-dir`](https://learn.hashicorp.com/tutorials/consul/get-started-create-datacenter?in=consul/getting-started#data-dir)-此標誌告訴 Consul Agent 他們應將狀態儲存在哪裡,其中可以包括伺服器和客戶端的敏感資料(如ACL令牌)。 - [`config-dir`](https://learn.hashicorp.com/tutorials/consul/get-started-create-datacenter?in=consul/getting-started#config-dir)-此標誌告訴Consul在哪裡尋找其配置。 啟動成功後,會提示: ```shell 2020-11-21T07:46:59.903+0800 [INFO] agent.server: federation state anti-entropy synced 2020-11-21T07:46:59.903+0800 [INFO] agent: Synced node info 2020-11-21T07:46:59.911+0800 [INFO] agent: Synced service: service=web 2020-11-21T07:46:59.923+0800 [INFO] agent: Synced service: service=proxyweb 2020-11-21T07:46:59.939+0800 [INFO] agent: Synced service: service=proxyweb-sidecar-proxy 2020-11-21T07:46:59.961+0800 [INFO] agent: Synced service: service=realweb 2020-11-21T07:46:59.971+0800 [INFO] agent: Synced service: service=realweb-sidecar-proxy ``` * 如果有報 realweb、proxy 代理錯誤的資訊,可以忽略掉。 #### 啟動客戶端 在副伺服器上,執行以下命令啟動一個新的 Agent。 ```shell consul agent \ -node=agent-two \ -bind=172.31.0.7 \ -enable-script-checks=true \ -data-dir=/tmp/consul \ -config-dir=/etc/consul.d ``` #### 檢查成員資訊 到目前為止,我們有兩臺伺服器,每臺伺服器都部署了 Consul 例項,但是他們都是獨立的,還沒有被關聯起來。 我們可以在每臺伺服器上執行以下命令檢查其成員資訊: ``` consul members ``` ```shell # consul server 1 Node Address Status Type Build Protocol DC Segment agent-one 172.31.0.6:8301 alive server 1.8.6 2 dc1 # consul server 2 Node Address Status Type Build Protocol DC Segment agent-two 172.31.0.7:8301 alive client 1.8.6 2 dc1
```
#### 關聯伺服器
現在,我們把副伺服器(172.31.0.7)加入到主伺服器(172.31.0.6)中。
在副伺服器上執行以下命令:
```
consul join 172.31.0.6
```
重新在每臺伺服器下執行 `consul members` 命令檢視成員資訊:
```shell
# consul server 1
Node Address Status Type Build Protocol DC Segment
agent-one 172.31.0.6:8301 alive server 1.8.6 2 dc1
agent-two 172.31.0.7:8301 alive client 1.8.6 2 dc1
# consul server 2
Node Address Status Type Build Protocol DC Segment
agent-one 172.31.0.6:8301 alive server 1.8.6 2 dc1
agent-two 172.31.0.7:8301 alive client 1.8.6 2 dc1
```
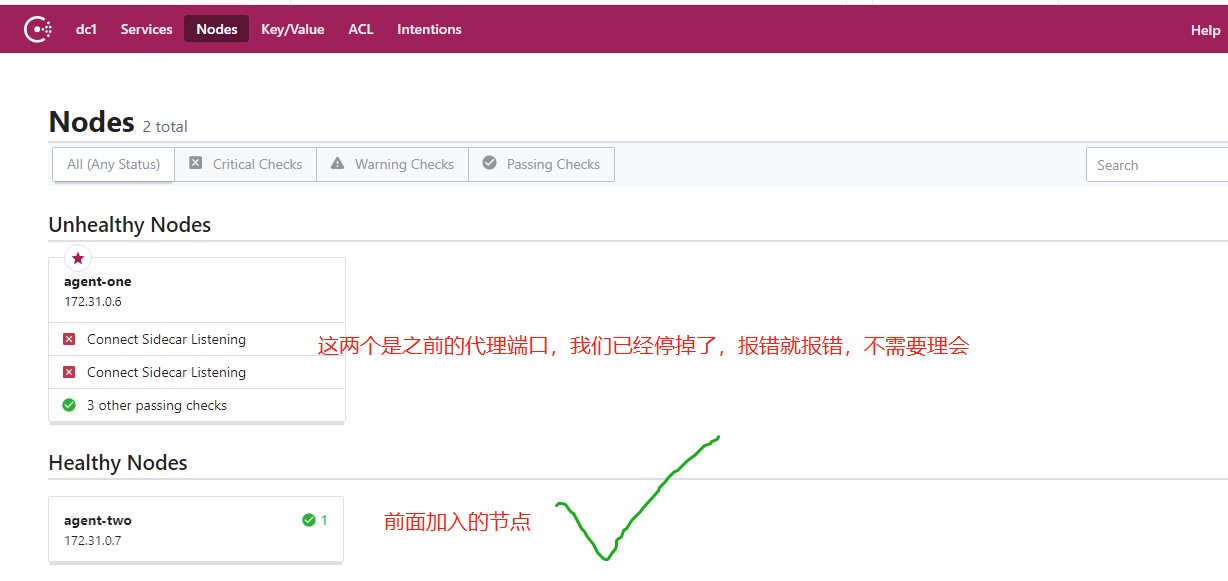
#### 開啟 UI 檢視服務節點資訊
開啟 Consul UI 介面(8500埠),點選 Nodes ,即可看到 Consul 所有伺服器節點。
### 10,叢集代理服務
本章內容講述如何通過代理功能,將一臺主機的服務在代理到另一臺伺服器中訪問。
#### 提供代理服務
在主伺服器上把 proxyweb 終端關掉(已關掉請忽略),進入 /etc/consul.d 目錄把 proxyweb.json
刪除,重新載入配置:
```
consul reload
```
然後啟動代理功能(Consul connect):
```shell
consul connect proxy -sidecar-for realweb
```
#### 另一臺伺服器代理
在副伺服器的 `/etc/consul.d/` 目錄中,新建一個 proxyweb.json 檔案,其內容如下:
```json
{
"service": {
"name": "proxyweb",
"connect": {
"sidecar_service": {
"proxy": {
"upstreams": [
{
"destination_name": "realweb",
"local_bind_port": 9191
}
]
}
}
}
}
}
```
重新載入配置:
```shell
consul reload
```
啟動代理服務
```shell
consul connect proxy -sidecar-for proxyweb
```
#### 驗證代理
在副伺服器開啟新的視窗,執行:
```
curl http://127.0.0.1:9191
```
發現
```
記得給筆者 痴者工良 點一下贊喲~~~ ``` 說明通過代理服務,可以將一臺主機的服務(埠),在另一臺主機上使用別的埠(相同埠也可以)訪問這個服務。 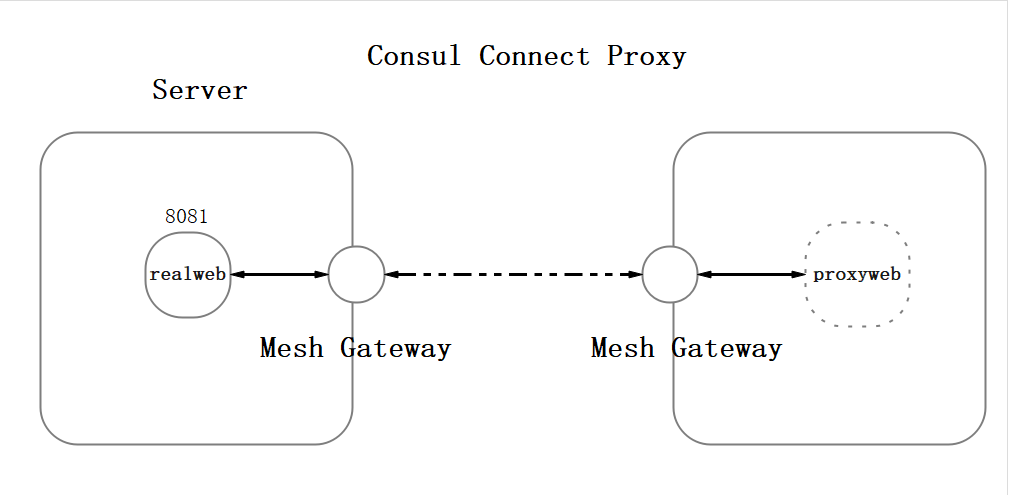 關於 Consul 入門的教程就到這裡為止~後面筆者會繼續寫 Consul ,歡迎關注~
恭喜你,部署 Consul 服務成功!
記得給筆者 痴者工良 點一下贊喲~~~ ``` 原本 `realweb` 服務暴露的埠為 `8081`,然後建立一個叫 proxyweb 的代理,其埠變成 `9191`,之後我們可以使用 `9191` 來訪問這個 `realweb` 服務。 下圖是從[官網](https://learn.hashicorp.com/tutorials/consul/service-mesh-with-envoy-proxy)淘過來的,大家可以根據圖片理解一下  假如搭建了一個微服務,其中一臺主機有個服務是 redis,埠是 9003,你會把 redis 暴露到公網上麼?肯定不能呀,於是通過代理功能,將 redis 服務代理到另一臺 web 伺服器,埠變成 5000,web 程式可以訪問 redis 服務,但是外界不能訪問。 然後 web 提供 9002 埠給使用者,使用者可以訪問 web 網頁服務。 #### UI 介面檢視 開啟 Consul 介面,可以看到代理服務。   ### 9,Consul 叢集/資料中心 本章內容將介紹如何將兩臺伺服器的 Agent 關聯起來,建立資料中心。 #### 開始準備 這裡需要兩臺伺服器才行,當然官方文件提供了使用虛擬機器的方法部署另一個系統,但是這裡不提倡,還是老老實實搞兩臺伺服器實際,不然你學啥叢集和微服務。。。 在 Linux 快速部署虛擬機器:https://learn.hashicorp.com/tutorials/consul/get-started-create-datacenter?in=consul/getting-started 切換到副伺服器/虛擬機器中,按照前面第二小節的安裝教程,安裝 consul。 在 **主伺服器**上,停止 Consul,並關閉其它終端視窗,只留一個終端視窗就行。 ``` root@50skbjiynxyxkcfh:~# top | grep consul 32318 root 20 0 785168 66096 49008 S 1.3 3.2 13:52.93 consul root@50skbjiynxyxkcfh:~# kill 32318 ``` #### 啟動 Consul 中心 在主伺服器中執行以下命令,啟動 Consul 例項。 ```shell # -bind 填寫子網ip或公網ip,另一臺伺服器可以訪問的ip consul agent \ -dev -server \ -bootstrap-expect=1 \ -node=agent-one \ -bind=172.31.0.6 \ -data-dir=/tmp/consul \ -config-dir=/etc/consul.d ``` - [`server`](https://learn.hashicorp.com/tutorials/consul/get-started-create-datacenter?in=consul/getting-started#server)-提供此標誌表示您希望代理以伺服器模式啟動。 - [`-bootstrap-expect`](https://learn.hashicorp.com/tutorials/consul/get-started-create-datacenter?in=consul/getting-started#bootstrap-expect)-這告訴 Consul datacenter 總共應該有多少臺伺服器。 - [`-node`](https://learn.hashicorp.com/tutorials/consul/get-started-create-datacenter?in=consul/getting-started#node)-資料中心中的每個節點必須具有唯一的名稱。 - [`-bind`](https://learn.hashicorp.com/tutorials/consul/get-started-create-datacenter?in=consul/getting-started#bind)-這是該代理將偵聽其他 Consul 成員進行通訊的地址。填子網ip或公網ip。 - [`data-dir`](https://learn.hashicorp.com/tutorials/consul/get-started-create-datacenter?in=consul/getting-started#data-dir)-此標誌告訴 Consul Agent 他們應將狀態儲存在哪裡,其中可以包括伺服器和客戶端的敏感資料(如ACL令牌)。 - [`config-dir`](https://learn.hashicorp.com/tutorials/consul/get-started-create-datacenter?in=consul/getting-started#config-dir)-此標誌告訴Consul在哪裡尋找其配置。 啟動成功後,會提示: ```shell 2020-11-21T07:46:59.903+0800 [INFO] agent.server: federation state anti-entropy synced 2020-11-21T07:46:59.903+0800 [INFO] agent: Synced node info 2020-11-21T07:46:59.911+0800 [INFO] agent: Synced service: service=web 2020-11-21T07:46:59.923+0800 [INFO] agent: Synced service: service=proxyweb 2020-11-21T07:46:59.939+0800 [INFO] agent: Synced service: service=proxyweb-sidecar-proxy 2020-11-21T07:46:59.961+0800 [INFO] agent: Synced service: service=realweb 2020-11-21T07:46:59.971+0800 [INFO] agent: Synced service: service=realweb-sidecar-proxy ``` * 如果有報 realweb、proxy 代理錯誤的資訊,可以忽略掉。 #### 啟動客戶端 在副伺服器上,執行以下命令啟動一個新的 Agent。 ```shell consul agent \ -node=agent-two \ -bind=172.31.0.7 \ -enable-script-checks=true \ -data-dir=/tmp/consul \ -config-dir=/etc/consul.d ``` #### 檢查成員資訊 到目前為止,我們有兩臺伺服器,每臺伺服器都部署了 Consul 例項,但是他們都是獨立的,還沒有被關聯起來。 我們可以在每臺伺服器上執行以下命令檢查其成員資訊: ``` consul members ``` ```shell # consul server 1 Node Address Status Type Build Protocol DC Segment agent-one 172.31.0.6:8301 alive server 1.8.6 2 dc1 # consul server 2 Node Address Status Type Build Protocol DC Segment agent-two 172.31.0.7:8301 alive client 1.8.6 2 dc1
恭喜你,部署 Consul 服務成功!
記得給筆者 痴者工良 點一下贊喲~~~ ``` 說明通過代理服務,可以將一臺主機的服務(埠),在另一臺主機上使用別的埠(相同埠也可以)訪問這個服務。  關於 Consul 入門的教程就到這裡為止~後面筆者會繼續寫 Consul ,歡迎關注~