
Spring Security系列之極速入門與實踐教程
阿新 • • 發佈:2020-07-24
@[TOC](Spring Security系列之極速入門與實踐教程)
### 1. Spring Security
Spring Security 是 Spring 家族中的一個安全管理框架,應用程式的兩個主要區域是“認證”和“授權”(或者訪問控制)。Spring Security是針對Spring專案的安全框架,也是Spring Boot底層安全模組預設的技術選型
這兩個主要區域是Spring Security 的兩個目標。
* “認證”(Authentication),是建立一個他宣告的主體的過程(一
個“主體”一般是指使用者,裝置或一些可以在你的應用程式中執行動
作的其他系統)。
* “授權”(Authorization)指確定一個主體是否允許在你的應用程式
執行一個動作的過程。為了抵達需要授權的店,主體的身份已經有認
證過程建立。
### 2. 實驗環境準備
環境準備:
* JDK 1.8
* SpringBoot2.2.1
* Maven 3.2+
* 開發工具
* IntelliJ IDEA
* smartGit
建立一個SpringBoot Initialize專案,詳情可以參考我之前部落格:[SpringBoot系列之快速建立專案教程](https://blog.csdn.net/u014427391/article/details/102870300)
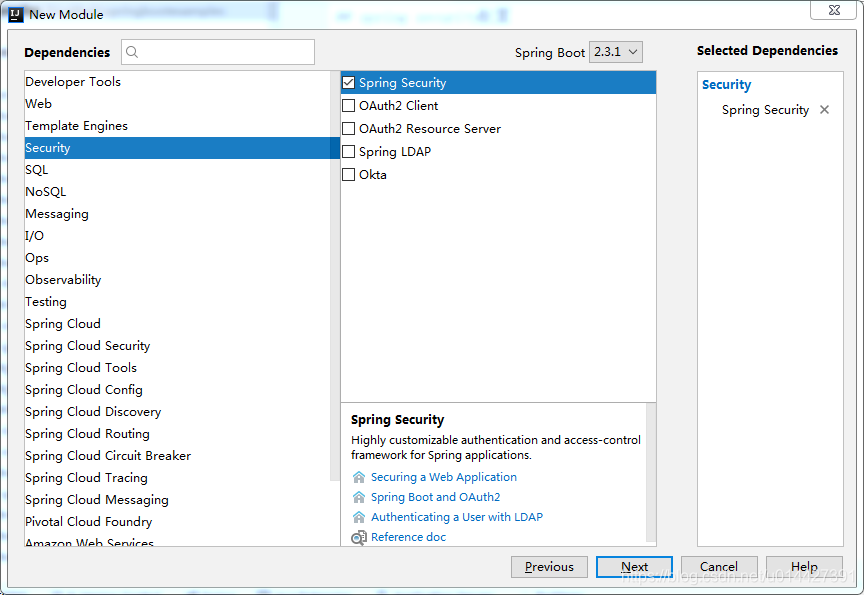
新建專案後,檢查一下spring-boot-starter-security場景啟動器是否配置成功,不需要寫版本
```xml
org.springframework.boot
spring-boot-starter-security
```
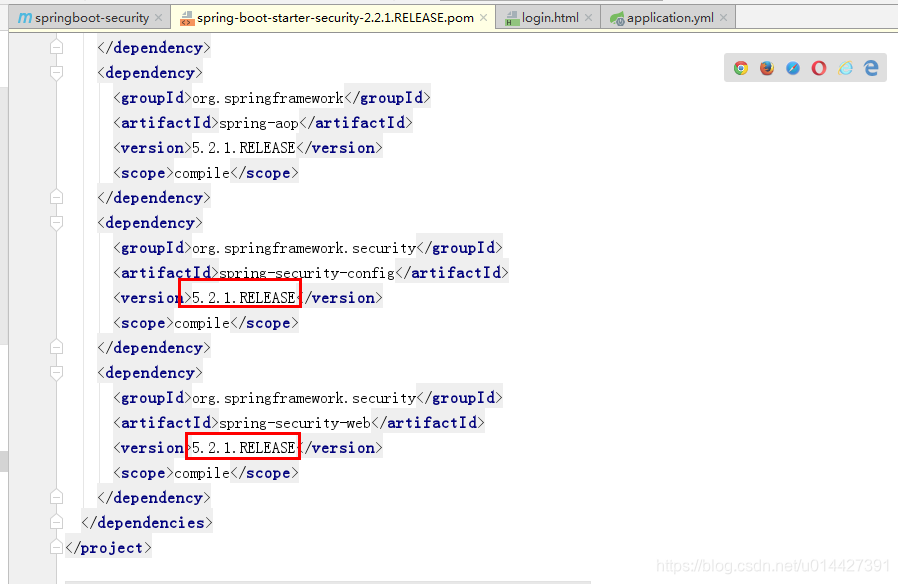
SpringBoot有版本仲裁機制,SpringBoot2.2.1的spring-boot-starter-security依賴的Spring security版本是5.2.1的
### 3. 日誌級別修改
配置Spring Security日誌級別,預設是info的,可以修改為debug
```yaml
## logback配置
logging:
level:
org:
springframework:
security: info
```
### 4. 配置使用者名稱/密碼
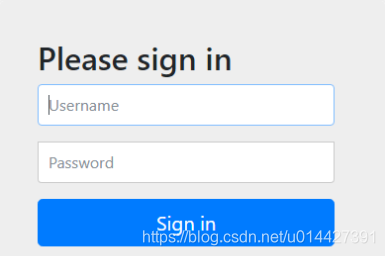
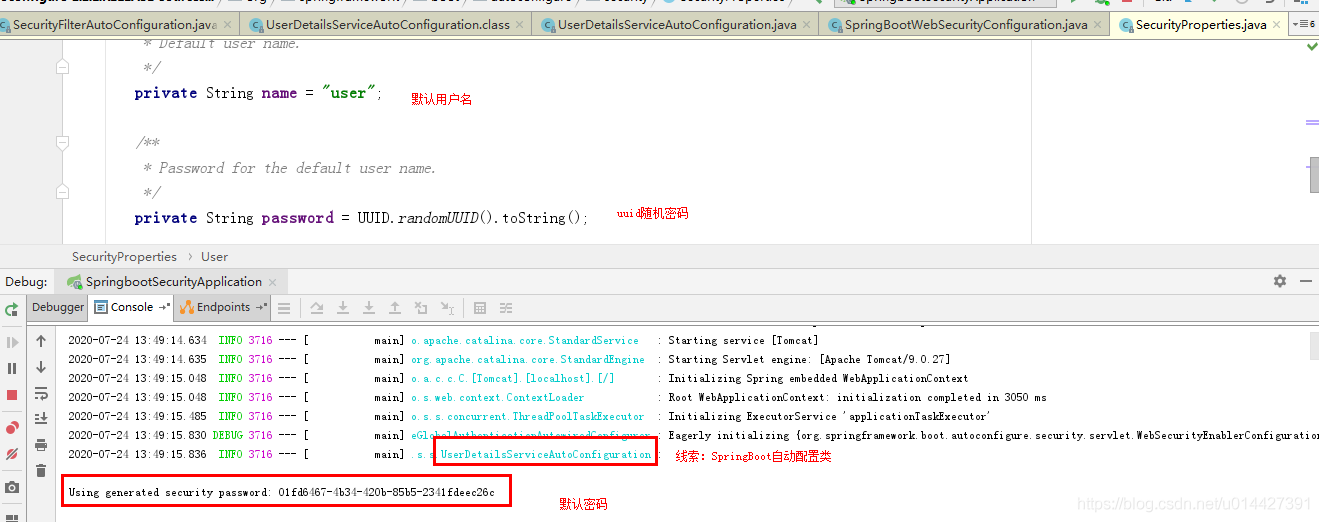
隨便寫個介面,訪問時候,就會跳到如下圖的登入頁面,為什麼?我們只是引入maven配置而已,然後賬號密碼是什麼?其實這個是Spring Security的預設登入頁面,頁面程式碼是在jar包裡的,預設的username是user,密碼是隨機生成的uuid格式的密碼
密碼會在控制檯列印,根據線索,找到自動配置類
要修改預設密碼,可以新建application.yml配置檔案,加上如下配置
```yaml
## spring security配置
spring:
security:
user:
name: nicky
password: 123
```
也可以新建Spring Security配置類,注意Spring Security5.2.1版本,配置密碼要用BCryptPasswordEncoder加密,不過登入還是明文,Spring Security不同版本各有差別,詳情配置還是參考官方文件
```java
@Configuration
public class SecurityConfiguration extends WebSecurityConfigurerAdapter {
@Override
protected void configure(AuthenticationManagerBuilder auth) throws Exception { //auth.inMemoryAuthentication()
auth.inMemoryAuthentication()
.withUser("nicky")
.password(bcryptPasswordEncoder().encode("123"))
.roles("admin");
}
@Bean
public PasswordEncoder bcryptPasswordEncoder() {
return new BCryptPasswordEncoder();
}
}
```
|加密方式 | security 4| security 5 |
|--|--|--|
|bcrypt |password| {bcrypt}password |
|ldap |password |{ldap}password|
|MD4 | password |{MD4}password |
|MD5 | password | {MD5}password|
|noop | password |{noop}password|
|pbkdf2 | password |{pbkdf2}password|
|scrypt | password| {scrypt}password|
|SHA-1| password |{SHA-1}password |
|SHA-256 | password| {SHA-256}password|
|sha256 | password| {sha256}password|
### 5. 資料庫方式校驗
拓展:如果要資料庫方式校驗使用者名稱密碼,可以自定義UserDetailsService方式:
```java
@Override
protected void configure(AuthenticationManagerBuilder auth) throws Exception {
auth.userDetailsService(userDetailsService)
.passwordEncoder(new CustomPasswordEncoder());
auth.parentAuthenticationManager(authenticationManagerBean());
}
```
UserDetailsServiceImpl.java
```java
package com.example.springboot.oauth2.service;
import com.example.springboot.oauth2.entity.User;
import com.example.springboot.oauth2.mapper.UserMapper;
import lombok.extern.slf4j.Slf4j;
import org.springframework.beans.factory.annotation.Autowired;
import org.springframework.security.core.authority.SimpleGrantedAuthority;
import org.springframework.security.core.userdetails.UserDetails;
import org.springframework.security.core.userdetails.UserDetailsService;
import org.springframework.security.core.userdetails.UsernameNotFoundException;
import org.springframework.stereotype.Service;
import java.util.Arrays;
import java.util.List;
/**
*
org.springframework.boot
org.springframework.boot
spring-boot-starter-thymeleaf
```
關閉Thymeleaf模板引擎快取,方便F9自動編譯
```yaml
spring:
thymeleaf:
cache: false
```
**寫個login介面,注意一定要GET方式,POST方式是Spring Security預設的校驗介面,介面名稱也是/login**
```java
@Controller
public class LoginController {
@GetMapping(value = {"/login"})
public ModelAndView toLogin() {
return new ModelAndView("login");
}
}
```
自定義登入頁面,要用post方式,除非你自己寫個校驗介面,POST /login是Spring Security官方的校驗介面,預設使用者名稱引數為username,密碼引數為password:
```html
Signin Template for Bootstrap

 *
 *
 * @author mazq
 * 修改記錄
 *    修改後版本:     修改人:  修改日期: 2020/04/30 15:15  修改內容:
 *
*/ @Slf4j @Service("userService") public class UserDetailsServiceImpl implements UserDetailsService { @Autowired UserMapper userRepository; @Override public UserDetails loadUserByUsername(String username) throws UsernameNotFoundException { User user = userRepository.findByUsername(username); if(user == null){ log.info("登入使用者[{}]沒註冊!",username); throw new UsernameNotFoundException("登入使用者["+username + "]沒註冊!"); } return new org.springframework.security.core.userdetails.User(user.getUsername(), user.getPassword(), getAuthority()); } private List getAuthority() { return Arrays.asList(new SimpleGrantedAuthority("ROLE_ADMIN")); // return Arrays.asList(Collections.emptyList()); } } ``` ```java @Override protected void configure(HttpSecurity http) throws Exception { http // 配置登入頁並允許訪問 .formLogin().usernameParameter("username").passwordParameter("password").loginPage("/login").permitAll() // 配置Basic登入 //.and().httpBasic() // 配置登出頁面 .and().logout().logoutUrl("/logout").logoutSuccessUrl("/") // 開放介面訪問許可權,不需要登入授權就可以訪問 .and().authorizeRequests().antMatchers("/oauth/**", "/login/**", "/logout/**").permitAll() // api介面需要admin管理員才能訪問 .antMatchers("/api/**").hasRole("admin") // 其餘所有請求全部需要鑑權認證 .anyRequest().authenticated() // 關閉跨域保護; .and().csrf().disable(); } ``` ### 6. 不攔截靜態資源 配置檔案,加上配置 ```java @Override public void configure(WebSecurity web) throws Exception { //解決靜態資源被攔截的問題 web.ignoring().antMatchers("/asserts/**"); web.ignoring().antMatchers("/favicon.ico"); } ``` ### 7. 自定義登入頁面 引入Thymeleaf模板引擎: ```xml
Oauth2.0 Login
© 2019
``` 修改配置檔案,`.loginPage("/login")`指定自定義的登入頁面 ```java @Override protected void configure(HttpSecurity http) throws Exception { http // 配置登入頁並允許訪問 .formLogin().usernameParameter("username").passwordParameter("password").loginPage("/login").permitAll() // 配置Basic登入 //.and().httpBasic() // 配置登出頁面 .and().logout().logoutUrl("/logout").logoutSuccessUrl("/") // 開放介面訪問許可權,不需要登入授權就可以訪問 .and().authorizeRequests().antMatchers("/oauth/**", "/login/**", "/logout/**").permitAll() // api介面需要admin管理員才能訪問 .antMatchers("/api/**").hasRole("admin") // 其餘所有請求全部需要鑑權認證 .anyRequest().authenticated() // 關閉跨域保護; .and().csrf().disable(); } ``` 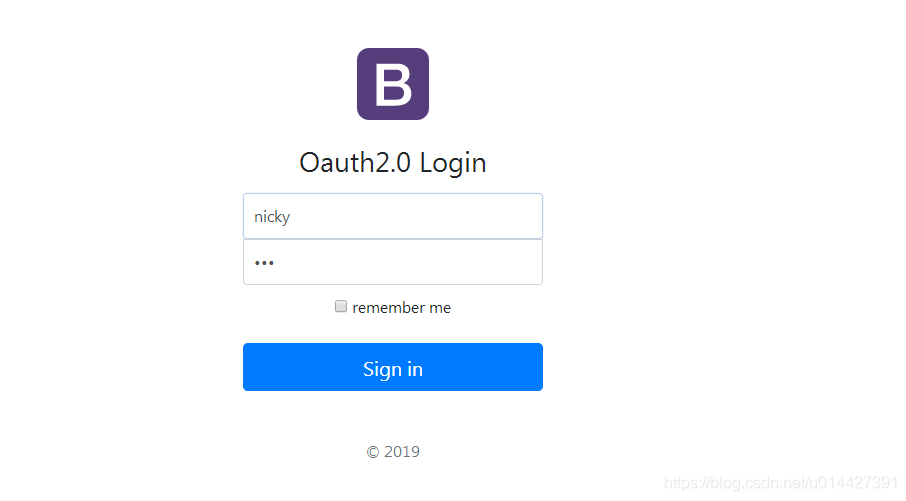 ### 8. Remember me 開啟記住我功能,登陸成功以後,將cookie發給瀏覽器儲存,以後訪問頁面帶上這個cookie,只要通過檢查就可以免登入 ```java @Override protected void configure(HttpSecurity http) throws Exception { //開啟記住我功能,登陸成功以後,將cookie發給瀏覽器儲存,以後訪問頁面帶上這個cookie,只要通過檢查就可以免登入 http.rememberMe().rememberMeParameter("remeber"); } ``` ok,Spring Security的知識點比較多,詳情請參考[官方文件](https://docs.spring.io/spring-security/site/docs/5.2.1.BUILD-SNAPSHOT/reference/html5/#crypto),本部落格參考官方文件,做了簡單記錄,僅僅作為入門參考手冊 程式碼例子下載:[code download](https://github.com/u014427391/springbootexamples/tree/master/springboot-s