
.Net Core微服務入門全紀錄(二)——Consul-服務註冊與發現(上)
阿新 • • 發佈:2020-06-14
# 前言
上一篇【[.Net Core微服務入門全紀錄(一)——專案搭建](https://www.cnblogs.com/xhznl/p/13071260.html)】講到要做到服務的靈活伸縮,那麼需要有一種機制來實現它,這個機制就是服務註冊與發現。當然這也並不是必要的,如果你的服務例項很少,並且很穩定,那麼就沒有必要使用服務註冊與發現。
# 服務註冊與發現
- 服務註冊:簡單理解,就是有一個註冊中心,我們的每個服務例項啟動時,都去註冊中心註冊一下,告訴註冊中心我的地址,埠等資訊。同樣的服務例項要刪除時,去註冊中心刪除一下,註冊中心負責維護這些服務例項的資訊。
- 服務發現:既然註冊中心維護了各個服務例項的資訊,那麼客戶端通過註冊中心就很容易發現服務的變化了。
有了服務註冊與發現,客戶端就不用再去配置各個服務例項的地址,改為從註冊中心統一獲取。
那註冊中心又是怎麼保證每個地址的可用狀態呢,假如某個例項掛了怎麼辦呢?原則上掛掉的例項不應該被客戶端獲取到,所以就要提到:健康檢查 。
- 健康檢查:每個服務都需要提供一個用於健康檢查的介面,該介面不具備業務功能。服務註冊時把這個介面的地址也告訴註冊中心,註冊中心會定時呼叫這個介面來檢測服務是否正常,如果不正常,則將它移除,這樣就保證了服務的可用性。
常見註冊中心有 Consul、ZooKeeper、etcd、Eureka。
# Consul
Consul官網:https://www.consul.io/
Consul的主要功能有服務註冊與發現、健康檢查、K-V儲存、多資料中心等。
- Consul安裝:很簡單,直接在官網下載解壓即可。
- Consul執行:在consul.exe目錄下開啟命令列執行 `consul.exe agent -dev`
- 瀏覽器訪問:http://localhost:8500/
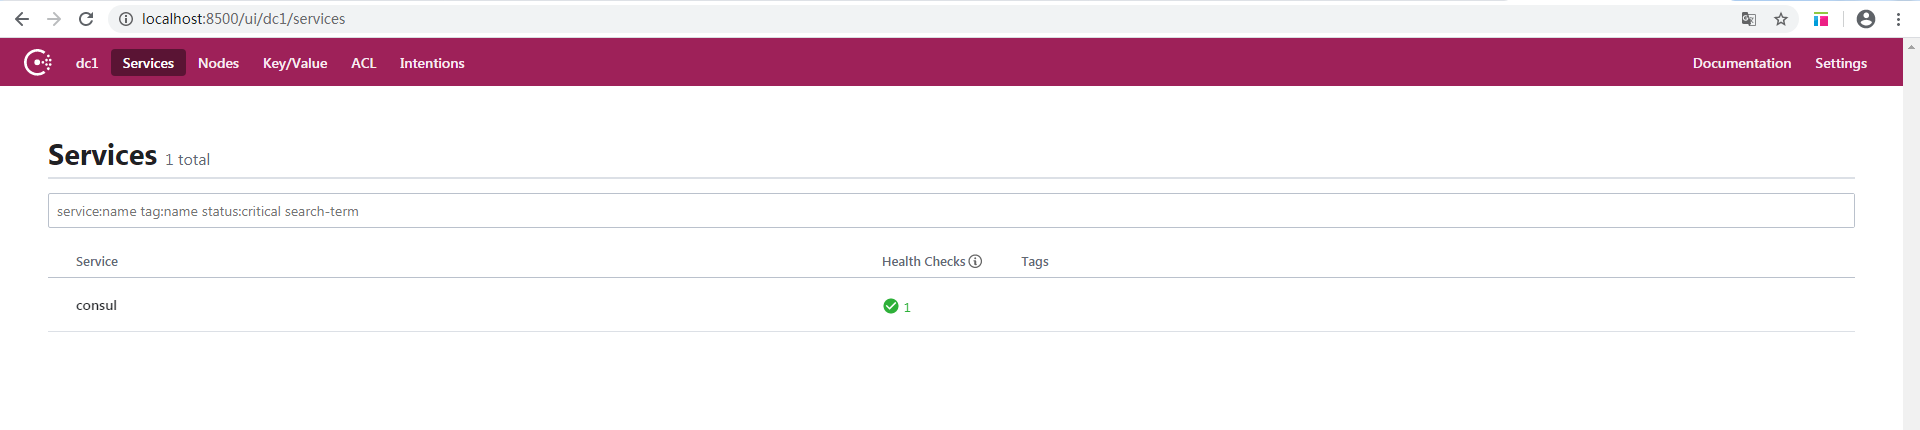
Consul已成功執行。
# 服務註冊
- 首先Nuget安裝一下Consul:

這個類庫裡封裝了Consul的api操作,方便我們直接使用。當然自己去寫http呼叫Consul的介面也不是不行。。。介面說明:https://www.consul.io/api-docs
- 改造一下訂單服務的程式碼:
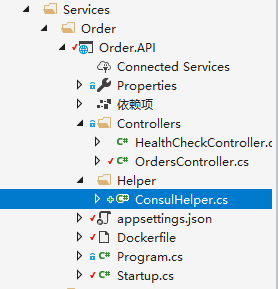
ConsulHelper.cs:
```
public static class ConsulHelper
{
///
/// 服務註冊到consul
///
///
///
public static IApplicationBuilder RegisterConsul(this IApplicationBuilder app, IConfiguration configuration, IHostApplicationLifetime lifetime)
{
var consulClient = new ConsulClient(c =>
{
//consul地址
c.Address = new Uri(configuration["ConsulSetting:ConsulAddress"]);
});
var registration = new AgentServiceRegistration()
{
ID = Guid.NewGuid().ToString(),//服務例項唯一標識
Name = configuration["ConsulSetting:ServiceName"],//服務名
Address = configuration["ConsulSetting:ServiceIP"], //服務IP
Port = int.Parse(configuration["ConsulSetting:ServicePort"]),//服務埠 因為要執行多個例項,埠不能在appsettings.json裡配置,在docker容器執行時傳入
Check = new AgentServiceCheck()
{
DeregisterCriticalServiceAfter = TimeSpan.FromSeconds(5),//服務啟動多久後註冊
Interval = TimeSpan.FromSeconds(10),//健康檢查時間間隔
HTTP = $"http://{configuration["ConsulSetting:ServiceIP"]}:{configuration["ConsulSetting:ServicePort"]}{configuration["ConsulSetting:ServiceHealthCheck"]}",//健康檢查地址
Timeout = TimeSpan.FromSeconds(5)//超時時間
}
};
//服務註冊
consulClient.Agent.ServiceRegister(registration).Wait();
//應用程式終止時,取消註冊
lifetime.ApplicationStopping.Register(() =>
{
consulClient.Agent.ServiceDeregister(registration.ID).Wait();
});
return app;
}
}
```
appsettings.json:
```
{
"Logging": {
"LogLevel": {
"Default": "Information",
"Microsoft": "Warning",
"Microsoft.Hosting.Lifetime": "Information"
}
},
"AllowedHosts": "*",
"ConsulSetting": {
"ServiceName": "OrderService",
"ServiceIP": "localhost",
"ServiceHealthCheck": "/healthcheck",
"ConsulAddress": "http://host.docker.internal:8500"//注意,docker容器內部無法使用localhost訪問宿主機器,如果是控制檯啟動的話就用localhost
}
}
```
Startup.cs:
```
public class Startup
{
public Startup(IConfiguration configuration)
{
Configuration = configuration;
}
public IConfiguration Configuration { get; }
// This method gets called by the runtime. Use this method to add services to the container.
public void ConfigureServices(IServiceCollection services)
{
services.AddControllers();
}
// This method gets called by the runtime. Use this method to configure the HTTP request pipeline.
public void Configure(IApplicationBuilder app, IWebHostEnvironment env, IHostApplicationLifetime lifetime)
{
if (env.IsDevelopment())
{
app.UseDeveloperExceptionPage();
}
app.UseRouting();
app.UseAuthorization();
app.UseEndpoints(endpoints =>
{
endpoints.MapControllers();
});
//服務註冊
app.RegisterConsul(Configuration, lifetime);
}
}
```
OrdersController.cs:
```
[Route("[controller]")]
[ApiController]
public class OrdersController : ControllerBase
{
private readonly