
Linux網路檔案共享服務之FTP
一、FTP介紹
ftp(File Transfer Protocol)是早期的三個應用級協議之一,基於C/S結構,雙通道協議,資料和命令連線,資料傳輸格式預設是二進位制,當然也支援檔案方式傳輸。預設情況下FTP協議使用TCP埠中的21和20這兩個埠,其中20用於資料傳輸,21用作命令傳輸,但是20號埠是否作為資料傳輸的埠,這與FTP使用的傳輸模式有關,從FTP伺服器的角度講,FTP傳輸資料的模式分為主動模式和被動模式。主動模式就是伺服器主動去連線客戶端,被動模式就是客戶端去連線伺服器。不管FTP伺服器工作在那個模式下,它的命令控制埠都監聽在ftp伺服器的tcp21埠,而主動模式(PORT)中資料傳輸埠是ftp伺服器的20號埠去連線客戶端的一個隨機埠來傳輸資料,在被動模式(PASV)是客戶端的一個隨機埠去連線FTP服務端的一個隨機埠,這樣一來各位可能會有一個疑問就是在被動模式中,客戶端怎麼知道去連線那個埠和伺服器連線傳輸資料呢?雙方的隨機埠怎麼確認呢?它的工作流程是這樣的,在被動模式中我們知道命令控制埠是連線FTP伺服器的21號埠(這是預設情況,不更改其監聽的埠),客戶端連線服務端的時候就會和服務端協商,到底哪個埠來當做資料傳輸的埠啊,事實上被動模式或主動模式中資料傳輸埠是通過命令鏈路雙方協商好的,主動模式的資料傳輸埠是通過命令連線告訴給服務端的,這樣一來當我們需要下載資料時,服務端會以20埠去連線客戶端的一個協商好的埠,同理被動模式中,資料埠也是雙方協商好了 的,在我們下載資料時,客戶端會以一個隨機埠去連線協商好的那個服務端的埠。
伺服器被動模式資料埠示例
[root@test ~]#ftp 192.168.0.99
Connected to 192.168.0.99 (192.168.0.99).
220 (vsFTPd 3.0.2)
Name (192.168.0.99:root): ftp
331 Please specify the password.
Password:
230 Login successful.
Remote system type is UNIX.
Using binary mode to transfer files.
ftp> ls
227 Entering Passive Mode (192,168,0,99,43,241).
150 Here comes the directory listing.
drwxr-xr-x    2 0        0               6 Oct 30  2018 pub
226 Directory send OK.
ftp>
說明:我們可以看到訊息狀態為227的告訴我們被動模式(192.168.0.99,43,241)這是什麼意思呢,其實它這就是告訴客戶端我們連線服務端的那個埠,它的計算方式是這樣的,以上為例它會去連線服務端的11249,這個埠就是通過43*256+241得來的,每傳輸一次資料都會寫上好一個數據埠,這就是ftp工作在被動模式的埠確定方式。
227 Entering Passive Mode (192,168,0,99,201,83).
150 Here comes the directory listing.
-rw-r--r--    1 0        0        1073741824 Dec 27 04:25 bigfile
226 Directory send OK.
ftp> ! ss -nt
State      Recv-Q Send-Q              Local Address:Port                             Peer Address:Port
ESTAB      0      0                    192.168.0.99:51838                            192.168.0.99:21
ESTAB      0      0                    192.168.0.99:59860                            192.168.0.99:3306
ESTAB      0      0                    192.168.0.99:3306                             192.168.0.99:59860
ESTAB      0      0                    192.168.0.99:41319                           192.168.0.232:1678
ESTAB      0      216                  192.168.0.99:41319                           192.168.0.232:1616
ESTAB      0      0             ::ffff:192.168.0.99:21                        ::ffff:192.168.0.99:51838
ftp> get bigfile
local: bigfile remote: bigfile
227 Entering Passive Mode (192,168,0,99,247,183).
150 Opening BINARY mode data connection for bigfile (1073741824 bytes).
說明:可看到資料鏈路上是客戶端的一個隨機埠連線服務端的21 埠 ,在下載資料時雙方協定的埠是256×247+183,接下來我們在來看看服務端上的埠連線情況
[qiuhom@test ~]$ss -nt
State      Recv-Q Send-Q              Local Address:Port                             Peer Address:Port
ESTAB      0      0                    192.168.0.99:51838                            192.168.0.99:21
ESTAB      0      0                    192.168.0.99:59860                            192.168.0.99:3306
ESTAB      0      0                    192.168.0.99:3306                             192.168.0.99:59860
ESTAB      204800 0                    192.168.0.99:35409                            192.168.0.99:63415
ESTAB      0      216                  192.168.0.99:41319                           192.168.0.232:1678
ESTAB      0      0                    192.168.0.99:41319                           192.168.0.232:1616
ESTAB      0      0             ::ffff:192.168.0.99:21                        ::ffff:192.168.0.99:51838
ESTAB      0      0             ::ffff:192.168.0.99:63415                     ::ffff:192.168.0.99:35409
[qiuhom@test ~]$bc
bc 1.06.95
Copyright 1991-1994, 1997, 1998, 2000, 2004, 2006 Free Software Foundation, Inc.
This is free software with ABSOLUTELY NO WARRANTY.
For details type `warranty'.
256*247+183
63415
說明:可以看到客戶端的35409這個埠與服務端的63415連線著。63415就是在下載資料的時候雙方協商好的資料傳輸埠
二、FTP軟體介紹
FTP伺服器軟體有Wu-ftpd,Proftpd,Pureftpd,servU,IIS,vsftpd,在centos上預設的FTP伺服器軟體就是vsftpd,它號稱是非常安全的FTPDaemon ,高速,穩定,下載速度是WU-FTP的兩倍,官方資料告訴我們說單擊最多可支援15000個併發。聽上去很牛逼的樣子,接下來我們來看看它
[root@test ~]#yum info vsftpd
已載入外掛:fastestmirror
Loading mirror speeds from cached hostfile
 * base: mirrors.aliyun.com
 * extras: mirrors.aliyun.com
 * updates: mirrors.aliyun.com
已安裝的軟體包
名稱    :vsftpd
架構    :x86_64
版本    :3.0.2
釋出    :25.el7
大小    :353 k
源    :installed
來自源:base
簡介    : Very Secure Ftp Daemon
網址    :https://security.appspot.com/vsftpd.html
協議    : GPLv2 with exceptions
描述    : vsftpd is a Very Secure FTP daemon. It was written completely from
         : scratch.

[root@test ~]#
說明:你看看它的簡介就是說非常安全的FTPDaemon。具體它的併發能夠達到多少,有待測試
在Linux系統上FTP客戶端軟體有,ftp,lftp,lftpget ,wget curl,其中ftp和lftp最為常用,ftp這個客戶端工具一邊用於測試,因為它不具備補全的功能,在生產環境中用起來不是很方便,還有就是它列出來的檔案、目錄,只能看檔案屬性資訊裡的‘-’,‘d’來區分,所以在字元介面一般我們都很少用ftp這個客戶端,相反lftp就彌補了ftp的確定,受到大眾的喜愛,它支援補全,我們用它就感覺是操作Linux檔案系統一樣。
ftp連線FTP伺服器的使用方法:
[root@test ~]#ftp -A 192.168.0.99 2121
Connected to 192.168.0.99 (192.168.0.99).
220 (vsFTPd 3.0.2)
Name (192.168.0.99:root): ftp
331 Please specify the password.
Password:
230 Login successful.
Remote system type is UNIX.
Using binary mode to transfer files.
ftp> ls
200 PORT command successful. Consider using PASV.
150 Here comes the directory listing.
drwxr-xr-x    2 0        0              21 Dec 27 04:25 pub
226 Directory send OK.
ftp> cd pub
250 Directory successfully changed.
ftp> ls
200 PORT command successful. Consider using PASV.
150 Here comes the directory listing.
-rw-r--r--    1 0        0        1073741824 Dec 27 04:25 bigfile
226 Directory send OK.
ftp> bye
221 Goodbye.
[root@test ~]#ftp -p 192.168.0.99 2121
Connected to 192.168.0.99 (192.168.0.99).
220 (vsFTPd 3.0.2)
Name (192.168.0.99:root): ftp
331 Please specify the password.
Password:
230 Login successful.
Remote system type is UNIX.
Using binary mode to transfer files.
ftp> ls
227 Entering Passive Mode (192,168,0,99,20,204).
150 Here comes the directory listing.
drwxr-xr-x    2 0        0              21 Dec 27 04:25 pub
226 Directory send OK.
ftp> cd pub
250 Directory successfully changed.
ftp> ls
227 Entering Passive Mode (192,168,0,99,205,210).
150 Here comes the directory listing.
-rw-r--r--    1 0        0        1073741824 Dec 27 04:25 bigfile
226 Directory send OK.
ftp> bye
221 Goodbye.
[root@test ~]#
說明:-A表示主動模式,-p(小寫) 表示被動模式,centos系統上預設是被動模式,這也說明了一點就是不同的客戶端,其連線伺服器的模式不一樣。
lftp連線ftp伺服器的使用方法:
[root@test ~]#lftp -u ftp 192.168.0.99 -p 2121
口令:
lftp [email protected]:~> ls
drwxr-xr-x    2 0        0              21 Dec 27 04:25 pub
lftp [email protected]:/> cd pub/
lftp [email protected]:/pub> ls
-rw-r--r--    1 0        0        1073741824 Dec 27 04:25 bigfile
lftp [email protected]:/pub> bye
[root@test ~]#lftp [email protected] -p 2121
口令:
lftp [email protected]:~> ls
drwxr-xr-x    2 0        0              21 Dec 27 04:25 pub
lftp [email protected]:/> cd pub/
lftp [email protected]:/pub> ls
-rw-r--r--    1 0        0        1073741824 Dec 27 04:25 bigfile
lftp [email protected]:/pub> bye
[root@test ~]#
說明:-p是指定埠 -u 指定使用者名稱,如果不用-u指定,可把使用者名稱寫在@前
還有一些別的客戶端工具如瀏覽器,Windows是對資源管理器,filezilla等等,這些都不在這裡過多演示
三、FTP服務
1)狀態碼說明
1xx:表示資訊類,比如125:表示資料連線開啟
2xx:表示成功類狀態,比如200:命令ok 230表示登入成功
3xx:表示補充類,比如331表示使用者名稱OK
4xx:表示客戶端錯誤,比如425表示不能開啟資料鏈接
5xx:表示伺服器錯誤,比如530表示不能登入
2)使用者認證
支援匿名使用者:ftp,anonymous,對應Linux使用者ftp
系統使用者:Linux使用者,使用者/etc/passwd,密碼/etc/shadow
虛擬使用者:特定服務端裝用使用者,獨立的使用者/密碼檔案
四、vsftpd服務介紹
vsftpd由vsftpd包提供,預設不再由xinetd管理,當然我們是可以配置成非獨立服務的,讓它由xinetd服務帶管。使用者認證配置檔案:/etc/pam.d/vsftpd,服務指令碼:centos7上是/usr/lib/systemd/system/vsftpd.service,centos6上是/etc/rc.d/init.d/vsftpd;服務主配置檔案是:/etc/vsftpd/vsftpd.conf
其中/etc/vsftpd/vsftpd.conf 可以通過man 5 vsftpd.conf 來檢視配置檔案幫助,它裡面的格式是選項=value的格式,等號前後不能有多餘的空格,否則服務將無法正常啟動。匿名使用者(對映為系統使用者ftp)共享檔案位置上:/var/ftp,這個目錄就是預設ftp的共享目錄;系統使用者共享檔案位置就是使用者的家目錄;虛擬使用者共享檔案位置:為其對映到系統使用者家目錄
五、vsftpd服務配置
命令埠的配置:命令埠的指定有listen_port=xx來指定,不寫在配置檔案中表示使用預設的命令埠21
主動模式埠:connet_from_port_20=YES 表示主動模式埠為20;ftp_data_port=xx表示指定主動模式的埠,預設是20
被動埠範圍:Linux客戶端預設使用被動模式,Windows客戶端預設使用主動模式;pasv_min_port=xxx;pasv_max_port=xxx通過這兩條選項來指定ftp最小連線埠和最大的連線埠,這樣配置後,資料埠就只能使用在指定這個範圍內的埠。其中0表示隨機分配埠
使用當地時間:use_localtime=YES預設的配置上NO,使用GMT
關於匿名使用者的配置:
anonymous_enable=YES 支援匿名使用者
no_anon_password=YES(預設NO) 匿名使用者略過口令檢查
anon_world_readable_only (預設YES)只能下載全部讀的檔案
anon_upload_enable=YES 匿名上傳,注意:檔案系統許可權
anon_mkdir_write_enable=YES 匿名建目錄
anon_umask=0333 指定匿名上傳檔案的umask,預設077
anon_other_write_enable=YES 可刪除和修改上傳的檔案
指定上傳檔案的預設的所有者和許可權
chown_uploads=YES(預設NO)
chown_username=wang
chown_upload_mode=0644
關於Linux系統使用者的配置
local_enable=YES 是否允許linux使用者登入
write_enable=YES 允許linux使用者上傳檔案
local_umask=022 指定系統使用者上傳檔案的預設許可權
guest_enable=YES 所有系統使用者都對映成guest使用者
guest_username=ftp 配合上面選項才生效,指定guest使用者
local_root=/ftproot guest使用者登入所在目錄
這裡需要說一下,對映成guest使用者後,使用者登入所指定的目錄,不能有guest所指定的使用者有可寫的許可權,否則使用者無法登陸。也就是說ftp的根目錄是不能有當前使用者的寫許可權的。
禁錮所有系統使用者在家目錄中
chroot_local_user=YES(預設NO,不禁錮)禁錮系統使用者
chroot_list_enable=YES開啟禁錮列表
chroot_list_file=/etc/vsftpd/chroot_list禁錮或不禁錮使用者的名單檔案,當chroot_local_user=YES時,則chroot_list中的使用者不禁錮(白名單),當chroot_local_user=NO時,chroot_list中的使用者禁錮(黑名單)
wu-ftp日誌:預設啟用
xferlog_enable=YES (預設) 啟用記錄上傳下載日誌
xferlog_std_format=YES (預設) 使用wu-ftp日誌格式
xferlog_file=/var/log/xferlog (預設)可自動生成
vsftpd日誌:預設不啟用
dual_log_enable=YES 使用vsftpd日誌格式,預設不啟用
vsftpd_log_file=/var/log/vsftpd.log(預設)可自動生成
登入提示資訊
ftpd_banner=“welcome to mage ftp server"
banner_file=/etc/vsftpd/ftpbanner.txt 優先上面項生效
目錄訪問提示資訊
dirmessage_enable=YES (預設)
message_file=.message(預設) 資訊存放在指定目錄下.message
使用pam(Pluggable Authentication Modules)完成使用者認證
pam_service_name=vsftpd
pam配置檔案:/etc/pam.d/vsftpd
/etc/vsftpd/ftpusers 預設檔案中使用者拒絕登入,當然具體這裡面的使用者數拒絕還是允許需要看/etc/pam.d/vsftpd 是怎麼定義的了
[root@test ~]#cat /etc/pam.d/vsftpd
#%PAM-1.0
session    optional     pam_keyinit.so    force revoke
auth       required     pam_listfile.so item=user sense=deny file=/etc/vsftpd/ftpusers onerr=succeed
auth       required     pam_shells.so
auth       include      password-auth
account    include      password-auth
session    required     pam_loginuid.so
session    include      password-auth
[root@test ~]#
說明:此檔案預設是定義的是/etc/vsftpd/ftpusers這個檔案中的使用者是拒絕登入ftp系統的,若我們需要/etc/vsftpd/ftpuser裡的使用者允許登入ftp系統,我們只需要改動/etc/pam.d/vsftpd即可,把sense=deny改成sense=allow即可。
是否啟用控制使用者登入的列表檔案
userlist_enable=YES 預設有此設定
userlist_deny=YES(預設值) 黑名單,不提示口令,NO為白名單
userlist_file=/etc/vsftpd/users_list 此為預設值
[root@test ~]#cat /etc/vsftpd/user_list
# vsftpd userlist
# If userlist_deny=NO, only allow users in this file
# If userlist_deny=YES (default), never allow users in this file, and
# do not even prompt for a password.
# Note that the default vsftpd pam config also checks /etc/vsftpd/ftpusers
# for users that are denied.
root
bin
daemon
adm
lp
sync
shutdown
halt
mail
news
uucp
operator
games
nobody
[root@test ~]#
說明:此檔案註釋告訴我們如果userlist_deny=NO 那麼ftp系統只允許此檔案中的使用者登入系統;如果userlist_deny=YES 且此選項預設是yes選項,那麼此檔案中的使用者是不允許登入到ftp系統的,況且不會給輸入密碼的機會。這也就是為什麼root使用者登入系統,沒有輸入密碼的機會就提示許可權決絕,不光是root,像bin,daemon這些使用者也是一樣的,總之在這個檔案中的使用者都不會提示輸入口令。假如我們想要讓root使用者登入到ftp系統裡,怎麼配置呢?首先我們要把此檔案的root使用者刪除。刪除了此檔案中的root使用者,我們用root登入就會有輸入密碼的提示
[root@test ~]#cat /etc/vsftpd/user_list
# vsftpd userlist
# If userlist_deny=NO, only allow users in this file
# If userlist_deny=YES (default), never allow users in this file, and
# do not even prompt for a password.
# Note that the default vsftpd pam config also checks /etc/vsftpd/ftpusers
# for users that are denied.
root
bin
daemon
adm
lp
sync
shutdown
halt
mail
news
uucp
operator
games
nobody
[root@test ~]#ftp 192.168.0.99
Connected to 192.168.0.99 (192.168.0.99).
220 (vsFTPd 3.0.2)
Name (192.168.0.99:root): root
530 Permission denied.
Login failed.
ftp> bye
221 Goodbye.
[root@test ~]#sed -i 's@root@#root@' /etc/vsftpd/user_list
[root@test ~]#cat /etc/vsftpd/user_list
# vsftpd userlist
# If userlist_deny=NO, only allow users in this file
# If userlist_deny=YES (default), never allow users in this file, and
# do not even prompt for a password.
# Note that the default vsftpd pam config also checks /etc/vsftpd/ftpusers
# for users that are denied.
#root
bin
daemon
adm
lp
sync
shutdown
halt
mail
news
uucp
operator
games
nobody
[root@test ~]#ftp 192.168.0.99
Connected to 192.168.0.99 (192.168.0.99).
220 (vsFTPd 3.0.2)
Name (192.168.0.99:root): root
331 Please specify the password.
Password:
530 Login incorrect.
Login failed.
ftp> bye
221 Goodbye.
[root@test ~]#
說明:我們可以看到我們把root從/etc/vsftpd/user_list檔案中註釋掉,root使用者登入FTP系統就可以輸入密碼了,但是我們輸入正確的口令為什麼還是不能登入呢?其實/etc/vsftpd/user_list檔案中告訴我們了,說預設vsftpd pam會檢查配置檔案/etc/vsftpd/ftpusers中的使用者,也就說系統使用者要想登入FTP系統,必須滿足/etc/vsftpd/user_list中沒有此使用者的同時,pam檢查/etc/vsftpd/ftpusers檔案此使用者通過,如果/etc/pam.d/vsftpd配置檔案中指定/etc/vsftpd/ftpusers中的使用者拒絕登入到ftp系統,那麼此使用者也必須滿足ftpusers中沒有此使用者。如果/etc/pam.d/vsftpd配置檔案中指定/etc/vsftpd/ftpusers中的使用者允許登入到ftp系統,則此使用者只需要滿足不存在/etc/vsftpd/user_list即可,當然預設情況兩個配置檔案中都沒有的使用者是可以登入系統的。
[root@test ~]#cat /etc/vsftpd/ftpusers
# Users that are not allowed to login via ftp
root
bin
daemon
adm
lp
sync
shutdown
halt
mail
news
uucp
operator
games
nobody
[root@test ~]#sed -i 's@root@#root@' /etc/vsftpd/ftpusers
[root@test ~]#cat /etc/vsftpd/ftpusers
# Users that are not allowed to login via ftp
#root
bin
daemon
adm
lp
sync
shutdown
halt
mail
news
uucp
operator
games
nobody
[root@test ~]#ftp 192.168.0.99
Connected to 192.168.0.99 (192.168.0.99).
220 (vsFTPd 3.0.2)
Name (192.168.0.99:root): root
331 Please specify the password.
Password:
230 Login successful.
Remote system type is UNIX.
Using binary mode to transfer files.
ftp> ls
227 Entering Passive Mode (192,168,0,99,66,75).
150 Here comes the directory listing.
drwxr-xr-x    5 0        0             190 Dec 27 04:26 bak
226 Directory send OK.
ftp> bye
221 Goodbye.
[root@test ~]#
說明:更改了ftpusers檔案,root就可以正常登入系統裡,這裡需要說一下,在生產環境中我們是不推薦這樣做的,因為ftp預設情況是不加密的,都是明文傳輸,如果用root登入,很有可能洩露root密碼,從而威脅到linux系統。這也告訴我們,我們如果用系統帳號作為ftp的登入帳號,必須限制其登入shell型別,否則會有ftp使用者登入到Linux系統的危險。/etc/vsftpd/ftpusers和/etc/vsftpd/user_list這兩個檔案中的使用者具體是拒絕還是允許,都取決於兩個引數的配置,ftpusers 取決於pam.d/vsftpd中的配置是否允許,user_list中的使用者取決於userlist_deny=yes or no,一般我們都取預設值即可。
vsftpd服務指定使用者身份執行
nopriv_user=nobody (預設值)
連線數限制
max_clients=0 最大併發連線數
max_per_ip=0 每個IP同時發起的最大連線數
傳輸速率:位元組/秒
anon_max_rate=0 匿名使用者的最大傳輸速率
local_max_rate=0 本地使用者的最大傳輸速率
連線時間:秒為單位
connect_timeout=60 主動模式資料連線超時時長
accept_timeout=60 被動模式資料連線超時時長
data_connection_timeout=300 資料連線無資料輸超時時長
idle_session_timeout=60 無命令操作超時時長
優先以文字方式傳輸
ascii_upload_enable=YES
ascii_download_enable=YES
這兩個選項不建議大家配置,因為預設的是binary模式傳輸資料,如果配置了這兩條後,進行傳輸二進位制的檔案會有問題,我們知道Windows和Linux的ascii檔案格式是不一樣的,windows上ascii的檔案格式回車加換行表示Linux裡的一個換行,這樣一來,假如使用者下載一個二進位制程式,用windows客戶端來下載,有可能存在破壞原來二進位制檔案的內容,導致下載下來的二進位制程式不可用。雖然ftp客戶端是可以切換傳輸模式,但還是不建議大家更改預設優先使用binary傳輸資料。因為我們用binary模式傳輸資料,沒有破壞檔案的風險,頂多下載一個文字檔案它的格式不一樣,但是我們可以用工具去轉換呀,如果是二進位制檔案被破環了,相對文字檔案去轉換要難得多,所以還是推薦大家使用binary模式去傳輸資料。
配置FTP服務以非獨立服務方執行
[root@test-node1 ~]#yum install vsftpd xinetd -y
Loaded plugins: fastestmirror, security
Setting up Install Process
Loading mirror speeds from cached hostfile
 * base: mirrors.aliyun.com
 * extras: mirrors.aliyun.com
 * updates: mirrors.aliyun.com
Package vsftpd-2.2.2-24.el6.x86_64 already installed and latest version
Package 2:xinetd-2.3.14-40.el6.x86_64 already installed and latest version
Nothing to do
[root@test-node1 ~]#grep "listen" /etc/vsftpd/vsftpd.conf
# When "listen" directive is enabled, vsftpd runs in standalone mode and
# listens on IPv4 sockets. This directive cannot be used in conjunction
# with the listen_ipv6 directive.
listen=YES
# This directive enables listening on IPv6 sockets. To listen on IPv4 and IPv6
# Make sure, that one of the listen options is commented !!
#listen_ipv6=YES
[root@test-node1 ~]#sed -i 's@listen=YES@listen=NO@' /etc/vsftpd/vsftpd.conf
[root@test-node1 ~]#grep "listen=" /etc/vsftpd/vsftpd.conf
listen=NO
[root@test-node1 ~]#cat >> /etc/xinetd.d/vsftpd << EOF
> service ftp
> {
> flags = REUSE
> socket_type = stream
> wait = no
> user = root
> server = /usr/sbin/vsftpd
> log_on_failure += USERID
> disable = no
> }
> EOF
[root@test-node1 ~]#cat /etc/xinetd.d/vsftpd
service ftp
{
flags = REUSE
socket_type = stream
wait = no
user = root
server = /usr/sbin/vsftpd
log_on_failure += USERID
disable = no
}
[root@test-node1 ~]#/etc/init.d/xinetd start
Starting xinetd:                                           [  OK  ]
[root@test-node1 ~]#ss -ntlp |grep 21
LISTEN     0      64                       :::21                      :::*      users:(("xinetd",3966,5))
[root@test-node1 ~]#ftp 192.168.0.151
Connected to 192.168.0.151 (192.168.0.151).
220 (vsFTPd 2.2.2)
Name (192.168.0.151:root): ftp
331 Please specify the password.
Password:
230 Login successful.
Remote system type is UNIX.
Using binary mode to transfer files.
ftp> ls
227 Entering Passive Mode (192,168,0,151,252,106).
150 Here comes the directory listing.
drwxr-xr-x    2 0        0            4096 Mar 22  2017 pub
226 Directory send OK.
ftp> cd pub
250 Directory successfully changed.
ftp> ls
227 Entering Passive Mode (192,168,0,151,230,82).
150 Here comes the directory listing.
226 Directory send OK.
ftp> bye
221 Goodbye.
[root@test-node1 ~]#
說明:centos7上用以上方式是可以開啟以xinetd來代管vsftpd,但是沒法連線去使用,不知道為什麼。centos6上用以上方式是可以的。
六、基於ssl的ftps實現
1)檢視是否支援SSL
[root@test ~]#ldd `which vsftpd`
        linux-vdso.so.1 =>  (0x00007ffe512c9000)
        libssl.so.10 => /lib64/libssl.so.10 (0x00007f3e65c8a000)
        libwrap.so.0 => /lib64/libwrap.so.0 (0x00007f3e65a7f000)
        libnsl.so.1 => /lib64/libnsl.so.1 (0x00007f3e65865000)
        libpam.so.0 => /lib64/libpam.so.0 (0x00007f3e65656000)
        libcap.so.2 => /lib64/libcap.so.2 (0x00007f3e65451000)
        libdl.so.2 => /lib64/libdl.so.2 (0x00007f3e6524d000)
        libcrypto.so.10 => /lib64/libcrypto.so.10 (0x00007f3e64deb000)
        libc.so.6 => /lib64/libc.so.6 (0x00007f3e64a1e000)
        libgssapi_krb5.so.2 => /lib64/libgssapi_krb5.so.2 (0x00007f3e647d1000)
        libkrb5.so.3 => /lib64/libkrb5.so.3 (0x00007f3e644e8000)
        libcom_err.so.2 => /lib64/libcom_err.so.2 (0x00007f3e642e4000)
        libk5crypto.so.3 => /lib64/libk5crypto.so.3 (0x00007f3e640b1000)
        libz.so.1 => /lib64/libz.so.1 (0x00007f3e63e9b000)
        libaudit.so.1 => /lib64/libaudit.so.1 (0x00007f3e63c72000)
        libattr.so.1 => /lib64/libattr.so.1 (0x00007f3e63a6d000)
        /lib64/ld-linux-x86-64.so.2 (0x00007f3e66127000)
        libkrb5support.so.0 => /lib64/libkrb5support.so.0 (0x00007f3e6385d000)
        libkeyutils.so.1 => /lib64/libkeyutils.so.1 (0x00007f3e63659000)
        libresolv.so.2 => /lib64/libresolv.so.2 (0x00007f3e63440000)
        libpthread.so.0 => /lib64/libpthread.so.0 (0x00007f3e63224000)
        libcap-ng.so.0 => /lib64/libcap-ng.so.0 (0x00007f3e6301e000)
        libselinux.so.1 => /lib64/libselinux.so.1 (0x00007f3e62df7000)
        libpcre.so.1 => /lib64/libpcre.so.1 (0x00007f3e62b95000)
[root@test ~]#
說明:我們都知道要想某個軟體支援ssl,那麼它必須呼叫ssl的庫檔案,ssl庫檔案就是libssl.so,用ldd命令可以檢視某個應用呼叫的庫檔案有哪些
2)建立自簽名證書
[root@test ~]#cd /etc/pki/tls/certs/
[root@test certs]#ls
ca-bundle.crt  ca-bundle.trust.crt  make-dummy-cert  Makefile  renew-dummy-cert
[root@test certs]#make vsftpd.pem
umask 77 ; \
PEM1=`/bin/mktemp /tmp/openssl.XXXXXX` ; \
PEM2=`/bin/mktemp /tmp/openssl.XXXXXX` ; \
/usr/bin/openssl req -utf8 -newkey rsa:2048 -keyout $PEM1 -nodes -x509 -days 365 -out $PEM2  ; \
cat $PEM1 >  vsftpd.pem ; \
echo ""    >> vsftpd.pem ; \
cat $PEM2 >> vsftpd.pem ; \
rm -f $PEM1 $PEM2
Generating a 2048 bit RSA private key
...........................+++
...+++
writing new private key to '/tmp/openssl.uUotmW'
-----
You are about to be asked to enter information that will be incorporated
into your certificate request.
What you are about to enter is what is called a Distinguished Name or a DN.
There are quite a few fields but you can leave some blank
For some fields there will be a default value,
If you enter '.', the field will be left blank.
-----
Country Name (2 letter code) [XX]:CN
State or Province Name (full name) []:sichuan
Locality Name (eg, city) [Default City]:guangyuan
Organization Name (eg, company) [Default Company Ltd]:test
Organizational Unit Name (eg, section) []:test
Common Name (eg, your name or your server's hostname) []:ftp.test.com
Email Address []:
[root@test certs]#ll
總用量 16
lrwxrwxrwx. 1 root root   49 6月  22 2019 ca-bundle.crt -> /etc/pki/ca-trust/extracted/pem/tls-ca-bundle.pem
lrwxrwxrwx. 1 root root   55 6月  22 2019 ca-bundle.trust.crt -> /etc/pki/ca-trust/extracted/openssl/ca-bundle.trust.crt
-rwxr-xr-x. 1 root root  610 3月  12 2019 make-dummy-cert
-rw-r--r--. 1 root root 2516 3月  12 2019 Makefile
-rwxr-xr-x. 1 root root  829 3月  12 2019 renew-dummy-cert
-rw-------  1 root root 3027 12月 27 22:54 vsftpd.pem
[root@test certs]#cat vsftpd.pem
-----BEGIN PRIVATE KEY-----
MIIEvQIBADANBgkqhkiG9w0BAQEFAASCBKcwggSjAgEAAoIBAQDWYYttWUinc+z9
uzcaEJ38qC3WEp/SNgijGj1Kn8dovJSvxgUHYuZlzgnBe3UfTrkHsQTj/f1y8OUd
4/8UCw1YRjPdZJAhZ4cnCwj6mgSxXM/ru0k232m7IeSZ5RcV/LlEZ+6wxmsv+Vow
2iaGDLlxaXczSgpHb4n0zigswCVzegmXQpQxBZvAuEEzyg204+Qf7J0qJPfc8j0H
F4Gx806C+FAlMxD79pAGxzlyb8w3gosG1H4eIlHJKtXUsZIo5cvPZxlVVqrg6SD4
o1U6FfIVGtOA0Ud4DtQnasrfQOWUOTuQrfJiykShVM8iCp5xGdZMWwD6cP0DbDdB
OUa4hB8PAgMBAAECggEAfckMGuPZKk9tjU6svQFlAVrYUhPpbFjB5pk9vyxSv1Ru
1VeVmcjgsHkc5kZ+6Riynh2yZeegLzHC7S/aebMmaFYAlnUr0D3DYhgqc4etGzf+
0yy3f5fEnMT9MYLmccMwHT/yIAy71ZEz5xgIpHyQzkd4ZkKaF2INivLvRZqUHtU4
IrzkGyF26DJNgw8+s5C+VtpF9Ii8oLQfvBvIkud4tw47rHpU5jp3Osply//s2Q8C
fHWcjqzHPWH6qSW9xppatXkJJmTiqYt9kiFJyEd5gf4ELkSEmv02Q9OHnCt6W4wo
/4EtlsfLcCPvkVjgI66PNCxObCkh13WoBOe/MJNuyQKBgQDrp3ZFPeWGMqCUTYHf
mHLlJcTtgCsqu3fxRYvG/gc5cy2Th8ECXJE4X08X6stCqBrlaLqnc2YgXjl0fNGL
YqjlXX/KymsmRWIUfBCLux6JqTfU9klQyzbZgbSIfZE0ATplT6J8MdpmzhnQJX2O
xm80KI9Vv4GmqtctjGiw4h0XcwKBgQDo4+Ty4h//VatA7sxpnDjY88y58cPyp/J1
4g0DUx2R4RVbCBkp+XgX7VXXT0TghuQSUwzvrVse9JrRxh7JegdkVshdiE2pg4NT
k+OJRi7fbWoX5cfPRCSJ1FXsNY2kz8gMhXuDWLualcQg83sHjdyUGdpCEn5i8dc1
xmsw98ka9QKBgHFNROopxm9tbBOh6G2vCJ7wN+zREPAszpBslbYJcUPIAwPJ45zV
EOV/vbGMLEpSNQxT/FqCe3nYk9tUIBPaTcZp3AWOqVHvTib3N6VXRGl/uN5lw/5a
lnahjEGLzgKpDICld0QrXAzNz09qlyHMeq8jSTc7KoUN4wN9XOCe9snNAoGBAIzv
POHvDcYLJfPJj1JqA8zm3QG52QbDs+q6vX1Bkydwuue34uKP4ak5KzV89wWZG/Qq
5i01D2uQQxCngIIUotyJ1/8iOT1YJOUzHgM4wazcHdQQbfZ0Glh+cvDbB7ixNTK+
pJw72mwWLfZy4gUUSGQnsPlDD9D44W/df4jGqqDxAoGAM107eZVXENYYbVNae0M3
K1o/kg+hVgkTtKJj1t3eMTZSOEIOlwHH48KkIdF5T37t5BQ2cmLaoBqAY2rJMP8U
YhQ65LrpC/m9IyewjE5lD5Zkz51WToMHSA9K+++1VY7+x5aJk4KJobBGl5BHMPDU
hxdjIeQujOoWlRLLWMCn/CE=
-----END PRIVATE KEY-----

-----BEGIN CERTIFICATE-----
MIIDozCCAougAwIBAgIJAIBmy3n1yB5dMA0GCSqGSIb3DQEBCwUAMGgxCzAJBgNV
BAYTAkNOMRAwDgYDVQQIDAdzaWNodWFuMRIwEAYDVQQHDAlndWFuZ3l1YW4xDTAL
BgNVBAoMBHRlc3QxDTALBgNVBAsMBHRlc3QxFTATBgNVBAMMDGZ0cC50ZXN0LmNv
bTAeFw0xOTEyMjcxNDU0MDFaFw0yMDEyMjYxNDU0MDFaMGgxCzAJBgNVBAYTAkNO
MRAwDgYDVQQIDAdzaWNodWFuMRIwEAYDVQQHDAlndWFuZ3l1YW4xDTALBgNVBAoM
BHRlc3QxDTALBgNVBAsMBHRlc3QxFTATBgNVBAMMDGZ0cC50ZXN0LmNvbTCCASIw
DQYJKoZIhvcNAQEBBQADggEPADCCAQoCggEBANZhi21ZSKdz7P27NxoQnfyoLdYS
n9I2CKMaPUqfx2i8lK/GBQdi5mXOCcF7dR9OuQexBOP9/XLw5R3j/xQLDVhGM91k
kCFnhycLCPqaBLFcz+u7STbfabsh5JnlFxX8uURn7rDGay/5WjDaJoYMuXFpdzNK
CkdvifTOKCzAJXN6CZdClDEFm8C4QTPKDbTj5B/snSok99zyPQcXgbHzToL4UCUz
EPv2kAbHOXJvzDeCiwbUfh4iUckq1dSxkijly89nGVVWquDpIPijVToV8hUa04DR
R3gO1Cdqyt9A5ZQ5O5Ct8mLKRKFUzyIKnnEZ1kxbAPpw/QNsN0E5RriEHw8CAwEA
AaNQME4wHQYDVR0OBBYEFBIAwA/ZbgW55Ljm/5Q/55wuGDd+MB8GA1UdIwQYMBaA
FBIAwA/ZbgW55Ljm/5Q/55wuGDd+MAwGA1UdEwQFMAMBAf8wDQYJKoZIhvcNAQEL
BQADggEBAIXXG0y8PiEkBFCbnusCOK7llJkzMhmogJjWFcLn9UfKzHvgpC1bhCRw
P8TKbviL616grY40NKHvGfy1kpO6vxykSnUnjATloTGyySnVQpmGOwVVT29t3Gtp
Opay0nrhKoyIZIMV44pHhPIbRAkofex3lNOXaL2lWCV8Es/1IXniyuq8XML3JSMZ
d+Lbu0P+e8sUQNQc1NCnbAUN6qFmG+LSjr+hRS25IlKQTATjMPNLcucGsF+2jwIQ
ScsSr4vVvYAj3JeW/2gV71hr4rZI8wLCZLszKKuhyyCGL2cpkS5Hwa3dahprEVkm
RB9ehsAnYgfTOMVPnzS1pgEem8cqDLg=
-----END CERTIFICATE-----
[root@test certs]#
說明:ftp的證書有一個要求,它需要把私鑰資訊和證書資訊放在同一個檔案中。我們也可以先各自建立私鑰檔案和證書檔案,最後把它們合併在一起也行;以上方式就一條命令將私鑰檔案和證書檔案一併放入一個檔案中
3) 配置vsftpd服務支援SSL:/etc/vsftpd/vsftpd.conf
[root@test certs]#grep "ssl" /etc/vsftpd/vsftpd.conf
[root@test certs]#cat >> /etc/vsftpd/vsftpd.conf << EOF
>
> ssl_enable=YES
> allow_anon_ssl=NO
> force_local_logins_ssl=YES
> force_local_data_ssl=YES
> rsa_cert_file=/etc/pki/tls/certs/vsftpd.pem
> EOF
[root@test certs]#grep "ssl" /etc/vsftpd/vsftpd.conf
ssl_enable=YES
allow_anon_ssl=NO
force_local_logins_ssl=YES
force_local_data_ssl=YES
[root@test certs]#tail -6 /etc/vsftpd/vsftpd.conf

ssl_enable=YES
allow_anon_ssl=NO
force_local_logins_ssl=YES
force_local_data_ssl=YES
rsa_cert_file=/etc/pki/tls/certs/vsftpd.pem
[root@test certs]#
說明:ssl_enable=YES表示啟用ssl,allow_anon_ssl=NO表示匿名使用者不支援ssl,force_local_logins_ssl=YES表示本地使用者登入加密,force_local_data_ssl=YES表示本地使用者資料傳輸加密,rsa_cert_file=/etc/pki/tls/certs/vsftpd.pem表示指定自簽名證書的位置,這個位置可以任意選擇,不一定是在這個目錄,也可以將證書放入/etc/vsftpd/ssl中也可以,看自己的習慣怎麼放就可以。
4)重啟vsftpd服務,測試
[root@test certs]#systemctl restart vsftpd
說明:之前加大選項和對應的值前後都不能有空格,否則重啟服務會起不來的,且日誌也不會記錄。
測試1,用tcpdump抓包,把vsftpd配置成不啟用ssl來抓21埠的報文,然後記錄到一個檔案中
[root@test certs]#tcpdump -i enp2s0 -nn -x port 21 &> xx.txt
[root@test certs]#cat xx.txt |grep -i user
23:29:44.168817 IP 192.168.0.151.42304 > 192.168.0.99.21: Flags [P.], seq 1:14, ack 21, win 115, options [nop,nop,TS val 5044219 ecr 185815506], length 13: FTP: USER qiuhom
[root@test certs]#cat xx.txt |grep -i pass
23:29:44.169050 IP 192.168.0.99.21 > 192.168.0.151.42304: Flags [P.], seq 21:55, ack 14, win 227, options [nop,nop,TS val 185819003 ecr 5044219], length 34: FTP: 331 Please specify the password.
23:29:45.560826 IP 192.168.0.151.42304 > 192.168.0.99.21: Flags [P.], seq 14:26, ack 55, win 115, options [nop,nop,TS val 5045611 ecr 185819003], length 12: FTP: PASS admin
[root@test certs]#
說明:可以看到在不啟用加密,使用者名稱和密碼就很容易的被別人抓包獲取
測試2,把vsftpd配置成啟用ssl,然後再來抓21埠的報文,然後記錄到一個檔案中
[root@test certs]#tcpdump -i enp2s0 -nn -x port 21 &> yy.txt
^C[root@test certs]#grep -i "user" yy.txt
[root@test certs]#grep -i "pass" yy.txt
[root@test certs]#
說明:可以看到加密後的報文我們是抓不到user和pass的字樣
用filezilla等工具測試
配置好加密重啟vsftpd後用filezilla工具連線它就會彈出一個整數資訊,讓你確認
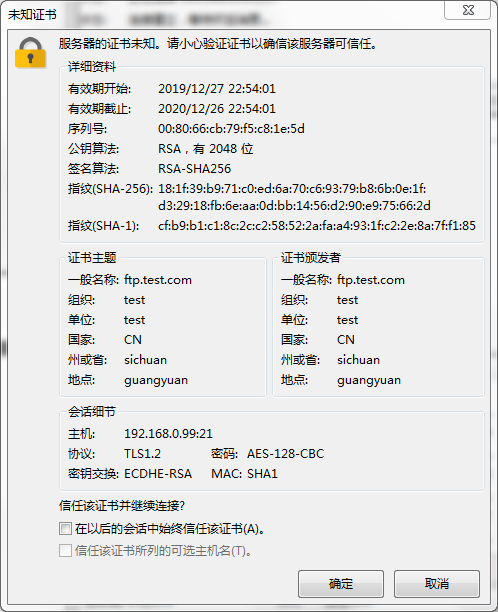
說明:從證書上看,可看到我們剛才在證書上填寫的內容,我們必須要信任了證書才可登入到伺服器,也可以選擇以後始終信任,這樣以後再連線伺服器就不會提示這個證書了
七、vsftpd虛擬使用者
虛擬使用者:
所有的虛擬使用者會統一對映為一個指定的系統帳號:訪問共享位置,即為此係統帳號的家目錄,各個虛擬賬號可以被賦予不同的訪問許可權,通過匿名使用者的許可權控制引數進行指定
實現虛擬使用者帳號的儲存方式:檔案
1)編輯文字檔案,此檔案需要被編碼為hash格式,並且奇數行為使用者名稱,偶數行為密碼。
[root@test vsftpd]#getent passwd tom
[root@test vsftpd]#getent passwd jerry
[root@test vsftpd]#cat >> vuser.txt << EOF
> tom
> admin
> jerry
> admin123
> EOF
[root@test vsftpd]#cat vuser.txt
tom
admin
jerry
admin123
[root@test vsftpd]#
2)準備使用者資料庫檔案
[root@test vsftpd]#db_load -T -t hash -f vuser.txt vuser.db
[root@test vsftpd]#ll vuser*
-rw-r--r-- 1 root root    25 12月 27 23:51 vuser.txt
-rw-r--r-- 1 root root 12288 12月 27 23:52 vuser.db
[root@test vsftpd]#
說明:為了安全,建議將存放使用者使用者名稱和密碼的資料庫檔案許可權修改成600
3)建立被對映到使用者和訪問FTP目錄
root@test vsftpd]#useradd -d /var/ftpboot/ -s /sbin/nologin vuser
[root@test vsftpd]#getent passwd vuser
vuser:x:1005:1005::/var/ftpboot/:/sbin/nologin
[root@test vsftpd]#chmod +rx /var/ftpboot/
[root@test vsftpd]#ll /var/ftpboot/ -d
dr-xr-xr-x 4 vuser vuser 127 12月 28 00:40 /var/ftpboot/
[root@test vsftpd]#chmod -w /var/ftpboot/
[root@test vsftpd]#mkdir /var/ftpboot/upload
[root@test vsftpd]#setfacl -m u:vuser:rwx /var/ftpboot/upload
[root@test vsftpd]#
說明:此帳號只用作虛擬賬戶對映成登入ftp系統的本地賬號,所以應該把shell型別給設定成/sbin/nologin型別,況且賈母要把寫的許可權給去掉,因為ftp伺服器不允許在根目錄下對使用者有寫的許可權。在其使用者的家目錄建立一個可讀寫的目錄是方便使用者上傳資料
4)建立pam配置檔案
[root@test vsftpd]#cat >> /etc/pam.d/vsftpd.db << EOF
> auth required pam_userdb.so db=/etc/vsftpd/vuser
> account required pam_userdb.so db=/etc/vsftpd/vuser
> EOF
[root@test vsftpd]#cat /etc/pam.d/vsftpd.db
auth required pam_userdb.so db=/etc/vsftpd/vuser
account required pam_userdb.so db=/etc/vsftpd/vuser
[root@test vsftpd]#
說明:配置檔案的說明可以通過man pam_userdb 來檢視pam_userdb這個模組的用法
5)在/etc/vsftpd/vsftpd.conf中指定pam的配置檔案,以及開啟guest使用者,並制定其對映成vuser
[root@test vsftpd]#grep "guest" /etc/vsftpd/vsftpd.conf
[root@test vsftpd]#grep "pam" /etc/vsftpd/vsftpd.conf
pam_service_name=vsftpd
[root@test vsftpd]#sed -i 's@pam_service_name=vsftpd@pam_service_name=vsftpd.db@' /etc/vsftpd/vsftpd.conf
[root@test vsftpd]#sed ^C
[root@test vsftpd]#grep "pam" /etc/vsftpd/vsftpd.conf
pam_service_name=vsftpd.db
[root@test vsftpd]#cat >> /etc/vsftpd/vsftpd.conf << EOF
> guest_enable=YES
> guest_username=vuser
> EOF
[root@test vsftpd]#grep "guest" /etc/vsftpd/vsftpd.conf
guest_enable=YES
guest_username=vuser
[root@test vsftpd]#
說明:在做以上實驗先進用selinux,若沒有禁用selinux ,還需要執行setsebool -P ftpd_full_access 1
6)建立虛擬使用者獨立的配置檔案
[root@test vsftpd]#mkdir /etc/vsftpd/vusers.d/
[root@test vsftpd]#grep "user_config_dir" /etc/vsftpd/vsftpd.conf
[root@test vsftpd]#cat >> /etc/vsftpd/vsftpd.conf << EOF
> user_config_dir=/etc/vsftpd/vusers.d/
> EOF
[root@test vsftpd]#grep "user_config_dir" /etc/vsftpd/vsftpd.conf
user_config_dir=/etc/vsftpd/vusers.d/
[root@test vsftpd]#cat >> /etc/vsftpd/vusers.d/tom << EOF
> anon_upload_enable=YES
> anon_mkdir_write_enable=YES
> anon_other_write_enable=YES
> EOF
[root@test vsftpd]#cat >> /etc/vsftpd/vusers.d/jerry << EOF
> local_root=/var/ftp
> EOF
[root@test vsftpd]#cat /etc/vsftpd/vusers.d/tom
anon_upload_enable=YES
anon_mkdir_write_enable=YES
anon_other_write_enable=YES
[root@test vsftpd]#cat /etc/vsftpd/vusers.d/jerry
local_root=/var/ftp
[root@test vsftpd]#
說明:以上分別給tom可以自由下載上傳,以及修改上傳的檔案,給jerry賦予登入ftp改變其指定的目錄的許可權。這裡需要注意一點就是使用者的授權檔案必須同虛擬使用者的名稱相同。至此基於檔案存放驗證vsftpd的虛擬使用者的實現就到此結束了,接下來就是測試我們新建的兩個虛擬使用者是否可登入系統,以及登入系統後的許可權
測試:
重啟服務,並在/var/ftp/目錄下建立一個varftp_dir檔案,在/var/ftpboot/下建立一個名為vuser_home,以示區分連個不同的目錄,並在var/ftpboot目錄下存放一個測試的下載檔案
[root@test vsftpd]#systemctl restart vsftpd
[root@test vsftpd]#touch /var/ftp/varftp_dir
[root@test vsftpd]#touch /var/ftpboot/vuser_home
[root@test vsftpd]#cp /etc/fstab /var/ftpboot/test_file
[root@test vsftpd]#ll /var/ftp/
總用量 0
drwxr-xr-x 2 root root 21 10月 31 2018 pub
-rw-r--r-- 1 root root  0 12月 28 00:39 varftp_dir
[root@test vsftpd]#ll /var/ftpboot/
總用量 4
-rw-r--r--  1 root root 552 12月 28 00:40 test_file
drwxrwxr-x+ 2 root root   6 12月 28 00:04 upload
-rw-r--r--  1 root root   0 12月 28 00:39 vuser_home
[root@test vsftpd]#
測試tom使用者是否可以正常登入,登入後是否可以正常上傳和下載檔案
[root@test vsftpd]#ftp 192.168.0.99
Connected to 192.168.0.99 (192.168.0.99).
220 (vsFTPd 3.0.2)
Name (192.168.0.99:root): tom
331 Please specify the password.
Password:
230 Login successful.
Remote system type is UNIX.
Using binary mode to transfer files.
ftp> ls
227 Entering Passive Mode (192,168,0,99,220,156).
150 Here comes the directory listing.
-rw-r--r--    1 0        0             552 Dec 27 16:40 test_file
drwxrwxr-x    2 0        0               6 Dec 27 16:04 upload
-rw-r--r--    1 0        0               0 Dec 27 16:39 vuser_home
226 Directory send OK.
ftp> pwd
257 "/"
ftp> !ls
ftpusers  user_list  vsftpd.conf  vsftpd.conf.bak  vsftpd_conf_migrate.sh  vuser.db  vusers.d  vuser.txt
ftp> lcd /root
Local directory now /root
ftp> !ls
bak  fstab
ftp> get test_file
local: test_file remote: test_file
227 Entering Passive Mode (192,168,0,99,99,53).
150 Opening BINARY mode data connection for test_file (552 bytes).
226 Transfer complete.
552 bytes received in 9.6e-05 secs (5750.00 Kbytes/sec)
ftp> cd upload
250 Directory successfully changed.
ftp> put fstab
local: fstab remote: fstab
227 Entering Passive Mode (192,168,0,99,254,231).
150 Ok to send data.
226 Transfer complete.
552 bytes sent in 0.000136 secs (4058.82 Kbytes/sec)
ftp> bye
221 Goodbye.
[root@test vsftpd]#
說明:用tom使用者登入ftp系統可正常的上傳下載檔案
測試jerry登入是否在/var/ftp目錄下
[root@test vsftpd]#ftp 192.168.0.99
Connected to 192.168.0.99 (192.168.0.99).
220 (vsFTPd 3.0.2)
Name (192.168.0.99:root): jerry
331 Please specify the password.
Password:
230 Login successful.
Remote system type is UNIX.
Using binary mode to transfer files.
ftp> ls
227 Entering Passive Mode (192,168,0,99,100,79).
150 Here comes the directory listing.
drwxr-xr-x    2 0        0              21 Oct 30  2018 pub
-rw-r--r--    1 0        0               0 Dec 27 16:39 varftp_dir
226 Directory send OK.
ftp> bye
221 Goodbye.
[root@test vsftpd]#ll /var/ftp
總用量 0
drwxr-xr-x 2 root root 21 10月 31 2018 pub
-rw-r--r-- 1 root root  0 12月 28 00:39 varftp_dir
[root@test vsftpd]#
說明:可看到jerry和tom登入到系統不是同一個目錄。
實現虛擬使用者帳號的儲存方式:mysql
1)實驗環境
centos6:ip 192.168.0.151 mysql資料庫伺服器
centos7:ip 192.168.0.99 vsftpd伺服器
2)安裝所需要的包和包組
centos6上安裝mysql-server 並啟動mysql資料庫
[root@ansible_centos6 ~]# yum install -y mysql-server
Loaded plugins: fastestmirror, refresh-packagekit, security
Setting up Install Process
Loading mirror speeds from cached hostfile
 * base: mirrors.aliyun.com
 * extras: mirrors.163.com
 * updates: mirrors.cn99.com
base                                                                       | 3.7 kB     00:00
epel                                                                       | 5.3 kB     00:00
epel/primary_db                                                            | 6.1 MB     00:01
extras                                                                     | 3.4 kB     00:00
updates                                                                    | 3.4 kB     00:00
updates/primary_db                                                         | 8.0 MB     00:02
Resolving Dependencies
--> Running transaction check
---> Package mysql-server.x86_64 0:5.1.73-8.el6_8 will be installed
--> Processing Dependency: mysql = 5.1.73-8.el6_8 for package: mysql-server-5.1.73-8.el6_8.x86_64
--> Processing Dependency: perl-DBI for package: mysql-server-5.1.73-8.el6_8.x86_64
--> Processing Dependency: perl-DBD-MySQL for package: mysql-server-5.1.73-8.el6_8.x86_64
--> Processing Dependency: perl(DBI) for package: mysql-server-5.1.73-8.el6_8.x86_64
--> Running transaction check
---> Package mysql.x86_64 0:5.1.73-8.el6_8 will be installed
---> Package perl-DBD-MySQL.x86_64 0:4.013-3.el6 will be installed
---> Package perl-DBI.x86_64 0:1.609-4.el6 will be installed
--> Finished Dependency Resolution

Dependencies Resolved

==================================================================================================
 Package                    Arch               Version                     Repository        Size
==================================================================================================
Installing:
 mysql-server               x86_64             5.1.73-8.el6_8              base             8.6 M
Installing for dependencies:
 mysql                      x86_64             5.1.73-8.el6_8              base             895 k
 perl-DBD-MySQL             x86_64             4.013-3.el6                 base             134 k
 perl-DBI                   x86_64             1.609-4.el6                 base             705 k

Transaction Summary
==================================================================================================
Install       4 Package(s)

Total download size: 10 M
Installed size: 29 M
Downloading Packages:
(1/4): mysql-5.1.73-8.el6_8.x86_64.rpm                                     | 895 kB     00:00
(2/4): mysql-server-5.1.73-8.el6_8.x86_64.rpm                              | 8.6 MB     00:01
(3/4): perl-DBD-MySQL-4.013-3.el6.x86_64.rpm                               | 134 kB     00:00
(4/4): perl-DBI-1.609-4.el6.x86_64.rpm                                     | 705 kB     00:00
--------------------------------------------------------------------------------------------------
Total                                                             5.5 MB/s |  10 MB     00:01
Running rpm_check_debug
Running Transaction Test
Transaction Test Succeeded
Running Transaction
  Installing : perl-DBI-1.609-4.el6.x86_64                                                    1/4
  Installing : perl-DBD-MySQL-4.013-3.el6.x86_64                                              2/4
  Installing : mysql-5.1.73-8.el6_8.x86_64                                                    3/4
  Installing : mysql-server-5.1.73-8.el6_8.x86_64                                             4/4
  Verifying  : perl-DBD-MySQL-4.013-3.el6.x86_64                                              1/4
  Verifying  : mysql-server-5.1.73-8.el6_8.x86_64                                             2/4
  Verifying  : mysql-5.1.73-8.el6_8.x86_64                                                    3/4
  Verifying  : perl-DBI-1.609-4.el6.x86_64                                                    4/4

Installed:
  mysql-server.x86_64 0:5.1.73-8.el6_8

Dependency Installed:
  mysql.x86_64 0:5.1.73-8.el6_8 perl-DBD-MySQL.x86_64 0:4.013-3.el6 perl-DBI.x86_64 0:1.609-4.el6

Complete!
[root@ansible_centos6 ~]# /etc/init.d/mysqld start
Initializing MySQL database:  WARNING: The host 'ansible_centos6' could not be looked up with resolveip.
This probably means that your libc libraries are not 100 % compatible
with this binary MySQL version. The MySQL daemon, mysqld, should work
normally with the exception that host name resolving will not work.
This means that you should use IP addresses instead of hostnames
when specifying MySQL privileges !
Installing MySQL system tables...
OK
Filling help tables...
OK

To start mysqld at boot time you have to copy
support-files/mysql.server to the right place for your system

PLEASE REMEMBER TO SET A PASSWORD FOR THE MySQL root USER !
To do so, start the server, then issue the following commands:

/usr/bin/mysqladmin -u root password 'new-password'
/usr/bin/mysqladmin -u root -h ansible_centos6 password 'new-password'

Alternatively you can run:
/usr/bin/mysql_secure_installation

which will also give you the option of removing the test
databases and anonymous user created by default.  This is
strongly recommended for production servers.

See the manual for more instructions.

You can start the MySQL daemon with:
cd /usr ; /usr/bin/mysqld_safe &

You can test the MySQL daemon with mysql-test-run.pl
cd /usr/mysql-test ; perl mysql-test-run.pl

Please report any problems with the /usr/bin/mysqlbug script!

                                                           [  OK  ]
Starting mysqld:                                           [  OK  ]
[root@ansible_centos6 ~]# ss -ntl |grep 3306
LISTEN     0      50                        *:3306                     *:*
[root@ansible_centos6 ~]#
在資料庫裡建立儲存虛擬使用者資料庫和連線的資料庫使用者
[root@ansible_centos6 ~]# mysql
Welcome to the MySQL monitor.  Commands end with ; or \g.
Your MySQL connection id is 3
Server version: 5.1.73 Source distribution

Copyright (c) 2000, 2013, Oracle and/or its affiliates. All rights reserved.

Oracle is a registered trademark of Oracle Corporation and/or its
affiliates. Other names may be trademarks of their respective
owners.

Type 'help;' or '\h' for help. Type '\c' to clear the current input statement.

mysql> show databases;
+--------------------+
| Database           |
+--------------------+
| information_schema |
| mysql              |
| test               |
+--------------------+
3 rows in set (0.00 sec)

mysql> create database vsftpd;
Query OK, 1 row affected (0.00 sec)

mysql> show databases;
+--------------------+
| Database           |
+--------------------+
| information_schema |
| mysql              |
| test               |
| vsftpd             |
+--------------------+
4 rows in set (0.01 sec)

mysql> grant select on vsftpd.* to vsftpd@'%' identified by 'admin123.com';
Query OK, 0 rows affected (0.00 sec)

mysql>
在vsftpd庫裡建立儲存虛擬使用者使用者名稱和密碼的表
mysql> use vsftpd
Database changed
mysql> show tables;
Empty set (0.00 sec)

mysql> create table users(
    -> id int auto_increment not null primary key,
    -> name char(50) binary not null,
    -> password char(48) binary not null);
Query OK, 0 rows affected (0.02 sec)

mysql> desc users;
+----------+----------+------+-----+---------+----------------+
| Field    | Type     | Null | Key | Default | Extra          |
+----------+----------+------+-----+---------+----------------+
| id       | int(11)  | NO   | PRI | NULL    | auto_increment |
| name     | char(50) | NO   |     | NULL    |                |
| password | char(48) | NO   |     | NULL    |                |
+----------+----------+------+-----+---------+----------------+
3 rows in set (0.01 sec)

mysql>
說明:name和password兩個欄位分別用binary修飾,表示此欄位區儲存的內容分大小寫,若不用binary 則不區分大小寫
在vsftpd伺服器上測試建立的使用者是否可以正常連線
[root@test vsftpd]#mysql -uvsftpd -h192.168.0.218 -p
Enter password:
Welcome to the MariaDB monitor.  Commands end with ; or \g.
Your MySQL connection id is 5
Server version: 5.1.73 Source distribution

Copyright (c) 2000, 2018, Oracle, MariaDB Corporation Ab and others.

Type 'help;' or '\h' for help. Type '\c' to clear the current input statement.

MySQL [(none)]> show databases;
+--------------------+
| Database           |
+--------------------+
| information_schema |
| test               |
| vsftpd             |
+--------------------+
3 rows in set (0.00 sec)

MySQL [(none)]> use vsftpd
Reading table information for completion of table and column names
You can turn off this feature to get a quicker startup with -A

Database changed
MySQL [vsftpd]> show tables;
+------------------+
| Tables_in_vsftpd |
+------------------+
| users            |
+------------------+
1 row in set (0.00 sec)

MySQL [vsftpd]> desc users;
+----------+----------+------+-----+---------+----------------+
| Field    | Type     | Null | Key | Default | Extra          |
+----------+----------+------+-----+---------+----------------+
| id       | int(11)  | NO   | PRI | NULL    | auto_increment |
| name     | char(50) | NO   |     | NULL    |                |
| password | char(48) | NO   |     | NULL    |                |
+----------+----------+------+-----+---------+----------------+
3 rows in set (0.00 sec)

MySQL [vsftpd]>
說明:到此資料庫伺服器上的配置就基本完成
centos7 vsftpd伺服器上安裝pam_mysql
[root@test ~]#yum info pam_mysql
已載入外掛:fastestmirror
Loading mirror speeds from cached hostfile
 * base: mirrors.aliyun.com
 * extras: mirrors.aliyun.com
 * updates: mirrors.aliyun.com
錯誤:沒有匹配的軟體包可以列出
說明:centos7上沒有找到pam_mysql,這個就需要我們去網上找原始碼包編譯安裝了
編譯pam_mysql-0.7RC1.tar.gz,說到Linux裡的編譯安裝我們不難就想起來三大步驟,configure,make,make install,在編譯前我們還需要注意我們的編譯環境是否準備好了,基礎的編譯開發包是否都安裝了
安裝編譯環境說依賴的包組和包
yum -y groupinstall "Development Tools"
yum -y install mariadb-devel pam-devel
上傳原始碼包,解壓,進行編譯
[root@test ~]#rz
rz waiting to receive.
 zmodem trl+C ȡ

  100%     327 KB  327 KB/s 00:00:01       0 Errorsz...

[root@test ~]#ls
bak  fstab  pam_mysql-0.7RC1.tar.gz  test_file
[root@test ~]#tar xf pam_mysql-0.7RC1.tar.gz
[root@test ~]#cd pam_mysql-0.7RC1/
[root@test pam_mysql-0.7RC1]#./configure --with-pam-mods-dir=/lib64/security
說明:編譯選項 就只需要指定模組的存放位置即可,pam相關的模組存放路徑都是lib64/security目錄下
./configure 沒有任何錯誤提示後,就可以make && make install
[root@test pam_mysql-0.7RC1]#make && make install
/bin/sh ./libtool --mode=compile gcc -DHAVE_CONFIG_H -I. -I. -I. -I/usr/include/security -I/usr/include  -g -O2  -g -O2 -I/usr/include/mysql    -c pam_mysql.c
mkdir .libs
 gcc -DHAVE_CONFIG_H -I. -I. -I. -I/usr/include/security -I/usr/include -g -O2 -g -O2 -I/usr/include/mysql -c pam_mysql.c  -fPIC -DPIC -o .libs/pam_mysql.o
pam_mysql.c: In function 'pam_mysql_converse':
pam_mysql.c:3192:4: warning: passing argument 2 of 'conv->conv' from incompatible pointer type [enabled by default]
    conv->appdata_ptr))) {
    ^
pam_mysql.c:3192:4: note: expected 'const struct pam_message **' but argument is of type 'struct pam_message **'
/bin/sh ./libtool --mode=link gcc  -g -O2 -I/usr/include/mysql     -o pam_mysql.la -rpath /lib64/security -module -avoid-version pam_mysql.lo  -L/usr/lib64/mysql -lmysqlclient -lpthread -lz -lm -ldl -lssl -lcrypto    -lcrypt
gcc -shared  .libs/pam_mysql.o  -L/usr/lib64/mysql -lmysqlclient -lpthread -lz -lm -ldl -lssl -lcrypto -lcrypt  -Wl,-soname -Wl,pam_mysql.so -o .libs/pam_mysql.so
creating pam_mysql.la
(cd .libs && rm -f pam_mysql.la && ln -s ../pam_mysql.la pam_mysql.la)
make[1]: 進入目錄“/root/pam_mysql-0.7RC1”
/bin/sh ./mkinstalldirs /lib64/security
/bin/sh ./libtool  --mode=install /bin/install -c pam_mysql.la /lib64/security/pam_mysql.la
/bin/install -c .libs/pam_mysql.so /lib64/security/pam_mysql.so
/bin/install -c .libs/pam_mysql.lai /lib64/security/pam_mysql.la
PATH="$PATH:/sbin" ldconfig -n /lib64/security
----------------------------------------------------------------------
Libraries have been installed in:
   /lib64/security

If you ever happen to want to link against installed libraries
in a given directory, LIBDIR, you must either use libtool, and
specify the full pathname of the library, or use the `-LLIBDIR'
flag during linking and do at least one of the following:
   - add LIBDIR to the `LD_LIBRARY_PATH' environment variable
     during execution
   - add LIBDIR to the `LD_RUN_PATH' environment variable
     during linking
   - use the `-Wl,--rpath -Wl,LIBDIR' linker flag
   - have your system administrator add LIBDIR to `/etc/ld.so.conf'

See any operating system documentation about shared libraries for
more information, such as the ld(1) and ld.so(8) manual pages.
----------------------------------------------------------------------
make[1]: 對“install-data-am”無需做任何事。
make[1]: 離開目錄“/root/pam_mysql-0.7RC1”
[root@test pam_mysql-0.7RC1]#
說明:到此pam_mysql就編譯安裝好了,接下來就需要看,原始碼包裡的README檔案,看看模組的用法
[root@test pam_mysql-0.7RC1]#less README
pam_mysql - A PAM authentication module against MySQL database.
$Id: README,v 1.8.2.9 2006/01/09 10:35:59 moriyoshi Exp $

Introduction
------------
This is a successor of the "old" pam_mysql module, which comes with
a more stable, secure and robust implementation.

Prerequisites
-------------
To try this module, you need the following stuff:
 - A *NIX (or similar) system, in which PAM facility is set up and working
   either system-wide or in a chroot jail.
 - A MySQL server, up and running.

Installation instruction
------------------------
See INSTALL file for detail.

An example of the configuration file:
---------------------------------------------------------------
auth       optional     pam_mysql.so user=root passwd=password
account    required     pam_mysql.so user=root passwd=password
---------------------------------------------------------------

Available options
-----------------
The module options are listed below with default in ()s:

verbose (0)

    If set to 1, produces logs with detailed messages that describes what
    PAM-MySQL is doing. May be useful for debugging.

debug

    An alias for the verbose option. This is added in 0.7pre2.

user

    The user name used to open the specified MySQL database.

passwd

    The password used to open the specified MySQL database.

host

    The host name or the absolute path to the unix socket where the
        MySQL server is listening.  The following formats are accepted:

    1. absolute path to the unix socket (e.g. "/tmp/mysql.sock")
        2. host name (e.g. "somewhere.example.com")
        3. host name + port number (e.g. "somewhere.example.com:3306")

db

    The name of the database that contains a user-password table.

table

    The name of table that maps unique login names to the passwords.
    This can be a combination of tables with full JOIN syntax if you
    need more control.  For example:

        [table=Host LEFT JOIN HostUser ON HostUser.host_id=Host.id \
                    LEFT JOIN User ON HostUser.user_id=User.id]

update_table

    The name of the table used for password alteration.
    If not defined, the value of the "table" option will be used instead.
    This is handy if you have a complex JOIN instead of a simple table in
    the "table" option above.

usercolumn

    The name of the column that contains a unix login name.
    Should be in a fully qualified form.

passwdcolumn

    The name of the column that contains a (encrypted) password string.
    Should be in a fully qualified form.

statcolumn

    The name of the column or an SQL expression that indicates the status of
    the user. The status is expressed by the combination of two bitfields
    shown below:

    bit 0 (0x01): if flagged, pam_mysql deems the account to be expired and
                  returns PAM_ACCT_EXPIRED. That is, the account is supposed
                  to no longer be available. Note this doesn't mean that
                  pam_mysql rejects further authentication operations.

    bit 1 (0x02): if flagged, pam_mysql deems the authentication token
                  (password) to be expired and returns PAM_NEW_AUTHTOK_REQD.
                  This ends up requiring that the user enter a new password.

    This option is available since 0.6.

crypt (plain)

    The method to encrypt the user's password:

       0 (or "plain") = No encryption.  Passwords stored in plaintext.
                        HIGHLY DISCOURAGED.

       1 (or "Y")     = Use crypt(3) function.

       2 (or "mysql") = Use MySQL PASSWORD() function. It is possible
                        that the encryption function used by PAM-MySQL