
SpringBoot系列教程web篇之Post請求引數解析姿勢彙總
作為一個常年提供各種Http介面的後端而言,如何獲取請求引數可以說是一項基本技能了,本篇為《190824-SpringBoot系列教程web篇之Get請求引數解析姿勢彙總》之後的第二篇,對於POST請求方式下,又可以怎樣獲取請求引數呢
本篇主要內容包括以下幾種姿勢
- @RequestBody json格式
- RequestEntity
- MultipartFile 檔案上傳
<!-- more -->
I. 環境搭建
首先得搭建一個web應用才有可能繼續後續的測試,藉助SpringBoot搭建一個web應用屬於比較簡單的活;
建立一個maven專案,pom檔案如下
<parent>
    <groupId>org.springframework.boot</groupId>
    <artifactId>spring-boot-starter-parent</artifactId>
    <version>2.1.7</version>
    <relativePath/> <!-- lookup parent from update -->
</parent>

<properties>
    <project.build.sourceEncoding>UTF-8</project.build.sourceEncoding>
    <project.reporting.outputEncoding>UTF-8</project.reporting.outputEncoding>
    <spring-cloud.version>Finchley.RELEASE</spring-cloud.version>
    <java.version>1.8</java.version>
</properties>

<dependencies>
    <dependency>
        <groupId>org.springframework.boot</groupId>
        <artifactId>spring-boot-starter-web</artifactId>
    </dependency>
</dependencies>

<build>
    <pluginManagement>
        <plugins>
            <plugin>
                <groupId>org.springframework.boot</groupId>
                <artifactId>spring-boot-maven-plugin</artifactId>
            </plugin>
        </plugins>
    </pluginManagement>
</build>
<repositories>
    <repository>
        <id>spring-milestones</id>
        <name>Spring Milestones</name>
        <url>https://repo.spring.io/milestone</url>
        <snapshots>
            <enabled>false</enabled>
        </snapshots>
    </repository>
</repositories>
新增專案啟動類Application.cass
@SpringBootApplication
public class Application {
    public static void main(String[] args) {
        SpringApplication.run(Application.class);
    }
}
在演示請求引數的解析例項中,我們使用終端的curl命令來發起http請求(主要原因是截圖上傳太麻煩,還是終端的文字輸出比較方便;缺點是不太直觀)
II. POST請求引數解析
接下來我們正式進入引數解析的妖嬈姿勢篇,會介紹一下常見的一些case(並不能說包含了所有的使用case)
下面所有的方法都放在 ParamPostRest 這個Controller中
@RestController
@RequestMapping(path = "post")
public class ParamPostRest {
}
在正式介紹之前,強烈推薦看一下《190824-SpringBoot系列教程web篇之Get請求引數解析姿勢彙總》, 因為get傳參的姿勢,在post引數解析中同樣適用,下面的內容並不會再次詳細介紹
1. HttpServletRequest
首先看一下最基本的使用case,和get請求裡的case一樣,我們先開一個介面
@PostMapping(path = "req")
public String requestParam(HttpServletRequest req) {
    return JSONObject.toJSONString(req.getParameterMap());
}
我們測試下兩種post請求下,會出現怎樣的結果
# 常規的表單提交方式
# content-type: application/x-www-form-urlencoded
➜  ~ curl 'http://127.0.0.1:8080/post/req' -X POST -d 'name=yihui&age=18'
{"name":["yihui"],"age":["18"]}%

# json傳提交
➜  ~ curl 'http://127.0.0.1:8080/post/req' -X POST -H 'content-type:application/json;charset:UTF-8' -d '{"name": "yihui", "age": 20}'
{}%
從上面的case中可以知道,通過傳統的表達方式提交的資料時,獲取引數和get獲取引數使用姿勢一樣;然而當然傳入的是json串格式的資料時,直接通過javax.servlet.ServletRequest#getParameter獲取不到對應的引數
我們通過debug,來看一下在傳json串資料的時候,如果我們要獲取資料,可以怎麼做
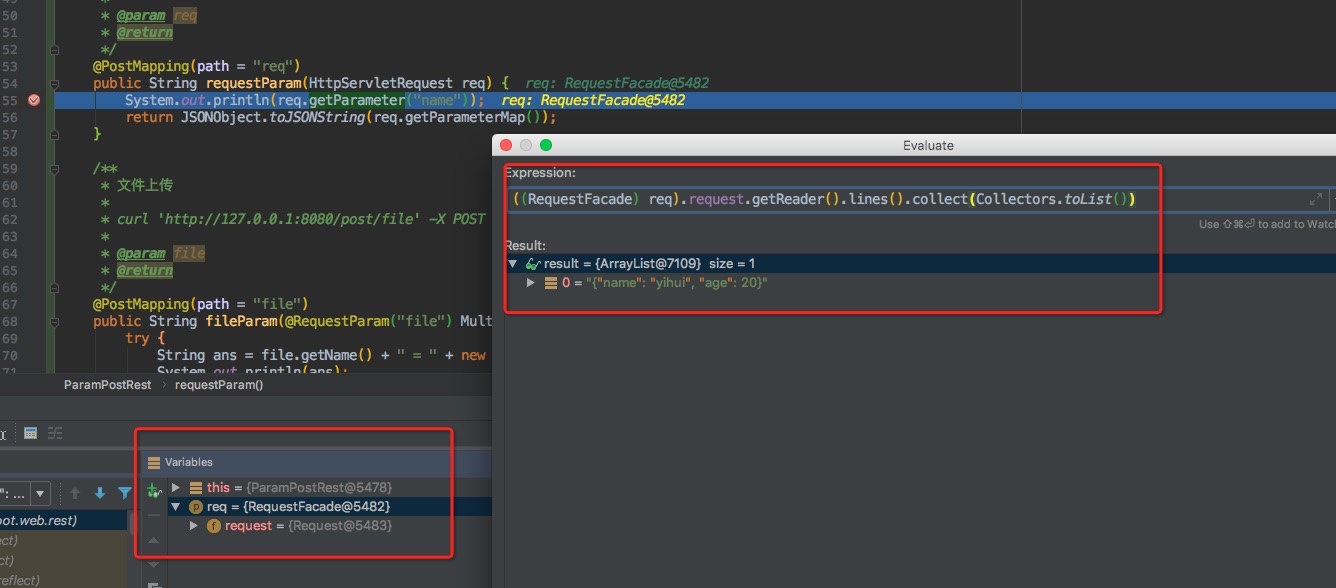
上面截圖演示了我們從請求的InputStream中獲取post引數;所以再實際使用的時候需要注意,流中的資料只能讀一次,讀完了就沒了; 這個和我們使用GET傳參是有很大的差別的
注意:如果您有一個列印請求引數日誌的切面,在獲取post傳的引數時需要注意,是不是把流的資料讀了,導致業務中無法獲取到正確的資料!!!
2. RequestBody
上面說到傳json串資料時,後端直接通過HttpServletRequest獲取資料不太方便,那麼有更優雅的使用姿勢麼?下面我們看一下@RequestBody註解的使用
@Data
public class BaseReqDO implements Serializable {
    private static final long serialVersionUID = 8706843673978981262L;

    private String name;

    private Integer age;

    private List<Integer> uIds;
}

@PostMapping(path = "body")
public String bodyParam(@RequestBody BaseReqDO req) {
    return req == null ? "null" : req.toString();
}
只需要在引數中新增@RequestBody註解即可,然後這個介面就支援json串的POST提交了
# json串資料提交
➜  ~ curl 'http://127.0.0.1:8080/post/body' -X POST -H 'content-type:application/json;charset:UTF-8' -d '{"name": "yihui", "age": 20}'
BaseReqDO(name=yihui, age=20, uIds=null)%

# 表單資料提交
➜  ~ curl 'http://127.0.0.1:8080/post/body' -X POST -d 'name=yihui&age=20'
{"timestamp":1566987651551,"status":415,"error":"Unsupported Media Type","message":"Content type 'application/x-www-form-urlencoded;charset=UTF-8' not supported","path":"/post/body"}%
說明:使用@RequestBody註解之後,可解析提交的json串;但不再支援表單提交引數方式(application/x-www-form-urlencoded)
3. RequestEntity
使用RequestEntity來解析引數,可能並不太常見,它用來解析json串提交的引數也比較合適,使用姿勢也比較簡單
@PostMapping(path = "entity")
public String entityParam(RequestEntity requestEntity) {
    return Objects.requireNonNull(requestEntity.getBody()).toString();
}
使用case如下
# json串資料提交
➜  ~ curl 'http://127.0.0.1:8080/post/entity' -X POST -H 'content-type:application/json;charset:UTF-8' -d '{"name": "yihui", "age": 20}'
{name=yihui, age=20}%

# 表單資料提交不行
➜  ~ curl 'http://127.0.0.1:8080/post/entity' -X POST -d 'name=yihui&age=19'
{"timestamp":1566988137298,"status":415,"error":"Unsupported Media Type","message":"Content type 'application/x-www-form-urlencoded;charset=UTF-8' not supported","path":"/post/entity"}%
4. MultipartFile 檔案上傳
檔案上傳也是一個比較常見的,支援起來也比較簡單,有兩種方式,一個是使用MultipartHttpServletRequest引數來獲取上傳的檔案;一個是藉助 @RequestParam註解
private String getMsg(MultipartFile file) {
    String ans = null;
    try {
        ans = file.getName() + " = " + new String(file.getBytes(), "UTF-8");
    } catch (IOException e) {
        e.printStackTrace();
        return e.getMessage();
    }
    System.out.println(ans);
    return ans;
}

/**
 * 檔案上傳
 *
 * curl 'http://127.0.0.1:8080/post/file' -X POST -F '[email protected]'
 *
 * @param file
 * @return
 */
@PostMapping(path = "file")
public String fileParam(@RequestParam("file") MultipartFile file) {
    return getMsg(file);
}

@PostMapping(path = "file2")
public String fileParam2(MultipartHttpServletRequest request) {
    MultipartFile file = request.getFile("file");
    return getMsg(file);
}
測試case如下
# 建立一個文字檔案
➜  ~ vim hello.txt
hello, this is yhh's spring test!

# 使用curl -F 實現檔案上傳,注意使用姿勢
➜  ~ curl 'http://127.0.0.1:8080/post/file' -F '[email protected]'
file = hello, this is yhh's spring test!

➜  ~ curl 'http://127.0.0.1:8080/post/file2' -F '[email protected]'
file = hello, this is yhh's spring test!
5. 其他
上面介紹的幾種有別於GET篇中的請求姿勢,請注意GET請求引數的解析方式,在POST請求中,可能也是適用的,為什麼說可能?因為在post請求中,不同的content-type,對引數的解析影響還是有的;
需要注意的是,對於傳統的表單提交(application/x-www-form-urlencoded)方式,post的引數解析依然可以使用
- @RequsetParam
- POJO(BEAN的解析方式)
- @PathVariable引數解析
- 方法引數解析
II. 其他
0. 專案&相關博文
- 190824-SpringBoot系列教程web篇之Get請求引數解析姿勢彙總
- 工程:https://github.com/liuyueyi/spring-boot-demo
- 專案: https://github.com/liuyueyi/spring-boot-demo/blob/master/spring-boot/202-web-params
1. 一灰灰Blog
盡信書則不如,以上內容,純屬一家之言,因個人能力有限,難免有疏漏和錯誤之處,如發現bug或者有更好的建議,歡迎批評指正,不吝感激
下面一灰灰的個人部落格,記錄所有學習和工作中的博文,歡迎大家前去逛逛
- 一灰灰Blog個人部落格 https://blog.hhui.top
- 一灰灰Blog-Spring專題部落格 http://spring.hhui.top
