
TabLayout用法,android頂部導航欄,android底部導航欄
轉載出處:http://blog.csdn.net/tianyaleixiaowu/article/details/50820257
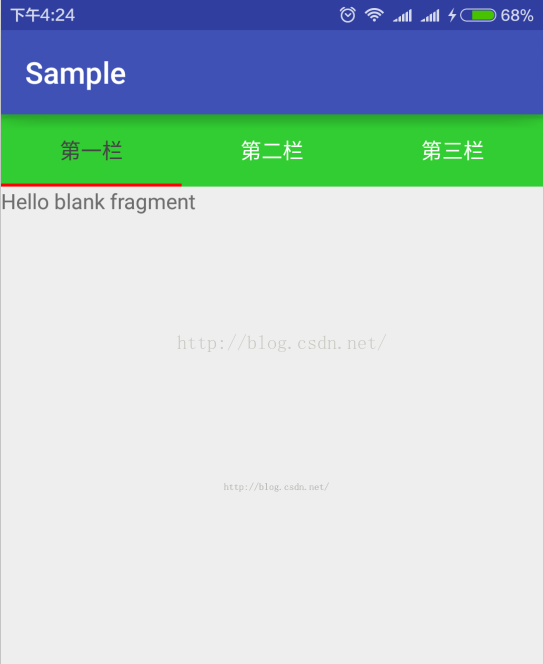
TabLayout是android.support.design裡的一個控制元件,使用它可以很方便的做出頂部導航和底部導航。類似於這樣的,能設定選中時字型的顏色和選中時的圖片。

首先我們引入compile 'com.android.support:design:23.1.1'
它的用法是:
第一種比較簡單,就是文字和一個指示器。
佈局檔案是
[html] view plain copy print?- <LinearLayoutxmlns:android="http://schemas.android.com/apk/res/android"
- android:layout_width="match_parent"
- android:layout_height="match_parent"
- xmlns:app="http://schemas.android.com/apk/res-auto"
- android:orientation="vertical">
-
<android.support.design.widget.TabLayout
- android:id="@+id/tab"
- android:layout_width="match_parent"
- android:layout_height="wrap_content"
- android:background="#32CD32"
- app:tabIndicatorColor="#f00"
- app:tabSelectedTextColor="#444"
- app:tabMode="fixed"
-
app:tabTextColor="#fff"/>
- <android.support.v4.view.ViewPager
- android:id="@+id/viewpager"
- android:layout_width="fill_parent"
- android:layout_height="0dp"
- android:layout_weight="1"/>
- </LinearLayout>
java程式碼
[java] view plain copy print?- import android.app.Fragment;
- import android.os.Bundle;
- import android.support.design.widget.TabLayout;
- import android.support.v4.view.ViewPager;
- import android.support.v7.app.AppCompatActivity;
- import com.tianyalei.wolf.mddesignlib.view.titlelayout.TitleFragmentPagerAdapter;
- import com.tianyalei.wolf.sample.R;
- import java.util.ArrayList;
- import java.util.List;
- import butterknife.Bind;
- import butterknife.ButterKnife;
- publicclass TabActivity extends AppCompatActivity {
- @Bind(R.id.tab)
- TabLayout tabLayout;
- @Bind(R.id.viewpager)
- ViewPager viewpager;
- @Override
- protectedvoid onCreate(Bundle savedInstanceState) {
- super.onCreate(savedInstanceState);
- setContentView(R.layout.activity_tab);
- ButterKnife.bind(this);
- // tabLayout.setTabTextColors(Color.WHITE, Color.GRAY);//設定文字在選中和為選中時候的顏色
- // tabLayout.setSelectedTabIndicatorColor(Color.WHITE);//設定選中時的指示器的顏色
- // tabLayout.setTabMode(TabLayout.MODE_SCROLLABLE);//可滑動,預設是FIXED
- List<Fragment> fragments = new ArrayList<>();
- fragments.add(new BlankFragment());
- fragments.add(new BlankFragment());
- fragments.add(new BlankFragment());
- TitleFragmentPagerAdapter adapter = new TitleFragmentPagerAdapter(getFragmentManager(), fragments, new String[]{"第一欄", "第二欄", "第三欄"});
- viewpager.setAdapter(adapter);
- tabLayout.setupWithViewPager(viewpager);
- }
- }
- /*
- * Copyright (C) 2012 www.amsoft.cn
- *
- * Licensed under the Apache License, Version 2.0 (the "License");
- * you may not use this file except in compliance with the License.
- * You may obtain a copy of the License at
- *
- * http://www.apache.org/licenses/LICENSE-2.0
- *
- * Unless required by applicable law or agreed to in writing, software
- * distributed under the License is distributed on an "AS IS" BASIS,
- * WITHOUT WARRANTIES OR CONDITIONS OF ANY KIND, either express or implied.
- * See the License for the specific language governing permissions and
- * limitations under the License.
- */
- package com.tianyalei.wolf.mddesignlib.view.titlelayout;
- import android.app.Fragment;
- import android.app.FragmentManager;
- import android.support.v13.app.FragmentPagerAdapter;
- import java.util.ArrayList;
- import java.util.List;
- /**
- * © 2012 amsoft.cn 名稱:TitleFragmentPagerAdapter.java 描述:一個通用的Fragment介面卡
- *
- * @author wolf
- * @version v1.0
- * @date:2016-3-7 上午10:57:53
- */
- publicclass TitleFragmentPagerAdapter extends FragmentPagerAdapter {
- /**
- * The m fragment list.
- */
-
相關推薦
Android學習總結——輸入法將BottomNavigationBar(底部導航欄)頂上去的問題
andro devel google tps 底部導航 style log cti googl 在應用清單中給當前<Activity>設置: android:windowSoftInputMode="adjustPan" 關於android:windo
微信小程式之仿android fragment之可滑動的底部導航欄例項 —— 微信小程式實戰系列(4)
底部3-5個選項的底部導航欄,目前在移動端上是主流佈局之一 因此騰訊官方特地做了,可以通過設定,就可以做出了一個底部的導航欄 但是通過設定的這個底部的導航欄,功能上比較固定,它必須要設定與它對應的一個頁面,而且並不能滑動。 在業務上,有時候會比較限制,並不能完全滿足所需
Android之RadioGroup+ViewPager製作的底部導航欄
在日常開發中我們常常會用到類似微信或者QQ的底部導航。實現這樣的效果有多種,今天就為大家介紹一種實現簡單,可控性好的底部導航的實現方法。 首先建立activity_main.xml佈局檔案,裡面主要由ViewPager和RadioGroup構成。ViewPager用來存
Android (爭取做到)最全的底部導航欄實現方法
本文(爭取做到)Android 最全的底部導航欄實現方法. 現在寫了4個主要方法. 還有一些個人感覺不完全切題的方法也會簡單介紹一下. 方法一. ViewPager + List<View> + PagerAdapter 先看a
android開發時華為手機底部導航欄擋住了應用佈局
原因:使用安卓的BottomNavigationView控制元件開發底部導航欄同時使用了沉浸式狀態列導致華為手機的底部導航欄會蓋住我應用的導航欄。 解決:先寫一個工具類 import android.content.Context; import android.co
自定義Toast,從頂部掉下,然後再彈一下
先把自定義類贈上,如果您覺得有用,請贊! import java.util.Timer; import java.util.TimerTask; import com.example.viewpageindicator.R; import android.
Android利用系統原生BottomNavigationView實現底部導航
rnorm .get nbsp upd access help value getitem span <android.support.design.widget.BottomNavigationView android:id="@+id/na
android開發(1):底部導航條的實現 | navigation tab
tom git 這一 cocoapod https android中 rip launcher href 底部導航條,在iOS中叫tabbar,在android中叫bottombar或bottom navigation,是一個常用的切換頁面的導航條。 同樣,如果有良好的第三
底部導航欄:在底部導航欄上設定小紅點和數字
在http://blog.csdn.net/yancychas/article/details/77254708這個的activity_main.xml基礎上,設定小紅點。 在看現在的activity_main.xml <?xml version="1.0"
TabLayout用法,android頂部導航欄,android底部導航欄
轉載出處:http://blog.csdn.net/tianyaleixiaowu/article/details/50820257 TabLayout是android.support.design裡的一個控制元件,使用它可以很方便的做出頂部導航和底部導航。
Android頂部導航之TabLayout和ViewPager的組合,setupWithViewPager有點坑
TabLayout是Android Design Support Library的元件,可以很方便的寫出頂部導航欄比以前那個什麼TabHost好用多了,因為是Design Support Library下的控制元件,所以使用它要引入相關依賴 impleme
Android 動態隱藏顯示導航欄,狀態欄
sets tab mil repeat art gif ava hide sticky Talk is cheap, show me the code.--Linus TorvaldsOkay, here:一、導航欄:[java] view plain copyprivat
Android 利用ViewPager+GridView,仿美團首頁導航欄分類佈局介面
先看美團的效果: 再看我們山寨的效果: 最初我是使用VIewPager+RecyclerVIew實現的,發現在左右滑動的時候,有問題,經常滑動不了,應該是RecyclerVIew消費了Touch事件,所以棄用這個方法了(效果圖是下面的效果,為了區別VIew頁面,每
Android底部導航欄切換介面,點選選項時文字和圖示改變顏色
** 類似底部導航欄的選單,點選圖示,文字和圖示都變顏色,Fragment切換介面詳解 ** 先看效果圖 以下是全部完整程式碼,如果有問題歡迎留言 圖示和文字佈局color_change.xml <?xml version="1.0" encodi
微信小程式前臺開發——實現登入,底部導航欄,頂部導航欄(分類顯示)
微信小程式前臺開發,實現登入功能,獲取微信頭像和微信名稱,實現底部導航欄,頂部導航欄(通過導航欄分類顯示內容)。 1、初次開發微信小程式需要去官網下載微信小程式開發工具。 2、通過官方的教程註冊小程式賬號。 3、開啟微信開發者工具新建專案。 選擇專案路徑,填寫
移動端雙擊導航欄,回到頂部var i=0;
$(‘.shuangjidaohang’).on(‘click’, function () { i++; setTimeo
ionic-基於angularjs實現沉浸式頂部導航欄,滾動時產生漸變效果
最近一直在研究angularjs和ionic框架,對於如何設計好的產品和使用者體驗一直都在思考,看了很多關於app設計的資料和其他的產品,覺得基於material design的設計確實是目前比較好的
Android最好用的底部導航欄,GitHub最火的開源控制元件之一
轉載自這個專案的github地址:https://github.com/xubinhong/BottomBar這個底部導航欄的特點:1.告別xml中的item佈局,一切icon、title統統繪製得出;2.扁平化,由於icon、title都是繪製得出的,所以只需要一個view
Android肝帝戰紀之基於上篇單Activity+多Fragment框架,開發電商式導航欄,多Fragment切換
電商式導航欄,多Fragment切換 介面構思示意圖 設計思路 在底部的LinearLayout中新增相應的圖示,然後設定tag繫結相應的 Fragment陣列對應的下標值,再點選切換的時候,根據獲取到的tag值,取出陣列中對應下標的Fragment,在
超簡單,幾行程式碼搞定Android底部導航欄
咳咳,答應過年增加新功能的,沒想到拖到現在,延遲了一個來月,尷尬,尷尬 那個,我們先忽略這尷尬的事情吧,進入正題才是最重要滴 老規矩,先上效果圖: BottomTabBar.png 跟原來的圖有個很明顯的區別,你們也一定都發現了,對不對。那麼顯眼的小紅