
AndroidTestCase來進行android 單元測試簡介
1 通過AndroidTestCase 實現的大致步驟:
- 新增自己的test case code, 讓它們繼承自AndroidTestCase.
- 定義自己的testSuite類,用來管理test cases.
- 定義自己的testRunner,用來執行測試.
2 這種方法所涉及到的android的類以及介面:
Android Test Case classes需要從AndroidTestCase類派生出來,而不再是從junit.framework.TestCase. 二者之間的最主要區別就是Android test cases提供了一個方法getContext()來獲取當前的上下文變數,這在android測試中很重要的,因為很多的android api都需要context。
2.1 AndroidTestCase主要成員:
- setUp() .
- tearDown().
- testAndroidTestCaseSetupProperly().
- TestSuite (in package junit.package):一個TestSuite就是一系列test case的集合,通過testsuite可以更好的來管理test case.
2.2TestSuite主要成員:
- void addTest (Test test).
- void addTestSuite(Class testClass).
向test suite中新增test case的方法分為如下兩種:
- TestSuite suite= new TestSuite().
suite.addTest(new MathTest(“testAdd”)).
suite.addTest(new MathTest(“testDivideByZero”)). - 通過addTestSuite()來新增:
suite.addTestSuite(MathTest.class);
- TestSuite suite= new TestSuite().
2.3 TestListener
這是一個interface ,用來監聽測試程序
有以下4個Public Methods :
abstract void addError(Test test,Throwable t)
abstract void addFailure(Test test,AssertionFailedError t)
abstract void endTest(Test test)
abstract void startTest(Test test)
AndroidTestRunner繼承自class junit.runner.BaseTestRunner,但是它沒有提供ui, 甚至來一個基於console的UI都沒有,所以,如果想要很好的檢視測試結果的話,你需要自己來處理來自於test runner的callback 函式。一會可以通過例子演示一下
AndroidTestRunner主要方法:
SetTest();
runTest();
addTestListener();
setContext();
3 簡單匯入InstrumentationTestRunner的操作步驟:
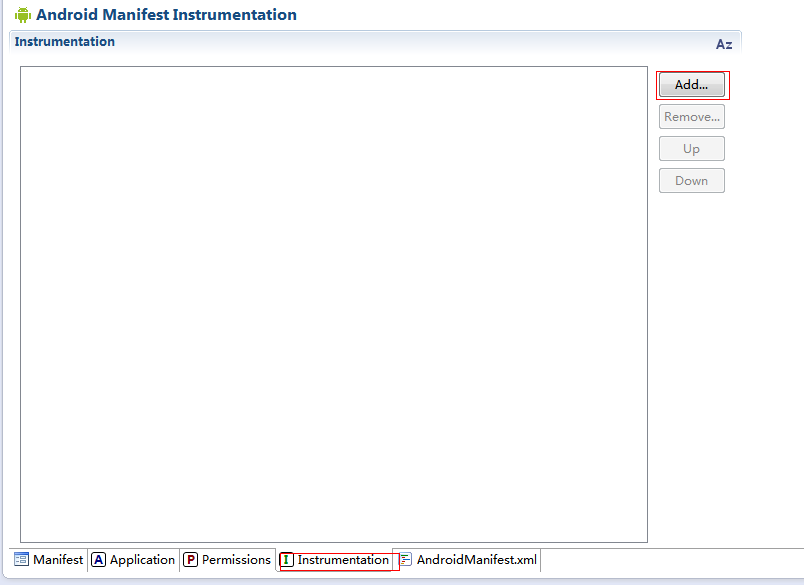
3.1 manifest.xml檔案中選擇Instrumentation後點擊Add,如下圖:
3.2 接著上一步出來的對話方塊中的點選name 一欄後面的Browse,如下圖操作:
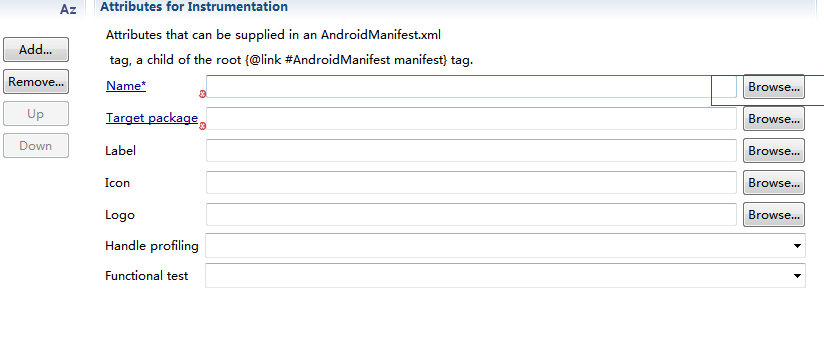

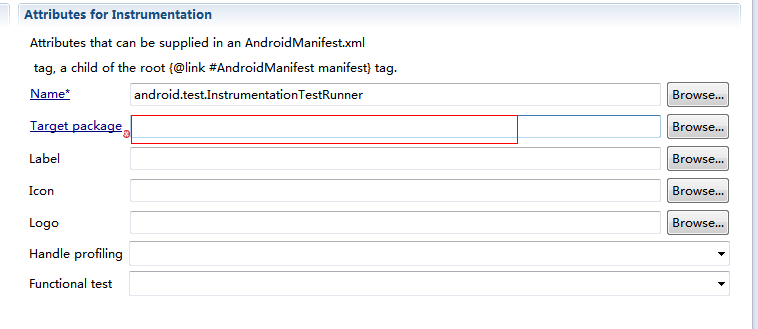
3.3 緊接著記得在如下圖的Target package中填上你所建立的工程的包名
3.4 最後需要在 清單檔案AndroidManiFest.xml中新增許可權:
<uses-library android:name="android.test.runner" />此外要檢查下AndroidTestRunner 在清單檔案AndroidManiFest.xml有沒新增成功,有如下程式碼則新增成功:
    <instrumentation
        android:name="android.test.InstrumentationTestRunner"
        android:targetPackage="com.example.android_sdcard" >//所建工程的包名
    </instrumentation>
4 現對sdcard的讀寫功能進行單元測試,程式碼如下:
4.1 AndroidManiFest.xml 檔案 如下:
   <?xml version="1.0" encoding="utf-8"?>
<manifest xmlns:android="http://schemas.android.com/apk/res/android"
    package="com.example.android_sdcard"
    android:versionCode="1"
    android:versionName="1.0" >

    <uses-sdk
        android:minSdkVersion="14"
        android:targetSdkVersion="14" />
     //sdcard的讀寫許可權
    <uses-permission android:name="android.permission.WRITE_EXTERNAL_STORAGE" />

    <instrumentation
        android:name="android.test.InstrumentationTestRunner"
        android:targetPackage="com.example.android_sdcard" >
    </instrumentation>

    <application
        android:allowBackup="true"
        android:icon="@drawable/ic_launcher"
        android:label="@string/app_name"
        android:theme="@style/AppTheme" >
        //新增AndroidTestCase的許可權
        <uses-library android:name="android.test.runner" />
        <activity
            android:name=".MainActivity"
            android:label="@string/app_name" >
            <intent-filter>
                <action android:name="android.intent.action.MAIN" />
                <category android:name="android.intent.category.LAUNCHER" />
            </intent-filter>
        </activity>
    </application>

</manifest>
4.2 MainActivity .java檔案如下:
package com.example.android_sdcard;
import android.app.Activity;
import android.os.Bundle;
import android.view.Menu;
import android.view.MenuItem;

public class MainActivity extends Activity {

    @Override
    protected void onCreate(Bundle savedInstanceState) {
        super.onCreate(savedInstanceState);
        setContentView(R.layout.activity_main);
    }

}
4.3 FileService.java檔案如下:
package com.example.android_sdcard;
import java.io.ByteArrayOutputStream;
import java.io.File;
import java.io.FileInputStream;
import java.io.FileNotFoundException;
import java.io.FileOutputStream;
import java.io.IOException;

import org.apache.http.util.ByteArrayBuffer;

import android.content.Context;
import android.os.Environment;

public class FileService {
    private Context context;

    public FileService(Context context) {
        this.context = context;
    }
    //空的建構函式
    public FileService() {

    }

    /**函式作用:用來讀取sdcard檔案的內容
     * @param fileName 要讀取的檔名
     * @return
     */
    public String getFileFromSdcard(String fileName) {
        FileInputStream inputStream = null;
        // 緩衝的流,和磁碟無關,不需要關閉
        ByteArrayOutputStream outputStream = new ByteArrayOutputStream();
        File file = new File(Environment.getExternalStorageDirectory(),
                fileName);
        if (Environment.MEDIA_MOUNTED.equals(Environment
                .getExternalStorageState())) {
            try {
                inputStream = new FileInputStream(file);
                int len = 0;
                byte[] data = new byte[2048];
                while ((len = inputStream.read(data)) != -1) {
                    outputStream.write(data, 0, len);

                }
            } catch (FileNotFoundException e) {
                // TODO Auto-generated catch block
                e.printStackTrace();
            } catch (IOException e) {
                // TODO Auto-generated catch block
                e.printStackTrace();
            } finally {
                if (inputStream != null) {
                    try {
                        inputStream.close();
                    } catch (IOException e) {
                        // TODO Auto-generated catch block
                        e.printStackTrace();
                    }
                }
            }
        }
        return new String(outputStream.toByteArray());
    }

    /**函式作用:向sdcard的檔案寫入內容
     * @param fileName 檔名稱
     * @param content   內容
     * @return
     */
    public boolean saveContentToSdcard(String fileName, String content) {
        boolean flag = false;
        FileOutputStream fileOutputStream = null;
        File file = new File(Environment.getExternalStorageDirectory(),
                fileName);
        if (Environment.MEDIA_MOUNTED.equals(Environment
                .getExternalStorageState())) {
            try {
                fileOutputStream = new FileOutputStream(file);
                fileOutputStream.write(content.getBytes());
                flag = true;
            } catch (FileNotFoundException e) {
                // TODO Auto-generated catch block
                e.printStackTrace();
            } catch (IOException e) {
                // TODO Auto-generated catch block
                e.printStackTrace();
            } finally {
                if (fileOutputStream != null) {
                    try {
                        fileOutputStream.close();
                    } catch (IOException e) {
                        // TODO Auto-generated catch block
                        e.printStackTrace();
                    }
                }
            }
        }

        return flag;
    }
}
4.4 Mytest.java檔案如下:
package com.example.android_sdcard;
import android.content.Context;
import android.test.AndroidTestCase;
import android.util.Log;

public class Mytest extends AndroidTestCase {
    private final String TAG = "MyTest";

    public Mytest() {
        // TODO Auto-generated constructor stub
    }

    public void saveFile() {
        Context context = getContext();
        FileService fileService = new FileService();
        boolean flag = fileService.saveContentToSdcard("android.txt", "hello java");
        Log.i(TAG, "---->" + flag);

    }

    public void readFile() {
        Context context = getContext();
        FileService fileService = new FileService();
        String msString = fileService.getFileFromSdcard("android.txt");
        Log.i(TAG, "---->" + msString);
    }
}
4.5 點在工程上右擊 Run As ->Android Junit Test,結果如下:

4.6 要檢視sdcard的寫入內容方法:
1.如果是真機執行去檢視手機sdcard下的android.txt的內容。
2.如果是模擬器執行請如下操作去檢視內容:
Windows->Show View->Other->File Explorer->mnt->sdcard->android.txt 後把android.txt pull到指定磁碟位置開啟檢視內容。