角點檢測和匹配之Harris與FAST角點檢測
這一章主要內容:
1. Harris角點檢測
2. FAST特徵檢測
3. 尺度不變的SURF特徵檢測
4.SURF檢測描述
一、引言
在計算機視覺中,特徵點或稱興趣點,角點(即影象的極值點,線段的終點,曲線曲率最大的點或水平、豎直方向上屬性最大的點等等)被廣泛應用。這些特徵點是影象很重要的特徵,對影象圖形的理解和分析有很重要的作用。特徵點在保留影象圖形重要特徵的同時,可以代替整幅影象的處理,有效地減少資訊的資料量,使其資訊的含量很高,有效地提高了計算的速度,有利於影象的可靠匹配,使得實時處理成為可能。
特徵點檢測就是是對有具體定義的、或者是能夠具體檢測出來的特徵點的檢測。目前檢測方法很多,具體分有三大類基於灰度影象的角點檢測、基於二值影象的角點檢測、基於輪廓曲線的角點檢測。基於灰度影象的角點檢測又可分為基於梯度、基於模板和基於模板梯度組合3類方法,其中基於模板的方法主要考慮畫素領域點的灰度變化,即影象亮度的變化,將與鄰點亮度對比足夠大的點定義為角點。常見的基於模板的角點檢測演算法有Kitchen-Rosenfeld角點檢測演算法,Harris角點檢測演算法、KLT角點檢測演算法及SUSAN角點檢測演算法。和其他角點檢測演算法相比,SUSAN角點檢測演算法具有演算法簡單、位置準確、抗噪聲能力強等特點。
特徵點的應用也很廣泛,去解決一些重要的影象問題,如目標識別,影象匹配,視覺跟蹤,3D重建等等。
二、Harris角點檢測
角點是影象區域性特徵,很方便的在影象中定位(甚至是半畫素精確定位),而且經常出現在人造的物體(如牆,門,窗戶,桌子等等)中,所以應用廣泛。
Harris角點檢測是最經典的檢測方法,基本原理就是,角點的水平和豎直方向梯度都比較大(經過數學推導,兩個特徵值即代表水平和垂直方向的強度),邊緣點是水平或豎直梯度有一個比較大,平坦點是水平和豎直梯度都比較小。因此主要是計算方向梯度,然後根據特定門限判斷是否是最大,確定角點。
opencv中提供兩個Harris角點檢測的函式,
2.1 cornerHarris
第一個比較簡單,直接呼叫即可
函式標頭檔案:
#include <opencv2/imgproc/imgproc.hpp>函式引數說明://! computes Harris cornerness criteria at each image pixel CV_EXPORTS_W void cornerHarris( InputArray src, OutputArray dst, int blockSize, int ksize, double k, int borderType=BORDER_DEFAULT );
blockSize:角點是兩個邊緣的連線點,因此在區域性範圍內,角點是所有方向上梯度最大的點,blockSize就是設定區域性檢測視窗大小
計算個方向變化的公式:

ksize:在計算個方向變化強度的時候使用了Sobel求其導數,該引數就是設定Sobel濾波器引數。
R計算可以近似為:
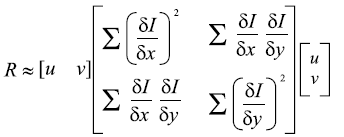
k: 兩個特徵值都不大於門限時,該點是普通點;當只有一個特徵值大於門限時,是邊緣點;當兩個特徵值都大於門限時,是角點。由於同時判斷兩個特徵值比較麻煩,經過變形,得出下面公式,根據公式的不同值對應不同結果。需要設定K引數,來調節所需要結果的效能,一般K取(0.05--0.5)。
R=

函式使用例項:
// Detect Harris Corners
cv::Mat cornerStrength;
cv::cornerHarris(image,cornerStrength,
                 3,     // neighborhood size
                 3,     // aperture size
                 0.01); // Harris parameter

// threshold the corner strengths
cv::Mat harrisCorners;
double threshold= 0.0001;
cv::threshold(cornerStrength,harrisCorners,
             threshold,255,cv::THRESH_BINARY_INV);
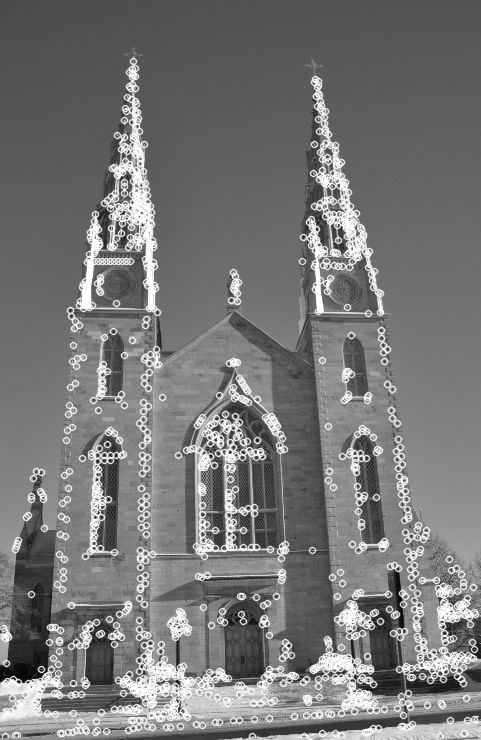
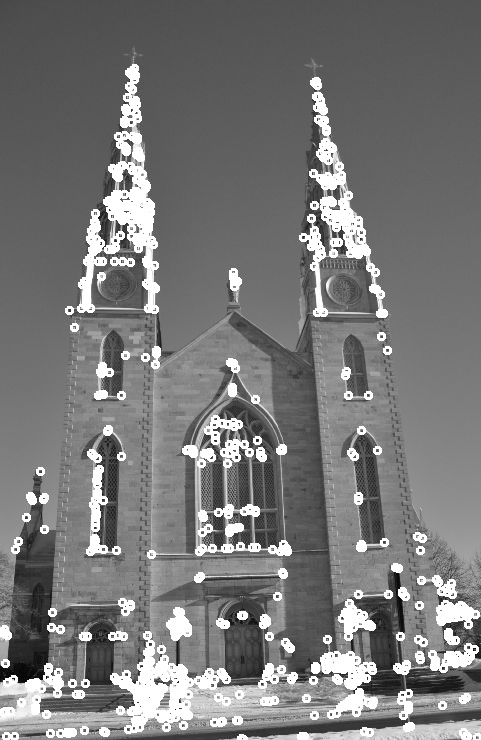
church01.jpg
Harris Corner Map.jpg
 程式分析:
程式分析:
可以看出角點檢測的圖形有很多簇角點,導致很難對角點進行精確定位,所以我們在下面定義個類,檢測角點並進行其他處理。
類得設計有兩步,第一步計算源影象所有的角點;第二步,1,可設定質量等級(即門限)的值,當大於門限值時,選為候選角點,2 ,再進行非極大值抑制演算法,排除一些雖然超過門限,但是不是區域性最大的點。實現方法:先膨脹(dilate),把區域性小於最大值的點全部膨脹為最大值,然後和原圖比較(compare),剩下和原圖相同的點,得出區域性最大點,存入localMax。通過bitwise_and,將localMax和cornerMap相與,完成非極大值抑制。
#if !defined HARRISD
#define HARRISD
#include <vector>
#include <opencv2/core/core.hpp>
#include <opencv2/imgproc/imgproc.hpp>
#include <opencv2/highgui/highgui.hpp>
#include <opencv2/features2d/features2d.hpp>
class HarrisDetector {
private:
// 32-bit float image of corner strength
cv::Mat cornerStrength;
// 32-bit float image of thresholded corners
cv::Mat cornerTh;
// image of local maxima (internal)
cv::Mat localMax;
// size of neighbourhood for derivatives smoothing
int neighbourhood;
// aperture for gradient computation
int aperture;
// Harris parameter
double k;
// maximum strength for threshold computation
double maxStrength;
// calculated threshold (internal)
double threshold;
// size of neighbourhood for non-max suppression
int nonMaxSize;
// kernel for non-max suppression
cv::Mat kernel;
public:
HarrisDetector() : neighbourhood(3), aperture(3), k(0.1), maxStrength(0.0), threshold(0.01), nonMaxSize(3) {
setLocalMaxWindowSize(nonMaxSize);
}
// Create kernel used in non-maxima suppression
void setLocalMaxWindowSize(int size) {
nonMaxSize= size;
kernel.create(nonMaxSize,nonMaxSize,CV_8U);
}
// Compute Harris corners
void detect(const cv::Mat& image) {
// Harris computation
cv::cornerHarris(image,cornerStrength,
neighbourhood,// neighborhood size
aperture, // aperture size
k); // Harris parameter
// internal threshold computation
double minStrength; // not used
cv::minMaxLoc(cornerStrength,&minStrength,&maxStrength);
// local maxima detection
cv::Mat dilated; // temporary image
cv::dilate(cornerStrength,dilated,cv::Mat());
cv::compare(cornerStrength,dilated,localMax,cv::CMP_EQ);
}
// Get the corner map from the computed Harris values
cv::Mat getCornerMap(double qualityLevel) {
cv::Mat cornerMap;
// thresholding the corner strength
threshold= qualityLevel*maxStrength;
cv::threshold(cornerStrength,cornerTh,threshold,255,cv::THRESH_BINARY);
// convert to 8-bit image
cornerTh.convertTo(cornerMap,CV_8U);
// non-maxima suppression
cv::bitwise_and(cornerMap,localMax,cornerMap);
return cornerMap;
}
// Get the feature points vector from the computed Harris values
void getCorners(std::vector<cv::Point> &points, double qualityLevel) {
// Get the corner map
cv::Mat cornerMap= getCornerMap(qualityLevel);
// Get the corners
getCorners(points, cornerMap);
}
// Get the feature points vector from the computed corner map
void getCorners(std::vector<cv::Point> &points, const cv::Mat& cornerMap) {
// Iterate over the pixels to obtain all feature points
for( int y = 0; y < cornerMap.rows; y++ ) {
const uchar* rowPtr = cornerMap.ptr<uchar>(y);
for( int x = 0; x < cornerMap.cols; x++ ) {
// if it is a feature point
if (rowPtr[x]) {
points.push_back(cv::Point(x,y));
}
}
}
}
// Draw circles at feature point locations on an image
void drawOnImage(cv::Mat &image, const std::vector<cv::Point> &points, cv::Scalar color= cv::Scalar(255,255,255), int radius=3, int thickness=2) {
std::vector<cv::Point>::const_iterator it= points.begin();
// for all corners
while (it!=points.end()) {
// draw a circle at each corner location
cv::circle(image,*it,radius,color,thickness);
++it;
}
}
};
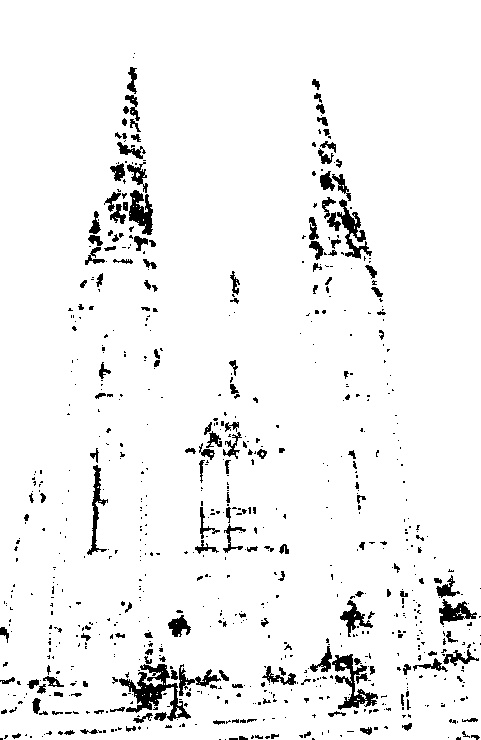
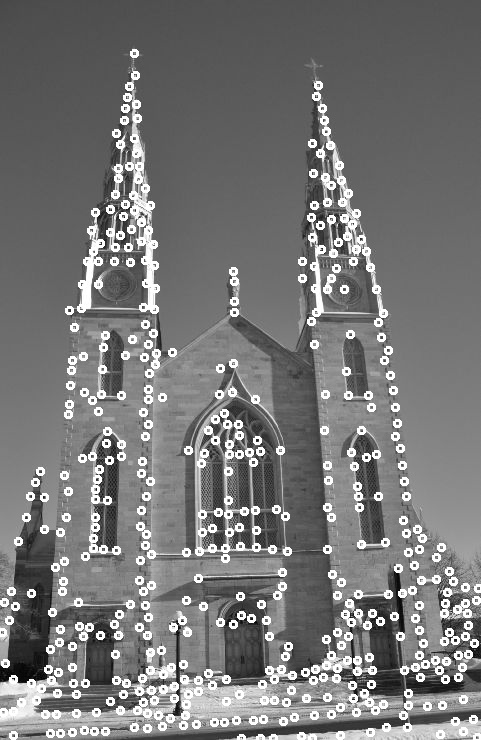
#endifHarris Corners.jpg
程式結果分析:
可以看出檢測出的角點,雖然是最優,但是一簇一簇的,有些地方重複太多。
2.2 goodFeaturesToTrack
由於第一種Harris演算法,對K值的選取有很大要求,K值是經驗值,對不同影象不好確定,因此提出改進型的Harris演算法,只需計算兩個特徵值,例外也不選用非極大值抑制方法,而選擇容忍距離。
函式定義:
//! finds the strong enough corners where the cornerMinEigenVal() or cornerHarris() report the local maxima
CV_EXPORTS_W void goodFeaturesToTrack( InputArray image, OutputArray corners,
                                     int maxCorners, double qualityLevel, double minDistance,
                                     InputArray mask=noArray(), int blockSize=3,
bool useHarrisDetector=false, double k=0.04 );// Compute good features to track
std::vector<cv::Point2f> corners;
cv::goodFeaturesToTrack(image,corners,
500, // maximum number of corners to be returned 角點總數
0.01, // quality level 質量等級
10); // minimum allowed distance between points 容忍距離
// for all corners
std::vector<cv::Point2f>::const_iterator it= corners.begin();
while (it!=corners.end()) {
// draw a circle at each corner location
cv::circle(image,*it,3,cv::Scalar(255,255,255),2);
++it;
}
2.3 GoodFeaturesToTrackDetector
opencv對goodFeaturesToTrack設定一個介面。
應用例項:
// vector of keypoints
	std::vector<cv::KeyPoint> keypoints;
	// Construction of the Good Feature to Track detector
	cv::GoodFeaturesToTrackDetector gftt(
		500,	// maximum number of corners to be returned
		0.01,	// quality level
		10);	// minimum allowed distance between points
	// point detection using FeatureDetector method
	gftt.detect(image,keypoints);

	cv::drawKeypoints(image,		// original image
		keypoints,					// vector of keypoints
		image,						// the resulting image
		cv::Scalar(255,255,255),	// color of the points
		cv::DrawMatchesFlags::DRAW_OVER_OUTIMG); //drawing flag
三、FAST(Features from Accelerated Segment Test)角點檢測
Harris角點檢測定義了角點的數學表示式,但是這只是眾多定義的一種,而且由於需要計算導數,比較複雜。特別是在實際應用中,角點檢測只是很多應用的第一步,所以在這提出了一種FAST角點檢測,角點的確定只取決於相鄰畫素的比較。
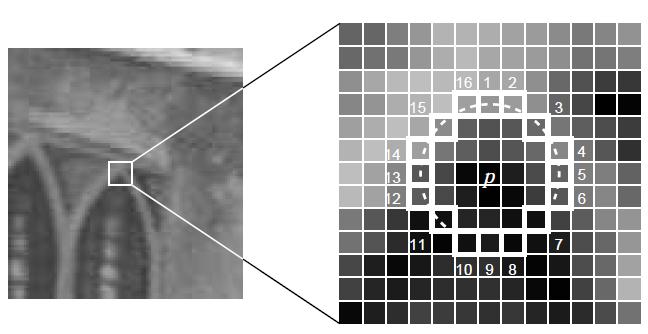
FAST演算法檢測的角點定義為在畫素點的周圍鄰域內有足夠多的畫素點與該點處於不同的區域。應用到灰度影象中,即有足夠多的畫素點的灰度值大於該點的灰度值或者小於該點的灰度值。例如選取半徑是3的情況,如下圖,如果這1-16個點中,有超過3/4即12個,與圓點的灰度差大於閾值,則確定該點為候選角點,再利用非極大值抑制,從期望角點中選出最佳角點。
為了能利用機器學習的的方法進行加速。對同一類影象,例如同一場景的影象,可以在16個方向上進行訓練,得到一棵決策樹,從而在判定某一畫素點是否為角點時,不再需要對所有方向進行檢測,而只需要按照決策樹指定的方向進行2-3次判定即可確定該點是否為角點。
另外非極大值抑制,一般是選擇原點與相鄰節點灰度差之和最大的角點,作為最後保留的最優角點。
opencv中提供的FAST函式如下:
函式舉例:
// Read input image
	image= cv::imread("church01.jpg",0);

	keypoints.clear();
	cv::FastFeatureDetector fast(40);
	fast.detect(image,keypoints);

cv::drawKeypoints(image,keypoints,image,cv::Scalar(255,255,255),cv::DrawMatchesFlags::DRAW_OVER_OUTIMG);FAST Features.jpg