
C# 之 FTP伺服器中檔案上傳與下載(二)
阿新 • • 發佈:2019-02-10
通過上一篇部落格《C# 之 FTP伺服器中檔案上傳與下載(一)》,我們已經建立好了一個FTP伺服器,並且該伺服器需要使用者名稱和密碼的驗證。今天我們來實現檔案的上傳。
首先,我們前臺需要一個FileUpload控制元件和一個Button控制元件
然後我們開始編寫後臺的上傳程式碼<%@ Page Language="C#" AutoEventWireup="true" CodeFile="Default.aspx.cs" Inherits="_Default" %> <!DOCTYPE html> <html xmlns="http://www.w3.org/1999/xhtml"> <head runat="server"> <meta http-equiv="Content-Type" content="text/html; charset=utf-8"/> <title></title> </head> <body> <form id="form1" runat="server"> <div> <asp:FileUpload ID="fuImage" runat="server" Width="400px" /> <asp:Button runat="server" ID="btnUpLoad" Text="上傳" CssClass="nButton" OnClick="btnUpLoad_Click" /> </div> </form> </body> </html>
using System;
using System.Collections.Generic;
using System.Linq;
using System.Net;
using System.Web;
using System.Web.UI;
using System.Web.UI.WebControls;

public partial class _Default : System.Web.UI.Page
{
    protected void Page_Load(object sender, EventArgs e)
    {

    }

    protected void btnUpLoad_Click(object sender, EventArgs e)
    {
        string strFtpPath = "FTP://192.168.1.100:21";   //ftp地址
        string strUserName = "hehe";    //使用者名稱
        string strPassword = "123456";  //密碼
        Boolean flag = false;

        string strFullName = "";
        if (fuImage.PostedFile.FileName != "")
        {
            strFullName = fuImage.PostedFile.FileName;  //所選擇檔案的路徑
        }
        else
        {
            Response.Write("<script>alert('請選擇要上傳的檔案!');</script>");
        }

        //上傳檔案
        System.IO.FileInfo fileInfo = new System.IO.FileInfo(fuImage.PostedFile.FileName);
        flag=UploadFile(fileInfo, strFtpPath, strUserName, strPassword);

        if (flag==true)
        {
            Response.Write("<script>alert('檔案上傳成功!');</script>");
        }
        else
        {
            Response.Write("<script>alert('檔案上傳失敗!');</script>");
        }
    }

    /// <summary>
    /// 上傳檔案
    /// </summary>
    /// <param name="fileinfo">需要上傳的檔案</param>
    /// <param name="targetDir">目標路徑</param>
    /// <param name="hostname">ftp地址</param>
    /// <param name="username">ftp使用者名稱</param>
    /// <param name="password">ftp密碼</param>
    /// <returns></returns>
    public static Boolean UploadFile(System.IO.FileInfo fileinfo, string hostname, string username, string password)
    {
        string strExtension = System.IO.Path.GetExtension(fileinfo.FullName);
        string strFileName="";

        strFileName = fileinfo.Name;    //獲取檔案的檔名
        string URI = hostname + "/" + strFileName;

        //獲取ftp物件
        System.Net.FtpWebRequest ftp = GetRequest(URI, username, password);

        //設定ftp方法為上傳
        ftp.Method = System.Net.WebRequestMethods.Ftp.UploadFile;

        //制定檔案傳輸的資料型別
        ftp.UseBinary = true;
        ftp.UsePassive = true;


        //檔案大小
        ftp.ContentLength = fileinfo.Length;
        //緩衝大小設定為2kb
        const int BufferSize = 2048;

        byte[] content = new byte[BufferSize - 1 + 1];
        int dataRead;

        //開啟一個檔案流(System.IO.FileStream)去讀上傳的檔案
        using (System.IO.FileStream fs = fileinfo.OpenRead())
        {
            try
            {
                //把上傳的檔案寫入流
                using (System.IO.Stream rs = ftp.GetRequestStream())
                {
                    do
                    {
                        //每次讀檔案流的2KB
                        dataRead = fs.Read(content, 0, BufferSize);
                        rs.Write(content, 0, dataRead);
                    } while (!(dataRead < BufferSize));
                    rs.Close();
                    return true;
                }
            }
            catch (Exception ex)
            {
                ftp = null;
                ftp = GetRequest(URI, username, password);
                ftp.Method = System.Net.WebRequestMethods.Ftp.DeleteFile;//刪除
                ftp.GetResponse();
                return false;
            }
            finally
            {
                fs.Close();
            }
        }


    }

    /// <summary>
    /// 得到ftp物件
    /// </summary>
    /// <param name="URI">ftp地址</param>
    /// <param name="username">ftp使用者名稱</param>
    /// <param name="password">ftp密碼</param>
    /// <returns>返回ftp物件</returns>
    private static System.Net.FtpWebRequest GetRequest(string URI, string username, string password)
    {
        //根據伺服器資訊FtpWebRequest建立類的物件
        FtpWebRequest result = (FtpWebRequest)FtpWebRequest.Create(URI);
        //提供身份驗證資訊
        result.Credentials = new System.Net.NetworkCredential(username, password);
        //result.Credentials = new System.Net.NetworkCredential();
        //設定請求完成之後是否保持到FTP伺服器的控制連線,預設值為true
        result.KeepAlive = false;
        return result;
    }
}
最後看看我們執行的效果吧

點選瀏覽,選擇我們需要上傳的檔案


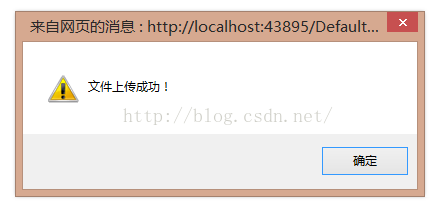
點選上傳,上傳我們選擇的檔案
最後我們看看我們的ftp伺服器中該檔案是否已經上傳
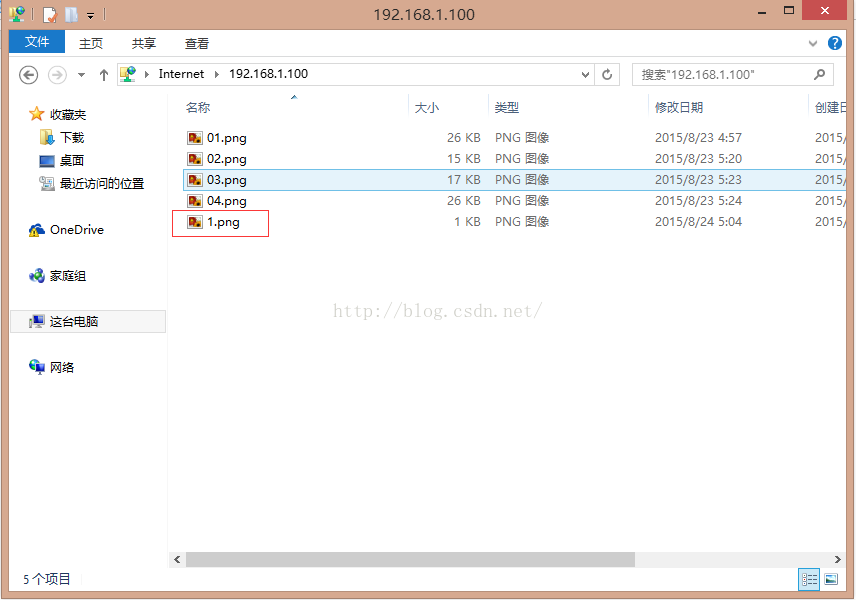
檔案上傳就這樣上傳成功了,我這裡的上傳可以上傳我們所有的檔案,當然我們也可以前臺通過JS來控制我們只能上傳什麼樣的格式,這個就讓大家自己去尋找一下答案吧。