
iOS 推送通知:本地通知(UILocalNotification)和遠端通知(APNs)詳解
——本地推送通知
推送通知的作用?
在App退到後臺或者完全退出時,可以使用通知來告訴使用者某件事情,比如推送新的聊天訊息、新聞等
通知對應的效果:
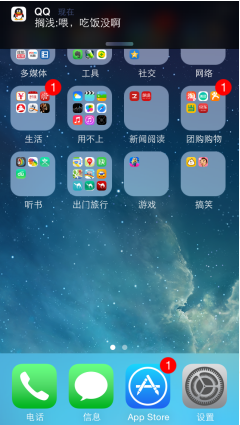
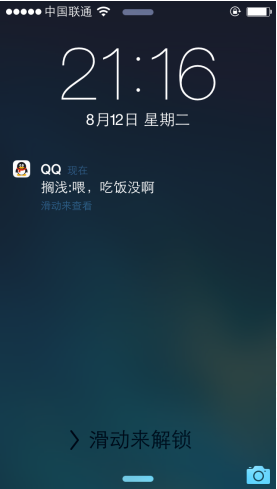
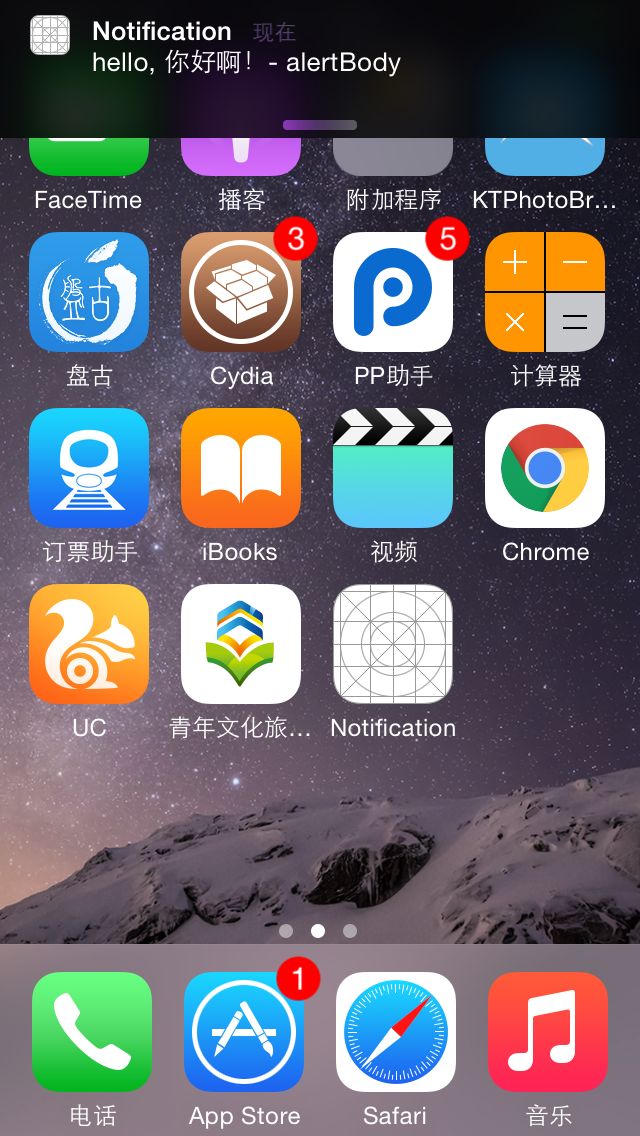
- 在主螢幕的頂端會出現通知訊息
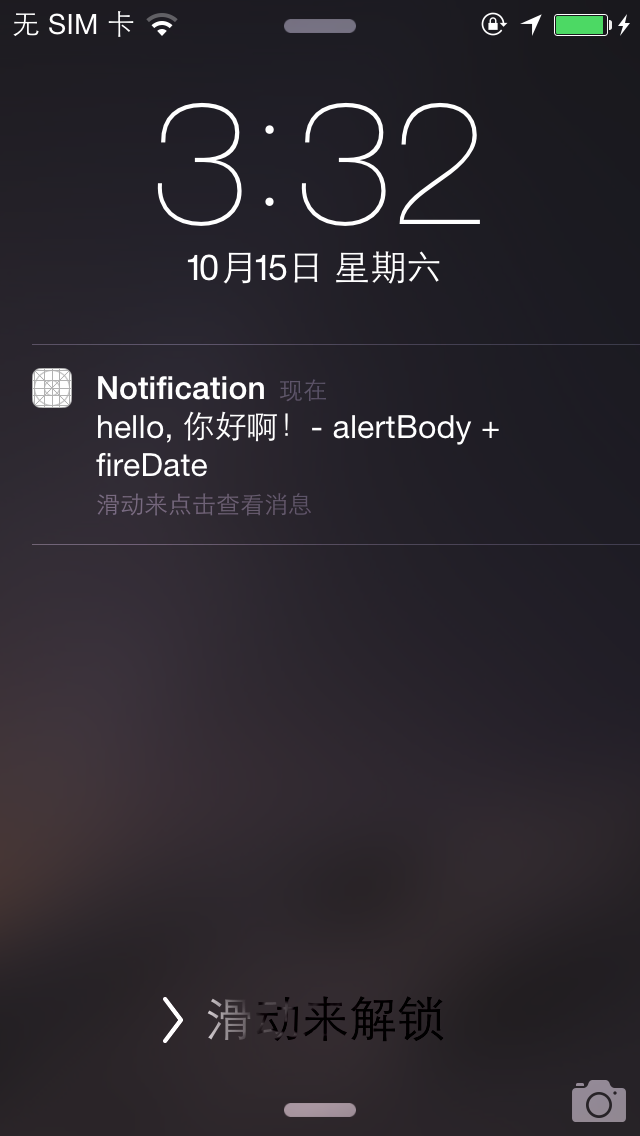
- 當手機鎖屏時出現在鎖屏介面,可以通過滑動開啟該App,
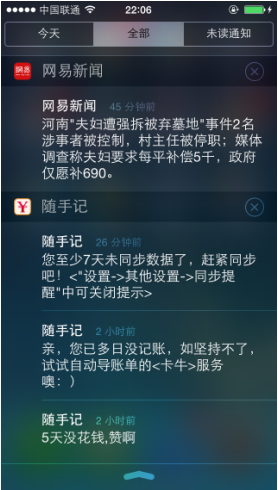
- 在通知中心中出現推送的訊息
- App圖示會有微標值① badgeValue
- 推送通知提示音
注意:
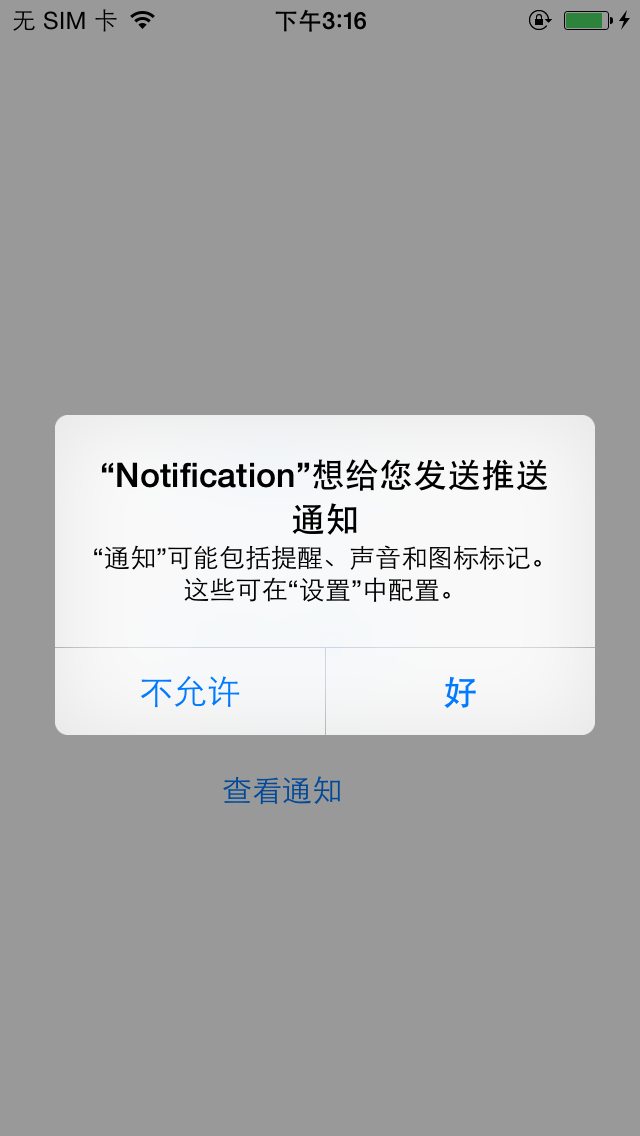
傳送通知時,如果程式正在前臺允許,那麼推送通知UI就不會顯示出來;點選通知系統預設會開啟該App。
通知的種類:
- 通知設計模式(NSNotification)
- 本地通知(UILocalNotification)
- 遠端通知(APNs)
通知設計模式:
——是一種設計模式,是一種設計思想,是抽象的,推送通知(本地和遠端)是肉眼可以看到的,是有介面的。
本地推送通知:
——本地通知不需要連線網路,一般是開發人員在合適的情況下在App內傳送通知,應用場景:當能夠確定在某個時間時需要提醒使用者。
遠端通知:
——遠端通知必須需要連線網路,遠端推送服務又稱為APNs(Apple Push Notification Services),一般是伺服器端傳送通知。
對於使用者,通知一般是指的推送通知,即本地推送通知和遠端推送通知
推送通知的代理類是: AppDelegate
推送通知的使用場景:
- 一些任務管理App,會在任務時間即將到達時,通知你該做任務了。如:提醒事項App、 電影App:電影即將開始提示使用者按時到達影院。
- 聊天App:程式退出到後臺或者完全退出時收到訊息
- 電商App:推薦新品時
- 新聞App:推送新聞
知識準備
- (BOOL)application:(UIApplication )application didFinishLaunchingWithOptions:(NSDictionary )launchOptions :啟動選項引數:當程式是通過點選應用程式圖示時該引數是nil,當應用程式完全退出時,點選推送通知時該引數不為空,key為UIApplicationLaunchOptionsLocalNotificationKey
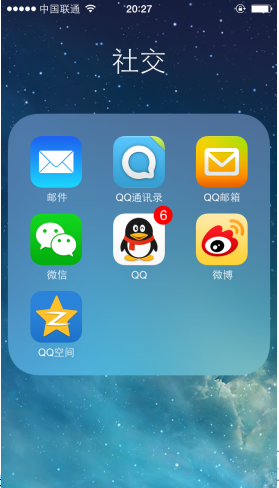
通常當用戶點選通知時會做一些業務處理,如QQ在前臺狀態下會將提醒數字+1, 當應用程式在後臺狀態或完全退出狀態下會開啟對應的聊天視窗
本地通知的基本使用
#import "ViewController.h"
@interface ViewController ()
@end
@implementation ViewController
- (void)viewDidLoad {
[super viewDidLoad];
}
// 簡單例項:點選通知進入App
- (IBAction)postLocalNotification:(id)sender {
UILocalNotification *localNotification = [[UILocalNotification alloc] init];
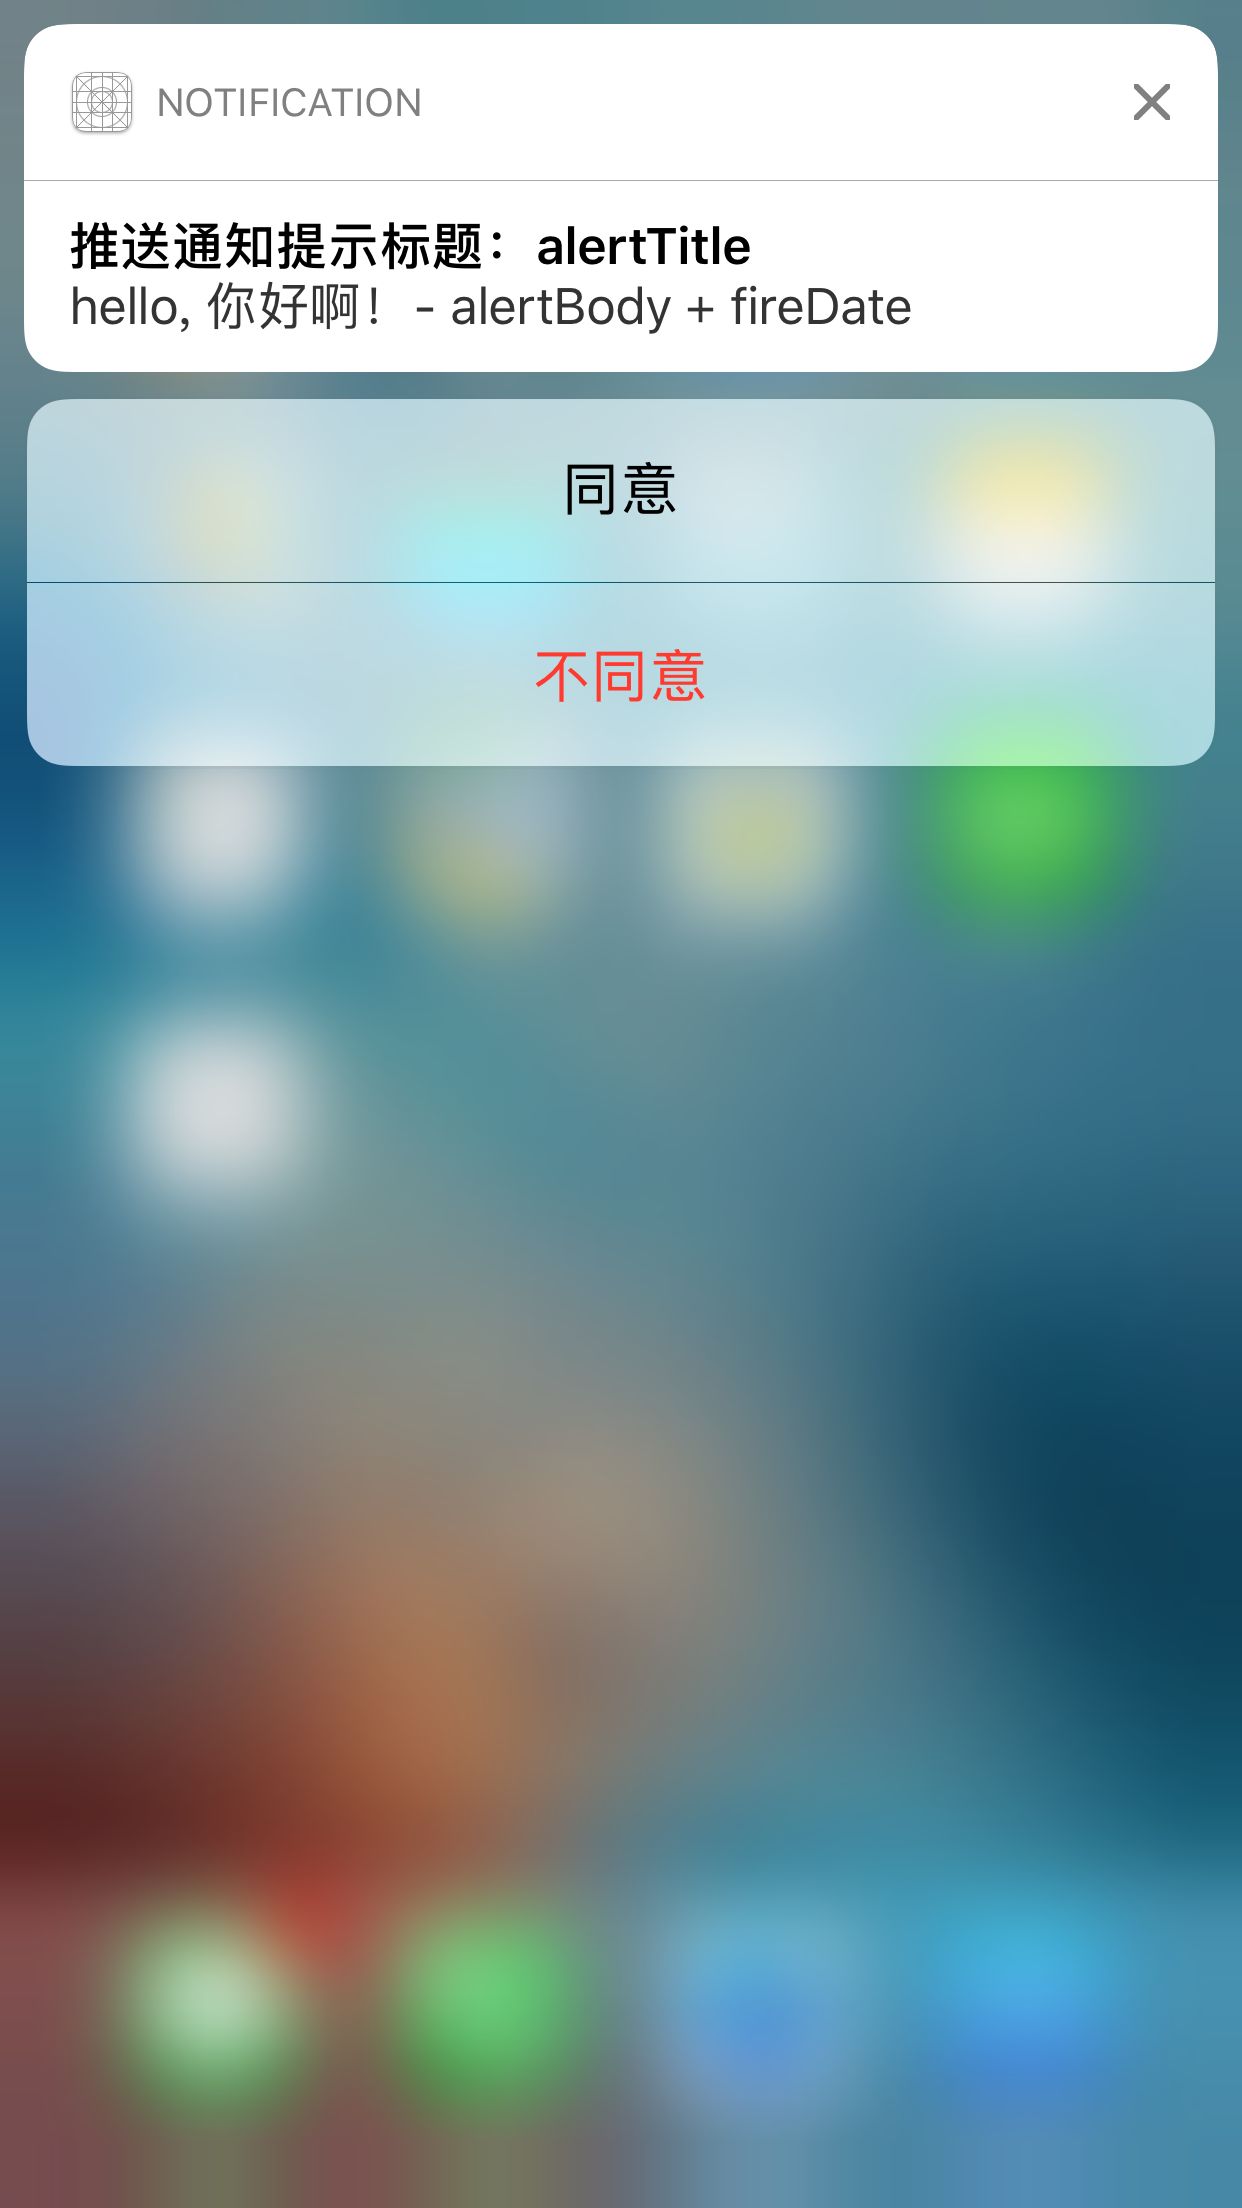
localNotification.alertBody = @"hello, 你好啊!- alertBody + fireDate";
localNotification.fireDate = [NSDate dateWithTimeIntervalSinceNow:3]; // 3秒鐘後
//--------------------可選屬性------------------------------
if ([[[UIDevice currentDevice] systemVersion] floatValue] >= 8.2) {
localNotification.alertTitle = @"推送通知提示標題:alertTitle"; // iOS8.2
}
// 鎖屏時在推送訊息的最下方顯示設定的提示字串
localNotification.alertAction = @"點選檢視訊息";
// 當點選推送通知訊息時,首先顯示啟動圖片,然後再開啟App, 預設是直接開啟App的
localNotification.alertLaunchImage = @"LaunchImage.png";
// 預設是沒有任何聲音的 UILocalNotificationDefaultSoundName:聲音類似於震動的聲音
localNotification.soundName = UILocalNotificationDefaultSoundName;
// 傳遞引數
localNotification.userInfo = @{@"type": @"1"};
//重複間隔:類似於定時器,每隔一段時間就傳送通知
// localNotification.repeatInterval = kCFCalendarUnitSecond;
localNotification.category = @"choose"; // 附加操作
// 定時傳送
[[UIApplication sharedApplication] scheduleLocalNotification:localNotification];
NSInteger applicationIconBadgeNumber = [[UIApplication sharedApplication] applicationIconBadgeNumber] + 1;
[[UIApplication sharedApplication] setApplicationIconBadgeNumber:applicationIconBadgeNumber];
// 立即傳送
// [[UIApplication sharedApplication] presentLocalNotificationNow:localNotification];
}
// 示例1:簡單示例:點選通知進入App
//- (IBAction)postLocalNotification:(id)sender {
// UILocalNotification *localNotification = [[UILocalNotification alloc] init];
// localNotification.alertBody = @"hello, 你好啊!- alertBody + fireDate";
// localNotification.fireDate = [NSDate dateWithTimeIntervalSinceNow:5]; // 5秒鐘後
//
// [[UIApplication sharedApplication] scheduleLocalNotification:localNotification];
//}
@end#import "AppDelegate.h"
#import "AppDelegate+PrivateMethod.h"
@interface AppDelegate ()
@end
@implementation AppDelegate
- (BOOL)application:(UIApplication *)application didFinishLaunchingWithOptions:(NSDictionary *)launchOptions {
// Override point for customization after application launch.
if (launchOptions != nil) {
UILocalNotification *localNotification = launchOptions[UIApplicationLaunchOptionsLocalNotificationKey];
if (localNotification != nil) {
// 程式完全退出狀態下,點選推送通知後的業務處理
// 如QQ會開啟想對應的聊天視窗
NSInteger applicationIconBadgeNumber = application.applicationIconBadgeNumber - 1;
application.applicationIconBadgeNumber = applicationIconBadgeNumber >= 0 ? applicationIconBadgeNumber : 0;
}
}
[self registerUserNotificationSettingsForIOS80];
return YES;
}
// 當App在前臺狀態下,如果有通知會呼叫該方法
// 當應用程式在後臺狀態下,點選推送通知,程式從後臺進入前臺後,會呼叫該方法(從鎖屏介面點選推送通知從後臺進入前臺也會執行)
// 當應用程式完全退出時不呼叫該方法
- (void)application:(UIApplication *)application didReceiveLocalNotification:(nonnull UILocalNotification *)notification {
NSLog(@"%@", notification);
// 處理點選通知後對應的業務
UIApplicationState applicationState = [[UIApplication sharedApplication] applicationState];
if (applicationState == UIApplicationStateActive) { // 前臺
// 例如QQ會增加tabBar上的badgeValue未讀數量
} else if (applicationState == UIApplicationStateInactive) {// 從前臺進入後臺
// 例如QQ會開啟對應的聊天視窗
NSInteger applicationIconBadgeNumber = application.applicationIconBadgeNumber - 1;
application.applicationIconBadgeNumber = applicationIconBadgeNumber >= 0 ? applicationIconBadgeNumber : 0;
}
[application cancelLocalNotification:notification];
}
// 監聽附加操作按鈕
- (void)application:(UIApplication *)application handleActionWithIdentifier:(nullable NSString *)identifier forLocalNotification:(nonnull UILocalNotification *)notification completionHandler:(nonnull void (^)())completionHandler {
NSLog(@"identifier:%@", identifier);
completionHandler();
}
// 該方法在iOS9.0後呼叫,iOS9.0之前呼叫上面那個方法
- (void)application:(UIApplication *)app handleActionWithIdentifier:(nullable NSString *)identifier forLocalNotification:(nonnull UILocalNotification *)notification withResponseInfo:(nonnull NSDictionary *)responseInfo completionHandler:(nonnull void (^)())completionHandler {
// ====identifier:no, content:{UIUserNotificationActionResponseTypedTextKey = "not agree";}
NSLog(@"====identifier:%@, content:%@", identifier, responseInfo);
completionHandler();
}
@end#import "AppDelegate.h"
@interface AppDelegate (PrivateMethod)
- (void)registerUserNotificationSettingsForIOS80;
@end
#import "AppDelegate+PrivateMethod.h"
@implementation AppDelegate (PrivateMethod)
- (void)registerUserNotificationSettingsForIOS80 {
// iOS8.0 適配
if ([[UIApplication sharedApplication] respondsToSelector:@selector(registerUserNotificationSettings:)]) {
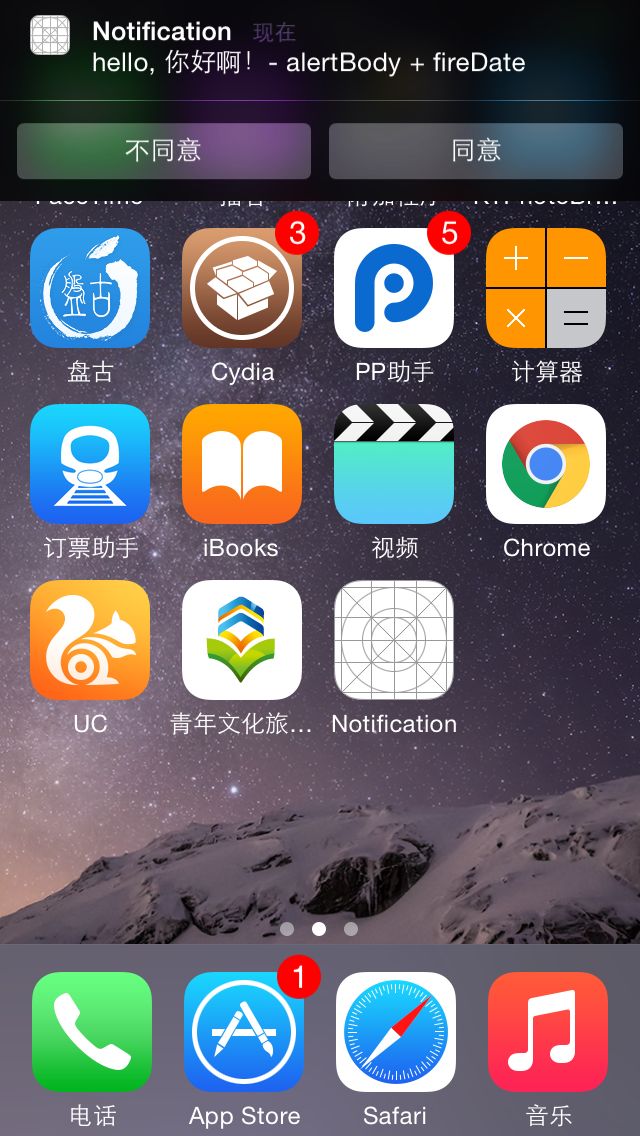
// categories: 推送訊息的附加操作,可以為nil,此時值顯示訊息,如果不為空,可以在推送訊息的後面增加幾個按鈕(如同意、不同意)
UIMutableUserNotificationCategory *category = [[UIMutableUserNotificationCategory alloc] init];
category.identifier = @"choose";
// 同意
UIMutableUserNotificationAction *action1 = [[UIMutableUserNotificationAction alloc] init];
action1.identifier = @"yes";
action1.title = @"同意";
action1.activationMode = UIUserNotificationActivationModeForeground; // 點選按鈕是否進入前臺
action1.authenticationRequired = true;
action1.destructive = false;
// 不同意
UIMutableUserNotificationAction *action2 = [[UIMutableUserNotificationAction alloc] init];
action2.identifier = @"no";
action2.title = @"不同意";
action2.activationMode = UIUserNotificationActivationModeBackground; // 後臺模式,點選了按鈕就完了
action2.authenticationRequired = true;
action2.destructive = true;
if ([[[UIDevice currentDevice] systemVersion] floatValue] >= 9.0) {
action2.behavior = UIUserNotificationActionBehaviorTextInput;
action2.parameters = @{UIUserNotificationTextInputActionButtonTitleKey: @"拒絕原因"};
}
[category setActions:@[action1, action2] forContext:UIUserNotificationActionContextDefault];
NSSet<UIUserNotificationCategory *> *categories = [NSSet setWithObjects:category, nil];
UIUserNotificationType types = UIUserNotificationTypeBadge | UIUserNotificationTypeSound | UIUserNotificationTypeAlert;
UIUserNotificationSettings *notificationSettings = [UIUserNotificationSettings settingsForTypes:types categories:categories];
[[UIApplication sharedApplication] registerUserNotificationSettings:notificationSettings];
}
}
@end
執行效果:

—————遠端推送通知—————
什麼是遠端推送通知
- 從遠端伺服器推送給客戶端的通知,需要連線網路
- 遠端推送服務,又稱為APNs 蘋果推送通知服務(Apple Push Notification services)
傳統推送通知
傳統推送通知是相對於APNs而言的,傳統推送通知的原理是:當APP開啟時和App的伺服器建立一個長連線(需要網路),當需要通知的時候,App伺服器通過長連線向對應的客戶端傳送資料,當客戶端接收到資料時使用UILocalNotfication本地通知的方式來展示,這樣就實現了傳統推送通知。
傳統推送通知必須要聯網,如果關閉了App或者打開了App但是無法連線伺服器了,這些情況都收不到通知了。
APNs遠端推送通知:只要手機聯網了,不管App是開啟或者關閉都能接收到蘋果伺服器推送的通知
APNs
- 所有蘋果裝置在聯網狀態下都會與蘋果伺服器建立長連線,連線是雙向的,蘋果裝置可以向蘋果伺服器傳送請求,蘋果伺服器也可以向蘋果裝置傳送請求。
蘋果伺服器常用的通知功能:
- 時間校準
- 系統升級
- 查詢我的iPhone
長連線的好處:更加及時
遠端通知的過程:
例如微信App:首先每個聯網並開啟微信的App都與微信伺服器有一個長連線,當微信A使用者向微信B使用者傳送一個訊息時,微信A使用者將訊息傳送到微信伺服器,然後微信伺服器判斷微信B使用者是否和微信伺服器建立了長連線,如果有直接通過微信B使用者和微信伺服器建立的連線管道直接傳送即可,這樣微信B使用者就能收到訊息;如果微信B使用者此時沒有開啟微信App,那麼微信伺服器就將訊息傳送給蘋果伺服器,蘋果伺服器再講訊息傳送到某臺蘋果裝置上。蘋果是怎麼知道該傳送給那臺裝置呢?使用者A傳送訊息時需要將使用者B的UDID和微信App的Bundle ID 附帶在訊息上一塊傳送給B使用者,這些訊息微信伺服器又傳送給蘋果伺服器,蘋果伺服器通過UDID就知道傳送給那臺裝置了,然後通過Bundle ID就知道是哪個App傳送的了。蘋果根據UDID + Bundle ID 生成一個deviceToken, 這樣每條微信訊息中都加上deviceToken蘋果伺服器就能識別裝置和App了。
例如 微信A使用者傳送訊息:{“to”:”1234567”, “msg”:”hello”} ——-》微信伺服器{“deviceToken”:”RSFWERWR23L342JOI2NLMO2H4”, “to”:”1234567”, “msg”:”hello”} —–》APNs伺服器 ——》微信B使用者
deviceToken 在客戶端傳送之前就請求???
實現步驟:
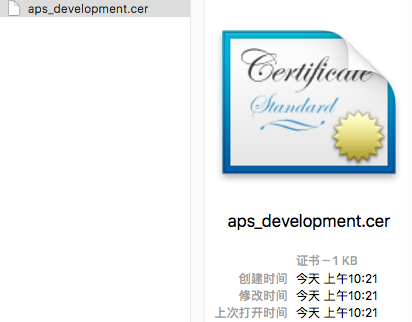
- 建立真機除錯證書並配置推送證書檔案:apns_development.cer和描述檔案
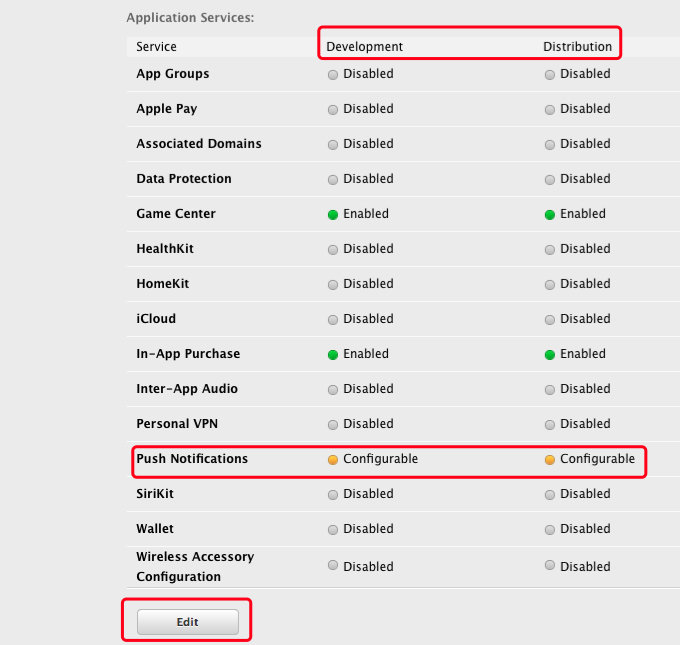
- 首先建立真機證書、AppIDs(要選擇Push Notifications), AppIDs建立完後可以看到狀態是Configurable,是黃色的圓點,此時還不能使用推送通知,還要繼續配置一下,選擇Edit–>Push Notifications—> Create Certificate(建立推送通知證書),當證書建立完成後,可以看到AppID中的狀態就變成了綠色的圓點(可用狀態)
- 首先建立真機證書、AppIDs(要選擇Push Notifications), AppIDs建立完後可以看到狀態是Configurable,是黃色的圓點,此時還不能使用推送通知,還要繼續配置一下,選擇Edit–>Push Notifications—> Create Certificate(建立推送通知證書),當證書建立完成後,可以看到AppID中的狀態就變成了綠色的圓點(可用狀態)
- 請求蘋果伺服器獲取deviceToken
- 傳送deviceToken給App的伺服器
- 監聽使用者點選遠端推送通知的行為

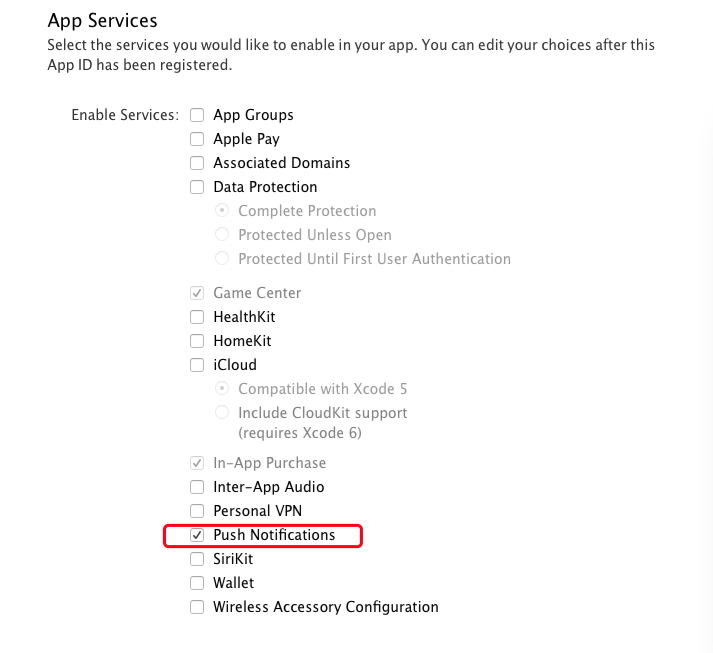
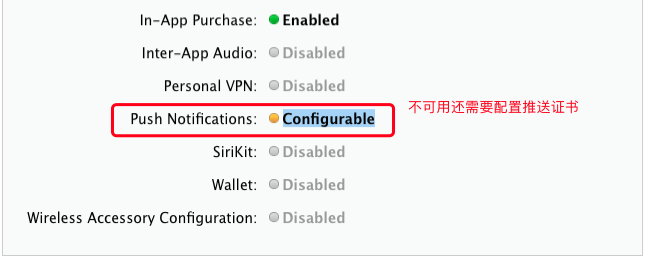

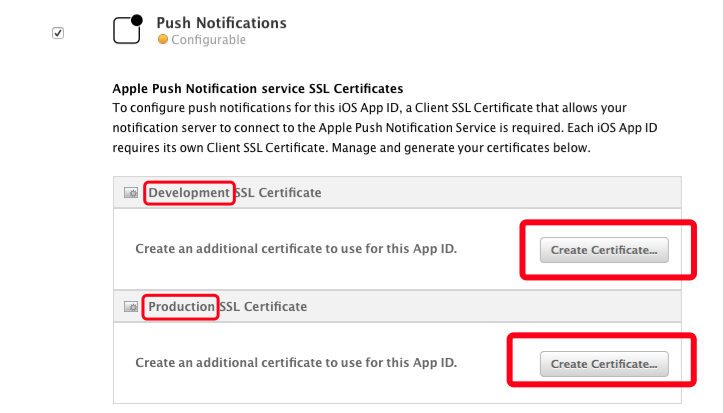


當配置App IDs時需要選擇Push Notifications,然後Edit,Create Certificate(建立證書),然後闖將證書選擇Apple Push Notification servide SSL(Sandbox)
獲取deviceToken:
- (BOOL)application:(UIApplication *)application didFinishLaunchingWithOptions:(NSDictionary *)launchOptions {
NSDictionary *dictionary = [launchOptions objectForKey:UIApplicationLaunchOptionsRemoteNotificationKey];
// 程式完全退出,點選通知[launchOptions objectForKey:UIApplicationLaunchOptionsRemoteNotificationKey]有值,
UITextView *textView = [[UITextView alloc] initWithFrame:CGRectMake(0, 0, 300, 300)];
textView.text = dictionary.description;
[self.window.rootViewController.view addSubview:textView];
if (dictionary != nil) {
// 處理程式完全退出時,點選推送通知
}
if ([[[UIDevice currentDevice] systemVersion] floatValue] > 8.0) {
UIUserNotificationType types = UIUserNotificationTypeBadge | UIUserNotificationTypeAlert | UIUserNotificationTypeSound;
UIUserNotificationSettings *settings = [UIUserNotificationSettings settingsForTypes:types categories:nil];
[[UIApplication sharedApplication] registerUserNotificationSettings:settings];
[[UIApplication sharedApplication] registerForRemoteNotifications];
} else {
UIRemoteNotificationType types = UIRemoteNotificationTypeBadge | UIRemoteNotificationTypeAlert | UIRemoteNotificationTypeSound;
[[UIApplication sharedApplication] registerForRemoteNotificationTypes:types];
}
return YES;
}
- (void)application:(UIApplication *)application didRegisterForRemoteNotificationsWithDeviceToken:(nonnull NSData *)deviceToken {
// <37d1dd32 c19a22a0 066cf575 013f968b a89f80b8 2780dd06 be8af24c 521d0c4d>
NSLog(@"deviceToken: %@", deviceToken);
}
// 我使用的iOS10.0.3,鎖屏和從後臺進入前臺會呼叫該方法,在前臺呼叫下面那個方法,程式完全退出時這兩個方法都不呼叫,可以通過判斷launchOptions 中的鍵是否有值來判斷,這裡使用的是iOS10.0.3,好像不同系統這幾種狀態呼叫那個方法不一樣???
- (void)application:(UIApplication *)application didReceiveRemoteNotification:(nonnull NSDictionary *)userInfo {
NSLog(@"從後臺進入前臺、鎖屏介面 這兩種情況會呼叫該方法");
}
// 前臺
// 該方法需要設定Background Modes --> Remote Notifications
- (void)application:(UIApplication *)application didReceiveRemoteNotification:(nonnull NSDictionary *)userInfo fetchCompletionHandler:(nonnull void (^)(UIBackgroundFetchResult))completionHandler {
NSLog(@"didReceiveRemoteNotification");
[_window.rootViewController.view addSubview:[[UISwitch alloc] init]];
completionHandler(UIBackgroundFetchResultNewData);
}
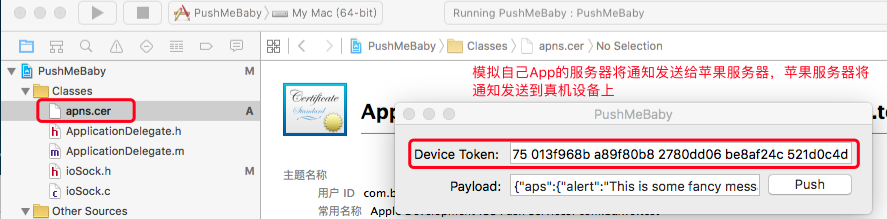
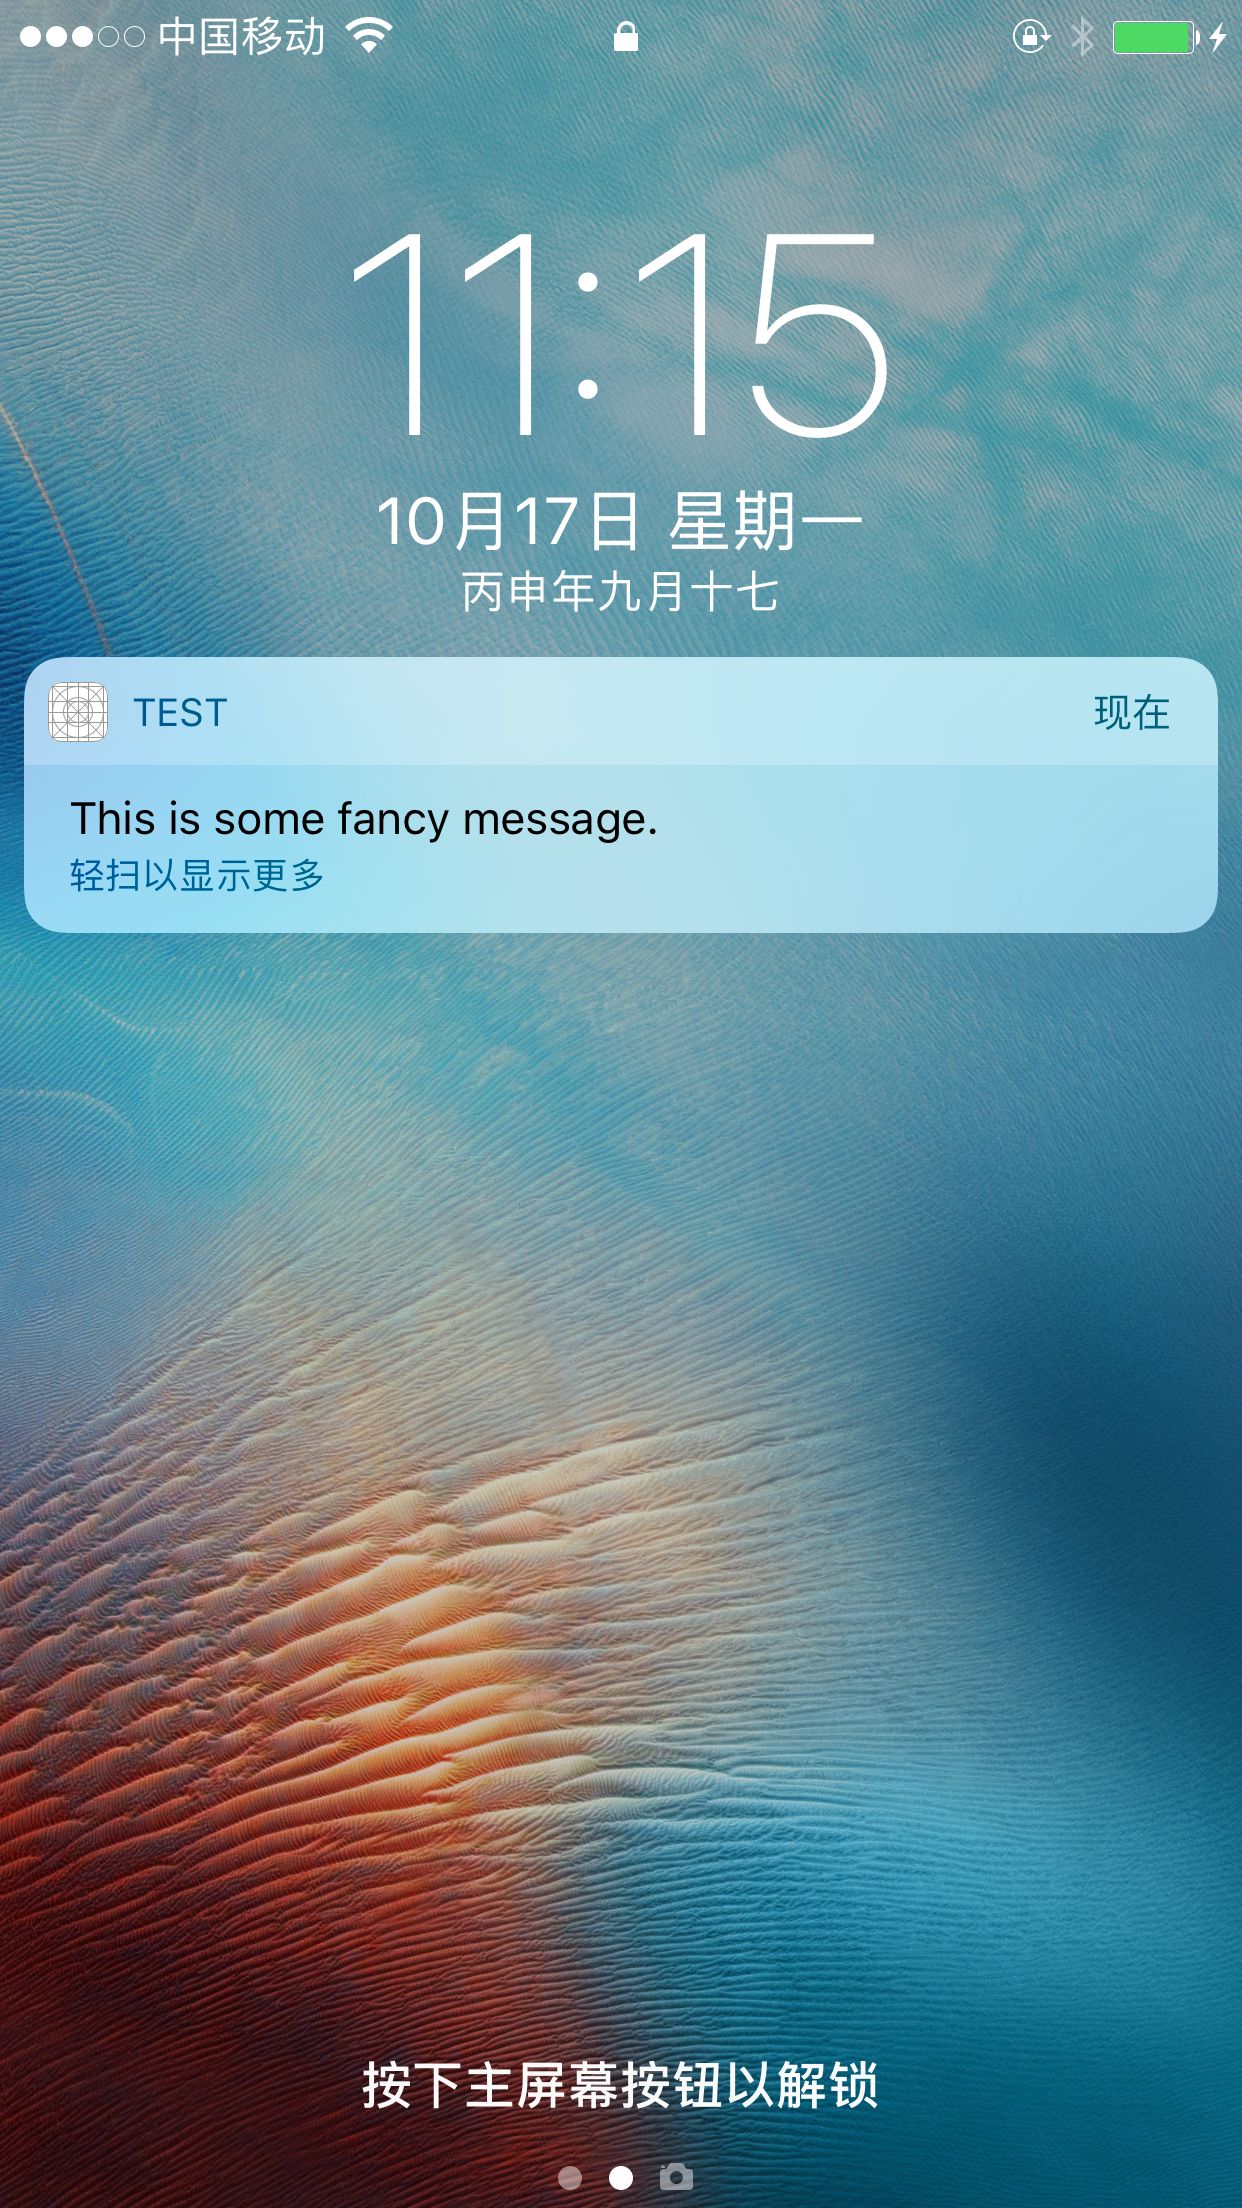
@end第三方PushMeBaby: 用於模擬自己的APP伺服器,伺服器傳送格式:
{
“apns”: {
“alert”: “This is some fancy message.”,
“badge”: 1,
“content-available”: “xxx” // 可選,不是必須的
}
}
上面那個代理方法都是使用者點選通知以後才會呼叫,如果想一收到訊息(使用者還沒點選通知)就會呼叫該方法,需要有3個條件
1. 設定Background Modes –> Remote Notifications
2. 在代理方法中呼叫程式碼塊 completionHandler(UIBackgroundFetchResultNewData);
3. App伺服器傳送資料時要增加一個”content-available”欄位,值隨意寫
滿足以上三個條件,當接收到通知時立即會呼叫代理方法
極光推送JPush
上面測試是使用第三放PushMeBaby來模擬自己App對應的伺服器,PushMeBaby用於將訊息傳送給蘋果哦伺服器,實際開發中可定不能使用這種方式,要麼自己搭建自己的推送伺服器和蘋果伺服器進行交換,要麼使用其他第三方平臺服務,第三方實現的更加方便、更加完善
遠端推送:是指伺服器向客戶端傳送訊息。
即時通訊:是使用者向用戶傳送訊息。