1. 程式人生 > >RabbitMQ訊息佇列+spring監聽mq伺服器多個ip,接收消費mq訊息(二)

RabbitMQ訊息佇列+spring監聽mq伺服器多個ip,接收消費mq訊息(二)

前文用了註解方式實現監聽多個ip,本文用消費端的類實現ServletContextListener監聽器來實現專案啟動時開啟監聽多個ip。大致的程式碼雷同。
環境和框架:和註解方式完全一樣。ssm+maven3.3.9+jdk1.7

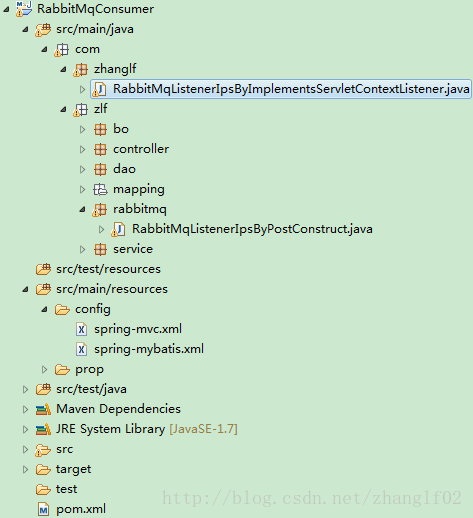
1 由於是實現監聽器,沒有註解,所以並不需要spring的掃包範圍限制。我特地把這個監聽類放到掃包範圍以外來測試。專案結構如下:

這裡寫圖片描述

2 pom.xml中引入rabbitmq的依賴

<dependency>
            <groupId>org.springframework.amqp</groupId
>
<artifactId>spring-rabbit</artifactId> <version>1.3.5.RELEASE</version> </dependency>

3.com.zhanglf.RabbitMqListenerIpsByImplementsServletContextListener 實現ServletContextListener監聽類介面。並在public void contextInitialized()方法中引入監聽mq的方法。

package
com.zhanglf; import java.io.IOException; import javax.servlet.ServletContext; import javax.servlet.ServletContextEvent; import javax.servlet.ServletContextListener; import org.springframework.web.context.WebApplicationContext; import org.springframework.web.context.support.WebApplicationContextUtils; import
com.rabbitmq.client.Address; import com.rabbitmq.client.Channel; import com.rabbitmq.client.Connection; import com.rabbitmq.client.ConnectionFactory; import com.rabbitmq.client.DefaultConsumer; import com.rabbitmq.client.Envelope; import com.rabbitmq.client.ShutdownListener; import com.rabbitmq.client.ShutdownSignalException; import com.rabbitmq.client.AMQP.BasicProperties; import com.zlf.bo.StaffBo; import com.zlf.service.IStaffService; public class RabbitMqListenerIpsByImplementsServletContextListener implements ServletContextListener { private Address[] addre; private String vhost; private String user; private String pwd; private String queueName; public RabbitMqListenerIpsByImplementsServletContextListener(){ this.addre = new Address[] { new Address("10.100.82.121", 5672), new Address("10.100.82.122", 5672), new Address("10.100.82.123", 5672) }; this.vhost = "gf-iih"; this.user = "admin"; this.pwd = "admin"; this.queueName = "tkq.queue"; } @Override public void contextInitialized(ServletContextEvent sce) { WebApplicationContext applicationContext = WebApplicationContextUtils.getWebApplicationContext(sce.getServletContext()); IStaffService staffService = applicationContext.getBean(IStaffService.class); RabbitMqListenerIpsByImplementsServletContextListener mqListener = new RabbitMqListenerIpsByImplementsServletContextListener(); mqListener.StartQueueListener(new ShutdownListener() { @Override public void shutdownCompleted(ShutdownSignalException arg0) { System.out.println("Connection Shutdown!"); } }, staffService); } @Override public void contextDestroyed(ServletContextEvent sce) { } private Connection getConnection(ShutdownListener listener) { ConnectionFactory factory = new ConnectionFactory(); factory.setUsername(user); factory.setPassword(pwd); factory.setVirtualHost(vhost); factory.setAutomaticRecoveryEnabled(true); Connection conn = null; try { conn = factory.newConnection(addre); conn.addShutdownListener(listener); } catch (IOException e) { e.printStackTrace(); } return conn; } public void StartQueueListener(ShutdownListener listener,final IStaffService staffService) { Connection conn = getConnection(listener); if (conn == null) { System.out.println("Failed to Create Connection!"); return; } try { final Channel channel = conn.createChannel(); // 設定ACK為手動模式,不在自動ACK boolean autoAck = false; /**channel.basicConsume各個引數的解釋 * String queueName:佇列名 * boolean autoAck: 伺服器是否要手動應答/確認,true-不需要。false-需要。所以這裡我們要在處理完業務邏輯後,消費掉mq後傳送ack。 * String consumerTag:用於建立上下文的客戶端標籤。每個標籤都代表一個獨立的訂閱。同一個channel的不同consumer使用不同的標籤。 * Consumer callback: 消費端介面,實現Consumer的最方便方法是繼承DefualtConsumer,並將其作為引數傳給basicConsumer方法。答 */ channel.basicConsume(queueName, autoAck, "zhanglfConsumerTag", new DefaultConsumer(channel) { @Override public void handleDelivery( String consumerTag, Envelope envelope, BasicProperties properties, byte[] body) throws IOException { long deliveryTag = envelope.getDeliveryTag(); String out = new String(body, "UTF-8"); StaffBo staffBo = staffService.selectByPrimaryKey("s01"); System.out.println("------------------"+staffBo.getName()+"------------"); if ("業務處理結果".equals("業務處理結果")) { // 通知mq伺服器移除此條mq。設定ack為每條mq都ack,不是批量ack。 channel.basicAck(deliveryTag, false); } else { // 如果業務處理異常,通知伺服器回收此條mq。 channel.basicNack(deliveryTag, false, true); } } }); } catch (IOException e) { e.printStackTrace(); } } }

4.在web.xml中引入這個自定義監聽類。

<!--自定義監聽器 -->
 <listener>  
     <listener-class>com.zhanglf.RabbitMqListenerIpsByImplementsServletContextListener
     </listener-class>  
</listener> 

這樣就完成了程式碼開發,注意點就是要使用WebApplicationContextUtils來獲取WebApplicationContext進而可以例項化別的層的類。這裡必須這樣做因為監聽器發生在spring容器初始化之前。當進來啟動監聽時,要呼叫的staffService.selectByPrimaryKey("s01"); 還沒有例項化,就會報空指標。

WebApplicationContextUtils講解

WebApplicationContextUtils是一個抽象類,其提供了一個很便利的方法來獲取spring應用的上下文即WebApplicationContext。其中的靜態方法getWebApplicationContext(ServletContext sc),提供一個ServletContext 型別引數即可。其原理十分簡單,在spring容器初始化的方法org.springframework.web.context.ContextLoader.initWebApplicationContext(ServletContext)中通過servletContext.setAttribute(WebApplicationContext.ROOT_WEB_APPLICATION_CONTEXT_ATTRIBUTE, this.context);已經將WebApplicationContext的例項放入ServletContext 中了。然後在工具類的org.springframework.web.context.support.WebApplicationContextUtils.getWebApplicationContext(ServletContext)中就可以通過傳入的ServletContext引數獲取到WebApplicationContext例項了。