
Spring——基於註解的配置
Spring註解配置
從 Spring 2.5 開始就可以使用註解來配置依賴注入。使用註解的方式使我們無需在XML中配置一個Bean引用,更加簡單和方便。
註解配置預設情況下在Spring中是關閉的,我們需要在配置檔案中使用<context:annotation-config/>啟用它。
如下spring-config.xml檔案:
<?xml version="1.0" encoding="UTF-8"?>
<beans xmlns="http://www.springframework.org/schema/beans"
xmlns:xsi="http://www.w3.org/2001/XMLSchema-instance" 一旦啟用註解配置後,我們就可以在程式碼中使用註解來進行依賴注入。其中下面是幾個重要的註解:
@Required註解應用於bean屬性的setter方法@Autowired註解可以應用到bean屬性的setter方法,非setter方法,建構函式和屬性@Qualifier,通過指定確切的將被引用的bean,@Autowired和@Qualifier註解可以用來刪除混亂- JSR-250 Annotations,Spring支援JSR-250的基礎的註解,其中包括了
@Resource,@PostContruct和@PreDestory註解
0.@Required註解
@Required註解應用於bean屬性的setter方法,它表示受影響的bean屬性在配置時必須放在XML配置檔案中,否則容器就會丟擲一個BeanInitializationException異常。
下面我們舉一個例子來說明。我們在IDEA中建立Maven工程,並且引入Spring的幾個核心庫,包括:spring-core,spring-beans和spring-context。最後的專案工程如下:
pom.xml檔案如下:
<?xml version="1.0" encoding="UTF-8"?>
<project xmlns="http://maven.apache.org/POM/4.0.0"
         xmlns:xsi="http://www.w3.org/2001/XMLSchema-instance"
         xsi:schemaLocation="http://maven.apache.org/POM/4.0.0 http://maven.apache.org/xsd/maven-4.0.0.xsd">
    <modelVersion>4.0.0</modelVersion>

    <groupId>com.gavin</groupId>
    <artifactId>spring-test</artifactId>
    <version>1.0-SNAPSHOT</version>

    <properties>
        <spring-version>5.0.4.RELEASE</spring-version>
    </properties>

    <dependencies>
        <dependency>
            <groupId>org.springframework</groupId>
            <artifactId>spring-core</artifactId>
            <version>${spring-version}</version>
        </dependency>
        <dependency>
            <groupId>org.springframework</groupId>
            <artifactId>spring-beans</artifactId>
            <version>${spring-version}</version>
        </dependency>
        <dependency>
            <groupId>org.springframework</groupId>
            <artifactId>spring-context</artifactId>
            <version>${spring-version}</version>
        </dependency>
    </dependencies>

</project>我們在domain包下建立一個Person類,如下:
package com.gavin.domain;

import org.springframework.beans.factory.annotation.Required;

public class Person {
    private String name;
    private int age;

    public String getName() {
        return name;
    }

    @Required
    public void setName(String name) {
        this.name = name;
    }

    public int getAge() {
        return age;
    }

    @Required
    public void setAge(int age) {
        this.age = age;
    }

    public void sayHello() {
        System.out.println("Hello, my name is " + name + ", I'm " + age + " years old!");
    }
}可以看到,我們使用@Required註解了屬性name和age的兩個setter方法setName()和setAge(),這表示我們在使用XML為Person類注入屬性時必須注入這兩個屬性。
假如我們的spring-config.xml檔案配置如下:
<?xml version="1.0" encoding="UTF-8"?>
<beans xmlns="http://www.springframework.org/schema/beans"
       xmlns:xsi="http://www.w3.org/2001/XMLSchema-instance"
       xmlns:context="http://www.springframework.org/schema/context"
       xsi:schemaLocation="
       http://www.springframework.org/schema/beans
       http://www.springframework.org/schema/beans/spring-beans.xsd
       http://www.springframework.org/schema/context
       http://www.springframework.org/schema/context/spring-context-3.0.xsd">

    <context:annotation-config/>
    <bean id="person" class="com.gavin.domain.Person">
        <property name="age" value="20"/>
    </bean>

</beans>可以看到,我們在為Person注入屬性時,只注入了age屬性,那麼建立Main類測試執行:
package com.gavin.test;

import com.gavin.domain.Person;
import org.springframework.context.ApplicationContext;
import org.springframework.context.support.ClassPathXmlApplicationContext;

public class Main {
    public static void main(String[] args) {
        ApplicationContext applicationContext = new ClassPathXmlApplicationContext("spring-config.xml");
        Person person = applicationContext.getBean("person", Person.class);
        person.sayHello();
    }
}
結果如下:
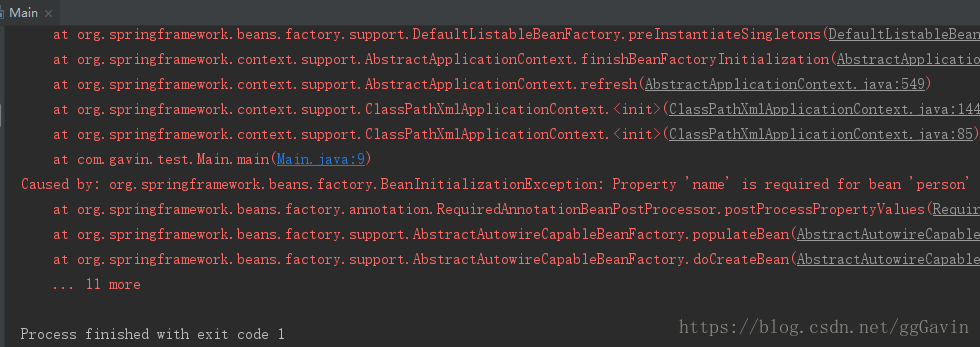
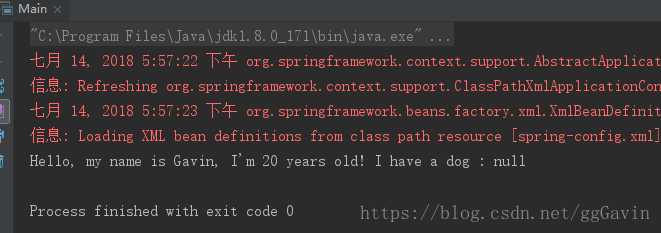
與我們預想的一致,報了BeanInitializationException異常。如果我們把name屬性的@Required註解去掉再執行:
package com.gavin.domain;

import org.springframework.beans.factory.annotation.Required;

public class Person {
    private String name;
    private int age;

    public String getName() {
        return name;
    }

    public void setName(String name) {
        this.name = name;
    }

    public int getAge() {
        return age;
    }

    @Required
    public void setAge(int age) {
        this.age = age;
    }

    public void sayHello() {
        System.out.println("Hello, my name is " + name + ", I'm " + age + " years old!");
    }
}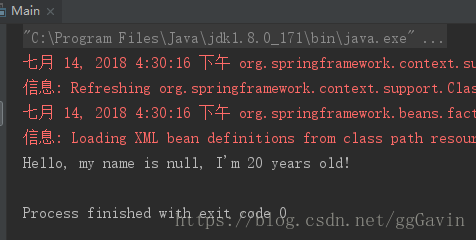
程式不再報錯了,但是name屬性的值為null,因為我們沒有在XML配置中為其注入值。
那麼到這裡就不難理解@Required註解的作用了。@Required註解用於註解屬性的setter方法,如果一個屬性的setter方法被@Required註解,則表示在XML配置中,該屬性一定要注入值,否則會報異常。
1.@Autowired註解
@Autowired 註解對在哪裡和如何完成自動連線提供了更多的細微的控制。
1.0 setter方法中的@Autowired
當Spring遇到一個在setter方法中使用的@Autowired註解,它會通過byType的方法自動為該屬性注入值。不理解自動注入的,可以參考Spring——裝配Bean。
我們在上例中進行擴充,首先新建domain物件Dog,如下:
package com.gavin.domain;

public class Dog {
    private String name;
    private String color;

    public String getName() {
        return name;
    }

    public void setName(String name) {
        this.name = name;
    }

    public String getColor() {
        return color;
    }

    public void setColor(String color) {
        this.color = color;
    }

    @Override
    public String toString() {
        return "Dog{" +
                "name='" + name + '\'' +
                ", color='" + color + '\'' +
                '}';
    }
}然後我們在Person類中新增Dog屬性,表示Person擁有Dog,並新增setter方法,然後為setter方法新增@Autowired註解:
package com.gavin.domain;

import org.springframework.beans.factory.annotation.Autowired;
import org.springframework.beans.factory.annotation.Required;

public class Person {
    private String name;
    private int age;

    private Dog dog;

    @Autowired
    public void setDog(Dog dog) {
        this.dog = dog;
    }

    public String getName() {
        return name;
    }

    @Required
    public void setName(String name) {
        this.name = name;
    }

    public int getAge() {
        return age;
    }

    @Required
    public void setAge(int age) {
        this.age = age;
    }

    public void sayHello() {
        System.out.println("Hello, my name is " + name + ", I'm " + age + " years old! I have a dog : " + dog);
    }
}接著,我們在spring-config.xml中裝配Dog物件,如下:
<?xml version="1.0" encoding="UTF-8"?>
<beans xmlns="http://www.springframework.org/schema/beans"
       xmlns:xsi="http://www.w3.org/2001/XMLSchema-instance"
       xmlns:context="http://www.springframework.org/schema/context"
       xsi:schemaLocation="
       http://www.springframework.org/schema/beans
       http://www.springframework.org/schema/beans/spring-beans.xsd
       http://www.springframework.org/schema/context
       http://www.springframework.org/schema/context/spring-context-3.0.xsd">

    <context:annotation-config/>
    <bean id="person" class="com.gavin.domain.Person">
        <property name="age" value="20"/>
        <property name="name" value="Gavin"/>
    </bean>

    <bean id="dog" class="com.gavin.domain.Dog">
        <property name="name" value="旺財"/>
        <property name="color" value="黃色"/>
    </bean>
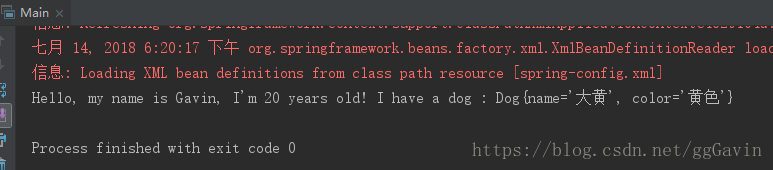
</beans>可以看到,我們在XML檔案中,並沒有為Person物件注入Dog的值,但是此時我們執行程式,得到結果:
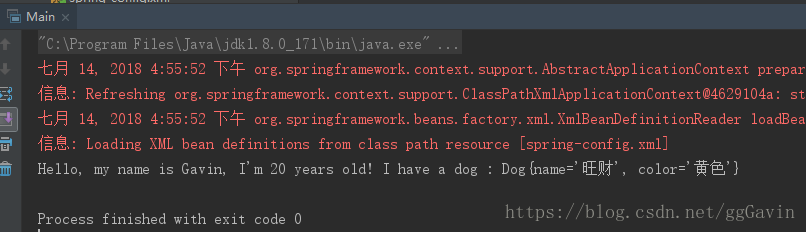
執行結果完全正確,說明Spring自動為Person類注入了Dog屬性,這正是@Autowired註解的作用。
1.1 屬性中的@Autowired註解
我們可以直接在屬性上運用@Autowired註解,這樣我們可以無需為該屬性寫setter方法,Spring會自動為該屬性注入值。所以如果我們在屬性上運用@Autowired註解,那麼Person類將變為:
package com.gavin.domain;

import org.springframework.beans.factory.annotation.Autowired;
import org.springframework.beans.factory.annotation.Required;

public class Person {
    private String name;
    private int age;
    @Autowired
    private Dog dog;

    public String getName() {
        return name;
    }

    @Required
    public void setName(String name) {
        this.name = name;
    }

    public int getAge() {
        return age;
    }

    @Required
    public void setAge(int age) {
        this.age = age;
    }

    public void sayHello() {
        System.out.println("Hello, my name is " + name + ", I'm " + age + " years old! I have a dog : " + dog);
    }
}此時再執行程式,我們可以發現如上面的例子一樣,Spring會為我們自動裝配Person類中的Dog屬性的值。
1.2 構造方法中的@Autowired註解
此外,我們也可以在構造方法上使用@Autowired註解,假如我們在Person類新增構造方法,併為其新增Dog引數,在構造方法中初始化Dog屬性,如下:
package com.gavin.domain;

import org.springframework.beans.factory.annotation.Autowired;
import org.springframework.beans.factory.annotation.Required;

public class Person {
    private String name;
    private int age;
    private Dog dog;

    @Autowired
    public Person(Dog dog) {
        this.dog = dog;
    }


    public String getName() {
        return name;
    }

    @Required
    public void setName(String name) {
        this.name = name;
    }

    public int getAge() {
        return age;
    }

    @Required
    public void setAge(int age) {
        this.age = age;
    }

    public void sayHello() {
        System.out.println("Hello, my name is " + name + ", I'm " + age + " years old! I have a dog : " + dog);
    }
}程式的執行結果依然是正確的。Spring為我們自動關聯了Dog物件。
1.3 @Autowired屬性的(required = false)選項
預設情況下,@Autowired註解意味著依賴是必須的,它類似於@Required註釋,然而,你可以使用@Autowired的(required=false) 選項關閉預設行為。
假設我們在spring-config.xml中刪除Dog的配置,如下:
<?xml version="1.0" encoding="UTF-8"?>
<beans xmlns="http://www.springframework.org/schema/beans"
       xmlns:xsi="http://www.w3.org/2001/XMLSchema-instance"
       xmlns:context="http://www.springframework.org/schema/context"
       xsi:schemaLocation="
       http://www.springframework.org/schema/beans
       http://www.springframework.org/schema/beans/spring-beans.xsd
       http://www.springframework.org/schema/context
       http://www.springframework.org/schema/context/spring-context-3.0.xsd">

    <context:annotation-config/>
    <bean id="person" class="com.gavin.domain.Person">
        <property name="age" value="20"/>
        <property name="name" value="Gavin"/>
    </bean>
</beans>然後我們在Person類中使用@Autowired註解Dog屬性,如下:
package com.gavin.domain;

import org.springframework.beans.factory.annotation.Autowired;
import org.springframework.beans.factory.annotation.Required;

public class Person {
    private String name;
    private int age;

    @Autowired
    private Dog dog;

    public String getName() {
        return name;
    }

    @Required
    public void setName(String name) {
        this.name = name;
    }

    public int getAge() {
        return age;
    }

    @Required
    public void setAge(int age) {
        this.age = age;
    }

    public void sayHello() {
        System.out.println("Hello, my name is " + name + ", I'm " + age + " years old! I have a dog : " + dog);
    }
}
執行程式,得到異常結果:

此時如果我們為@Autowired加上(required = false)屬性,則表示Dog屬性不是必須的:
package com.gavin.domain;

import org.springframework.beans.factory.annotation.Autowired;
import org.springframework.beans.factory.annotation.Required;

public class Person {
    private String name;
    private int age;

    @Autowired(required = false)
    private Dog dog;

    public String getName() {
        return name;
    }

    @Required
    public void setName(String name) {
        this.name = name;
    }

    public int getAge() {
        return age;
    }

    @Required
    public void setAge(int age) {
        this.age = age;
    }

    public void sayHello() {
        System.out.println("Hello, my name is " + name + ", I'm " + age + " years old! I have a dog : " + dog);
    }
}再次執行程式,我們就可以得到正常的執行結果,只是Dog屬性為null而已:
至此,@Autowired註解的用法就介紹完畢了。
2.@Qualifier註解
有時候會出現這樣一種情況,當我們建立多個具有相同型別的bean時,並且想要用一個屬性只為它們其中的一個進行裝配,在這種情況下,我們可以結合使用@Qualifier和@Autowired註解通過指定哪一個真正的bean將會被裝配來消除混亂。
我們依然使用上面的例子來介紹。
首先Dog類仍然如下:
package com.gavin.domain;

public class Dog {
    private String name;
    private String color;

    public String getName() {
        return name;
    }

    public void setName(String name) {
        this.name = name;
    }

    public String getColor() {
        return color;
    }

    public void setColor(String color) {
        this.color = color;
    }

    @Override
    public String toString() {
        return "Dog{" +
                "name='" + name + '\'' +
                ", color='" + color + '\'' +
                '}';
    }
}此時,我們在spring-config.xml檔案中配置兩個Dog,dog1和dog2,如下所示:
<?xml version="1.0" encoding="UTF-8"?>
<beans xmlns="http://www.springframework.org/schema/beans"
       xmlns:xsi="http://www.w3.org/2001/XMLSchema-instance"
       xmlns:context="http://www.springframework.org/schema/context"
       xsi:schemaLocation="
       http://www.springframework.org/schema/beans
       http://www.springframework.org/schema/beans/spring-beans.xsd
       http://www.springframework.org/schema/context
       http://www.springframework.org/schema/context/spring-context-3.0.xsd">

    <context:annotation-config/>
    <bean id="person" class="com.gavin.domain.Person">
        <property name="age" value="20"/>
        <property name="name" value="Gavin"/>
    </bean>

    <bean id="dog1" class="com.gavin.domain.Dog">
        <property name="name" value="大黃"/>
        <property name="color" value="黃色"/>
    </bean>

    <bean id="dog2" class="com.gavin.domain.Dog">
        <property name="name" value="小黑"/>
        <property name="color" value="黑色"/>
    </bean>

</beans>假設我們Person類沒變,其包含Dog屬性,並且使用@Autowired指定其自動裝配,那麼此時編譯器就會報錯,因為我們配置了兩個Dog物件,它不知道具體要裝配哪個Dog物件。所以我們可以使用@Qualifier註解來指定裝配的是具體哪一個物件。如下:
package com.gavin.domain;

import org.springframework.beans.factory.annotation.Autowired;
import org.springframework.beans.factory.annotation.Qualifier;
import org.springframework.beans.factory.annotation.Required;

public class Person {
    private String name;
    private int age;

    @Autowired
    @Qualifier("dog1")
    private Dog dog;

    public String getName() {
        return name;
    }

    @Required
    public void setName(String name) {
        this.name = name;
    }

    public int getAge() {
        return age;
    }

    @Required
    public void setAge(int age) {
        this.age = age;
    }

    public void sayHello() {
        System.out.println("Hello, my name is " + name + ", I'm " + age + " years old! I have a dog : " + dog);
    }
}我們指定了其裝配的是dog1,所以程式執行結果如下:
3.JSR-250註解
在2.5版本中,Spring框架的核心(core)現在支援以下JSR-250註解:
@PostContruct@PreDestory@Resource
3.0 @PostConstruct和@PreDestroy註解
在spring-config.xml檔案配置中,為了定義一個bean的安裝和解除安裝,我們可以使用init-method和destroy-method引數宣告。init-method屬性指定了一個方法,該方法在bean例項化之後會被立即呼叫。同樣地,destroy-method指定了一個方法,該方法在一個bean從容器中刪除之前被呼叫。
我們可以使用@PostConstruct註解作為初始化回撥方法的一個替代,@PreDestroy註解作為銷燬回撥方法的一個替代。
我們在上例的基礎上做擴充,首先我們建立HelloService類,如下:
package com.gavin.service;

import javax.annotation.PostConstruct;
import javax.annotation.PreDestroy;

public class HelloService {
    private String message;

    public HelloService() {
        System.out.println("Inside the constructor");
    }

    public void setMessage(String message) {
        this.message = message;
    }

    public String getMessage() {
        return message;
    }

    @PostConstruct
    public void init(){
        System.out.println("構造方法正在被執行...");
    }

    @PreDestroy
    public void destory(){
        System.out.println("Bean正在被銷燬...");
    }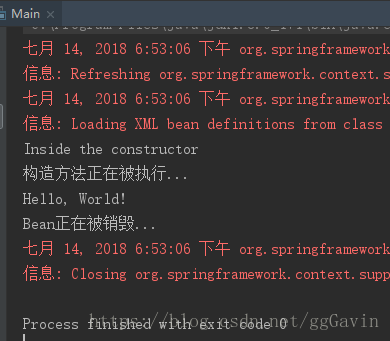
}我們通過@PostConstruct註解和@PreDestory註解指定了初始化回撥方法和銷燬回撥方法。
接著,我們在XML配置檔案中裝配HelloService,如下:
<bean id="helloService" class="com.gavin.service.HelloService">
    <property name="message" value="Hello, World!"/>
</bean>
將主方法更改如下:
package com.gavin.test;

import com.gavin.domain.Person;
import com.gavin.service.HelloService;
import org.springframework.context.ApplicationContext;
import org.springframework.context.support.ClassPathXmlApplicationContext;

public class Main {
    public static void main(String[] args) {
        ApplicationContext applicationContext = new ClassPathXmlApplicationContext("spring-config.xml");
        // Person person = applicationContext.getBean("person", Person.class);
        // person.sayHello();

        HelloService helloService = applicationContext.getBean("helloService", HelloService.class);
        System.out.println(helloService.getMessage());
        ((ClassPathXmlApplicationContext) applicationContext).registerShutdownHook();
    }
}這裡,我們需要註冊一個關閉鉤registerShutdownHook()方法,該方法在 AbstractApplicationContext類中被宣告。這將確保一個完美的關閉並呼叫相關的銷燬方法。
執行結果如下:
3.1 @Resource註解
我們可以在欄位中或者setter方法中使用@Resource註解,它使用一個name屬性,該屬性以一個bean名稱的形式被注入,也就是說,它遵循byName形式的自動裝配。
比如我們在上面的例子中使用了@Autowired與@Qualifier註解的結合:
public class Person {
    private String name;
    private int age;

    @Autowired
    @Qualifier("dog1")
    private Dog dog;

    // ...
}在這裡,我們也可以使用@Resource註解,效果是一樣的,寫法如下:
public class Person {
    private String name;
    private int age;

    @Resource(name = "dog1")
    private Dog dog;

    // ...
}@Resource與@Autowired註解的用法很類似,它們的區別如下:
@Autowired註解為Spring提供的註解,只按照byType方式注入,預設情況下,它要求依賴物件必須存在,如果允許為null,可以設定它的required屬性為false,如果我們想按照byName方式來裝配,可以結合@Qualifier註解一起使用;@Resource為J2EE提供的註解,它有兩個重要的屬性:name和type。而預設情況下,@Resource註解按照byName的方式來裝配。@Resource的裝配順序是這樣的:
- 如果同時指定了
name和type,則從Spring上下文中找到唯一匹配的bean進行裝配,找不到則丟擲異常。 - 如果指定了
name,則從上下文中查詢名稱(id)匹配的bean進行裝配,找不到則丟擲異常。 - 如果指定了
type,則從上下文中找到型別匹配的唯一bean進行裝配,找不到或是找到多個,都會丟擲異常。 - 如果既沒有指定
name,又沒有指定type,則自動按照byName方式進行裝配;如果沒有匹配,則回退為一個原始型別進行匹配,如果匹配則自動裝配。
- 如果同時指定了
個人認為,統一使用Spring提供的註解比較好,也就是我們更偏向於使用
@Autowired註解,特殊情況下使用@Autowired與@Qualifier註解的結合即可。