
Jenkins整合iOS自動化打包(GitLab + xcodebuild + xcrun + ftp)
下面主要是針對使用xcodebuild + xcrun編寫指令碼配置的方式做一個踩坑記錄,我就是用的這個。
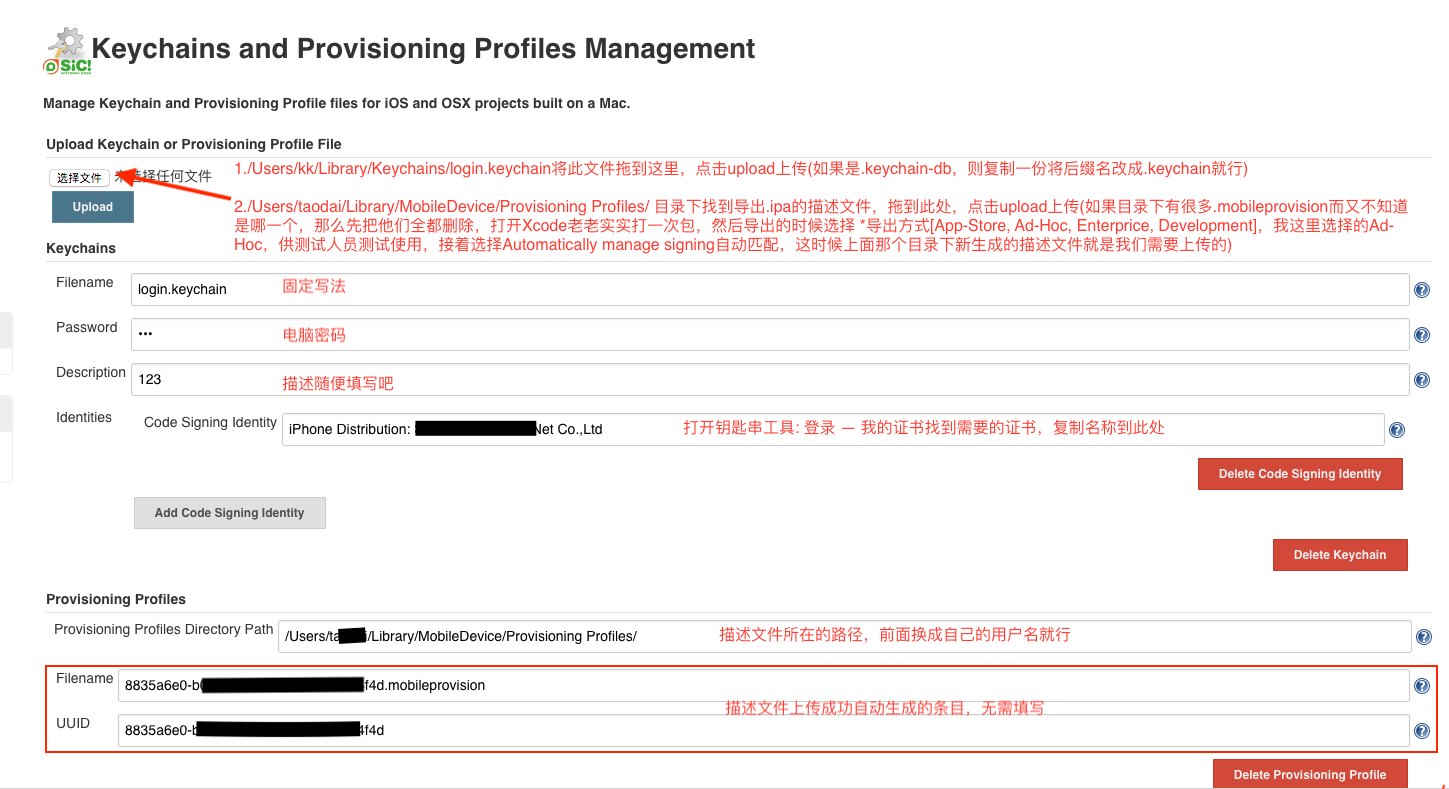
一、在全域性配置中選擇Keychains and Provisioning Profiles Management
二、進入到建立的專案下
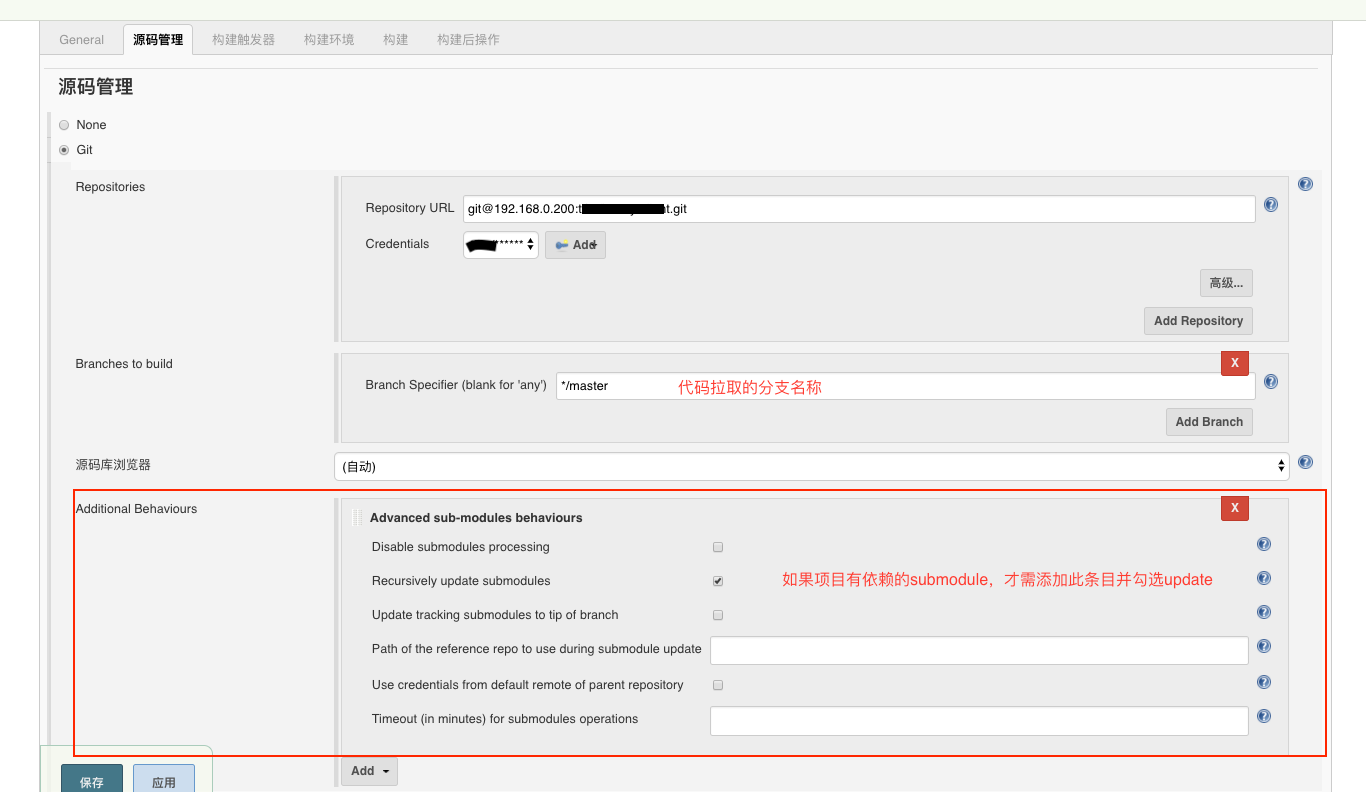
(1)原始碼管理
(2)構建觸發器+構建環境

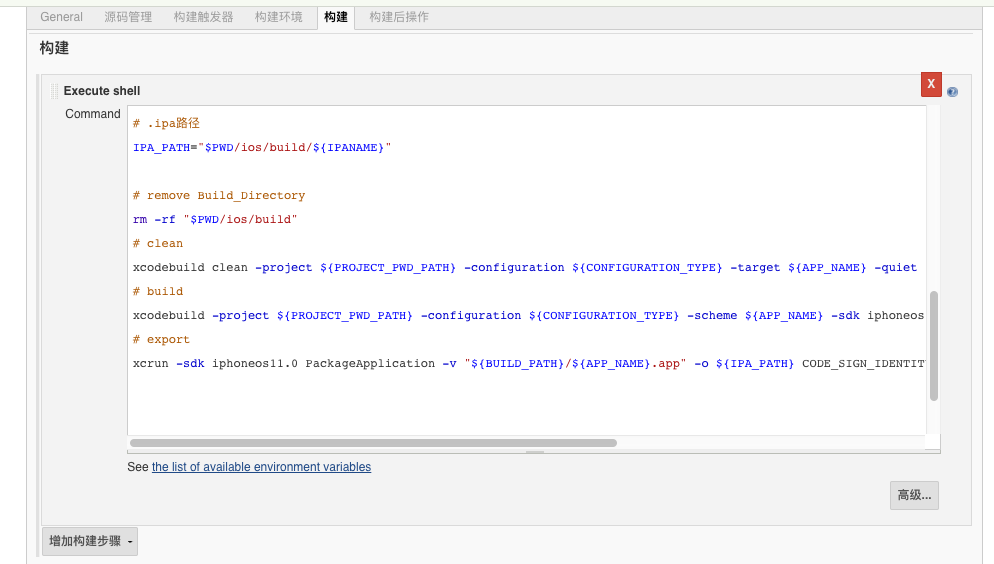
(3)構建
(4)構建後操作(存到ftp服務)

三、xcodebuild + xcrun 指令碼
# 工程名/Target/Schema

APP_NAME="test"

# 專案絕對路徑

PROJECT_PWD_PATH="$PWD/ios/test.xcodeproj"

# build 路徑

BUILD_PATH="$PWD/ios/build/Release-iphoneos"

# configuration

CONFIGURATION_TYPE="Release"

# info.plist路徑

INFO_PLIST_PATH="$PWD/ios/test/Info.plist"

# 簽名

CODE_SIGN_NAME="iPhone Distribution: xxxxxx Net Co.,Ltd"

# 描述檔案

MOBILE_PROVISION="883xxxxxx0-xxxxx-xxxxx-f4d.mobileprovision"

# 取版本號

bundleShortVersion=$(/usr/libexec/PlistBuddy -c "print CFBundleShortVersionString" "${INFO_PLIST_PATH}")

# 取build值

bundleVersion=$(/usr/libexec/PlistBuddy -c "print CFBundleVersion" "${INFO_PLIST_PATH}")

# 日期

DATE="$(date +%Y%m%d)"

# 生成.ipa名稱

IPANAME="${APP_NAME}_V${bundleShortVersion}_${DATE}.ipa"

# .ipa路徑

IPA_PATH="$PWD/ios/build/${IPANAME}"


# remove Build_Directory

rm -rf "$PWD/ios/build"

# clean

xcodebuild clean -project ${PROJECT_PWD_PATH} -configuration ${CONFIGURATION_TYPE} -target ${APP_NAME} -quiet || exit

# build

xcodebuild -project ${PROJECT_PWD_PATH} -configuration ${CONFIGURATION_TYPE} -scheme ${APP_NAME} -sdk iphoneos11.0 -arch arm64 CONFIGURATION_BUILD_DIR=${BUILD_PATH} -quiet || exit

# export

xcrun -sdk iphoneos11.0 PackageApplication -v "${BUILD_PATH}/${APP_NAME}.app" -o ${IPA_PATH} CODE_SIGN_IDENTITY ${CODE_SIGN_NAME}  --embed ${MOBILE_PROVISION} || exit


# open ${IPA_PATH}

# export_plist
# EXPORT_PLIST="~/Desktop/ExportOptions_temp.plist"
# .xcarchive路徑
#XCARCHIVE_PATH="$PWD/ios/build/CaibaClient.xcarchive"
#xcodebuild archive -project ${PROJECT_PWD_PATH} -scheme ${APP_NAME} -configuration Release -archivePath "${XCARCHIVE_PATH}" -quiet || exit
#xcodebuild -exportArchive -archivePath "${XCARCHIVE_PATH}" -exportPath ${IPA_PATH} -exportOptionsPlist ${EXPORT_PLIST} -quiet || exit
修改上面的指令碼就可以使用,主要是修改相關的路徑和工程名。
其中:
1. target和schema可以在專案路徑下執行命令xcodebuild -list檢視
2.在專案路徑下執行命令xcodebuild -showsdks檢視支援的sdk引數
3.此處是針對.xcodeproj專案,如果是使用的cocoapods整合的專案,需執行pod install,並且工程名不再是.xcodeproj而是.xcworkspace,具體可參考iOS持續整合:Jenkins+GitLab+蒲公英
4.上面的指令碼可以改成字尾名為.sh的檔案xcodebuild.sh置於*.xcodeproj同級目錄,在該目錄下使用命令./xcodebuild.sh即可執行指令碼自動打包,如無許可權執行命令chmod +x xcodebuild.sh
5.在上面export命令中使用了PackageApplication ,它是在舊版的xcode中存在,用來將.app檔案轉成.ipa,但是在Xcode 9中已經廢棄了這個。
一種解決方式是使用新的指令碼命令-exportArchive匯出.ipa
另一種方式就是拷貝這個檔案到新的Xcode目錄下。 檔案下載連結-----PackageApplication Download 下載後放到指定目錄下並執行命令即可
# 放到指定目錄
/Applications/Xcode.app/Contents/Developer/Platforms/iPhoneOS.platform/Developer/usr/bin/

# 終端執行下面兩條命令
sudo xcode-select -switch /Applications/Xcode.app/Contents/Developer/

chmod +x /Applications/Xcode.app/Contents/Developer/Platforms/iPhoneOS.platform/Developer/usr/bin/PackageApplication
6.如果使用Xcode工具進行構建,需要的team name 和 team id 可登陸 Developer 網站檢視