
CentOS 7 安裝 Mysql + 踩坑記錄
安裝Mysql:
0、下載:(我的系統是 CentOS 64位,選擇下載64位Mysql5.6)
wget https://dev.mysql.com/get/Downloads/MySQL-5.6/mysql-5.6.42-linux-glibc2.12-x86_64.tar.gz這裡我沒有采用先離線下載後上傳到伺服器的方式,而是直接伺服器線上下載,不過速度還是很快的!(之前試圖離線下載,沒想到速度很慢,幾次下載都中斷了)

1、解除安裝老版本mysql:
這步主要是防止之前已經安裝了,會影響現在安裝
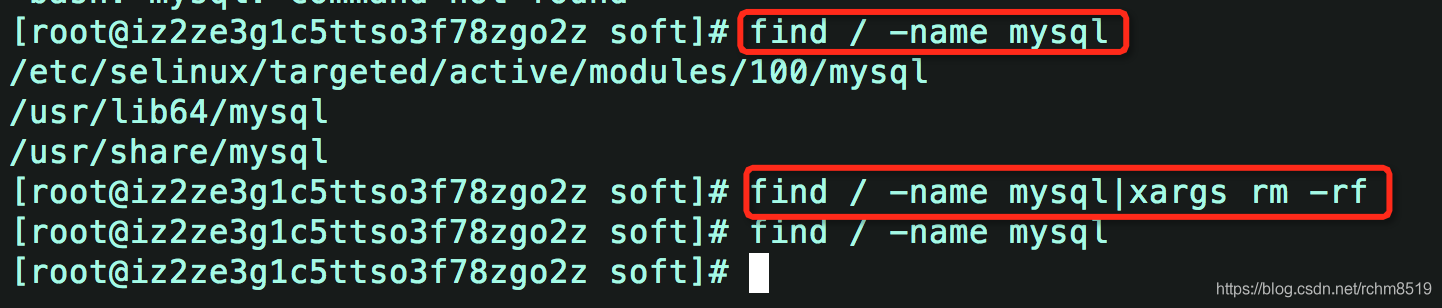
查詢並刪除mysql有關的檔案
find / -name mysql
rm -rf     //上邊查詢到的路徑,多個路徑用空格隔開
//或者下邊一條命令即可
find / -name mysql|xargs rm -rf
2、解壓mysql:
tar -zxvf mysql-5.6.42-linux-glibc2.12-x86_64.tar.gz -C /usr/local為了方便,我們可以對加壓後查mysql資料夾重新命名
mv mysql-5.6.42-linux-glibc2.12-x86_64 mysql 3、新增mysql使用者組和mysql使用者:
先檢查是否有mysql使用者組和mysql使用者:
groups mysql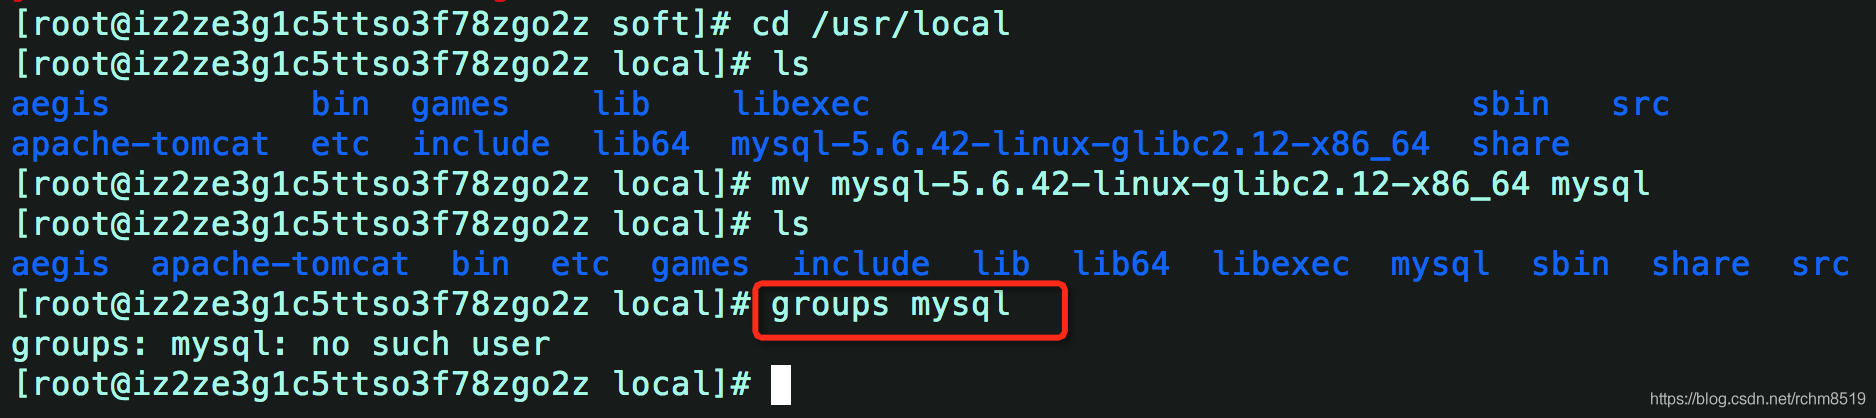
如果沒有就新增:
groupadd mysql
useradd -r -g mysql mysql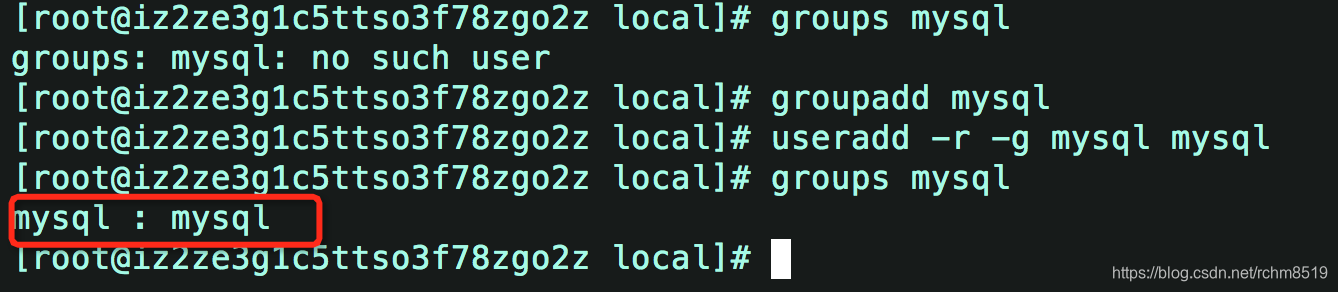
新增成功。
4、進入mysql目錄更改許可權(修改當前目錄擁有者為mysql):
cd mysql/
chown -R mysql:mysql ./
5、執行安裝指令碼:
./scripts/mysql_install_db --user=mysql
此時會報以下錯誤:
[[email protected] mysql]# ./scripts/mysql_install_db --user=mysql
FATAL ERROR: please install the following Perl modules before executing ./scripts/mysql_install_db:
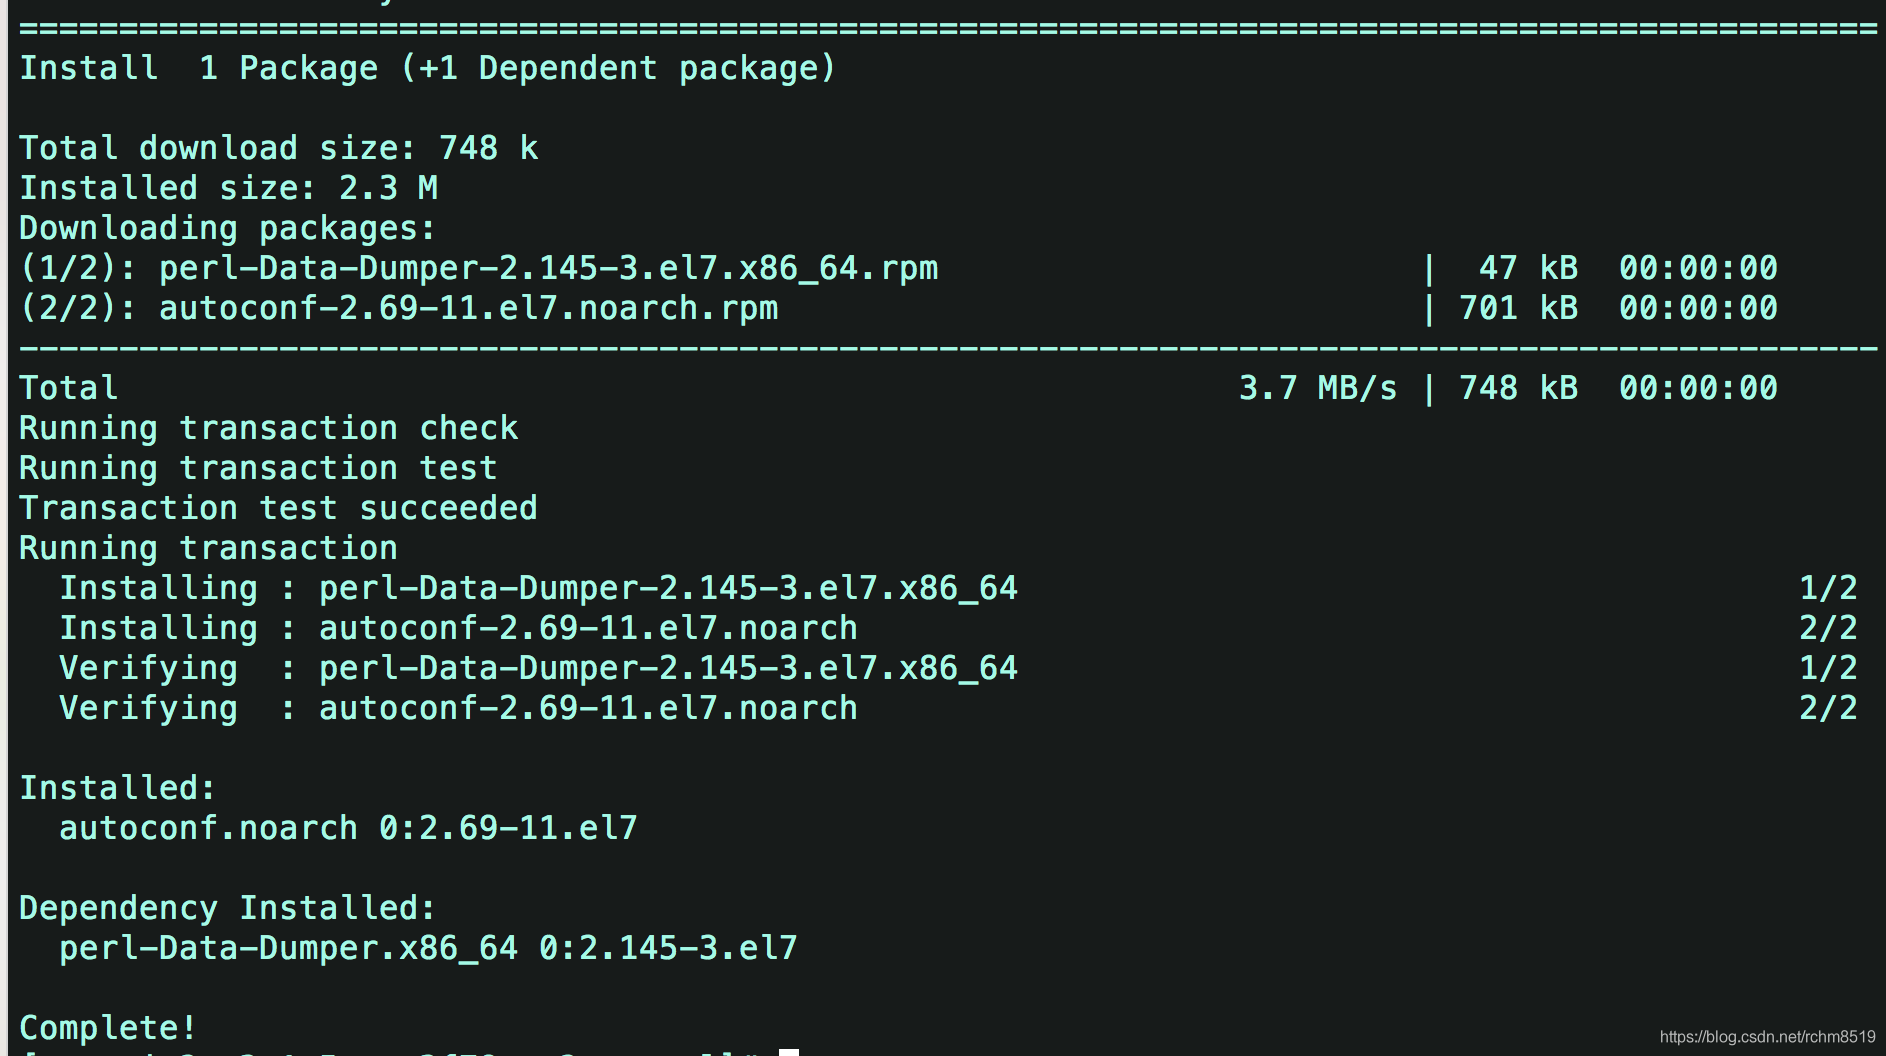
Data::Dumper解決方法 :安裝autoconf庫
命令:yum -y install autoconf //此包安裝時會安裝Data:Dumper模組
安裝完autoconf庫之後,再執行 ./scripts/mysql_install_db --user=mysql ,又可能出現下面的錯誤!

[[email protected] mysql]# ./scripts/mysql_install_db --user=mysql
Installing MySQL system tables..../bin/mysqld: error while loading shared libraries: libaio.so.1: cannot open shared object file: No such file or directory
出現該問題首先檢查該連結庫檔案有沒有安裝,使用命令進行核查:
rpm -qa|grep libaio
執行該命令後發現系統中無該連結庫檔案
那麼請使用以下命令安裝:
yum -y install libaio-devel.x86_64

安裝成功後,繼續執行資料庫的初始化命令,提示成功。
[[email protected] mysql]# ./scripts/mysql_install_db --user=mysql
Installing MySQL system tables...2018-11-18 00:13:52 0 [Warning] TIMESTAMP with implicit DEFAULT value is deprecated. Please use --explicit_defaults_for_timestamp server option (see documentation for more details).
2018-11-18 00:13:52 0 [Note] Ignoring --secure-file-priv value as server is running with --bootstrap.
2018-11-18 00:13:52 0 [Note] ./bin/mysqld (mysqld 5.6.42) starting as process 18662 ...
2018-11-18 00:13:52 18662 [Note] InnoDB: Using atomics to ref count buffer pool pages
2018-11-18 00:13:52 18662 [Note] InnoDB: The InnoDB memory heap is disabled
2018-11-18 00:13:52 18662 [Note] InnoDB: Mutexes and rw_locks use GCC atomic builtins
2018-11-18 00:13:52 18662 [Note] InnoDB: Memory barrier is not used
2018-11-18 00:13:52 18662 [Note] InnoDB: Compressed tables use zlib 1.2.11
2018-11-18 00:13:52 18662 [Note] InnoDB: Using Linux native AIO
2018-11-18 00:13:52 18662 [Note] InnoDB: Using CPU crc32 instructions
2018-11-18 00:13:52 18662 [Note] InnoDB: Initializing buffer pool, size = 128.0M
2018-11-18 00:13:52 18662 [Note] InnoDB: Completed initialization of buffer pool
2018-11-18 00:13:52 18662 [Note] InnoDB: The first specified data file ./ibdata1 did not exist: a new database to be created!
2018-11-18 00:13:52 18662 [Note] InnoDB: Setting file ./ibdata1 size to 12 MB
2018-11-18 00:13:52 18662 [Note] InnoDB: Database physically writes the file full: wait...
2018-11-18 00:13:52 18662 [Note] InnoDB: Setting log file ./ib_logfile101 size to 48 MB
2018-11-18 00:13:52 18662 [Note] InnoDB: Setting log file ./ib_logfile1 size to 48 MB
2018-11-18 00:13:53 18662 [Note] InnoDB: Renaming log file ./ib_logfile101 to ./ib_logfile0
2018-11-18 00:13:53 18662 [Warning] InnoDB: New log files created, LSN=45781
2018-11-18 00:13:53 18662 [Note] InnoDB: Doublewrite buffer not found: creating new
2018-11-18 00:13:53 18662 [Note] InnoDB: Doublewrite buffer created
2018-11-18 00:13:53 18662 [Note] InnoDB: 128 rollback segment(s) are active.
2018-11-18 00:13:53 18662 [Warning] InnoDB: Creating foreign key constraint system tables.
2018-11-18 00:13:53 18662 [Note] InnoDB: Foreign key constraint system tables created
2018-11-18 00:13:53 18662 [Note] InnoDB: Creating tablespace and datafile system tables.
2018-11-18 00:13:53 18662 [Note] InnoDB: Tablespace and datafile system tables created.
2018-11-18 00:13:53 18662 [Note] InnoDB: Waiting for purge to start
2018-11-18 00:13:53 18662 [Note] InnoDB: 5.6.42 started; log sequence number 0
2018-11-18 00:13:53 18662 [Note] Binlog end
2018-11-18 00:13:53 18662 [Note] InnoDB: FTS optimize thread exiting.
2018-11-18 00:13:53 18662 [Note] InnoDB: Starting shutdown...
2018-11-18 00:13:55 18662 [Note] InnoDB: Shutdown completed; log sequence number 1625977
OK

Filling help tables...2018-11-18 00:13:55 0 [Warning] TIMESTAMP with implicit DEFAULT value is deprecated. Please use --explicit_defaults_for_timestamp server option (see documentation for more details).
2018-11-18 00:13:55 0 [Note] Ignoring --secure-file-priv value as server is running with --bootstrap.
2018-11-18 00:13:55 0 [Note] ./bin/mysqld (mysqld 5.6.42) starting as process 18686 ...
2018-11-18 00:13:55 18686 [Note] InnoDB: Using atomics to ref count buffer pool pages
2018-11-18 00:13:55 18686 [Note] InnoDB: The InnoDB memory heap is disabled
2018-11-18 00:13:55 18686 [Note] InnoDB: Mutexes and rw_locks use GCC atomic builtins
2018-11-18 00:13:55 18686 [Note] InnoDB: Memory barrier is not used
2018-11-18 00:13:55 18686 [Note] InnoDB: Compressed tables use zlib 1.2.11
2018-11-18 00:13:55 18686 [Note] InnoDB: Using Linux native AIO
2018-11-18 00:13:55 18686 [Note] InnoDB: Using CPU crc32 instructions
2018-11-18 00:13:55 18686 [Note] InnoDB: Initializing buffer pool, size = 128.0M
2018-11-18 00:13:55 18686 [Note] InnoDB: Completed initialization of buffer pool
2018-11-18 00:13:55 18686 [Note] InnoDB: Highest supported file format is Barracuda.
2018-11-18 00:13:55 18686 [Note] InnoDB: 128 rollback segment(s) are active.
2018-11-18 00:13:55 18686 [Note] InnoDB: Waiting for purge to start
2018-11-18 00:13:55 18686 [Note] InnoDB: 5.6.42 started; log sequence number 1625977
2018-11-18 00:13:55 18686 [Note] Binlog end
2018-11-18 00:13:55 18686 [Note] InnoDB: FTS optimize thread exiting.
2018-11-18 00:13:55 18686 [Note] InnoDB: Starting shutdown...
2018-11-18 00:13:57 18686 [Note] InnoDB: Shutdown completed; log sequence number 1625987
OK

To start mysqld at boot time you have to copy
support-files/mysql.server to the right place for your system

PLEASE REMEMBER TO SET A PASSWORD FOR THE MySQL root USER !
To do so, start the server, then issue the following commands:

  ./bin/mysqladmin -u root password 'new-password'
  ./bin/mysqladmin -u root -h iz2ze3g1c5ttso3f78zgo2z password 'new-password'

Alternatively you can run:

  ./bin/mysql_secure_installation

which will also give you the option of removing the test
databases and anonymous user created by default.  This is
strongly recommended for production servers.

See the manual for more instructions.

You can start the MySQL daemon with:

  cd . ; ./bin/mysqld_safe &

You can test the MySQL daemon with mysql-test-run.pl

  cd mysql-test ; perl mysql-test-run.pl

Please report any problems at http://bugs.mysql.com/

The latest information about MySQL is available on the web at

  http://www.mysql.com

Support MySQL by buying support/licenses at http://shop.mysql.com

WARNING: Found existing config file ./my.cnf on the system.
Because this file might be in use, it was not replaced,
but was used in bootstrap (unless you used --defaults-file)
and when you later start the server.
The new default config file was created as ./my-new.cnf,
please compare it with your file and take the changes you need.

WARNING: Default config file /etc/my.cnf exists on the system
This file will be read by default by the MySQL server
If you do not want to use this, either remove it, or use the
--defaults-file argument to mysqld_safe when starting the server

[[email protected] mysql]#
安裝完之後修改當前目錄擁有者為root使用者,修改data目錄擁有者為mysql:
chown -R root:root ./
chown -R mysql:mysql data
6、啟動mysql:
[[email protected] mysql]# ./support-files/mysql.server start
Starting MySQL.181118 00:23:52 mysqld_safe error: log-error set to '/var/log/mariadb/mariadb.log', however file don't exists. Create writable for user 'mysql'.
The server quit without updating PID file (/var/lib/mysql/i[FAILED]5ttso3f78zgo2z.pid).
上面啟動報錯,提示log檔案無許可權,我們可以通過更改配置修改log檔案指向,並建立一個log檔案來解決:
配置檔案:/etc/my.cnf
[mysqld_safe]
log-error=/var/log/mariadb/mariadb.log
pid-file=/var/run/mariadb/mariadb.pid
修改後:
[mysqld_safe]
log-error=/usr/local/mysql/logs/mysqld.log
pid-file=/var/run/mysql/mysql.pid
建立log檔案,並修改檔案許可權:
[[email protected] etc]# cd /usr/local/mysql/
[[email protected] mysql]# mkdir logs
[[email protected] mysql]# cd logs
[[email protected] logs]# echo "" > /usr/local/mysql/logs/mysqld.log
[[email protected] logs]# chown -R mysql:mysql /usr/local/mysql/logs/mysqld.log
重新執行啟動mysql命令:
[[email protected] mysql]# ./support-files/mysql.server start
Starting MySQL.                                            [  OK  ]
[[email protected] mysql]#
[OK].
7、修改密碼
[[email protected] mysql]# ./bin/mysqladmin -u root password 'root'
./bin/mysqladmin: connect to server at 'localhost' failed
error: 'Can't connect to local MySQL server through socket '/tmp/mysql.sock' (2)'
Check that mysqld is running and that the socket: '/tmp/mysql.sock' exists!
[mysqld]
datadir=/var/lib/mysql
socket=/var/lib/mysql/mysql.sock
# Disabling symbolic-links is recommended to prevent assorted security risks
symbolic-links=0
# Settings user and group are ignored when systemd is used.
# If you need to run mysqld under a different user or group,
# customize your systemd unit file for mariadb according to the
# instructions in http://fedoraproject.org/wiki/Systemd 修改後:
[mysqld]
basedir=/usr/local/mysql
datadir=/usr/local/mysql/data
socket=/usr/local/mysql/tmp/mysql.sock
# Disabling symbolic-links is recommended to prevent assorted security risks
symbolic-links=0
# Settings user and group are ignored when systemd is used.
# If you need to run mysqld under a different user or group,
# customize your systemd unit file for mariadb according to the
# instructions in http://fedoraproject.org/wiki/Systemd
相關推薦
CentOS 7 安裝 Mysql + 踩坑記錄
安裝Mysql: 0、下載:(我的系統是 CentOS 64位,選擇下載64位Mysql5.6) wget https://dev.mysql.com/get/Downloads/MySQL-5.6/mysql-5.6.42-linux-glibc2.12-x86_64.
CentOS7.4安裝MySQL踩坑記錄
pre table tro end warning 更新 file auth lock CentOS7.4安裝MySQL踩坑記錄 time: 2018.3.19 CentOS7.4安裝MySQL時網上的文檔雖然多但是不靠譜的也多, 可能因為版本與時間的問題, 所以記錄下自
CentOS 7 安裝MySQL 5.6遇到問題及解決方案
linux localhost not ces name 解決 info target case centos下安裝mysql真的沒有想象中那麽容易,在這裏我總結一下遇到的問題 1. ERROR 2002 (HY000): Can’t connect to loca
centos 7安裝mysql
外部 eve rpm iptable 自動 mysql conn mysql-cli 開機 一、安裝mysql 1、下載mysql安裝包https://dev.mysql.com/downloads/ 我下載的是MySQL-5.6.36-1.
centos 7 安裝 MySQL 5.6
計算機 mysqld rpm安裝 unity 文件中 change root server class 由於Centos7 默認數據庫是mariabd,所以通過rpm安裝MySQL需要卸載原有的Mariabd,再下載所有的依賴包比較麻煩且容易出錯。通過yum的方式安裝。
centos 7 安裝 MySQL 5.7
centos 7 yum 安裝 mysql5.7環境介紹服務器地址:192.168.99.122MySQL版本:MySQL 5.7mysql-community-server-5.7.19-1.el7.x86_64操作步驟#下載安裝yum源wget http://repo.mysql.com/mysql57-
朝花夕拾:linux CentOS 7 安裝mysql 5.7.13
linux centos 7 安裝mysql 5.7 1.安裝環境:[root@localhost ~]# cat /etc/redhat-release CentOS Linux release 7.3.1611 (Core)Mysql版本號:mysql-5.7.13-linux-glibc2.5-
centOS 7 安裝mysql
reload -- centos wid moni 默認 blog vsp download 安裝環境:CentOS7 64位 MINI版,安裝MySQL5.7 1、配置YUM源 在MySQL官網中下載YUM源rpm安裝包:http://dev.mysql.com/down
centos 7 安裝 MySql
text 服務 centos 7 分享圖片 emc sql 驗證 配置服務 技術 本人最煩安裝配置服務了! 下載安裝msyql的repo源 [root@yzj ~]# wget http://repo.mysql.com/mysql-community-release-el
CentOS 7 - 安裝MySQL 5.7
tools -bash temp 找到 system lan mmu mysql etc CentOS 7的默認yum倉庫中並沒有MySQL5.7,我們需要手動添加,好在MySQL官方提供了倉庫的地址,所以我們能夠比較簡單地安裝MySQL。 本文我們將介紹CentOS 7下
CentOS 7 安裝 MySQL 5.7.23
gre cmd 環境變量 under emp -i 阿裏 not -a 阿裏雲服務器 CentOS 7 安裝 MySQL 5.7.23 。 一、準備工作 1、MySQL 官網下載 MySQL 5.7.23 :mysql-5.7.23-linux-glibc2.12-x8
CentOS 7 安裝 MySQL 大全
這是我見到的最好的一篇介紹mysql安裝的文章,特轉載下來供自己參考。 原文連結:http://waylau.com/centos-7-install-mysql/ 環境 CentOS 7.1 (64-bit system) MySQL 5.6.24
CentOS 7 安裝 MySQL 5.6.4 -- 通過二進位制包方式安裝
一、檢視系統已經安裝的mysql資料庫 1.檢視系統是否已經安裝了 mariadb [[email protected] ~]$ rpm -qa |grep mariadb mariadb-libs-5.5.52-1.el7.x86_64 2.檢視是否已經存在配置檔案 m
CentOS 7安裝MySQL 8.0.13
#!/bin/sh yum install gcc-c++ ncurses-devel wget -c -P /opt/tmp/ http://ftp.iij.ad.jp/pub/db/mysql/Downloads/MySQL-8.0/mysql-boost-8.0.13.tar.gz wget
ubuntu16.04 安裝MongoDB 踩坑記錄及使用
MongoDB官網提供的安裝命令 //依次執行以下命令 sudo apt-key adv --keyserver hkp://keyserver.ubuntu.com:80 --recv 9DA31620334BD75D9DCB49F368818C72E52529D4 echo "deb
Centos 7 安裝Mysql-5.7
==========運維之路 環境如下 [[email protected] ~]# cat /etc/redhat-release CentOS Linux release 7.5.1804 (Core) [[email prote
CentOS 7安裝mysql,並且開啟遠端navicat連線mysql資料庫
前述:失敗了三次,但是看到一篇兄臺的文章按他的方法一步步來完美執行一步到位 正文:在CentOS中預設安裝有MariaDB,這個是MySQL的分支,但為了需要,還是要在系統中安裝MySQL,而且安裝完成之後可以直接覆蓋掉MariaDB。 1 下載並安裝MySQL官方的 Y
linux系統centOS 7安裝 mysql-5.7.21-linux-glibc2.12-x86_64.tar.gz
#解除安裝系統自帶的Mariadb [[email protected] local]# rpm -qa|grep mariadb mariadb-libs-5.5.52-1.el7.x86_64 [[email protected] local]# rpm -e --nodep
記錄安裝ELK踩坑記錄
記錄下這次安裝部署ELK踩坑記錄 安裝的elasticsearch是6.4.1,kibana-6.4.1 將elasticsearch-6.4.1.tar.gz上傳的機器之後,解壓,然後 # cd elasticsearch-6.4.1/bin //進入目錄 # ./
安裝oracle11g-踩坑記錄
準備oracle11g安裝包,在此下載的oracle zip壓縮包,共有兩個壓縮包(如圖)分別解壓壓縮包得到如下兩個資料夾(如圖)將目錄 win64_11gR2_database_2of2\database\stage\Components 目錄下的所有檔案copy到win64_11gR2_database_