
智慧家居簡單實現---使用ESP8266簡單實現和APP通訊
轉載於:http://blog.csdn.net/jsagacity/article/details/78531819
前段時間,公司利用 ESP8266 這個WiFi模組,做了好多小產品。從手機 APP 直連這個 ESP8266 進行通訊,再到實現遠端控制。中間實現過程磕磕碰碰,雖然這方面已經做得非常成熟,但是網上的資料少之又少。現在把實現方式展示出來,同時也算是做一個筆記。
首先這裡要實現的是Android端的APP直連ESP8266進行雙向通訊。
首先我們來說一下這個ESP8266,這個在淘寶上非常便宜,10塊左右,安信可的產品。這個WiFi模組已經做得非常的成熟,下面介紹一下它的基本使用,首先這個模組有三種模式:
1:STA 模式:
2:AP 模式:ESP8266模組作為熱點,實現手機或電腦直接與模組通訊,實現區域網無線控制。
3:STA+AP 模式:兩種模式的共存模式,即可以通過網際網路控制可實現無縫切換,方便操作。
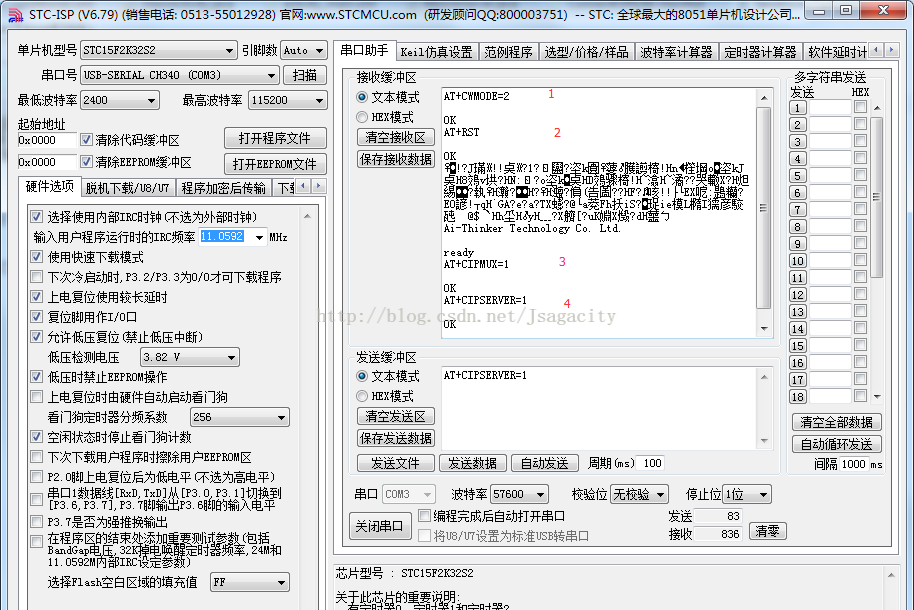
今天的實現用AP模式就夠了,指令有下面這幾個就夠了:
1、設定wifi模式:AT+CWMODE=2
2、重啟生效:AT+RST
3、啟動多連線:AT+CIPMUX=1
4、建立server:AT+CIPSERVER=1
另外還有非常多的指令可以修改這個模組的引數,甚至還可以修改裡面的程式重新燒錄,更多的詳情就參考安信可的官網。這個就需要電子比較厲害的人才會適合了,我是Android開發的,所以這方面不太瞭解,還望海涵。
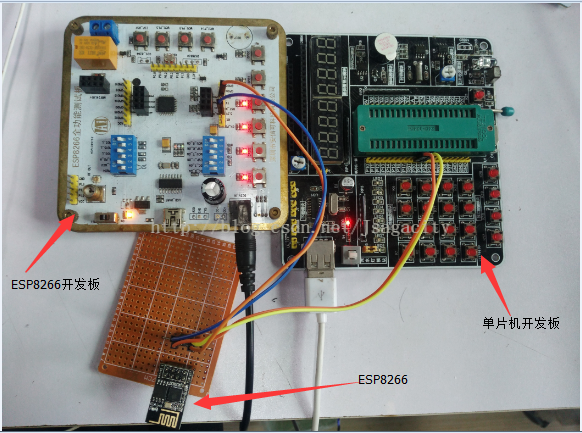
這是裝置:
接下來通過串列埠傳送指令開啟ESP8266的WiFi:
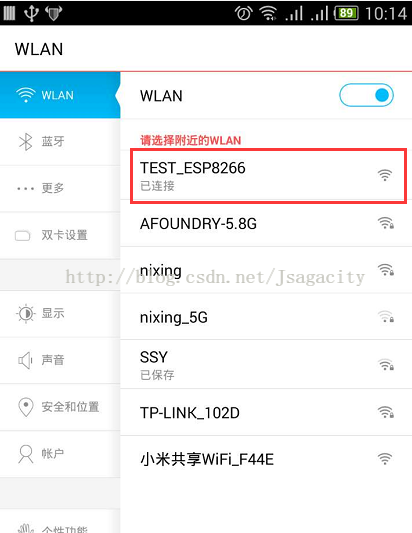
傳送完這四個指令之後,開啟手機就可以看到相應的WiFi開啟了(這個WiFi名給我改過):
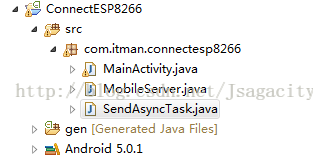
好了,硬體準備完畢,接下來我們準備APP軟體,針對Android端的。新建一個Android專案,專案結構:
新增一個非同步處理類:
- /**
- * Created by Layne_Yao on 2017/5/12.
- * CSDN:http://blog.csdn.net/Jsagacity
- */
- publicclass SendAsyncTask extends AsyncTask<String, Void, Void> {
- //這裡是連線ESP8266的IP和埠號,IP是通過指令在微控制器開發板查詢到,而埠號可以自行設定,也可以使用預設的,333就是預設的
- privatestaticfinal String IP = "192.168.4.1";
- privatestaticfinalint PORT = 333;
- private Socket client = null;
- private PrintStream out = null;
- @Override
- protected Void doInBackground(String... params) {
- String str = params[0];
- try {
- client = new Socket(IP, PORT);
- client.setSoTimeout(5000);
- // 獲取Socket的輸出流,用來發送資料到服務端
- out = new PrintStream(client.getOutputStream());
- out.print(str);
- out.flush();
- if (client == null) {
- returnnull;
- } else {
- out.close();
- client.close();
- }
- } catch (IOException e) {
- e.printStackTrace();
- }
- returnnull;
- }
- }
在手機端建立一個作為接受ESP8266傳送的訊息的伺服器:
- publicclass MobileServer implements Runnable {
- private ServerSocket server;
- private DataInputStream in;
- privatebyte[] receice;
- private Handler handler = new Handler();
- public MobileServer() {
- }
- publicvoid setHandler(Handler handler) {
- this.handler = handler;
- }
- @Override
- publicvoid run() {
- try {
- //5000是手機端開啟的伺服器的埠號,ESP8266進行TCP連線時使用的埠,而IP也是通過指令查詢的聯入裝置的IP
- server = new ServerSocket(5000);
- while (true) {
- Socket client = server.accept();
- in = new DataInputStream(client.getInputStream());
- receice = newbyte[50];
- in.read(receice);
- in.close();
- Message message = new Message();
- message.what = 1;
- message.obj = new String(receice);
- handler.sendMessage(message);
- }
- } catch (IOException e) {
- e.printStackTrace();
- }
- try {
- server.close();
- } catch (IOException e) {
- e.printStackTrace();
- }
- }
- }
佈局檔案:
- <RelativeLayout xmlns:android="http://schemas.android.com/apk/res/android"
- xmlns:tools="http://schemas.android.com/tools"
- android:layout_width="match_parent"
- android:layout_height="match_parent"
- tools:context="com.itman.connectesp8266.MainActivity" >
- <TextView
- android:id="@+id/tv_content"
- android:layout_width="match_parent"
- android:layout_height="25dp"
- android:layout_centerHorizontal="true"
- android:layout_marginTop="10dp"
- android:background="#fe9920"
- android:gravity="center"
- android:text="接收的內容" />
- <Button
- android:id="@+id/bt_send"
- android:layout_width="match_parent"
- android:layout_height="wrap_content"
- android:layout_below="@id/tv_content"
- android:layout_centerHorizontal="true"
- android:layout_marginTop="40dp"
- android:text="傳送" />
- <TextView
- android:id="@+id/tv_send_text"
- android:layout_width="wrap_content"
- android:layout_height="wrap_content"
- android:layout_below="@id/bt_send"
- android:layout_centerHorizontal="true"
- android:layout_marginTop="33dp"
- android:text="傳送的內容" />
- </RelativeLayout>
最後是MainActivity:
- publicclass MainActivity extends ActionBarActivity implements OnClickListener {
- private TextView tv_content, tv_send_text;
- private Button bt_send;
- @Override
- protectedvoid onCreate(Bundle savedInstanceState) {
- super.onCreate(savedInstanceState);
- setContentView(R.layout.activity_main);
- InitView();
- //開啟伺服器
- MobileServer mobileServer = new MobileServer();
- mobileServer.setHandler(handler);
- new Thread(mobileServer).start();
- }
- privatevoid InitView() {
- tv_content = (TextView) findViewById(R.id.tv_content);
- tv_send_text = (TextView) findViewById(R.id.tv_send_text);
- bt_send = (Button) findViewById(R.id.bt_send);
- bt_send.setOnClickListener(this);
- }
- @Override
- publicvoid onClick(View v) {
- switch (v.getId()) {
- case R.id.bt_send:
- String str = "Sent to the ESP8266";
- new SendAsyncTask().execute(str);
- tv_send_text.setText(str);
- break;
- }
- }
- Handler handler = new Handler() {
- @Override
- publicvoid handleMessage(Message msg) {
- switch (msg.what) {
- case1:
- tv_content.setText("WiFi模組傳送的:" + msg.obj);
- Toast.makeText(MainActivity.this, "接收到資訊", Toast.LENGTH_LONG)
- .show();
- }
- }
- };
- }
最後不要忘了新增網路許可權:
- <uses-permission android:name="android.permission.INTERNET"/>
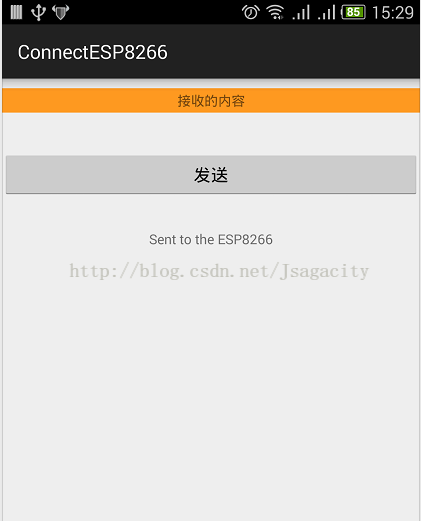
執行到真機,確保手機連線上ESP8266的WiFi,就可以進行手機發送資訊到ESP8266了。手機APP傳送過去的:
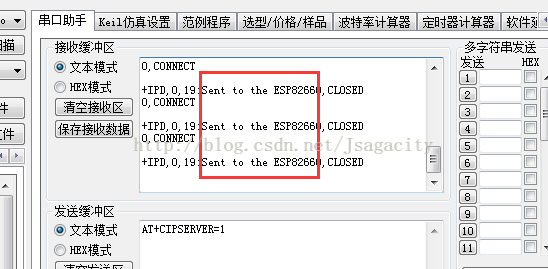
ESP8266接收到的:
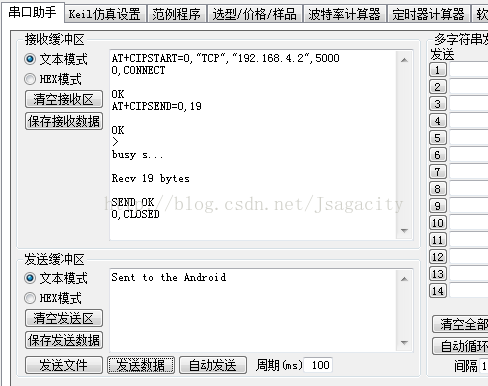
接下來是ESP8266傳送資料到APP。首先ESP要使用到的指令有:
1、建立TCP連線:AT+CIPSTART=0,"TCP","192.168.4.2",5000
2、確定傳送資料的長度:AT+CIPSEND=0,19
3、傳送資訊:Sent to the Android
操作指令:
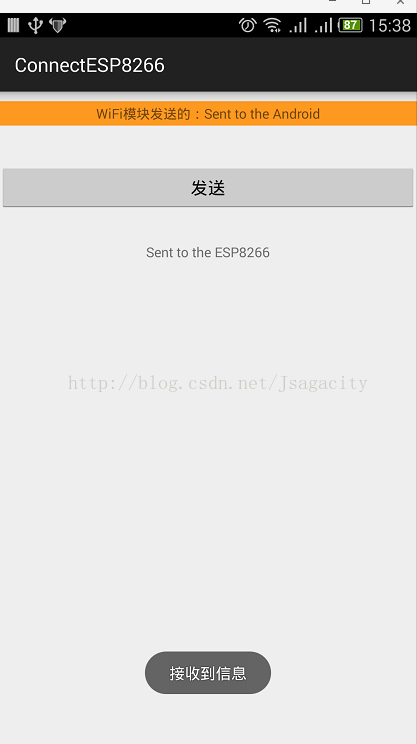
APP端接受到的資訊:
以上是簡單的實現APP和ESP8266直連通訊的實現。
如果想要實現遠端控制,過程是比較繁雜的,但是並不複雜。
這裡只簡單的說明一下大致的實現方式:
1、要實現遠端控制就必須得租用一個伺服器,當然自己電腦也可以作為伺服器,就是需要配置。最簡單的方式是租用雲伺服器,比如阿里雲的ECS,如果是學生,還有學生價。
2、接下來是最麻煩的步驟:
1)手機發資料到雲伺服器,這個不用多說了,使用json資料的網路通訊;
2)接著就是雲伺服器繼續把手機發送過來的轉發的ESP8266,而云伺服器和ESP8266之間的通訊是需要使用TCP長連線的。因為ESP8266這邊的IP是會變化的所以只能使用長連線;
3)ESP8266發資料到雲伺服器就不用再多說了,就第2點中的長連線。但是雲伺服器怎麼推送資料到APP呢?答案也是長連線的,這裡可以使用別人整合好的框架mina。
以上就是遠端控制的大致過程要點,想要實現就各自去完成了。當初我還是在別的平臺問人問到的實現方案,網上根本沒有相應的資料,或者是方案。以上的實現方案雖然有點繁雜,但是並不複雜,慢慢實現是沒有很大難度的。