Golang 客戶端對伺服器端的證書進行校驗(單向證書校驗)
[[email protected] ~]# echo "192.168.10.100 zigoo.com" >> /etc/hosts
[[email protected] ~]# more /etc/hosts
127.0.0.1 localhost localhost.localdomain localhost4 localhost4.localdomain4
::1 localhost localhost.localdomain localhost6 localhost6.localdomain6
192.168.10.100 zigoo.com
[[email protected]
[[email protected] ~]# tree $GOPATH/src/contoso.org -L 3 ##檢視專案目錄結構
/root/code/go/src/contoso.org├── client
│ ├── client.go
│ └── debug
└── server
├── debug
└── server.go
2 directories, 4 files
[[email protected] ~]#
[[email protected] ~]# cd $GOPATH/src/contoso.org/client
[[email protected]
Generating RSA private key, 2048 bit long modulus
.......................................................................................................................................................+++
..........+++
e is 65537 (0x10001)
[[email protected]
You are about to be asked to enter information that will be incorporated
into your certificate request.
What you are about to enter is what is called a Distinguished Name or a DN.
There are quite a few fields but you can leave some blank
For some fields there will be a default value,
If you enter '.', the field will be left blank.
-----
Country Name (2 letter code) [XX]:CN
State or Province Name (full name) []:GuangDong
Locality Name (eg, city) [Default City]:ShenZhen
Organization Name (eg, company) [Default Company Ltd]:ZiGoo
Organizational Unit Name (eg, section) []: ## 直接按回車鍵跳過
Common Name (eg, your name or your server's hostname) []:zigoo.com
Email Address []:[email protected]
[[email protected] client]#
客戶端:
私鑰檔案 ca.key
數字證書 ca.crt
[[email protected] client]#tree $GOPATH/src/contoso.org -L 3 ##檢視專案目錄結構
/root/code/go/src/contoso.org
├── client
│ ├── ca.crt
│ ├── ca.key
│ ├── client.go
│ └── debug
└── server
├── debug
└── server.go
2 directories, 6 files
[[email protected] client]#
[[email protected] client]#cp ca.key ca.crt $GOPATH/src/contoso.org/server
[[email protected] client]#cd $GOPATH/src/contoso.org/server
[[email protected] server]#openssl genrsa -out server.key 2048 ## 3). 生成一個伺服器端私鑰
Generating RSA private key, 2048 bit long modulus
........+++
......................................+++
e is 65537 (0x10001)
[[email protected] server]# openssl req -new -key server.key -out server.csr ## 4). 使用伺服器端私鑰生成數字證書請求
You are about to be asked to enter information that will be incorporated
into your certificate request.
What you are about to enter is what is called a Distinguished Name or a DN.
There are quite a few fields but you can leave some blank
For some fields there will be a default value,
If you enter '.', the field will be left blank.
-----
Country Name (2 letter code) [XX]:CN
State or Province Name (full name) []:GuangDong
Locality Name (eg, city) [Default City]:ShenZhen
Organization Name (eg, company) [Default Company Ltd]:ZiGoo
Organizational Unit Name (eg, section) []:
Common Name (eg, your name or your server's hostname) []:zigoo.com
Email Address []:[email protected]
Please enter the following 'extra' attributes
to be sent with your certificate request
A challenge password []:123456
An optional company name []:
##
5). 使用客戶端CA私鑰簽發伺服器端的數字證書
[[email protected] server]#openssl x509 -req -in server.csr -CA ca.crt -CAkey ca.key -CAcreateserial -out server.crt -days 365
Signature ok
subject=/C=CN/ST=GuangDong/L=ShenZhen/O=ZiGoo/CN=zigoo.com/[email protected]
Getting CA Private Key
伺服器端:
私鑰檔案 server.key
數字證書 server.crt
[[email protected] server]#tree $GOPATH/src/contoso.org -L 3 ##檢視專案目錄結構
/root/code/go/src/contoso.org
├── client
│ ├── ca.crt
│ ├── ca.key
│ ├── client.go
│ └── debug
└── server
├── ca.crt
├── ca.key
├── ca.srl
├── debug
├── server.crt
├── server.csr
├── server.go
└── server.key
2 directories, 12 files
[[email protected] server]#
使用Go建立一個HTTPS Web Server
/root/code/go/src/contoso.org/server/server.go :
package main
import (
"fmt"
"net/http"
)
func handler(res http.ResponseWriter, req *http.Request) {
fmt.Fprintf(res, "Hi, This is an example of https service in golang!\n")
fmt.Fprintf(res,
`[{"Name":"jason","Age":35,"Weight":60.3,"Speciality":"computer science","Hobby":["tennis","swimming","reading"],"Score":725.5,"Secret":"SRRMb3ZlFFlvdSE="}]`)
}
func main() {
http.HandleFunc("/", handler)
http.ListenAndServeTLS(":8081", "server.crt", "server.key", nil)
}
[[email protected] ~]#
cd $GOPATH/src/contoso.org/server ##伺服器端路徑
[[email protected] server]# go run server.go ##臨時性非全域性執行程式,注意,要先啟動伺服器端
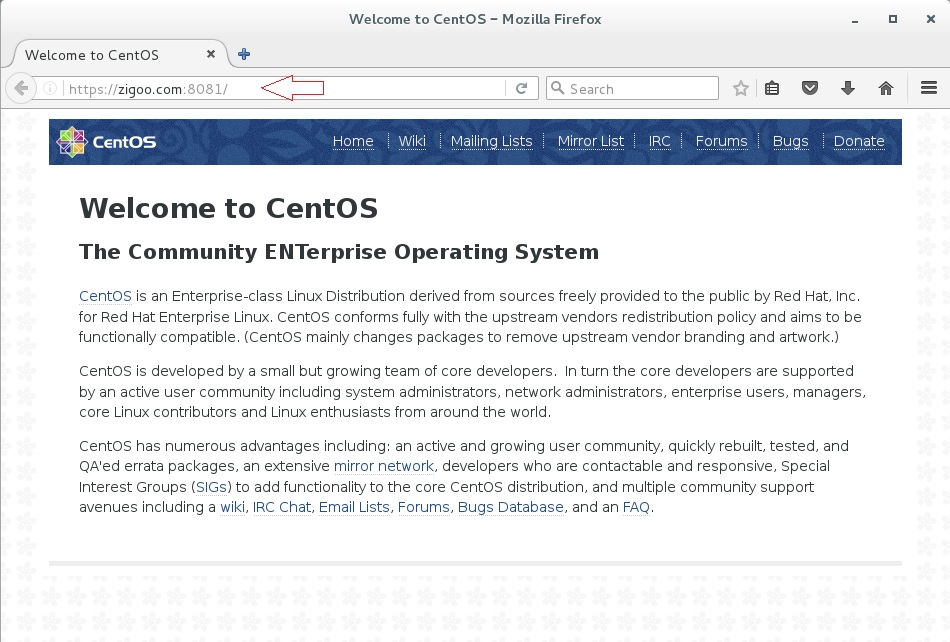
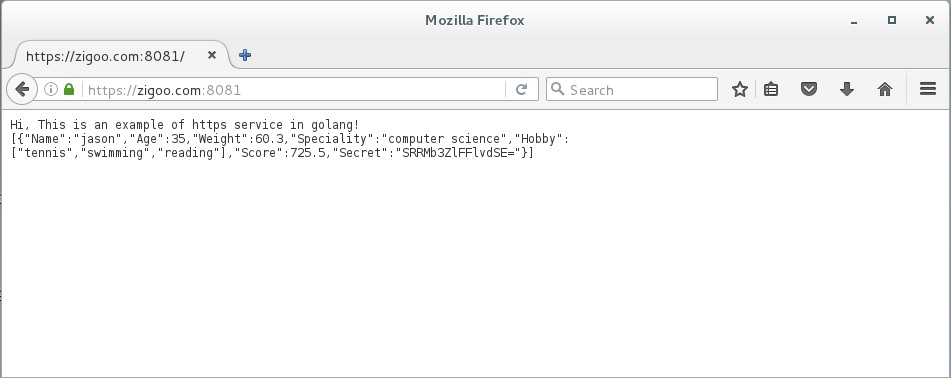
在瀏覽器地址欄輸入:https://zigoo.com:8081
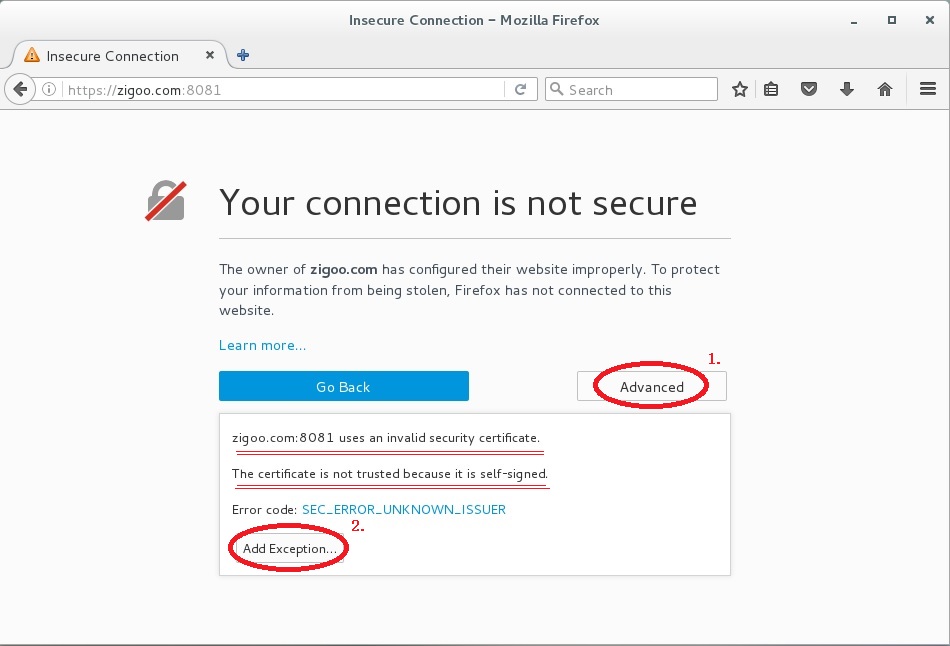
頁面顯示:“Your connection is not secure” 瀏覽器無法訪問HTTPS Web Server
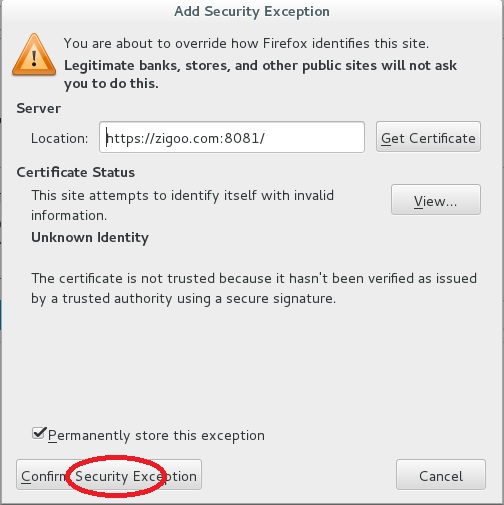
該瀏覽器跳過單向證書校驗的臨時辦法:
Advanced ---> Add Exception...---> Confirm Security Exception
取消在該瀏覽器上新增的安全異常,恢復到這個瀏覽器需要的單向證書校驗狀態:
Preferences ---> Advanced ---> View Certificates ---> Servers ---> Unknown (Not Stored) zigoo.com:8081 ---> Delete...---> OK
a). 在Servers選項卡內滾動列表到下面,發現與zigoo.com內容相關的行刪掉;
b)
在Authorities選項卡內滾動列表到下面,發現與ZiGoo內容相關的行刪掉;
注意:必須重新啟動HTTPS Web Server,按組合鍵 Ctrl + C 退出 go run server.go 啟動的HTTPS Web Server,
這樣重新整理瀏覽器才會再一次地看到“Your connection is not secure”
[[email protected] ~]#cd $GOPATH/src/contoso.org/server ##伺服器端路徑
[[email protected] server]# go run server.go ##臨時性非全域性執行程式,注意,要先啟動伺服器端,再一次啟動HTTPS Web Server
使用Go建立一個HTTPS Web Client
/root/code/go/src/contoso.org/client/client.go :
package main
import (
"crypto/tls"
"crypto/x509"
"fmt"
"io/ioutil"
"net/http"
)
func main() {
pool := x509.NewCertPool()
caCertPath := "ca.crt"
caCrt, err := ioutil.ReadFile(caCertPath)
if err != nil {
fmt.Println("ReadFile err:", err)
return
}
pool.AppendCertsFromPEM(caCrt)
tr := &http.Transport{
TLSClientConfig: &tls.Config{RootCAs: pool},
}
client := &http.Client{Transport: tr}
resp, err := client.Get("https://zigoo.com:8081")
if err != nil {
fmt.Println("Get error:", err)
return
}
defer resp.Body.Close()
body, err := ioutil.ReadAll(resp.Body)
fmt.Println(string(body))
}
[[email protected] ~]#
cd $GOPATH/src/contoso.org/client ##客戶端路徑
[[email protected] client]# go run client.go ##臨時性非全域性執行程式,注意,要先啟動伺服器端
Hi, This is an example of https service in golang!
[{"Name":"jason","Age":35,"Weight":60.3,"Speciality":"computer science","Hobby":["tennis","swimming","reading"],"Score":725.5,"Secret":"SRRMb3ZlFFlvdSE="}]
[[email protected] client]#
客戶端的另外一種實現,伺服器端程式碼保持不變,讓客戶端跳過對證書的校驗:
/root/code/go/src/contoso.org/client/client.go :
package main
import (
"crypto/tls"
"fmt"
"io/ioutil"
"net/http"
)
func main() {
tr := &http.Transport{
TLSClientConfig: &tls.Config{InsecureSkipVerify: true}, //InsecureSkipVerify引數值只能在客戶端上設定有效
}
client := &http.Client{Transport: tr}
resp, err := client.Get("https://zigoo.com:8081")
if err != nil {
fmt.Println("error:", err)
return
}
defer resp.Body.Close()
body, err := ioutil.ReadAll(resp.Body)
fmt.Println(string(body))
}
[[email protected] ~]#
cd $GOPATH/src/contoso.org/client ##客戶端路徑
[[email protected] client]# go run client.go ##臨時性非全域性執行程式,注意,要先啟動伺服器端
Hi, This is an example of https service in golang!
[{"Name":"jason","Age":35,"Weight":60.3,"Speciality":"computer science","Hobby":["tennis","swimming","reading"],"Score":725.5,"Secret":"SRRMb3ZlFFlvdSE="}]
[[email protected] client]#
我們可以看一下伺服器端沒有報錯,客戶端卻同樣地從伺服器端api介面獲得了我們需要的資料。
相關推薦
Golang 客戶端對伺服器端的證書進行校驗(單向證書校驗)
[[email protected] ~]# echo "192.168.10.100 zigoo.com" >> /etc/hosts [[email protected] ~]# more /etc/hosts 127.0.0.1
非同步獲取資料Ajax,以及對獲取的資料進行繫結(顯示在頁面上)
最近,經常用Ajax去非同步獲取資料,今天就把它總結一下 1.Ajax是非同步的JavaScr
Android 客戶端與伺服器端進行資料互動(一、登入伺服器端)
概要 安卓APP要實現很多功能(比如登入註冊、發表評論等)時都必須要使用到網路資料互動。所以在學習了這部分內容後,就將其以最常見的登入過程為例整理出來,也方便跟我一樣的新手能迅速學習上手。 預期效果圖如下,輸入手機號和密碼,點選Login按鈕,上傳資料到伺
Android 客戶端與伺服器端進行資料互動(二、登入客戶端)
概要 Android客戶端分為User,HttpUtil,HttpCallbackListener,MainActivity四個部分。User model與服務端的一樣,一方面是用於本地使用者資訊的儲存model,另一方面也是為了保證構造URL時使用的key一
java使用UDP來進行客戶端和伺服器端通訊的簡單例子
1:客戶端程式 package com.pb.udp; import java.io.IOException; import java.net.DatagramPacket; import java.net.InetAddress; import java.net.Unk
LInux中利用執行緒實現多個客戶端和伺服器端進行通訊
上一篇博文講了如何利用子程序實現多個客戶端和伺服器端進行通訊, 那麼,這一篇部落格就來實現一下如何利用執行緒實現多個客戶端和伺服器端進行通訊 程式碼實現: ser1.c #include <
Android客戶端程式通過Web Service實現對伺服器端資料庫的查詢
1.eclipse+webservice開發例項 http://blog.csdn.net/xw13106209/article/details/7049614/ 2.java通過JDBC連結SQLServer2012 http://blog.csdn.net/stewen_001/article/det
PG客戶端連線伺服器端報Connection refused (0x0000274D/10061) 的問題分析
C:\Users\Administrator>psql -h 192.168.80.189 -U highgo -p 5899 psql: 無法聯接到伺服器: Connection refused (0x0000274D/10061)
Socket-tcp協議客戶端與伺服器端互聯
客戶端 using System; using System.Collections.Generic; using System.Linq; using System.Net; using System.Net.Sockets; using System.Text; using System.T
如何使用CAD看圖軟體移動端對檢視的圖紙進行平移?
如何使用CAD看圖軟體移動端對檢視的圖紙進行平移?在電腦中的CAD看圖軟體中大多數的小夥伴們都知道如何對CAD圖紙進行移動,但是如何使用CAD看圖軟體移動端對檢視的圖紙進行平移?具體要怎麼來進行操作了,小夥伴們都知道嗎?有什麼好的辦法嗎?那下面小編就利用迅捷CAD看圖來教教大傢俱體操作方法,有興趣的朋友可以一
zookeeper叢集的客戶端與伺服器端
zookeeper服務端命令: 啟動命令:sh zkServer.sh start 停止命令:sh zkServer.sh stop zookeeper客戶端命令: 啟動命令:sh zkCli.sh 連線其他客戶端:sh zkCli.sh -server ip:port
php 客戶端與伺服器端安全與破解
一般的加密和授權:轉發伺服器(代理伺服器) 解決方案:hhvm編譯程式碼 放扒取: js類 1:防止滑鼠右鍵事件,在html->body <body oncontextmenu=self.event.returnValue=false> 或
APP(Android版)客戶端與伺服器端時間校準
APP開發人員經常會遇見一個bug就是,APP顯示的時間不準,或者說APP時間與伺服器時間不一致,會導致資料請求、資料顯示等各種問題。這時候我們就需要一種機制來解決時間不一致的問題。 解決方案如下: 1.伺服器端永遠使用UTC時間,包括引數和返回值,不要使用Date格式,而是使用UT
java socket:客戶端與伺服器端通訊
Socket:網路上兩個程式通過一個雙向的通訊連線實現資料交換,連線的一段為一個socket,要實現兩個程式的資料交換一般要一對socket。 這個定義參考自百度百科,我覺得說的還不錯,另外,socket的英文有‘插口’的意思,其實也可以理解為程式的插口等等。
客戶端與伺服器端建立連線的過程
一、概述 學習計算機其實就是在通曉原理的基礎上藉助實踐驗證想法。王陽明的“知行合一”用在計算機上,也是十分的貼切。這裡先說明兩個概念 Socket、TCP。 “交流”讓智人走上食物鏈的頂端。計算機網路的發展讓交流變得更加便利,同時也促進交流技術的發展。如果有兩個網友想送
客戶端到伺服器端的通訊過程及原理(很清晰,保證看後頓悟)
學習任何東西,我們只要搞清楚其原理,就會觸類旁通。現在結和我所學,我想總結一下客戶端到伺服器端的通訊過程。只有明白了原理,我們才會明白當我們程式開發過程中錯誤的問題會出現在那,才會更好的解決問題。 我們首先要了解一個概念性的詞彙:Socket sock
實現 React Naitve 熱更新 (client && server) 客戶端以及伺服器端
目前針對react native 熱更新的方案比較成熟的選擇有microsoft公司的code-push 傳送門,與react-native 中文網的pushy 傳送門 本文選擇code-push 用來進行對react-native 實現熱更新,code-pus
android客戶端與伺服器端互動 如何保持session
最近在開發專案的過程中,遇到android與web伺服器要在同一session下通訊的問題。 在解決問題前先回顧下Session與Cookie: Cookie和Session都為了用來儲存狀態資訊,都是儲存客戶端狀態的機制,它們都是為了解決HTTP無狀態的問題而所做
android客戶端從伺服器端獲取json資料並解析的實現程式碼
package com.nuoter.adapterUntil; import java.util.HashMap; import java.util.List; import android.content.Context; import android.graphics.Bitmap;
通俗易懂客戶端與伺服器端互動原理(HTTP資料請求與HTTP響應,包括Servlet部分)
經常看到HTTP客戶端與伺服器端互動原理的各種版本的文章,但是專業術語太多,且流程過於複雜,不容易消化。於是就按照在 Servlet 裡面的內容大致做了一些穿插。本來 連 Tomcat 容器 和 Servlet 的生命週期也準備在這裡一起寫的,但怕過去龐大,於是就簡單的 引用

