
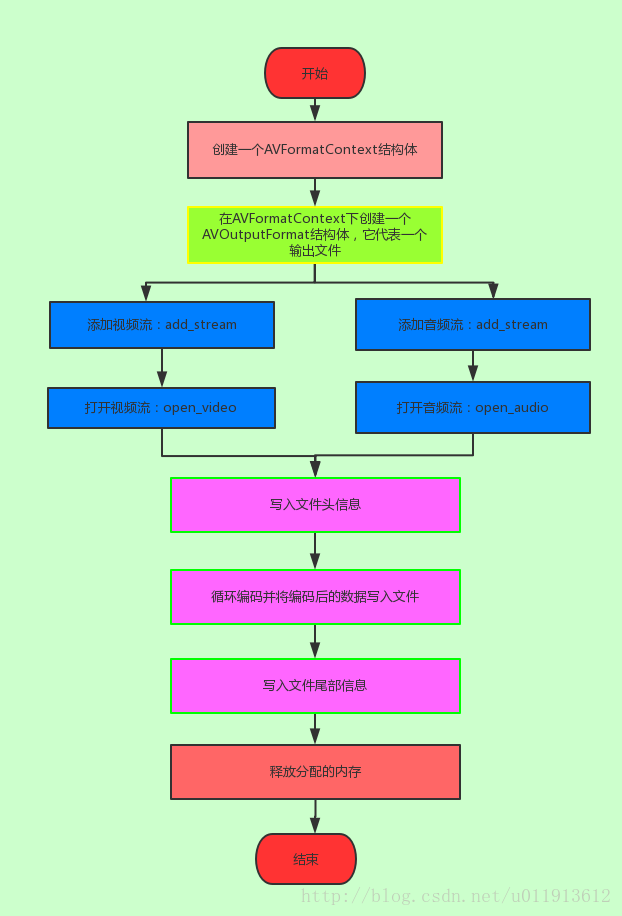
ffmpeg學習十一:封裝音視訊到同一個檔案(muxing.c原始碼分析)
這一節學習怎麼把音訊流和視訊按一定的格式封裝成一個檔案。ffmpeg所給的例子muxing.c很好的演示封裝的過程,因此,這一節主要是學習muxing.c這個檔案。
這個檔案的路徑為:doc/examples/muxing.c
首先感受下,執行結果如下:
直接執行./muxing xxx.xxx即可

這裡插講以下使用ffmpeg生成gif的命令:
當我們執行muxing可執行檔案的時候,比如,執行./muxing hello.mp4,就會生成Mp4檔案,我們可以將其轉為gif格式的圖片:
ffmpeg -i hello.mp4 -r 10 -t 1 hello.gif
-i:指定輸入檔案
-r:幀率,一秒鐘10幀
-t:制定gif的時間長度,這裡這制定1s鍾。
main函式
muxing.c的main函式如下:
/**************************************************************/
/* media file output */
int main(int argc, char **argv)
{
OutputStream video_st = { 0 }, audio_st = { 0 };
const char *filename;
AVOutputFormat *fmt;
AVFormatContext *oc;
AVCodec *audio_codec, *video_codec;
int ret;
int have_video = 0 我們可以梳理一下這個過程:
add_stream
接下來看看如何新增一個輸出流的:
/* Add an output stream. */
static void add_stream(OutputStream *ost, AVFormatContext *oc,
                       AVCodec **codec,
                       enum AVCodecID codec_id)
{
    AVCodecContext *c;
    int i;

    /* find the encoder */
    *codec = avcodec_find_encoder(codec_id);
    if (!(*codec)) {
        fprintf(stderr, "Could not find encoder for '%s'\n",
                avcodec_get_name(codec_id));
        exit(1);
    }

    ost->st = avformat_new_stream(oc, NULL);
    if (!ost->st) {
        fprintf(stderr, "Could not allocate stream\n");
        exit(1);
    }
    ost->st->id = oc->nb_streams-1;
    c = avcodec_alloc_context3(*codec);
    if (!c) {
        fprintf(stderr, "Could not alloc an encoding context\n");
        exit(1);
    }
    ost->enc = c;

    switch ((*codec)->type) {
    case AVMEDIA_TYPE_AUDIO:
        c->sample_fmt  = (*codec)->sample_fmts ?
            (*codec)->sample_fmts[0] : AV_SAMPLE_FMT_FLTP;
        c->bit_rate    = 64000;
        c->sample_rate = 44100;
        if ((*codec)->supported_samplerates) {
            c->sample_rate = (*codec)->supported_samplerates[0];
            for (i = 0; (*codec)->supported_samplerates[i]; i++) {
                if ((*codec)->supported_samplerates[i] == 44100)
                    c->sample_rate = 44100;
            }
        }
        c->channels        = av_get_channel_layout_nb_channels(c->channel_layout);
        c->channel_layout = AV_CH_LAYOUT_STEREO;
        if ((*codec)->channel_layouts) {
            c->channel_layout = (*codec)->channel_layouts[0];
            for (i = 0; (*codec)->channel_layouts[i]; i++) {
                if ((*codec)->channel_layouts[i] == AV_CH_LAYOUT_STEREO)
                    c->channel_layout = AV_CH_LAYOUT_STEREO;
            }
        }
        c->channels        = av_get_channel_layout_nb_channels(c->channel_layout);
        ost->st->time_base = (AVRational){ 1, c->sample_rate };
        break;

    case AVMEDIA_TYPE_VIDEO:
        c->codec_id = codec_id;

        c->bit_rate = 400000;
        /* Resolution must be a multiple of two. */
        c->width    = 352;
        c->height   = 288;
        /* timebase: This is the fundamental unit of time (in seconds) in terms
         * of which frame timestamps are represented. For fixed-fps content,
         * timebase should be 1/framerate and timestamp increments should be
         * identical to 1. */
        ost->st->time_base = (AVRational){ 1, STREAM_FRAME_RATE };
        c->time_base       = ost->st->time_base;

        c->gop_size      = 12; /* emit one intra frame every twelve frames at most */
        c->pix_fmt       = STREAM_PIX_FMT;
        if (c->codec_id == AV_CODEC_ID_MPEG2VIDEO) {
            /* just for testing, we also add B-frames */
            c->max_b_frames = 2;
        }
        if (c->codec_id == AV_CODEC_ID_MPEG1VIDEO) {
            /* Needed to avoid using macroblocks in which some coeffs overflow.
             * This does not happen with normal video, it just happens here as
             * the motion of the chroma plane does not match the luma plane. */
            c->mb_decision = 2;
        }
    break;

    default:
        break;
    }

    /* Some formats want stream headers to be separate. */
    if (oc->oformat->flags & AVFMT_GLOBALHEADER)
        c->flags |= AV_CODEC_FLAG_GLOBAL_HEADER;
}
這個過程其實非常簡單:
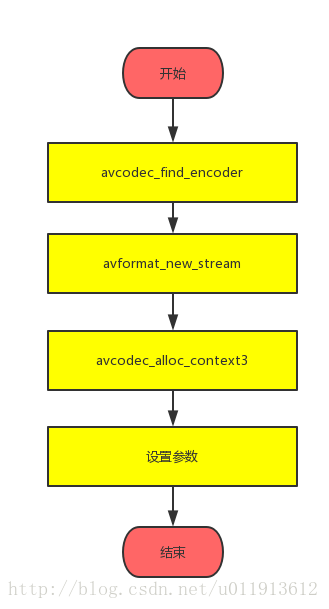
這個過程總結起來是這樣的:建立一個編碼器,建立一個新的流,設定編碼器上下文環境的引數。
在這個函式中,音訊編碼器和視訊編碼器通過(*codec)->type來區分,然後音訊和部分的引數設定必然不同,具體引數的設定,可以參考前面的文章。
open_video與open_audio
open_video
static void open_video(AVFormatContext *oc, AVCodec *codec, OutputStream *ost, AVDictionary *opt_arg)
{
    int ret;
    AVCodecContext *c = ost->enc;
    AVDictionary *opt = NULL;

    av_dict_copy(&opt, opt_arg, 0);

    /* open the codec */
    ret = avcodec_open2(c, codec, &opt);
    av_dict_free(&opt);
    if (ret < 0) {
        fprintf(stderr, "Could not open video codec: %s\n", av_err2str(ret));
        exit(1);
    }

    /* allocate and init a re-usable frame */
    ost->frame = alloc_picture(c->pix_fmt, c->width, c->height);
    if (!ost->frame) {
        fprintf(stderr, "Could not allocate video frame\n");
        exit(1);
    }

    /* If the output format is not YUV420P, then a temporary YUV420P
     * picture is needed too. It is then converted to the required
     * output format. */
    ost->tmp_frame = NULL;
    if (c->pix_fmt != AV_PIX_FMT_YUV420P) {
        ost->tmp_frame = alloc_picture(AV_PIX_FMT_YUV420P, c->width, c->height);
        if (!ost->tmp_frame) {
            fprintf(stderr, "Could not allocate temporary picture\n");
            exit(1);
        }
    }

    /* copy the stream parameters to the muxer */
    ret = avcodec_parameters_from_context(ost->st->codecpar, c);
    if (ret < 0) {
        fprintf(stderr, "Could not copy the stream parameters\n");
        exit(1);
    }
}
這個函式,主要還是使用avcodec_open2來開啟編碼器,然後分配AVFrame結構體,分配AVFrame結構體使用的是alloc_picture函式,這個函式如下:
/**************************************************************/
/* video output */

static AVFrame *alloc_picture(enum AVPixelFormat pix_fmt, int width, int height)
{
    AVFrame *picture;
    int ret;

    picture = av_frame_alloc();
    if (!picture)
        return NULL;

    picture->format = pix_fmt;
    picture->width  = width;
    picture->height = height;

    /* allocate the buffers for the frame data */
    ret = av_frame_get_buffer(picture, 32);
    if (ret < 0) {
        fprintf(stderr, "Could not allocate frame data.\n");
        exit(1);
    }

    return picture;
}
這個函式av_frame_alloc函式來真正分配一個AVFrame結構體,並設定AVFrame的並設定其格式,以及視訊長和寬。並分配快取。
open_audio
open_audio和open_video類似:
static void open_audio(AVFormatContext *oc, AVCodec *codec, OutputStream *ost, AVDictionary *opt_arg)
{
    AVCodecContext *c;
    int nb_samples;
    int ret;
    AVDictionary *opt = NULL;

    c = ost->enc;

    /* open it */
    av_dict_copy(&opt, opt_arg, 0);
    ret = avcodec_open2(c, codec, &opt);
    av_dict_free(&opt);
    if (ret < 0) {
        fprintf(stderr, "Could not open audio codec: %s\n", av_err2str(ret));
        exit(1);
    }

    /* init signal generator */
    ost->t     = 0;
    ost->tincr = 2 * M_PI * 110.0 / c->sample_rate;
    /* increment frequency by 110 Hz per second */
    ost->tincr2 = 2 * M_PI * 110.0 / c->sample_rate / c->sample_rate;

    if (c->codec->capabilities & AV_CODEC_CAP_VARIABLE_FRAME_SIZE)
        nb_samples = 10000;
    else
        nb_samples = c->frame_size;

    ost->frame     = alloc_audio_frame(c->sample_fmt, c->channel_layout,
                                       c->sample_rate, nb_samples);
    ost->tmp_frame = alloc_audio_frame(AV_SAMPLE_FMT_S16, c->channel_layout,
                                       c->sample_rate, nb_samples);

    /* copy the stream parameters to the muxer */
    ret = avcodec_parameters_from_context(ost->st->codecpar, c);
    if (ret < 0) {
        fprintf(stderr, "Could not copy the stream parameters\n");
        exit(1);
    }

    /* create resampler context */
        ost->swr_ctx = swr_alloc();
        if (!ost->swr_ctx) {
            fprintf(stderr, "Could not allocate resampler context\n");
            exit(1);
        }

        /* set options */
        av_opt_set_int       (ost->swr_ctx, "in_channel_count",   c->channels,       0);
        av_opt_set_int       (ost->swr_ctx, "in_sample_rate",     c->sample_rate,    0);
        av_opt_set_sample_fmt(ost->swr_ctx, "in_sample_fmt",      AV_SAMPLE_FMT_S16, 0);
        av_opt_set_int       (ost->swr_ctx, "out_channel_count",  c->channels,       0);
        av_opt_set_int       (ost->swr_ctx, "out_sample_rate",    c->sample_rate,    0);
        av_opt_set_sample_fmt(ost->swr_ctx, "out_sample_fmt",     c->sample_fmt,     0);

        /* initialize the resampling context */
        if ((ret = swr_init(ost->swr_ctx)) < 0) {
            fprintf(stderr, "Failed to initialize the resampling context\n");
            exit(1);
        }
}
也是開啟一個編碼器,並設定對應的引數。具體引數的設定請參看之前的文章。
write_video_frame和write_audio_frame
write_video_frame
該函式如下:
/*
 * encode one video frame and send it to the muxer
 * return 1 when encoding is finished, 0 otherwise
 */
static int write_video_frame(AVFormatContext *oc, OutputStream *ost)
{
    int ret;
    AVCodecContext *c;
    AVFrame *frame;
    int got_packet = 0;
    AVPacket pkt = { 0 };

    c = ost->enc;

    frame = get_video_frame(ost);

    av_init_packet(&pkt);

    /* encode the image */
    ret = avcodec_encode_video2(c, &pkt, frame, &got_packet);
    if (ret < 0) {
        fprintf(stderr, "Error encoding video frame: %s\n", av_err2str(ret));
        exit(1);
    }

    if (got_packet) {
        ret = write_frame(oc, &c->time_base, ost->st, &pkt);
    } else {
        ret = 0;
    }

    if (ret < 0) {
        fprintf(stderr, "Error while writing video frame: %s\n", av_err2str(ret));
        exit(1);
    }

    return (frame || got_packet) ? 0 : 1;
}
這個函式做三件事情:
1.獲得一幀視訊。使用get_video_frame函式。
2.壓縮它。使用avcodec_encode_video2函式。
3.寫入檔案。使用write_frame函式。
get_video_frame如下:
static AVFrame *get_video_frame(OutputStream *ost)
{
    AVCodecContext *c = ost->enc;

    /* check if we want to generate more frames */
    if (av_compare_ts(ost->next_pts, c->time_base,
                      STREAM_DURATION, (AVRational){ 1, 1 }) >= 0)
        return NULL;

    /* when we pass a frame to the encoder, it may keep a reference to it
     * internally; make sure we do not overwrite it here */
    if (av_frame_make_writable(ost->frame) < 0)
        exit(1);

    if (c->pix_fmt != AV_PIX_FMT_YUV420P) {
        /* as we only generate a YUV420P picture, we must convert it
         * to the codec pixel format if needed */
        if (!ost->sws_ctx) {
            ost->sws_ctx = sws_getContext(c->width, c->height,
                                          AV_PIX_FMT_YUV420P,
                                          c->width, c->height,
                                          c->pix_fmt,
                                          SCALE_FLAGS, NULL, NULL, NULL);
            if (!ost->sws_ctx) {
                fprintf(stderr,
                        "Could not initialize the conversion context\n");
                exit(1);
            }
        }
        fill_yuv_image(ost->tmp_frame, ost->next_pts, c->width, c->height);
        sws_scale(ost->sws_ctx,
                  (const uint8_t * const *)ost->tmp_frame->data, ost->tmp_frame->linesize,
                  0, c->height, ost->frame->data, ost->frame->linesize);
    } else {
        fill_yuv_image(ost->frame, ost->next_pts, c->width, c->height);
    }

    ost->frame->pts = ost->next_pts++;

    return ost->frame;
}
這個函式首先會檢查pts,來判斷要不要生成一幀影象。如果需要,就使用fill_yuv_image來生成一幀影象,生成影象結束後,更新pts,也就是ost->next_pts自增。
真正生成一幀資料是在fill_yuv_image函式中實現的:
/* Prepare a dummy image. */
static void fill_yuv_image(AVFrame *pict, int frame_index,
                           int width, int height)
{
    int x, y, i;

    i = frame_index;

    /* Y */
    for (y = 0; y < height; y++)
        for (x = 0; x < width; x++)
            pict->data[0][y * pict->linesize[0] + x] = x + y + i * 3;

    /* Cb and Cr */
    for (y = 0; y < height / 2; y++) {
        for (x = 0; x < width / 2; x++) {
            pict->data[1][y * pict->linesize[1] + x] = 128 + y + i * 2;
            pict->data[2][y * pict->linesize[2] + x] = 64 + x + i * 5;
        }
    }
}
static int write_frame(AVFormatContext *fmt_ctx, const AVRational *time_base, AVStream *st, AVPacket *pkt)
{
    /* rescale output packet timestamp values from codec to stream timebase */
    av_packet_rescale_ts(pkt, *time_base, st->time_base);
    pkt->stream_index = st->index;

    /* Write the compressed frame to the media file. */
    log_packet(fmt_ctx, pkt);
    return av_interleaved_write_frame(fmt_ctx, pkt);
}
這個函式首先使用av_packet_rescale_ts來調整時間戳。av_packet_rescale_ts函式的作用為不同time_base度量之間的轉換,這裡是將AVCodecContext的time_base轉換為AVStream中的time_base。av_interleaved_write_frame用來寫入資料到檔案。這個函式定義如下:
/**
 * Write a packet to an output media file ensuring correct interleaving.
 *
 * This function will buffer the packets internally as needed to make sure the
 * packets in the output file are properly interleaved in the order of
 * increasing dts. Callers doing their own interleaving should call
 * av_write_frame() instead of this function.
 *
 * Using this function instead of av_write_frame() can give muxers advance
 * knowledge of future packets, improving e.g. the behaviour of the mp4
 * muxer for VFR content in fragmenting mode.
 *
 * @param s media file handle
 * @param pkt The packet containing the data to be written.
 *            <br>
 *            If the packet is reference-counted, this function will take
 *            ownership of this reference and unreference it later when it sees
 *            fit.
 *            The caller must not access the data through this reference after
 *            this function returns. If the packet is not reference-counted,
 *            libavformat will make a copy.
 *            <br>
 *            This parameter can be NULL (at any time, not just at the end), to
 *            flush the interleaving queues.
 *            <br>
 *            Packet's @ref AVPacket.stream_index "stream_index" field must be
 *            set to the index of the corresponding stream in @ref
 *            AVFormatContext.streams "s->streams".
 *            <br>
 *            The timestamps (@ref AVPacket.pts "pts", @ref AVPacket.dts "dts")
 *            must be set to correct values in the stream's timebase (unless the
 *            output format is flagged with the AVFMT_NOTIMESTAMPS flag, then
 *            they can be set to AV_NOPTS_VALUE).
 *            The dts for subsequent packets in one stream must be strictly
 *            increasing (unless the output format is flagged with the
 *            AVFMT_TS_NONSTRICT, then they merely have to be nondecreasing).
 *            @ref AVPacket.duration "duration") should also be set if known.
 *
 * @return 0 on success, a negative AVERROR on error. Libavformat will always
 *         take care of freeing the packet, even if this function fails.
 *
 * @see av_write_frame(), AVFormatContext.max_interleave_delta
 */
int av_interleaved_write_frame(AVFormatContext *s, AVPacket *pkt);
這個函式的作用是互動式的寫入一Packet的資料到檔案中。第一個引數是檔案控制代碼,第二個引數是要寫入的資料包。
write_video_frame
write_audio_frame和write_video_frame類似,其原始碼如下:
/*
 * encode one audio frame and send it to the muxer
 * return 1 when encoding is finished, 0 otherwise
 */
static int write_audio_frame(AVFormatContext *oc, OutputStream *ost)
{
    AVCodecContext *c;
    AVPacket pkt = { 0 }; // data and size must be 0;
    AVFrame *frame;
    int ret;
    int got_packet;
    int dst_nb_samples;

    av_init_packet(&pkt);
    c = ost->enc;

    frame = get_audio_frame(ost);

    if (frame) {
        /* convert samples from native format to destination codec format, using the resampler */
            /* compute destination number of samples */
            dst_nb_samples = av_rescale_rnd(swr_get_delay(ost->swr_ctx, c->sample_rate) + frame->nb_samples,
                                            c->sample_rate, c->sample_rate, AV_ROUND_UP);
            av_assert0(dst_nb_samples == frame->nb_samples);

        /* when we pass a frame to the encoder, it may keep a reference to it
         * internally;
         * make sure we do not overwrite it here
         */
        ret = av_frame_make_writable(ost->frame);
        if (ret < 0)
            exit(1);

            /* convert to destination format */
            ret = swr_convert(ost->swr_ctx,
                              ost->frame->data, dst_nb_samples,
                              (const uint8_t **)frame->data, frame->nb_samples);
            if (ret < 0) {
                fprintf(stderr, "Error while converting\n");
                exit(1);
            }
            frame = ost->frame;

        frame->pts = av_rescale_q(ost->samples_count, (AVRational){1, c->sample_rate}, c->time_base);
        ost->samples_count += dst_nb_samples;
    }

    ret = avcodec_encode_audio2(c, &pkt, frame, &got_packet);
    if (ret < 0) {
        fprintf(stderr, "Error encoding audio frame: %s\n", av_err2str(ret));
        exit(1);
    }

    if (got_packet) {
        ret = write_frame(oc, &c->time_base, ost->st, &pkt);
        if (ret < 0) {
            fprintf(stderr, "Error while writing audio frame: %s\n",
                    av_err2str(ret));
            exit(1);
        }
    }

    return (frame || got_packet) ? 0 : 1;
}
至此,封裝音視訊到一個檔案的過程就分析完了。其框架我們在一開始就以流程圖的方式給出,只要結合這個流程圖,看懂原始碼應該不是什麼難事。