
android中Zxing實現二維碼功能的快速整合以及掃描介面的定製
阿新 • • 發佈:2019-01-25
Zxing二維碼庫是相當豐富。但是我們往往只需要裡面的掃碼識別以及生成二維碼的功能就可以了,所以這次用到了已經抽離出核銷程式碼的框架包
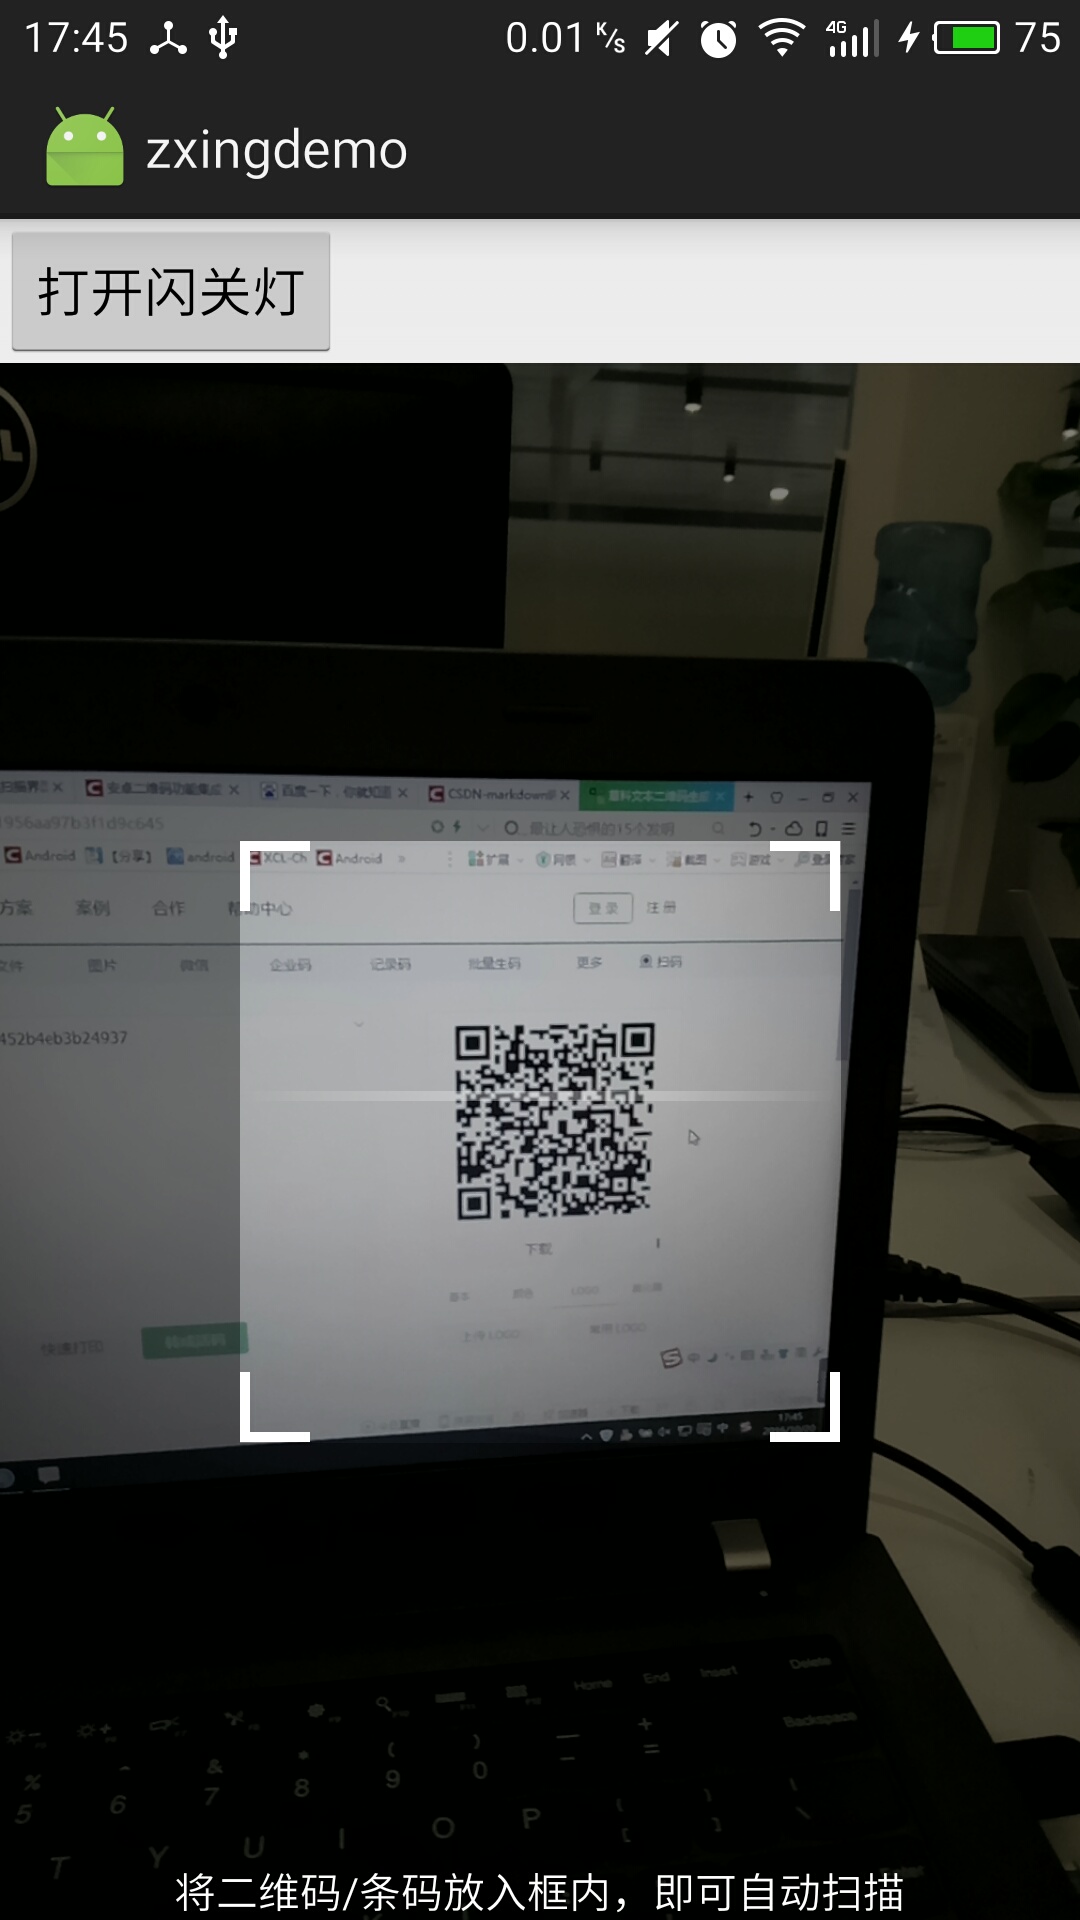
compile ‘com.journeyapps:zxing-android-embedded:3.3.0’,來快速整合開發。比較簡單,後面還會有掃面介面的定製,仿微信二維碼掃一掃功能。上幾個效果圖:
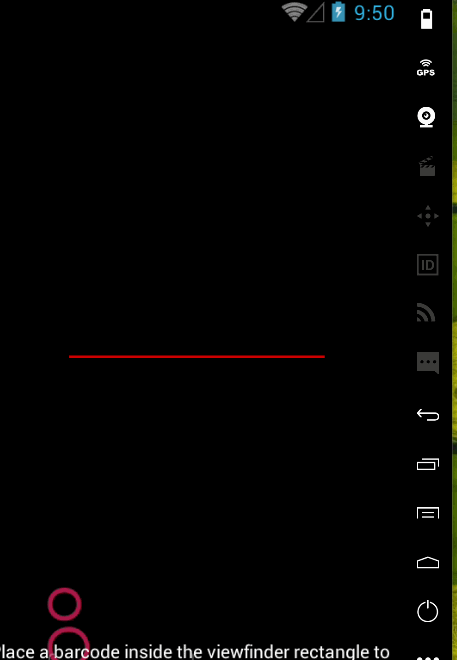
掃描中
掃描結果:

接下來我們來實現他。
一、整合二維碼的簡單掃一掃以及生成二維碼的功能(錄屏用的是genymotion,錄的有點奇怪啊)
1、Zxing二維碼的環境。我們只要compile ‘com.journeyapps:zxing-android-embedded:3.3.0’這個後面就不需要再集成了。
2、xml檔案中
<?xml version="1.0" encoding="utf-8"?>
<LinearLayout xmlns:android="http://schemas.android.com/apk/res/android"
android:layout_width="match_parent"
android:layout_height="match_parent"
xmlns:app="http://schemas.android.com/apk/res-auto"
android:orientation="vertical">
<Button
3、CustomScanAct.java
package com.coofond.zxingdemo;

import android.app.Activity;
import android.content.pm.PackageManager;
import android.os.Bundle;
import android.os.PersistableBundle;
import android.view.KeyEvent;
import android.view.View;
import android.widget.Button;
import android.widget.Toast;

import com.journeyapps.barcodescanner.CaptureManager;
import com.journeyapps.barcodescanner.DecoratedBarcodeView;

/**
 * Created by IBM on 2016/10/13.
 */

public class CustomScanAct extends Activity implements DecoratedBarcodeView.TorchListener { // 實現相關介面
    // 新增一個按鈕用來控制閃光燈,同時新增兩個按鈕表示其他功能,先用Toast表示
    Button swichLight;
    DecoratedBarcodeView mDBV;
    private CaptureManager captureManager;
    private boolean isLightOn = false;


    @Override
    protected void onPause() {
        super.onPause();
        captureManager.onPause();
    }

    @Override
    protected void onResume() {
        super.onResume();
        captureManager.onResume();
    }

    @Override
    protected void onDestroy() {
        super.onDestroy();
        captureManager.onDestroy();
    }

    @Override
    public void onSaveInstanceState(Bundle outState, PersistableBundle outPersistentState) {
        super.onSaveInstanceState(outState, outPersistentState);
        captureManager.onSaveInstanceState(outState);
    }

    @Override
    public boolean onKeyDown(int keyCode, KeyEvent event) {
        return mDBV.onKeyDown(keyCode, event) || super.onKeyDown(keyCode, event);
    }

    @Override
    protected void onCreate(Bundle savedInstanceState) {
        super.onCreate(savedInstanceState);
        setContentView(R.layout.act_customscan);
        swichLight = (Button) findViewById(R.id.btn_switch);
        mDBV= (DecoratedBarcodeView) findViewById(R.id.dbv_custom);

        mDBV.setTorchListener(this);

        // 如果沒有閃光燈功能,就去掉相關按鈕
        if (!hasFlash()) {
            swichLight.setVisibility(View.GONE);
        }
        //重要程式碼,初始化捕獲
        captureManager = new CaptureManager(this, mDBV);
        captureManager.initializeFromIntent(getIntent(), savedInstanceState);
        captureManager.decode();
        //選擇閃關燈
        swichLight.setOnClickListener(new View.OnClickListener() {
            @Override
            public void onClick(View v) {
                if (isLightOn) {
                    mDBV.setTorchOff();
                } else {
                    mDBV.setTorchOn();
                }
            }
        });
    }

    // torch 手電筒
    @Override
    public void onTorchOn() {
        Toast.makeText(this, "torch on", Toast.LENGTH_LONG).show();
        isLightOn = true;
    }

    @Override
    public void onTorchOff() {
        Toast.makeText(this, "torch off", Toast.LENGTH_LONG).show();
        isLightOn = false;
    }

    // 判斷是否有閃光燈功能
    private boolean hasFlash() {
        return getApplicationContext().getPackageManager()
                .hasSystemFeature(PackageManager.FEATURE_CAMERA_FLASH);
    }


}
4、MainActivity.java
package com.coofond.zxingdemo;

import android.app.Activity;
import android.content.Intent;
import android.os.Bundle;
import android.view.View;
import android.widget.Button;
import android.widget.TextView;

import com.google.zxing.integration.android.IntentIntegrator;
import com.google.zxing.integration.android.IntentResult;

public class MainActivity extends Activity {
    private Button btnClick;
    private TextView tvResult;

    @Override
    protected void onCreate(Bundle savedInstanceState) {
        super.onCreate(savedInstanceState);
        setContentView(R.layout.activity_main);
        initView();
        initEvent();
    }

    private void initView() {
        btnClick = (Button) findViewById(R.id.btn_click);
        tvResult = (TextView) findViewById(R.id.tv_result);
    }

    private void initEvent() {
        btnClick.setOnClickListener(new View.OnClickListener() {
            @Override
            public void onClick(View v) {
                //假如你要用的是fragment進行介面的跳轉
                //IntentIntegrator intentIntegrator = IntentIntegrator.forSupportFragment(ShopFragment.this).setCaptureActivity(CustomScanAct.class);
                IntentIntegrator intentIntegrator = new IntentIntegrator(MainActivity.this);
                intentIntegrator
                        .setDesiredBarcodeFormats(IntentIntegrator.ALL_CODE_TYPES)
                        .setPrompt("將二維碼/條碼放入框內,即可自動掃描")//寫那句提示的話
                        .setOrientationLocked(false)//掃描方向固定
                        .setCaptureActivity(CustomScanAct.class) // 設定自定義的activity是CustomActivity
                        .initiateScan(); // 初始化掃描
            }
        });
    }

    //獲取掃描的結果
    @Override
    public void onActivityResult(int requestCode, int resultCode, Intent data) {
        IntentResult intentResult = IntentIntegrator.parseActivityResult(requestCode, resultCode, data);
        if (intentResult != null) {
            if (intentResult.getContents() == null) {

            } else {
                // ScanResult 為獲取到的字串
                String ScanResult = intentResult.getContents();
                tvResult.setText(ScanResult);
            }
        } else {
            super.onActivityResult(requestCode, resultCode, data);
        }
    }
}
這樣就集成了二維碼的基本功能了。顯示的是一個閃動的鐳射條。。。
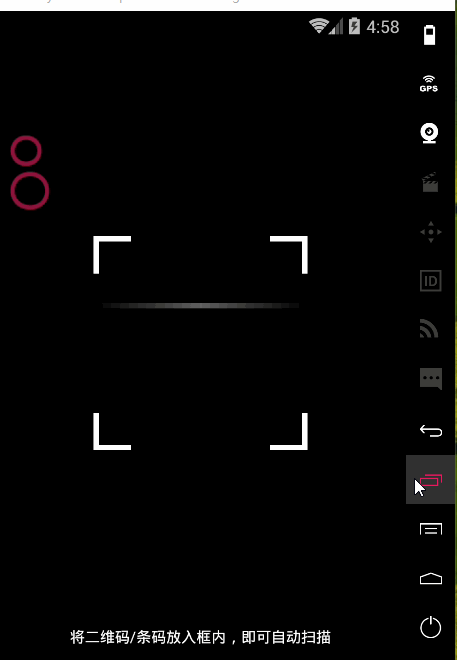
二、仿造微信掃一掃,重新定製掃面介面,看下要實現的效果圖
1、主要是這一句 app:zxing_scanner_layout=”@layout/barcode_scanner”指向你自定義的介面
 <!-- 這個控制元件就是掃描的視窗了 -->
    <com.journeyapps.barcodescanner.DecoratedBarcodeView
        android:layout_width="match_parent"
        android:layout_height="match_parent"
        android:id="@+id/dbv_custom"
        app:zxing_framing_rect_width="200dp"
        app:zxing_framing_rect_height="200dp"
        app:zxing_preview_scaling_strategy="fitXY"
        app:zxing_use_texture_view="true"
        app:zxing_scanner_layout="@layout/barcode_scanner"
       >
    </com.journeyapps.barcodescanner.DecoratedBarcodeView>
2、那麼我們看下如何定製這個視窗barcode_scanner.xml看一下
<?xml version="1.0" encoding="utf-8"?>
<merge xmlns:android="http://schemas.android.com/apk/res/android"
    xmlns:app="http://schemas.android.com/apk/res-auto"
    >
    <com.journeyapps.barcodescanner.BarcodeView
        android:layout_width="match_parent"
        android:layout_height="match_parent"
        android:id="@+id/zxing_barcode_surface"
        app:zxing_framing_rect_width="250dp"
        app:zxing_framing_rect_height="250dp">
    </com.journeyapps.barcodescanner.BarcodeView>

    <com.coofond.zxingdemo.CustomViewfinderView
        android:layout_width="match_parent"
        android:layout_height="match_parent"
        android:id="@+id/zxing_viewfinder_view"
        app:zxing_possible_result_points="@color/zxing_custom_possible_result_points"
        app:zxing_result_view="@color/zxing_custom_result_view"
        app:zxing_viewfinder_laser="#FFFFFF"
        app:zxing_viewfinder_mask="@color/zxing_custom_viewfinder_mask"/>

    <TextView
        android:id="@+id/zxing_status_view"
        android:layout_width="wrap_content"
        android:layout_height="wrap_content"
        android:layout_gravity="bottom|center_horizontal"
        android:background="@color/zxing_transparent"
        android:text="@string/zxing_msg_default_status"
        android:textColor="@color/zxing_status_text"/>

</merge>
3、主要是要自定義ViewfinderView,重新繪製你的掃描介面。看下CustomViewfinderView.java中的檔案
package com.coofond.zxingdemo;

import android.content.Context;
import android.graphics.Canvas;
import android.graphics.LinearGradient;
import android.graphics.Rect;
import android.graphics.Shader;
import android.util.AttributeSet;

import com.google.zxing.ResultPoint;
import com.journeyapps.barcodescanner.ViewfinderView;

import java.util.ArrayList;
import java.util.List;

/**
 * 自定義zxing二維碼掃描介面
 * Created by IBM on 2016/10/20.
 */

public class CustomViewfinderView extends ViewfinderView {
    public int laserLinePosition=0;
    public float[] position=new float[]{0f,0.5f,1f};
    public int[] colors=new int[]{0x00ffffff,0xffffffff,0x00ffffff};
    public LinearGradient linearGradient ;
    public CustomViewfinderView(Context context, AttributeSet attrs) {
        super(context, attrs);
    }


    /**
     * 重寫draw方法繪製自己的掃描框
     * @param canvas
     */
    @Override
    public void onDraw(Canvas canvas) {
        refreshSizes();
        if (framingRect == null || previewFramingRect == null) {
            return;
        }

        Rect frame = framingRect;
        Rect previewFrame = previewFramingRect;

        int width = canvas.getWidth();
        int height = canvas.getHeight();
        //繪製4個角

        paint.setColor(0xFFFFFFFF);//定義畫筆的顏色
        canvas.drawRect(frame.left, frame.top, frame.left+70, frame.top+10, paint);
        canvas.drawRect(frame.left, frame.top, frame.left + 10, frame.top + 70, paint);

        canvas.drawRect(frame.right-70, frame.top, frame.right, frame.top+10, paint);
        canvas.drawRect(frame.right-10, frame.top, frame.right, frame.top+70, paint);

        canvas.drawRect(frame.left, frame.bottom-10, frame.left+70, frame.bottom, paint);
        canvas.drawRect(frame.left, frame.bottom-70, frame.left+10, frame.bottom, paint);

        canvas.drawRect(frame.right-70, frame.bottom-10, frame.right, frame.bottom, paint);
        canvas.drawRect(frame.right-10, frame.bottom-70, frame.right, frame.bottom, paint);
        // Draw the exterior (i.e. outside the framing rect) darkened
        paint.setColor(resultBitmap != null ? resultColor : maskColor);
        canvas.drawRect(0, 0, width, frame.top, paint);
        canvas.drawRect(0, frame.top, frame.left, frame.bottom + 1, paint);
        canvas.drawRect(frame.right + 1, frame.top, width, frame.bottom + 1, paint);
        canvas.drawRect(0, frame.bottom + 1, width, height, paint);

        if (resultBitmap != null) {
            // Draw the opaque result bitmap over the scanning rectangle
            paint.setAlpha(CURRENT_POINT_OPACITY);
            canvas.drawBitmap(resultBitmap, null, frame, paint);
        } else {
            //  paint.setAlpha(SCANNER_ALPHA[scannerAlpha]);
            //  scannerAlpha = (scannerAlpha + 1) % SCANNER_ALPHA.length;
            int middle = frame.height() / 2 + frame.top;
            laserLinePosition=laserLinePosition+5;
            if(laserLinePosition>frame.height())
            {
                laserLinePosition=0;
            }
            linearGradient= new LinearGradient(frame.left + 1, frame.top+laserLinePosition , frame.right -1 , frame.top +10+laserLinePosition, colors, position, Shader.TileMode.CLAMP);
            // Draw a red "laser scanner" line through the middle to show decoding is active

            //  paint.setColor(laserColor);
            paint.setShader(linearGradient);
            //繪製掃描線
            canvas.drawRect(frame.left + 1, frame.top+laserLinePosition , frame.right -1 , frame.top +10+laserLinePosition, paint);
            paint.setShader(null);
            float scaleX = frame.width() / (float) previewFrame.width();
            float scaleY = frame.height() / (float) previewFrame.height();

            List<ResultPoint> currentPossible = possibleResultPoints;
            List<ResultPoint> currentLast = lastPossibleResultPoints;
            int frameLeft = frame.left;
            int frameTop = frame.top;
            if (currentPossible.isEmpty()) {
                lastPossibleResultPoints = null;
            } else {
                possibleResultPoints = new ArrayList<>(5);
                lastPossibleResultPoints = currentPossible;
                paint.setAlpha(CURRENT_POINT_OPACITY);
                paint.setColor(resultPointColor);
                for (ResultPoint point : currentPossible) {
                    canvas.drawCircle(frameLeft + (int) (point.getX() * scaleX),
                            frameTop + (int) (point.getY() * scaleY),
                            POINT_SIZE, paint);
                }
            }
            if (currentLast != null) {
                paint.setAlpha(CURRENT_POINT_OPACITY / 2);
                paint.setColor(resultPointColor);
                float radius = POINT_SIZE / 2.0f;
                for (ResultPoint point : currentLast) {
                    canvas.drawCircle(frameLeft + (int) (point.getX() * scaleX),
                            frameTop + (int) (point.getY() * scaleY),
                            radius, paint);
                }
            }
            postInvalidateDelayed(16,
                    frame.left ,
                    frame.top ,
                    frame.right ,
                    frame.bottom);
            // postInvalidate();

        }
    }
}