
android 極光推送快速自動整合及,自定義通知樣式及雙指下拉通知欄顯示全部內容
一,整合步驟:
1.極光推送官網,註冊,登入,建立應用,用專案包名獲取AppKey:
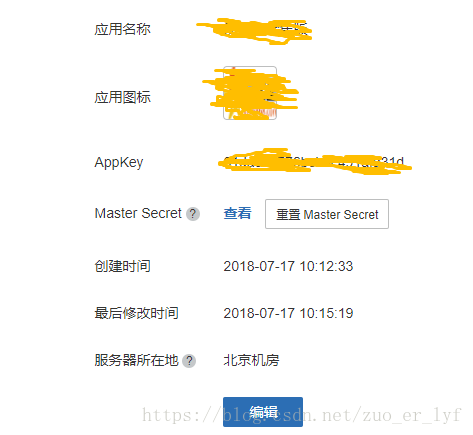
注:包名必須與專案的包名一致
2.在 module 的 gradle 中新增依賴和支援:
android {
    ......
    defaultConfig {
        applicationId "com.xxx.xxx" //JPush上註冊的包名.
        ......

        ndk {
            //選擇要新增的對應cpu型別的.so庫。
            abiFilters 'armeabi', 'armeabi-v7a', 'arm64-v8a'
            // 還可以新增 'x86', 'x86_64', 'mips', 'mips64'
        }

        manifestPlaceholders = [
            JPUSH_PKGNAME : applicationId,
            JPUSH_APPKEY : "你的appkey", //JPush上註冊的包名對應的appkey.
            JPUSH_CHANNEL : "developer-default", //暫時填寫預設值即可.
        ]
        ......
    }
    ......
}

dependencies {
    ......

    compile 'cn.jiguang.sdk:jpush:3.1.1'  // 此處以JPush 3.1.1 版本為例。
    compile 'cn.jiguang.sdk:jcore:1.1.9'  // 此處以JCore 1.1.9 版本為例。
    ......
}
3.確認android studio的 Project 根目錄的主 gradle 中配置了jcenter支援。(新建project預設配置就支援)
buildscript {
    repositories {
        jcenter()
    }
    ......
}

allprojets {
    repositories {
        jcenter()
    }
}
4.定義接收器:MyReceiver:
public class MyReceiver extends BroadcastReceiver {
    private static final String TAG = "JPush";

    @Override
    public void onReceive(Context context, Intent intent) {

        Bundle bundle=intent.getExtras();
        if(JPushInterface.ACTION_REGISTRATION_ID.equals(intent.getAction())){
            String regId=bundle.getString(JPushInterface.EXTRA_REGISTRATION_ID);
            Log.i(TAG, "[MyReceiver] 接收Registration Id : " + regId);
        }else if(JPushInterface.ACTION_MESSAGE_RECEIVED.equals(intent.getAction())) {
            Log.i(TAG, "[MyReceiver] 接收到推送下來的自定義訊息: " + bundle.getString(JPushInterface.EXTRA_MESSAGE));
            String type2 = bundle.getString(JPushInterface.EXTRA_EXTRA);
            Log.i(TAG, "[MyReceiver] 接收到推送下來的自定義訊息內容: " + type2);
        }else if(JPushInterface.ACTION_NOTIFICATION_RECEIVED.equals(intent.getAction())){
            Log.i(TAG, "[MyReceiver] 接收到推送下來的通知");

        }else if(JPushInterface.ACTION_NOTIFICATION_OPENED.equals(intent.getAction())){
            Log.i(TAG, "[MyReceiver] 使用者點選打開了通知");
        }
    }


    //send msg to MainActivity
    private void processCustomMessage(Context context, Bundle bundle) {
        //省略了

    }
}
5.初始化SDK,建立Application檔案,(注意:必須要在配置檔案進行配置)
public class MyApliction extends Application {

    @Override
    public void onCreate() {
        super.onCreate();

        //初始化sdk
        JPushInterface.setDebugMode(true);//正式版的時候設定false,關閉除錯
        JPushInterface.init(this);

        //建議新增tag標籤,傳送訊息的之後就可以指定tag標籤來發送了
        Set<String> set = new HashSet<>();
        set.add("yzx");//名字任意,可多新增幾個
        JPushInterface.setTags(this, set, null);//設定標籤
    }
}
6.配置 AndroidManifest.xml,(您應用的包名:填寫自己的專案包名)
<?xml version="1.0" encoding="utf-8"?>
<manifest xmlns:android="http://schemas.android.com/apk/res/android"
    xmlns:tools="http://schemas.android.com/tools"
    package="您應用的包名">
    <uses-sdk android:minSdkVersion="9" android:targetSdkVersion="23" />

    <!-- Required -->
    <permission
        android:name="您應用的包名.permission.JPUSH_MESSAGE"
        android:protectionLevel="signature" />

    <!-- Required -->
    <uses-permission android:name="您應用的包名.permission.JPUSH_MESSAGE" />
    <uses-permission android:name="android.permission.RECEIVE_USER_PRESENT" />
    <uses-permission android:name="android.permission.INTERNET" />
    <uses-permission android:name="android.permission.WAKE_LOCK" />
    <uses-permission android:name="android.permission.READ_PHONE_STATE" />
    <uses-permission android:name="android.permission.WRITE_EXTERNAL_STORAGE" />
    <uses-permission android:name="android.permission.READ_EXTERNAL_STORAGE" />
    <uses-permission android:name="android.permission.VIBRATE" />
    <uses-permission android:name="android.permission.MOUNT_UNMOUNT_FILESYSTEMS" />
    <uses-permission android:name="android.permission.ACCESS_NETWORK_STATE" />
    <uses-permission android:name="android.permission.WRITE_SETTINGS" />
    <uses-permission android:name="android.permission.ACCESS_WIFI_STATE" />

    <!-- Optional. Required for location feature -->
    <uses-permission android:name="android.permission.SYSTEM_ALERT_WINDOW" /> <!-- 用於開啟 debug 版本的應用在6.0 系統上 層疊視窗許可權 -->
    <uses-permission android:name="android.permission.ACCESS_COARSE_LOCATION" />
    <uses-permission android:name="android.permission.CHANGE_WIFI_STATE" />
    <uses-permission android:name="android.permission.ACCESS_FINE_LOCATION" />
    <uses-permission android:name="android.permission.ACCESS_LOCATION_EXTRA_COMMANDS" />
    <uses-permission android:name="android.permission.CHANGE_NETWORK_STATE" />
    <uses-permission android:name="android.permission.GET_TASKS" />

    <application
        android:icon="@drawable/ic_launcher"
        android:label="@string/app_name"
        android:name="Your Application Name">//配置上面的Application

        <!-- Required SDK 核心功能-->
        <!-- 可配置android:process引數將PushService放在其他程序中 -->
        <service
            android:name="cn.jpush.android.service.PushService"
            android:enabled="true"
            android:exported="false" >
            <intent-filter>
                <action android:name="cn.jpush.android.intent.REGISTER" />
                <action android:name="cn.jpush.android.intent.REPORT" />
                <action android:name="cn.jpush.android.intent.PushService" />
                <action android:name="cn.jpush.android.intent.PUSH_TIME" />
            </intent-filter>
        </service>


    <!-- since 3.0.9 Required SDK 核心功能-->
        <provider
            android:authorities="您應用的包名.DataProvider"
            android:name="cn.jpush.android.service.DataProvider"
            android:exported="true"
        />

        <!-- since 1.8.0 option 可選項。用於同一裝置中不同應用的JPush服務相互拉起的功能。 -->
        <!-- 若不啟用該功能可刪除該元件,將不拉起其他應用也不能被其他應用拉起 -->
         <service
             android:name="cn.jpush.android.service.DaemonService"
             android:enabled="true"
             android:exported="true">
             <intent-filter >
                 <action android:name="cn.jpush.android.intent.DaemonService" />
                 <category android:name="您應用的包名"/>
             </intent-filter>
         </service>

         <!-- since 3.1.0 Required SDK 核心功能-->
          <provider
               android:authorities="您應用的包名.DownloadProvider"
               android:name="cn.jpush.android.service.DownloadProvider"
               android:exported="true"
           />

        <!-- Required SDK核心功能-->
        <receiver
            android:name="cn.jpush.android.service.PushReceiver"
            android:enabled="true" >
          <intent-filter android:priority="1000">
                <action android:name="cn.jpush.android.intent.NOTIFICATION_RECEIVED_PROXY" />
                <category android:name="您應用的包名"/>
            </intent-filter>
            <intent-filter>
                <action android:name="android.intent.action.USER_PRESENT" />
                <action android:name="android.net.conn.CONNECTIVITY_CHANGE" />
            </intent-filter>
            <!-- Optional -->
            <intent-filter>
                <action android:name="android.intent.action.PACKAGE_ADDED" />
                <action android:name="android.intent.action.PACKAGE_REMOVED" />
                <data android:scheme="package" />
            </intent-filter>
        </receiver>

        <!-- Required SDK核心功能-->
        <activity
            android:name="cn.jpush.android.ui.PushActivity"
            android:configChanges="orientation|keyboardHidden"
            android:theme="@android:style/Theme.NoTitleBar"
            android:exported="false" >
            <intent-filter>
                <action android:name="cn.jpush.android.ui.PushActivity" />
                <category android:name="android.intent.category.DEFAULT" />
                <category android:name="您應用的包名" />
            </intent-filter>
        </activity>
        <!-- SDK核心功能-->
        <activity
            android:name="cn.jpush.android.ui.PopWinActivity"
            android:configChanges="orientation|keyboardHidden"
            android:exported="false"
            android:theme="@style/MyDialogStyle">
            <intent-filter>
                <category android:name="android.intent.category.DEFAULT" />
                <category android:name="您應用的包名" />
            </intent-filter>
        </activity>

        <!-- Required SDK核心功能-->
        <service
            android:name="cn.jpush.android.service.DownloadService"
            android:enabled="true"
            android:exported="false" >
        </service>

        <!-- Required SDK核心功能-->
        <receiver android:name="cn.jpush.android.service.AlarmReceiver" />


        <!-- User defined. 使用者自定義的廣播接收器-->
         <receiver
             android:name="您自己定義的Receiver"
             android:enabled="true">
             <intent-filter>
                 <!--Required 使用者註冊SDK的intent-->
                 <action android:name="cn.jpush.android.intent.REGISTRATION" />
                 <!--Required 使用者接收SDK訊息的intent-->
                 <action android:name="cn.jpush.android.intent.MESSAGE_RECEIVED" />
                 <!--Required 使用者接收SDK通知欄資訊的intent-->
                 <action android:name="cn.jpush.android.intent.NOTIFICATION_RECEIVED" />
                 <!--Required 使用者開啟自定義通知欄的intent-->
                 <action android:name="cn.jpush.android.intent.NOTIFICATION_OPENED" />
                 <!-- 接收網路變化 連線/斷開 since 1.6.3 -->
                 <action android:name="cn.jpush.android.intent.CONNECTION" />
                 <category android:name="您應用的包名" />
             </intent-filter>
         </receiver>

        <!-- Required. For publish channel feature -->
        <!-- JPUSH_CHANNEL 是為了方便開發者統計APK分發渠道。-->
        <!-- 例如: -->
        <!-- 發到 Google Play 的APK可以設定為 google-play; -->
        <!-- 發到其他市場的 APK 可以設定為 xxx-market。 -->
        <meta-data android:name="JPUSH_CHANNEL" android:value="developer-default"/>
        <!-- Required. AppKey copied from Portal -->
        <meta-data android:name="JPUSH_APPKEY" android:value="您應用的Appkey"/>
    </application>
</manifest>
注:可能會遇見問題:
Error:Execution failed for task ':greencar:processDebugManifest'.

> Manifest merger failed withmultiple errors, see logs
解決方法:
在manifest根標籤上加入xmlns:tools="http://schemas.android.com/tools",並在Manifest.xml的application標籤下新增tools:replace="android:icon, android:label, android:theme"。(並不能解決所有問題)
最好的方法是:檢視右下角的gradle console區域裡面的日誌資訊,跟著改就可以了。如下:

詳細錯誤程式碼式例:
E:\code\YxzWholeSale\app\src\main\AndroidManifest.xml:74:13-36 Error:
	Attribute provider#[email protected] value=(true) from AndroidManifest.xml:74:13-36
	is also present at [cn.jiguang.sdk:jpush:3.1.1] AndroidManifest.xml:116:13-37 value=(false).
	Suggestion: add 'tools:replace="android:exported"' to <provider> element at AndroidManifest.xml:71:9-75:15 to override.
意思是,AndroidManifest.xml檔案74行處程式碼報錯,建議在AndroidManifest.xml檔案71行出新增tools:replace="android:exported"
這只是其中的一個錯誤,可能還會有其他的問題,都可以用此方法解決。
到這裡基本是整合完成了,可以在極光推送官網進行推送驗證:

接收通知訊息效果圖:
二,自定義通知欄訊息樣式
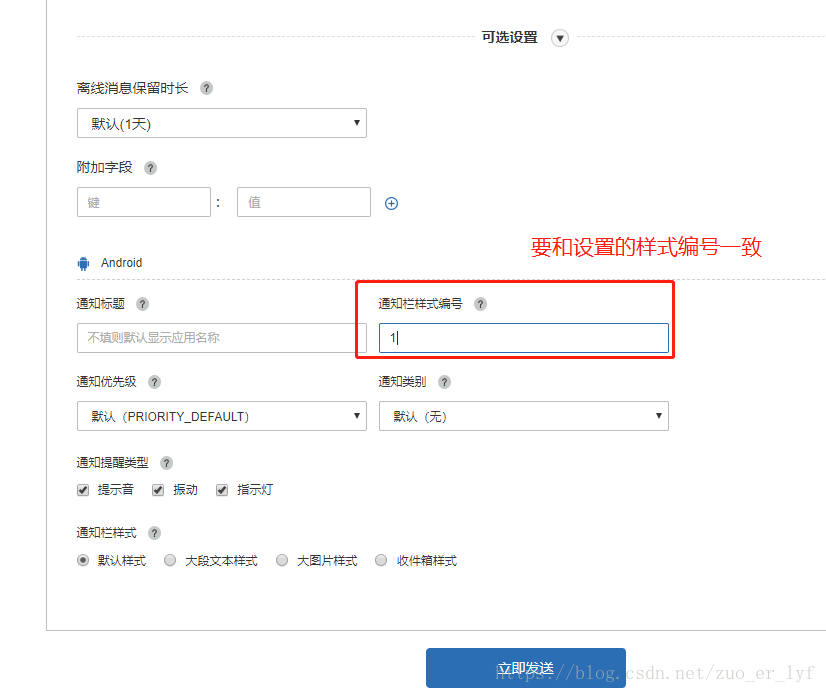
極光推送有提供:CustomPushNotificationBuilder 進行自定義樣式設定:
public class JpushNotifictionUtil {
 /**
     * 自定義通知欄
     *
     * @param context
     * @param number     自定義樣式編號
     * @param layoutId   佈局Id
     * @param iconTipId  指定最頂層狀態列小圖示
     * @param iconShowId 指定下拉狀態列時顯示的通知圖示
     */
    public static void customPushNotification(Context context, int number,
                                              int layoutId, int iconTipId, int iconShowId) {
        // 指定定製的 Notification Layout
        CustomPushNotificationBuilder builder = new CustomPushNotificationBuilder(
                context, layoutId, R.id.custom_push_notification_icon,
                R.id.custom_push_notification_title,
                R.id.custom_push_notification_text);


        // 指定最頂層狀態列小圖示
        builder.statusBarDrawable = iconTipId;

        // 指定下拉狀態列時顯示的通知圖示
        builder.layoutIconDrawable = iconShowId;


        JPushInterface.setPushNotificationBuilder(number, builder);

    }
}
可在MainActivity中呼叫:(關鍵程式碼)
 @Override
    protected int getContentId() {
        return R.layout.activity_main;
    }

    @Override
    protected void init() {
        super.init();

        JpushNotifictionUtil.customPushNotification(this,1,R.layout.custom_push_notification,R.drawable.icon_home2,R.drawable.icon_home2);


    }
自定義樣式佈局:R.layout.custom_push_notification:
<?xml version="1.0" encoding="utf-8"?>
<LinearLayout xmlns:android="http://schemas.android.com/apk/res/android"
android:layout_width="fill_parent"
android:layout_height="fill_parent"
android:gravity="center_vertical"
android:background="@color/bggray"
android:orientation="horizontal">
<RelativeLayout
android:layout_width="match_parent"
android:layout_height="wrap_content"
android:orientation="vertical">
<ImageView
android:id="@+id/custom_push_notification_icon"
android:layout_width="40dp"
android:layout_height="40dp"
android:layout_centerVertical="true" />
<LinearLayout
android:layout_width="match_parent"
android:layout_height="wrap_content"
android:layout_centerVertical="true"
android:layout_marginLeft="5dp"
android:layout_toRightOf="@+id/custom_push_notification_icon"
android:orientation="vertical">
<TextView
android:id="@+id/custom_push_notification_title"
android:layout_width="wrap_content"
android:layout_height="wrap_content"
android:textColor="#A4C638"
android:textSize="14sp" />
<TextView
android:id="@+id/custom_push_notification_text"
android:layout_width="wrap_content"
android:layout_height="wrap_content"
android:textColor="#FFB6FF"
android:textSize="14sp" />
</LinearLayout>
</RelativeLayout>
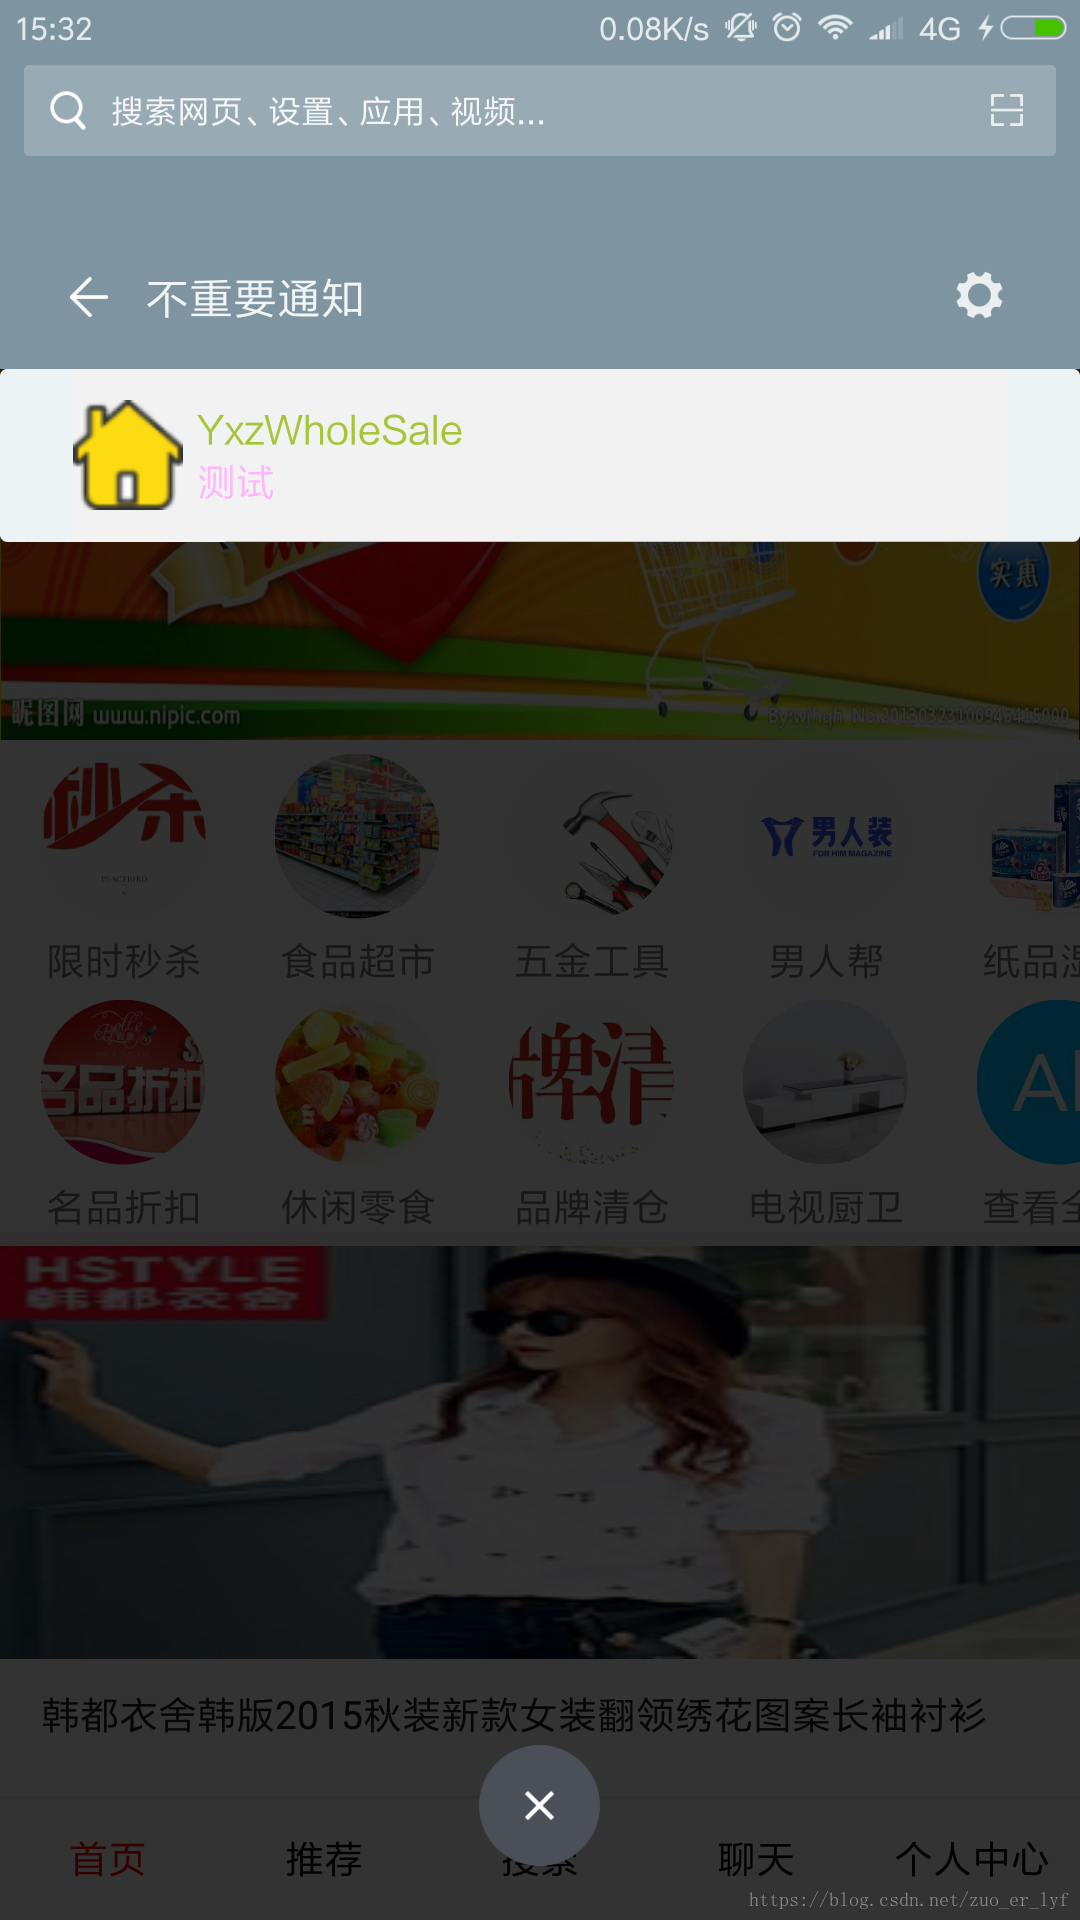
</LinearLayout>自定義推送驗證:
效果圖:
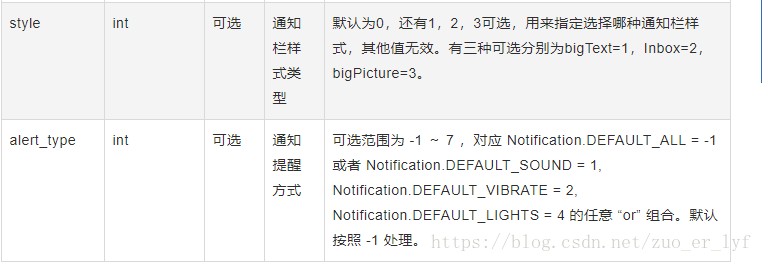
三,另外提及一點訊息通知欄的富文字,一般訊息通知欄預設一行,要實現雙指下拉顯示全部,需要伺服器後臺,訊息推送的時候,進行引數配置:
相關推薦
android 極光推送快速自動整合及,自定義通知樣式及雙指下拉通知欄顯示全部內容
一,整合步驟: 1.極光推送官網,註冊,登入,建立應用,用專案包名獲取AppKey: 注:包名必須與專案的包名一致 2.在 module 的 gradle 中新增依賴和支援: android { ...... defaultConfig {
ionic平臺下的Android極光推送整合文件
雖然當前提供推送服務的第三方有很多,例如jpush,友盟,個推,騰訊信鴿等。但是由於大部分第三方只支援原生環境,再加上考慮到ionic平臺下網上已經提供了一套jpush的整合方案,所以我只是針對在jpush下ionic app推送做一些簡要的整理。 廢話不多說,直入主題。
Android 極光推送整合與使用詳解
極光新建應用 首先需要有極光賬號,在後臺新建應用 新建時會要求上傳app圖示和填寫app名字,然後需要完成推送設定 點選推送設定後出現android 與iOS的按鈕,點選android後填寫包名就好, 然後點選下載Demo來下載需要整合的控制元件
android 極光推送 聲音與振動 的關閉和開啟
fff getc 用法 koa pub tar brush asi drawable 前言:最近剛好在寫一些推送方面的東西,又是新手,不斷在網上找資料,很少,不過還是找到了一些,反正百度我是再也不想百度了,谷歌一下子就能找到想要的。 廢話不多說。
android 極光推送 自定義聲音
可以定義樣式,那麼可以禁用極光的聲音,收到通知就播放一個聲音就好:禁用: // 極光 JPushInterface.setDebugMode(IS_DEBUG); JPushInterface.init(this); BasicPushNotificationB
Android極光推送通過不同的通知內容跳入不同的頁面
1、在註冊清單中加入 <receiver android:name="your receiver全路徑" android:enabled="true"> <intent-filter> <!-- 以下是要
Android極光推送區分測試正式環境詳解
前沿: 極光推送是我們在實際生活中使用比較多的一種推送方式,成本低廉,不少公司都是使用的他,換工作之後,當前公司還是使用的極光推送。 問題/需求想要效果: 當前的公司需要測試環境的只能夠推送測試,正式環境的只能夠推送正式,應為IOS方存在可以直接通過配
Android極光推送自定義通知問題
private void showInspectorRecordNotification() { RemoteViews customView = new RemoteViews(context.getPackageName(), R.layout.
# Android 極光推送伺服器端和移動端
Android 極光推送伺服器端和移動端 這裡是Android 有關伺服器端進行推送和手機客戶端接收的一些簡單的例子 伺服器端採用的是MyEclipse2014,手機端是Android studio 2.0 下面是一個簡單的JSP頁面程式碼 <
Android極光推送(Android studio 3.0+)
使用步驟: Step 1.建立應用: 進入極光控制檯後,點選“建立應用”按鈕,進入建立應用的介面。 填上你的應用程式的名稱以及應用包名這二項就可以了, 最後點選最下方的 “建立我的應用”按鈕,建立應用完畢。 Step 2. 根目錄的主
極光推送的基本整合步驟
<uses-sdk android:minSdkVersion="9" android:targetSdkVersion="23" /> <!-- Required --> <permission android:na
極光推送能獲取 registrationId,但是接收不到通知 - iOS
整合極光推送進行除錯的時候,執行 App 可以正常獲取 registrationId,但是卻遲遲無法收到推送訊息,而Android 端是可以正常收到訊息; 檢查了證書配置和極光的配置一切正常,便開始返回檢視 code 尋找問題. 最終發現如下方法中的 deviceToken 被注掉後導致註冊 i
埋在我和極光推送之間的那些坑,好用的極光推送文件
//---------------------------JPush------------------------- 這個要好好總結一下,走了很多歪路:(本檔案請結合開發文件SDK,官網上的demo一同使用) 1,首先在app develop官網上新增app
Android O 自定義通知例項及一個自定義自動適配縮放圖片至特定大小的田字格ImageView
這一篇博文的思路很簡單,沒有什麼深入的理論,源由是最近在實習公司裡開發用到了Android O的通知,發現與以往有所不同,相關的資料是有,但是大部分都不適用於這個版本,這裡只是寫一個非常簡單的Demo,算是程式碼的儲存吧。另外,為什麼一個自定義View要和通知
iOS 極光推送開發環境可以收到,生產環境收不到推送
極光推送開發環境可以收到,生產環境收不到推送 首先闡述一下我遇到的問題 我們專案連通了極光推送,以前寫過的專案也是這樣 在開發環境下測試 好使了 但是打包ADHoc時候 就不好使了,當時也沒在意 因為網上好多人說 只要測試好使了 證書顯示配置成功了(綠燈
spring boot整合swagger,自定義註解,攔截器,xss過濾,非同步呼叫,定時任務案例
本文介紹spring boot整合swagger,自定義註解,攔截器,xss過濾,非同步呼叫,定時任務案例 整合swagger--對於做前後端分離的專案,後端只需要提供介面訪問,swagger提供了介面呼叫測試和各種註釋的視覺化web介面。配置swagger的掃描包路徑,api資訊等,見配置類Swagger
WPF筆記:WPF自定義treeview樣式及資料繫結
定義treeview 展開按鈕(togglebutton)樣式,建立資源: <Style x:Key="ExpandCollapseToggleStyle" TargetType="ToggleButton"> <Setter Property="Foc
QT如何自定義滑鼠樣式及如何用windows自帶畫圖工具進行滑鼠樣式的設計
眾所周知,QT系統自身擁有眾多的滑鼠樣式,這些滑鼠樣式均比較常見,顏色、樣式為系統所固有,無法更改。哪麼能不能自定義滑鼠的形狀、顏色等特點呢?答案是可以的。自定義的滑鼠樣式可以隨意指定,顏色更是多種多樣,極具個性化。 QT自帶的滑鼠樣式(在此不做過多介紹): 可以直接拿來用,具體用法如下:
Android屬性動畫上手實現各種動畫效果,自定義動畫,拋物線等
在上一篇Android基礎動畫,組合動畫,幀動畫,佈局動畫,Activity跳轉動畫中我寫了基礎動畫的用法,那麼這次我們來看Android屬性動畫上手實現各種效果,包括實現基本的透明度,縮放,平
自定義EditText樣式及游標
<?xml version="1.0" encoding="utf-8"?> <RelativeLayout xmlns:android="http://schemas.android.com/apk/res/android" android:la