
Android效能優化系列之佈局優化
在Android開發中,UI佈局可以說是每個App使用頻率很高的,隨著UI越來越多,佈局的重複性、複雜度也會隨之增長,這樣使得UI佈局的優化,顯得至關重要,UI佈局不慎,就會引起過度繪製,從而造成UI卡頓的情況,本篇部落格,我就來總結一下UI佈局優化的相關技巧。
學會使用佈局標籤優化佈局
(1)<include>標籤
include標籤常用於將佈局中的公共部分提取出來供其他layout共用,以實現佈局模組化,這在佈局編寫方便提供了大大的便利。例如我們在進行App開發時基本每個頁面都會有標題欄,在不使用include的情況下你在每個介面都需要重新在xml裡面寫一個頂部標題欄,工作量無疑是巨大的,使用include標籤,我們只需要把這個會被多次使用的頂部欄獨立成一個xml檔案,然後在需要使用的地方通過include標籤引入即可。
下面以在一個佈局main.xml中用include引入另一個佈局foot.xml為例。main.mxl程式碼如下:
<RelativeLayout xmlns:android="http://schemas.android.com/apk/res/android"
android:layout_width="match_parent"
android:layout_height="match_parent">
<ListView
android:id="@+id/simple_list_view"
android:layout_width="match_parent"
android:layout_height="match_parent" 其中include引入的foot.xml為公用的頁面底部,程式碼如下:
<?xml version="1.0" encoding="utf-8"?>
<RelativeLayout xmlns:android="http://schemas.android.com/apk/res/android" <include>標籤唯一需要的屬性是layout屬性,指定需要包含的佈局檔案。可以定義android:id和android:layout_*屬性來覆蓋被引入佈局根節點的對應屬性值。注意重新定義android:id後,子佈局的頂結點i就變化了。
注意:
使用include最常見的問題就是findViewById查詢不到目標控制元件,這個問題出現的前提是在include時設定了id,而在findViewById時卻用了被include進來的佈局的根元素id。例如上述例子中,include時設定了該佈局的id為my_foot_ly
,而my_foot_ly.xml中的根檢視的id為my_foot_parent_id。此時如果通過findViewById來找my_foot_parent_id這個控制元件,然後再查詢my_foot_parent_id下的子控制元件則會丟擲空指標。程式碼如下 :
View titleView = findViewById(R.id.my_foot_parent_id) ; // 此時 titleView 為空,找不到。此時空指標
TextView titleTextView = (TextView)titleView.findViewById(R.id.title_tv) ; titleTextView.setText("new Title");
其正確的使用形式應該如下:
// 使用include時設定的id,即R.id.my_title_ly
 View titleView = findViewById(R.id.my_foot_ly) ;
// 通過titleView找子控制元件 TextView titleTextView = (TextView)titleView.findViewById(R.id.title_tv) ; titleTextView.setText("new Title");
或者更簡單的直接查詢它的子控制元件
TextView titleTextView = (TextView)findViewById(R.id.title_tv) ; titleTextView.setText("new Title");
那麼使用findViewById(R.id.my_foot_parent_id)為什麼會報空指標呢? 我們來分析它的原始碼看看吧。對於佈局檔案的解析,最終都會呼叫到LayoutInflater的inflate方法,該方法最終又會呼叫rInflate方法,我們看看這個方法。
inflate方法中關鍵程式碼
if (TAG_MERGE.equals(name)) {
    if (root == null || !attachToRoot) {
        throw new InflateException("<merge /> can be used only with a valid "
                + "ViewGroup root and attachToRoot=true");
    }

    rInflate(parser, root, inflaterContext, attrs, false);
} else {
    // Temp is the root view that was found in the xml
    final View temp = createViewFromTag(root, name, inflaterContext, attrs);

    ViewGroup.LayoutParams params = null;

    if (root != null) {
        if (DEBUG) {
            System.out.println("Creating params from root: " +
                    root);
        }
        // Create layout params that match root, if supplied
        params = root.generateLayoutParams(attrs);
        if (!attachToRoot) {
            // Set the layout params for temp if we are not
            // attaching. (If we are, we use addView, below)
            temp.setLayoutParams(params);
        }
    }
rInflate方法關鍵程式碼
void rInflate(XmlPullParser parser, View parent, Context context,
        AttributeSet attrs, boolean finishInflate) throws XmlPullParserException, IOException {

    final int depth = parser.getDepth();
    int type;

    while (((type = parser.next()) != XmlPullParser.END_TAG ||
            parser.getDepth() > depth) && type != XmlPullParser.END_DOCUMENT) {

        if (type != XmlPullParser.START_TAG) {
            continue;
        }

        final String name = parser.getName();

        if (TAG_REQUEST_FOCUS.equals(name)) {
            parseRequestFocus(parser, parent);
        } else if (TAG_TAG.equals(name)) {
            parseViewTag(parser, parent, attrs);
        } else if (TAG_INCLUDE.equals(name)) {
            if (parser.getDepth() == 0) {
                throw new InflateException("<include /> cannot be the root element");
            }
            parseInclude(parser, context, parent, attrs);
        } else if (TAG_MERGE.equals(name)) {
            throw new InflateException("<merge /> must be the root element");
        } else {
            final View view = createViewFromTag(parent, name, context, attrs);
            final ViewGroup viewGroup = (ViewGroup) parent;
            final ViewGroup.LayoutParams params = viewGroup.generateLayoutParams(attrs);
            rInflateChildren(parser, view, attrs, true);
            viewGroup.addView(view, params);
        }
    }

    if (finishInflate) {
        parent.onFinishInflate();
    }
}
這個方法其實就是遍歷xml中的所有元素,然後挨個進行解析。例如解析到一個標籤,那麼就根據使用者設定的一些layout_width、layout_height、id等屬性來構造一個TextView物件,然後新增到父控制元件(ViewGroup型別)中。標籤也是一樣的,我們看到遇到include標籤時,會呼叫parseInclude函式,這就是對標籤的解析,我們看看吧。
private void parseInclude(XmlPullParser parser, Context context, View parent,
        AttributeSet attrs) throws XmlPullParserException, IOException {
    int type;

    if (parent instanceof ViewGroup) {
        // Apply a theme wrapper, if requested. This is sort of a weird
        // edge case, since developers think the <include> overwrites
        // values in the AttributeSet of the included View. So, if the
        // included View has a theme attribute, we'll need to ignore it.
        final TypedArray ta = context.obtainStyledAttributes(attrs, ATTRS_THEME);
        final int themeResId = ta.getResourceId(0, 0);
        final boolean hasThemeOverride = themeResId != 0;
        if (hasThemeOverride) {
            context = new ContextThemeWrapper(context, themeResId);
        }
        ta.recycle();

        // If the layout is pointing to a theme attribute, we have to
        // massage the value to get a resource identifier out of it.
        int layout = attrs.getAttributeResourceValue(null, ATTR_LAYOUT, 0);
        if (layout == 0) {
            final String value = attrs.getAttributeValue(null, ATTR_LAYOUT);
            if (value == null || value.length() <= 0) {
                throw new InflateException("You must specify a layout in the"
                        + " include tag: <include layout=\"@layout/layoutID\" />");
            }

            // Attempt to resolve the "?attr/name" string to an identifier.
            layout = context.getResources().getIdentifier(value.substring(1), null, null);
        }

        // The layout might be referencing a theme attribute.
        if (mTempValue == null) {
            mTempValue = new TypedValue();
        }
        if (layout != 0 && context.getTheme().resolveAttribute(layout, mTempValue, true)) {
            layout = mTempValue.resourceId;
        }

        if (layout == 0) {// include標籤中沒有設定layout屬性,會丟擲異常
            final String value = attrs.getAttributeValue(null, ATTR_LAYOUT);
            throw new InflateException("You must specify a valid layout "
                    + "reference. The layout ID " + value + " is not valid.");
        } else {
            final XmlResourceParser childParser = context.getResources().getLayout(layout);

            try {
                final AttributeSet childAttrs = Xml.asAttributeSet(childParser);

                while ((type = childParser.next()) != XmlPullParser.START_TAG &&
                        type != XmlPullParser.END_DOCUMENT) {
                    // Empty.
                }

                if (type != XmlPullParser.START_TAG) {
                    throw new InflateException(childParser.getPositionDescription() +
                            ": No start tag found!");
                }
         // 1、解析include中的第一個元素
                final String childName = childParser.getName();
         // 如果第一個元素是merge標籤,那麼呼叫rInflate函式解析
                if (TAG_MERGE.equals(childName)) {
                    // The <merge> tag doesn't support android:theme, so
                    // nothing special to do here.
// 2、我們例子中的情況會走到這一步,首先根據include的屬性集建立被include進來的xml佈局的根view // 這裡的根view對應為my_foot_layout.xml中的RelativeLayout
                    rInflate(childParser, parent, context, childAttrs, false);
                } else {
                    final View view = createViewFromTag(parent, childName,
                            context, childAttrs, hasThemeOverride);
                    final ViewGroup group = (ViewGroup) parent;

                    final TypedArray a = context.obtainStyledAttributes(
                            attrs, R.styleable.Include);
                    final int id = a.getResourceId(R.styleable.Include_id, View.NO_ID);
                    final int visibility = a.getInt(R.styleable.Include_visibility, -1);
                    a.recycle();

                    // We try to load the layout params set in the <include /> tag.
                    // If the parent can't generate layout params (ex. missing width
                    // or height for the framework ViewGroups, though this is not
                    // necessarily true of all ViewGroups) then we expect it to throw
                    // a runtime exception.
                    // We catch this exception and set localParams accordingly: true
                    // means we successfully loaded layout params from the <include>
                    // tag, false means we need to rely on the included layout params.
                    ViewGroup.LayoutParams params = null;
                    try {
            // 獲3、取佈局屬性
                        params = group.generateLayoutParams(attrs);
                    } catch (RuntimeException e) {
                        // Ignore, just fail over to child attrs.
                    }
                    if (params == null) {
                        params = group.generateLayoutParams(childAttrs);
                    }
                    view.setLayoutParams(params);

                    // Inflate all children.解析所有子控制元件
                    rInflateChildren(childParser, view, childAttrs, true);
// 5、將include中設定的id設定給根view,因此實際上my_foot_layout.xml中的RelativeLayout的id會變成include標籤中的id,include不設定id,那麼也可以通過relative的找到.
                    if (id != View.NO_ID) {
                        view.setId(id);
                    }

                    switch (visibility) {
                        case 0:
                            view.setVisibility(View.VISIBLE);
                            break;
                        case 1:
                            view.setVisibility(View.INVISIBLE);
                            break;
                        case 2:
                            view.setVisibility(View.GONE);
                            break;
                    }

                    group.addView(view);
                }
            } finally {
                childParser.close();
            }
        }
    } else {
        throw new InflateException("<include /> can only be used inside of a ViewGroup");
    }

    LayoutInflater.consumeChildElements(parser);
}
整個過程就是根據不同的標籤解析不同的元素,首先會解析include元素,然後再解析被include進來的佈局的root view元素。在我們的例子中對應的root view就是id為my_foot_parent_id的RelativeLayout,然後再解析root view下面的所有元素,這個過程是從上面註釋的2~4的過程,然後是設定佈局引數。我們注意看註釋5處,這裡就解釋了為什麼include標籤和被引入的佈局的根元素都設定了id的情況下,通過被引入的根元素的id來查詢子控制元件會找不到的情況。我們看到,註釋5處的會判斷include標籤的id如果不是View.NO_ID的話會把該id設定給被引入的佈局根元素的id,即此時在我們的例子中被引入的id為my_foot_parent_id的根元素RelativeLayout的id被設定成了include標籤中的id,即RelativeLayout的id被動態修改成了”my_foot_ly”。因此此時我們再通過“my_foot_parent_id”這個id來查詢根元素就會找不到了!
所以結論就是: 如果include中設定了id,那麼就通過include的id來查詢被include佈局根元素的View;如果include中沒有設定Id, 而被include的佈局的根元素設定了id,那麼通過該根元素的id來查詢該view即可。拿到根元素後查詢其子控制元件都是一樣的。
(2)<viewstub>標籤
viewstub標籤同include標籤一樣可以用來引入一個外部佈局,不同的是,viewstub引入的佈局預設不會擴張,即既不會佔用顯示也不會佔用位置,從而在解析layout時節省cpu和記憶體。
viewstub常用來引入那些預設不會顯示,只在特殊情況下顯示的佈局,如進度佈局、網路失敗顯示的重新整理佈局、資訊出錯出現的提示佈局等。
下面以在一個佈局main.xml中加入網路錯誤時的提示頁面network_error.xml為例。main.mxl程式碼如下:
<?xml version="1.0" encoding="utf-8"?>
<RelativeLayout xmlns:android="http://schemas.android.com/apk/res/android"
    android:layout_width="match_parent"
    android:layout_height="match_parent" >

……
    <ViewStub
        android:id="@+id/network_error_layout"
        android:layout_width="match_parent"
        android:layout_height="match_parent"
        android:layout="@layout/network_error" />

</RelativeLayout>
其中network_error.xml為只有在網路錯誤時才需要顯示的佈局,預設不會被解析,示例程式碼如下:
<?xml version="1.0" encoding="utf-8"?>
<RelativeLayout xmlns:android="http://schemas.android.com/apk/res/android"
    android:layout_width="match_parent"
    android:layout_height="match_parent" >

    <Button
        android:id="@+id/network_setting"
        android:layout_width="@dimen/dp_160"
        android:layout_height="wrap_content"
        android:layout_centerHorizontal="true"
        android:text="@string/network_setting" />

    <Button
        android:id="@+id/network_refresh"
        android:layout_width="@dimen/dp_160"
        android:layout_height="wrap_content"
        android:layout_below="@+id/network_setting"
        android:layout_centerHorizontal="true"
        android:layout_marginTop="@dimen/dp_10"
        android:text="@string/network_refresh" />

</RelativeLayout>
在java中通過(ViewStub)findViewById(id)找到ViewStub,通過stub.inflate()展開ViewStub,然後得到子View,如下:
private View networkErrorView;

private void showNetError() {
// not repeated infalte
if (networkErrorView != null) {
networkErrorView.setVisibility(View.VISIBLE);
return;
}

ViewStub stub = (ViewStub)findViewById(R.id.network_error_layout);
if(stub !=null){

networkErrorView = stub.inflate();
Button networkSetting = (Button)networkErrorView.findViewById(R.id.network_setting);
Button refresh = (Button)findViewById(R.id.network_refresh);
}
}

private void showNormal() {
if (networkErrorView != null) {
networkErrorView.setVisibility(View.GONE);
}
}
在上面showNetError()中展開了ViewStub,同時我們對networkErrorView進行了儲存,這樣下次不用繼續inflate。這就是後面第三部分提到的減少不必要的infalte。
注意這裡我對ViewStub的例項進行了一個非空判斷,這是因為ViewStub在XML中定義的id只在一開始有效,一旦ViewStub中指定的佈局載入之後,這個id也就失敗了,那麼此時findViewById()得到的值也會是空
viewstub標籤大部分屬性同include標籤類似。
上面展開ViewStub部分程式碼
    ViewStub stub = (ViewStub)findViewById(R.id.network_error_layout);
networkErrorView = stub.inflate();
也可以寫成下面的形式
View viewStub = findViewById(R.id.network_error_layout);
viewStub.setVisibility(View.VISIBLE);   // ViewStub被展開後的佈局所替換
networkErrorView =  findViewById(R.id.network_error_layout); // 獲取展開後的佈局
注意:
View 的可見性設定為 gone 後,在inflate 時,這個View 及其子View依然會被解析的。使用ViewStub就能避免解析其中指定的佈局檔案,從而節省佈局檔案的解析時間,及記憶體的佔用。另外需要提醒大家一點,ViewStub所載入的佈局是不可以使用<merge>標籤的
(3)<merge>標籤
在使用了include後可能導致佈局巢狀過多,多餘不必要的layout節點,從而導致解析變慢,不必要的節點和巢狀可通過hierarchy viewer(下面佈局調優工具中有具體介紹)或設定->開發者選項->顯示佈局邊界檢視。
merge標籤可用於兩種典型情況:
a. 佈局頂結點是FrameLayout且不需要設定background或padding等屬性,可以用merge代替,因為Activity內容試圖的parent view就是個FrameLayout,所以可以用merge消除只剩一個。
b. 某佈局作為子佈局被其他佈局include時,使用merge當作該佈局的頂節點,這樣在被引入時頂結點會自動被忽略,而將其子節點全部合併到主佈局中。
以(1) 標籤的示例為例,用hierarchy viewer檢視main.xml佈局如下圖:
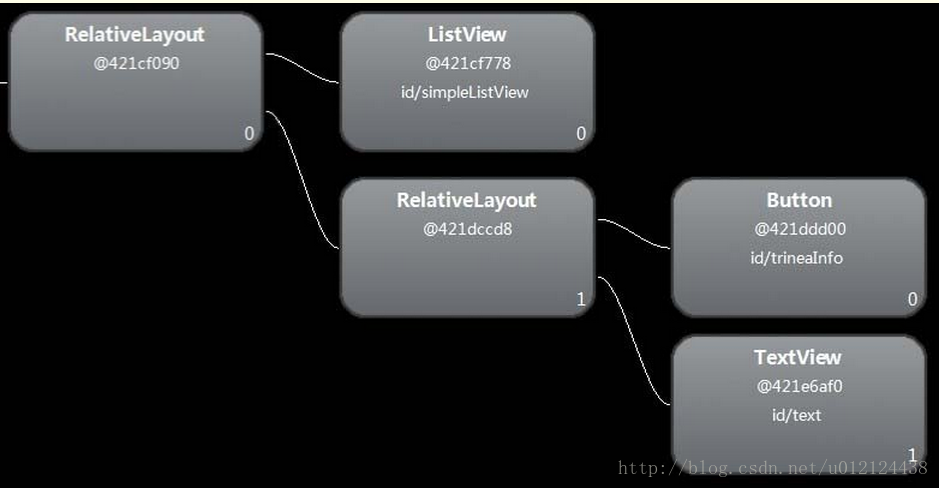
可以發現多了一層沒必要的RelativeLayout,將foot.xml中RelativeLayout改為merge,如下:
<?xml version="1.0" encoding="utf-8"?>
<merge xmlns:android="http://schemas.android.com/apk/res/android"
    android:layout_width="match_parent"
    android:layout_height="match_parent" >

    <Button
        android:id="@+id/button"
        android:layout_width="match_parent"
        android:layout_height="@dimen/dp_40"
        android:layout_above="@+id/text"/>

    <TextView
        android:id="@+id/text"
        android:layout_width="match_parent"
        android:layout_height="@dimen/dp_40"
        android:layout_alignParentBottom="true"
        android:text="@string/app_name" />

</merge>
執行後再次用hierarchy viewer檢視main.xml佈局如下圖:

這樣就不會有多餘的RelativeLayout節點了。
去除不必要的巢狀和View節點
(1) 首次不需要使用的節點設定為GONE或使用viewstub
(2) 使用RelativeLayout代替LinearLayout
大約在Android4.0之前,新建工程的預設main.xml中頂節點是LinearLayout,而在之後已經改為RelativeLayout,因為RelativeLayout效能更優,且可以簡單實現LinearLayout巢狀才能實現的佈局。
4.0及以上Android版本可通過設定->開發者選項->顯示佈局邊界開啟頁面佈局顯示,看看是否有不必要的節點和巢狀。4.0以下版本可通過hierarchy viewer檢視。
減少不必要的infalte
(1)對於inflate的佈局可以直接快取,用全部變數代替區域性變數,避免下次需再次inflate
如上面ViewStub示例中的
if (networkErrorView != null) {
networkErrorView.setVisibility(View.VISIBLE);
return;
}
佈局調優工具
(1) hierarchy viewer
hierarchy viewer可以方便的檢視Activity的佈局,各個View的屬性、measure、layout、draw的時間,如果耗時較多會用紅色標記,否則顯示綠色。
Hierarchy Viewer是隨Android SDK釋出的工具,位於Android SDK/tools/hierarchyviewer.bat (Windows作業系統,mac上顯示的為hierarchyviewer),使用起來也是超級簡單,通過此工具可以詳細的理解當前介面的控制元件佈局以及某個控制元件的屬性(name、id、height等)。
1)連線裝置真機或者模擬器
2)啟動你要觀察的應用。
3)開啟Hierarchyviewer,點選hierarchyviewer檔案即可。
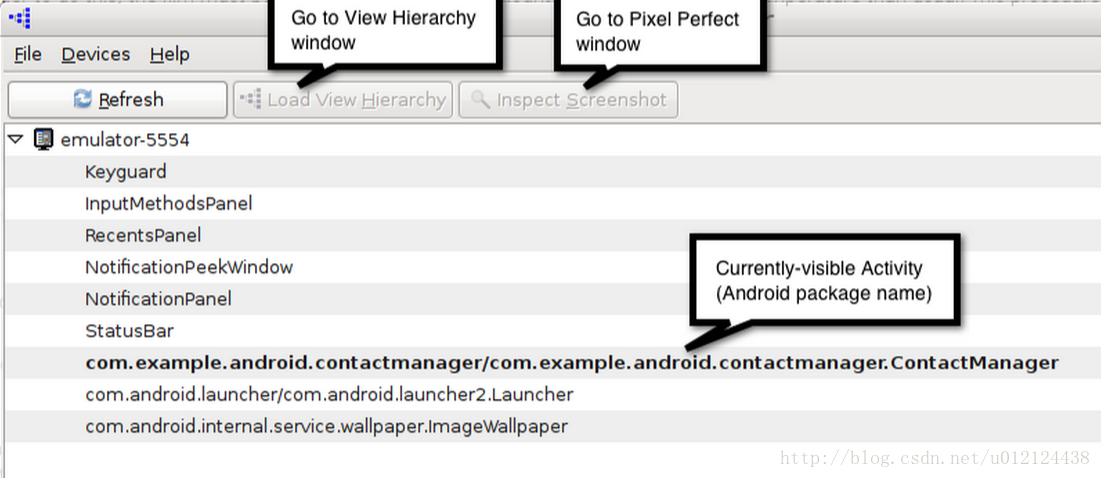
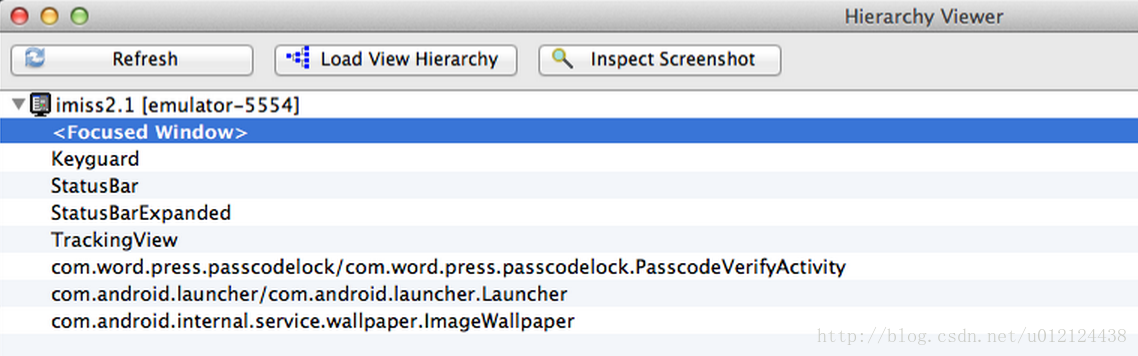
4)雙擊最上面的,如下圖的<Focused Window>,這個是當前視窗,載入完畢後會顯示當前介面層次結構。
5)觀察層次結構圖,這個圖有點大,可以拖動。View Hierarchy視窗顯示了Activity的所有View物件,選中某個View還可以檢視View的具體資訊,最好選擇工具中的Show Extras選項。
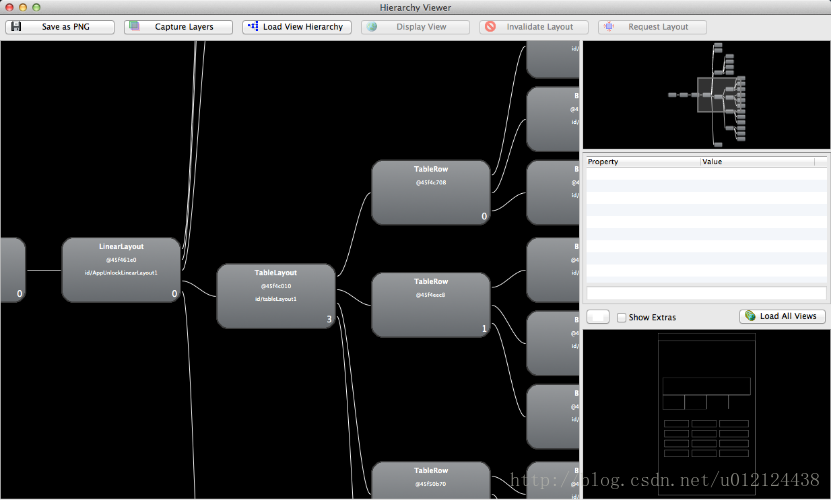
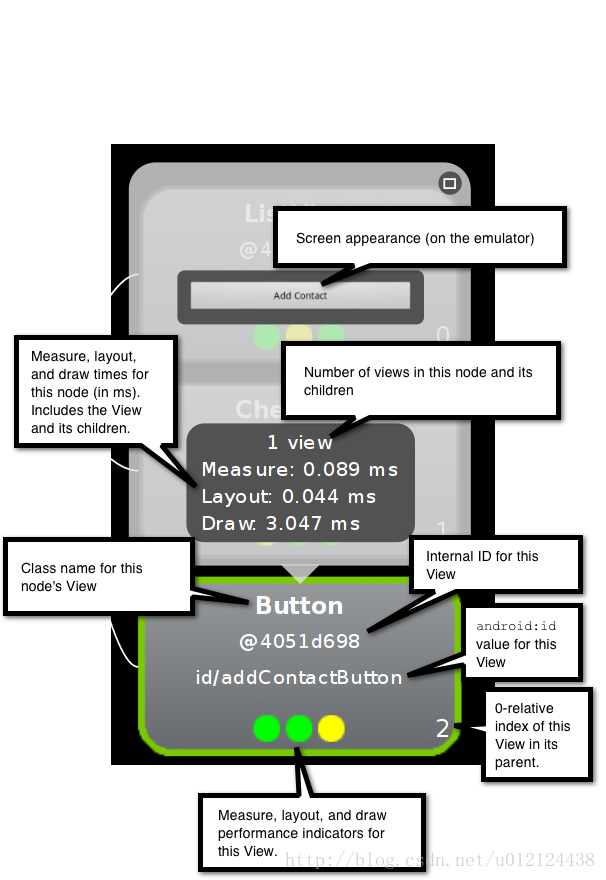
View Hierarcy 同時能幫助你識別渲染效能比較低的部分。View節點中帶有紅色或黃色的點代表速度較慢的View物件。如單步執行應用程式那樣,你可以這樣來判斷某個View 速度一直很慢,還是隻在某個特定環境下速度才慢。
請注意,低效能並不表示一定有問題,特別像是ViewGroup物件,View的子節點越多,結構越複雜,效能越差。
View Hierarchy 視窗還可以幫助你找到效能問題。只要看每個View節點的效能指標(顏色點)就可以,你可以看到測量(佈局或繪製)最慢的View物件是哪個,這樣你就能快速確定,要優先察看哪個問題。
(2)Lint
先來段developer的官方引用:
Android Studio provides a code scanning tool called Lint that can help you to easily identify and correct problems with the structural quality of your code, without having to execute the app or write any test cases.該圖詮釋了Lint工具是如何檢測應用原始碼的:
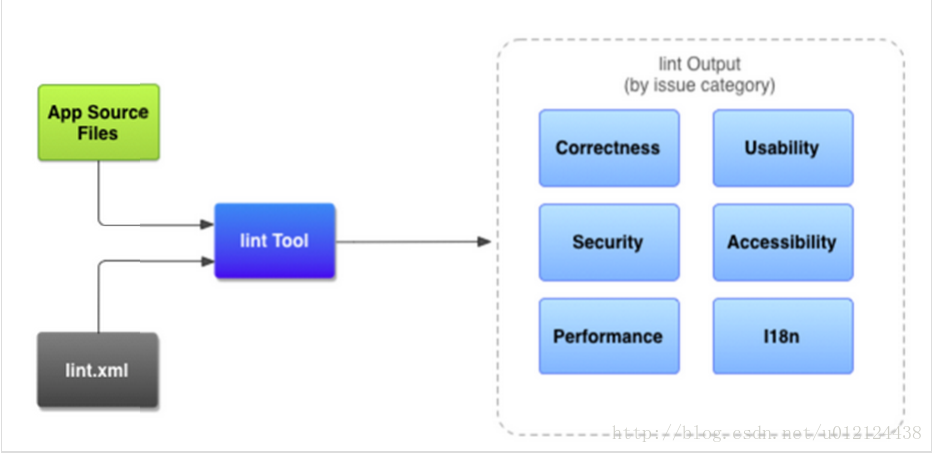
Android Lint是Google提供給Android開發者的靜態程式碼檢查工具。使用Lint對Android工程程式碼進行掃描和檢查,可以發現程式碼潛在的問題,提醒程式設計師及早修正。
Android Lint使用
Lint簡要來說,有以下的作用:
佈局效能(以前是 layoutopt工具,可以解決無用佈局、巢狀太多、佈局太多)
未使用到資源
不一致的陣列大小
國際化問題(硬編碼)
圖示的問題(重複的圖示,錯誤的大小)
可用性問題(如不指定的文字欄位的輸入型)
manifest檔案的錯誤
記憶體洩露 — 如:handle的不當使用 。
佔記憶體的資源及時回收 — 如:cursor未關閉等
Analyze”選單中選擇“Inspect Code”,其中可以選擇scope,即檢測範圍,也可以選擇不同的檢測配置,我們先進行預設的配置檢測吧。檢測需要一定的時間,結果會在EventLog顯示:
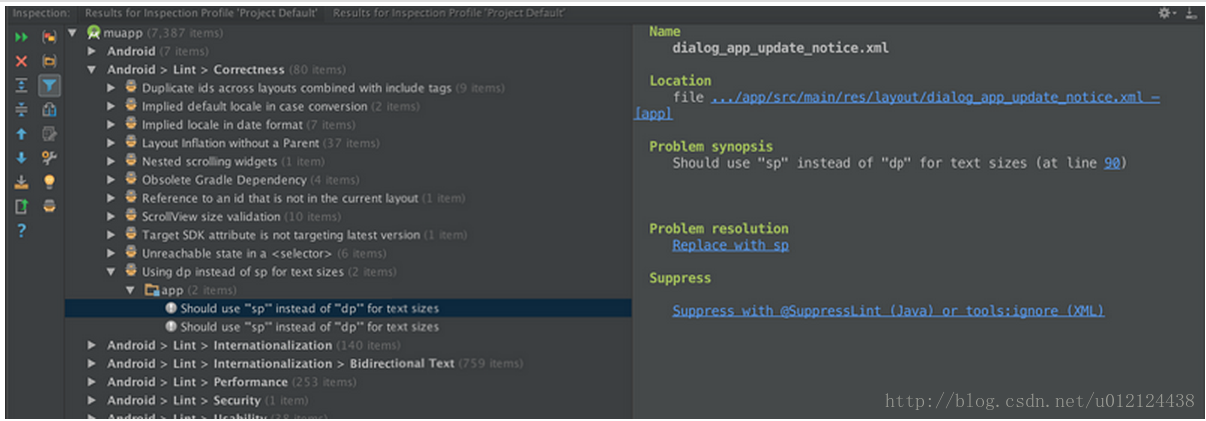
可以看到,我們的專案有很多問題,比如我選擇了Correctness中的Using dp instead of sp for text sizes屬性,發現應用中有2處在textSize中誤用了dp,其給出了類的具體位置和解決方案。可能你覺得這些無關大雅,那麼可以檢視Probable bugs項,在其中找到一項 String comparison using ‘==’,instead of ‘equals()’,可以看到SecurityBankCardListActivity類中的有一行程式碼:
this.mBankCard.getCardId() == mBankCard.getCardId()//cardId為String型別在此就不一一列舉。
可能你會覺得Lint分析的太過詳細,我無法迅速找到問題,那麼你可以點選
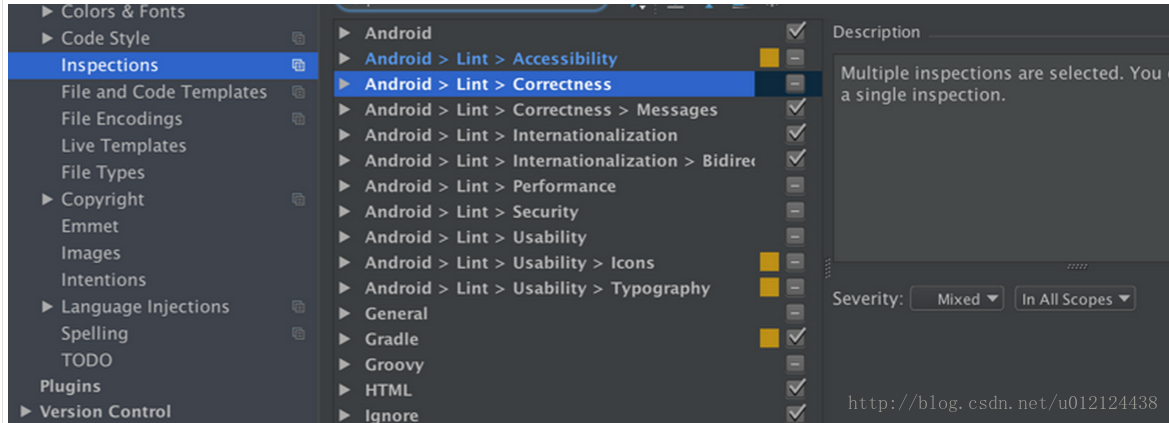
AS的Lint配置
開啟設定對話方塊,找到Editor,然後是Inspections,選擇某一個Lint選項,修改嚴重等級,如圖:
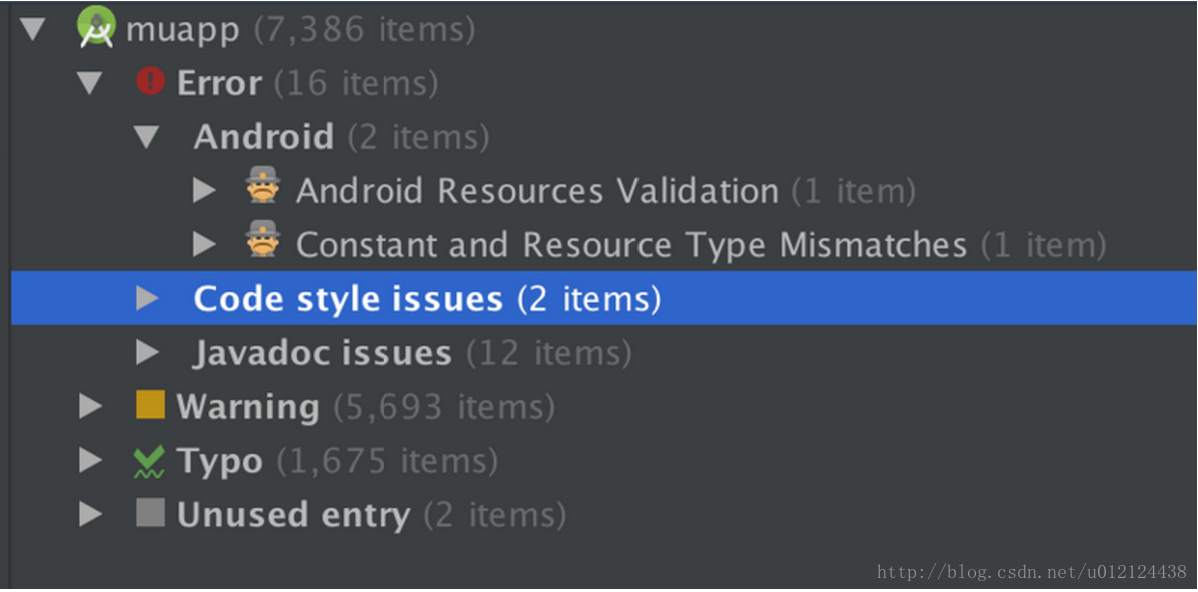
最後貼一下Lint檢查的常見型別:
最後貼一下Lint檢查的常見型別:
1.Correctness:Messeges
(1)字串國際化不完全
(2)國際化的字串,在預設位置(default locale),沒有定義
2.Correctness
(1)Xml中view的id重名
(2)程式碼中使用的某些API高於Manifest中的Min SDK
(3)字串國際化中,同一名字的的String-Array對應的item值不相同 (4)Activity沒有註冊到Manifest
(5)使用已經廢棄的api
(6)避免使用px,使用dp
(7)新增不需要的許可權
3.Performance
(1) 避免在繪製或者解析佈局(draw/layout)時,分配物件。eg,Ondraw()中例項化Paint().
(2)Layout中無用的引數。
(3)可優化的佈局:如一個線性佈局(一個Imageview和一個TextView),可被TextView和一個Compound Drawable代替。
(4)可優化的程式碼:如SparseArray可代替一個Interger2Object的Hashmap
(5)優化layout,比如如果子view都是wrap_content,則設定android:baselineAligned為false,則When set to false, prevents the layout from aligning its children’s baselines.
(6)使用FloatMath代替Math,執行sin()和ceil(),以避免float的兩次轉換。
(7)Nested weight (內外均有weight)將拖累執行效果
(8)未被使用的資源
(9)Overdraw 即指定theme的activity會自己繪製背景,但是佈局中會再一次設定背景
(10)View或view的父親沒有用
4.Security
(1)設定setJavascriptEnable將導致指令碼攻擊漏洞(XSS vulnerabilities)
5.Usability:Icons
(1) 圖片尺寸在轉換成不同dpi時,存在不能整除的問題,比如2*24px
(2)顯示有些base 和browser的資源名不同,但圖片內容完全相同。
6.Usability
(1)自定義view缺少預設的構造方法
7.Usability:Typography
(1)特殊字元需用編碼代替,如“_”需要用“–”
8.Accessibility
(1)ImageView缺少src內容
檢查Overdraw
Overdraw(過度繪製)描述的是螢幕上的某個畫素在同一幀的時間內被繪製了多次。在多層次重疊的UI結構裡面,如果不可見的UI也在做繪製的操作,會導致某些畫素區域被繪製了多次。這樣就會浪費大量的CPU以及GPU資源。
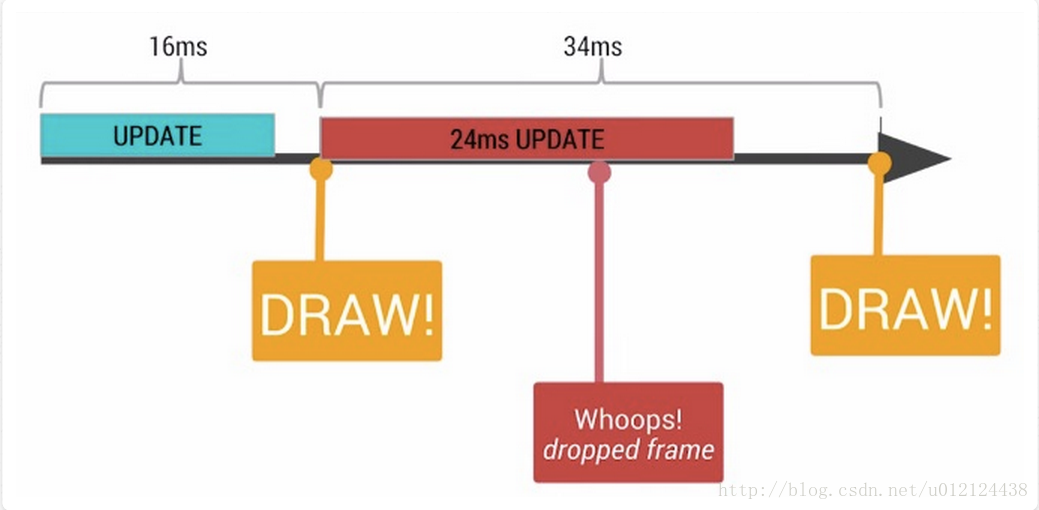
手機原本為了保持視覺的流暢度,其螢幕重新整理頻率是60hz,即在1000/60=16.67ms內更新一幀。如果沒有完成任務,就會發生掉幀的現象,也就是我們所說的卡頓。
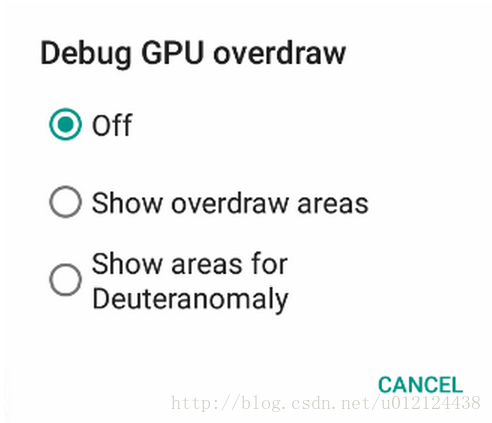
debug GPU overdraw
在Android系統內部也有一個神器可以檢視app的UI的過度繪製情況,在開發者選項中有個debug GPU overdraw(除錯GPU過度繪製),開啟之後有off(關閉),show overdraw areas(顯示過度繪製區域),show areas for Deuteranomaly(為紅綠症患者顯示過度繪製區域)
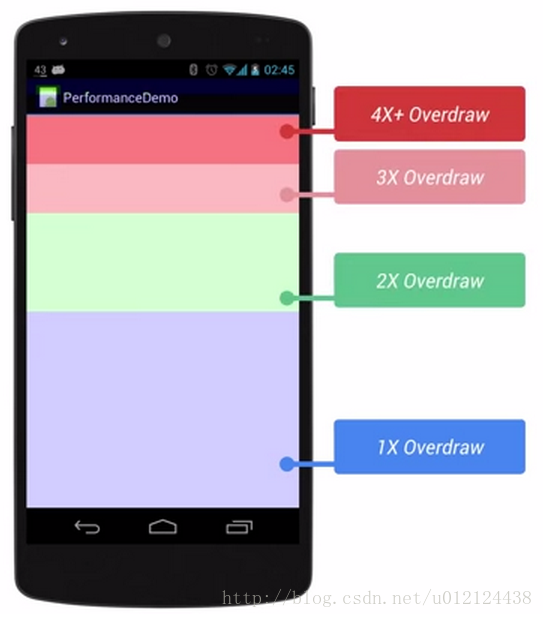
我們選擇show overdraw areas,發現整個手機介面的顏色變了,在開啟過度繪製選項後,其中的藍色,淡綠,淡紅,深紅代表了4種不同程度的Overdraw情況,我們的目標就是儘量減少紅色Overdraw,看到更多的藍色區域。
Profile GPU rendering
其次android系統還內建了Profile GPU rendering工具,這個工具也是在開發者選項中開啟,它能夠以柱狀圖的方式顯示當前介面的渲染時間
藍色代表測量繪製的時間,或者說它代表需要多長時間去建立和更新你的DisplayList.在Android中,一個檢視在可以實際的進行渲染之前,它必須被轉換成GPU所熟悉的格式,簡單來說就是幾條繪圖命令,複雜點的可能是你的自定義的View嵌入了自定義的Path. 一旦完成,結果會作為一個DisplayList物件被系統送入快取,藍色就是記錄了需要花費多長時間在螢幕上更新檢視(說白了就是執行每一個View的onDraw方法,建立或者更新每一個View的Display List物件).
橙色部分表示的是處理時間,或者說是CPU告訴GPU渲染一幀的地方,這是一個阻塞呼叫,因為CPU會一直等待GPU發出接到命令的回覆,如果柱狀圖很高,那就意味著你給GPU太多的工作,太多的負責檢視需要OpenGL命令去繪製和處理.
紅色代表執行的時間,這部分是Android進行2D渲染 Display List的時間,為了繪製到螢幕上,Android需要使用OpenGl ES的API介面來繪製Display List.這些API有效地將資料傳送到GPU,最總在螢幕上顯示出來.
下面我們通過一個小demo來實踐一下
剛開啟這個專案,我們就發現了在第一個有過度繪製問題,效果如下
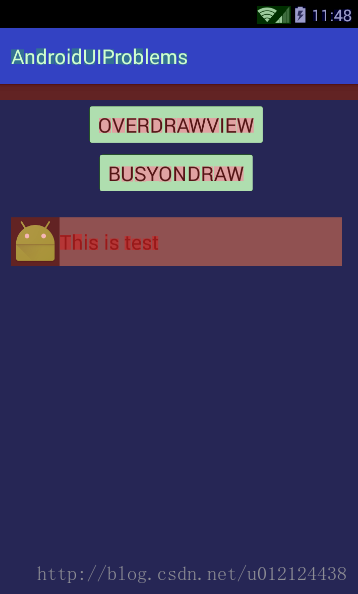
存在問題
在按鈕overdraw上面就有個紅色的過度繪製區域
在文字框This is test的佈局中也是紅色過度繪製區域
解決方法
要解決這個問題,我們首先需要分析這是怎麼引起的。分析到activity_main.xml的佈局檔案時,發現這裡使用了多個巢狀的LinearLayout佈局,而且每個LinearLayout都會使用一次android:background設定一次自己的背景顏色,他們造成了過度繪製。
仔細分析在其中一個巢狀ImageView的LinearLayout佈局背景顏色與最外層的背景顏色是一樣的,屬於不需要的背景色,因此將這個LinearLayout中的android:background屬性刪除,這時發現文字框佈局已經不再是紅色了
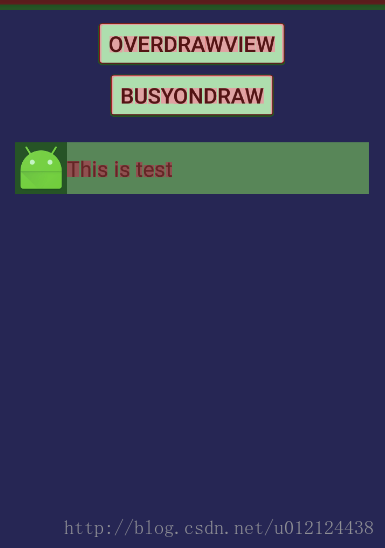
咋看之下一切都很完美,但其實整個ui其實還含有一個隱含的繪製效果,那邊是在activity中,使用setContentView(R.layout.activity_main)設定佈局的時候,android會自動填充一個預設的背景,而在這個UI中,我們使用了填充整個app的背景,因此不需要預設背景,取消也很簡單,只需要在activity中的onCreate方法中新增這麼一句就行了
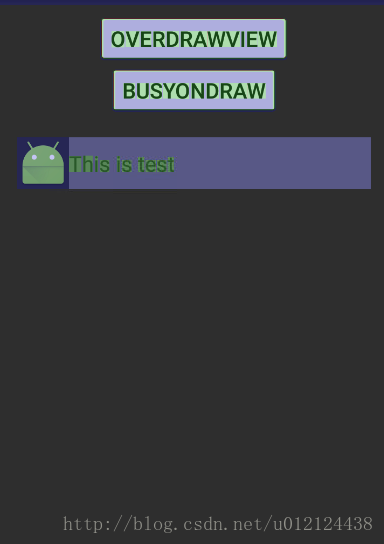
現在看最終優化效果
OVERDRAWVIEW頁面的問題
在overdrawviewactivity中只有一個自定義的圖案,而這個自定義的圖案引起了過度繪製的問題
解決方法
首先這個也是填充了整個ui介面的繪製圖片,因此我們也在activity中的onCreate方法中新增getWindow().setBackgroundDrawable(null);取消預設繪製。
繼續研究,發現過度繪製問題是由於OverDrawView類中的ondraw方法中多次繪製了矩形導致的,程式碼如下:
@Override
protected void onDraw(Canvas canvas) {
super.onDraw(canvas);
int width = getWidth();
int height = getHeight();
mPaint.setColor(Color.GRAY);
canvas.drawRect(0, 0, width, height, mPaint);
mPaint.setColor(Color.CYAN);
canvas.drawRect(0, height/4, width, height, mPaint);
mPaint.setColor(Color.DKGRAY);
canvas.drawRect(0, height/3, width, height, mPaint);
mPaint.setColor(Color.LTGRAY);
canvas.drawRect(0, height/2, width, height, mPaint);
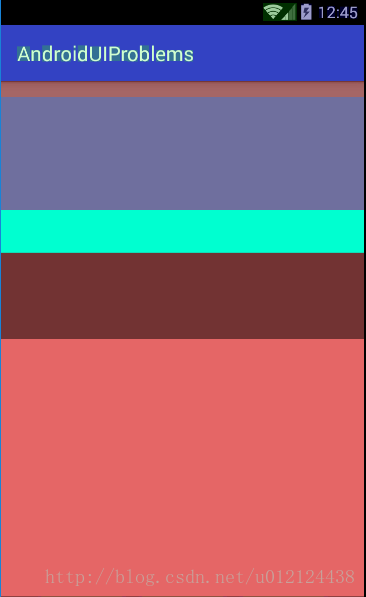
}通過分析得知,顏色為GRAY的矩形的高度其實不需要設定為整個螢幕的高度,它的高度只需要設定為它所顯示範圍的高度就可以了,因此可以設為height/4。
其他的矩形也是同樣的道理,因此更改這裡的程式碼為:
@Override
protected void onDraw(Canvas canvas) {
super.onDraw(canvas);
     int width = getWidth();
      int height = getHeight();
    mPaint.setColor(Color.GRAY);
      canvas.drawRect(0, 0, width, height/4, mPaint);
    mPaint.setColor(Color.CYAN);
      canvas.drawRect(0, height/4, width, height/3, mPaint);
     mPaint.setColor(Color.DKGRAY);
      canvas.drawRect(0, height/3, width, height/2, mPaint);
      mPaint.setColor(Color.LTGRAY);
    canvas.drawRect(0, height/2, width, height, mPaint);
}
優化的介面

至此,佈局優化的內容就到此結束了,有不足的地方,歡迎大家評論指出