
spring AOP 之三:使用@AspectJ定義切入點
@AspectJ相關文章
使用註解來建立切面是AspectJ 5所引入的關鍵特性。AspectJ 5之前,編寫AspectJ切面需要學 習一種Java語言的擴充套件,但是AspectJ面向註解的模型可以非常簡便地通過少量註解把任意類 轉變為切面。
AspectJ提供了五個註解來定義通知,如表4.2所示:

表4.2 Spring使用AspectJ註解來宣告通知方法

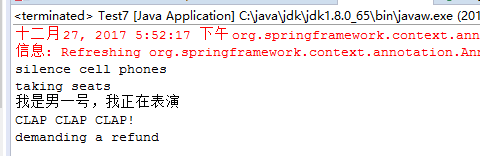
示例1:Audience類:觀看演出的切面
package com.dxz.aop.demo7; import org.springframework.stereotype.Component; @Componentpublic class Performance { public void perform(){ System.out.println("我是男一號,我正在表演"); } } package com.dxz.aop.demo7; import org.aspectj.lang.annotation.AfterReturning; import org.aspectj.lang.annotation.Aspect; import org.aspectj.lang.annotation.Before; import org.springframework.context.annotation.Configuration; @Aspect @Configurationpublic class Audience { /** * 手機調至靜音狀態 */ @Before("execution(** com.dxz.aop.demo7.Performance.perform(..))") public void silenceCellPhones() { System.out.println("silence cell phones"); } /** * 就坐 */ @Before("execution(** com.dxz.aop.demo7.Performance.perform(..))")public void takeSeats() { System.out.println("taking seats"); } /** * 鼓掌喝彩 */ @AfterReturning("execution(** com.dxz.aop.demo7.Performance.perform(..))") public void applause() { System.out.println("CLAP CLAP CLAP!"); } /** * 退款 */ @AfterReturning("execution(** com.dxz.aop.demo7.Performance.perform(..))") public void demandRefund() { System.out.println("demanding a refund"); } } package com.dxz.aop.demo7; import org.springframework.context.annotation.ComponentScan; import org.springframework.context.annotation.Configuration; import org.springframework.context.annotation.EnableAspectJAutoProxy; import org.springframework.context.annotation.Import; @Configuration @ComponentScan @EnableAspectJAutoProxy @Import({Audience.class})/*@Aspect可以生效,相當於Configuration類作用,都是配置類*/ public class AppConfig { }
啟動類:
package com.dxz.aop.demo7;

import org.springframework.context.ApplicationContext;
import org.springframework.context.annotation.AnnotationConfigApplicationContext;

public class Test7 {

    public static void main(String[] args) {
        ApplicationContext context = new AnnotationConfigApplicationContext(AppConfig.class);
        Performance outPut = (Performance) context.getBean("performance");
        outPut.perform();
    }
}
結果:
你可能已經注意到了,所有的這些註解都給定了一個切點表示式作為它的值,同時,這四個方法的切點表示式都是相同的。其實,它們可以設定成不同的切點表示式,但是在這裡,這個切點表示式就能滿足所有通知方法的需求。這樣的重複讓人感覺有些不對勁。如果我們只定義這個切點一次,然後每次需要的時候引用它,那麼這會是一個很好的方案。
幸好,我們完全可以這樣做:@Pointcut註解能夠在一個@AspectJ切面內定義可重用的切 點。接下來的程式清單4.2展現了新的Audience,現在它使用了@Pointcut。

示例2:@Pointcut註解宣告頻繁使用的切點表示式
package com.dxz.aop.demo7;

import org.aspectj.lang.annotation.AfterReturning;
import org.aspectj.lang.annotation.Aspect;
import org.aspectj.lang.annotation.Before;
import org.aspectj.lang.annotation.Pointcut;
import org.springframework.context.annotation.Configuration;

@Aspect
@Configuration
public class Audience2 {

    @Pointcut("execution(** com.dxz.aop.demo7.Performance.perform(..))")
    public void performance() {}

    /**
     * 手機調至靜音狀態
     */
    @Before("performance()")
    public void silenceCellPhones() {
        System.out.println("silence cell phones");
    }

    /**
     * 就坐
     */
    @Before("performance()")
    public void takeSeats() {
        System.out.println("taking seats");
    }

    /**
     * 鼓掌喝彩
     */
    @AfterReturning("performance()")
    public void applause() {
        System.out.println("CLAP CLAP CLAP!");
    }

    /**
     * 退款
     */
    @AfterReturning("performance()")
    public void demandRefund() {
        System.out.println("demanding a refund");
    }
}
package com.dxz.aop.demo7;

import org.springframework.context.annotation.ComponentScan;
import org.springframework.context.annotation.Configuration;
import org.springframework.context.annotation.EnableAspectJAutoProxy;
import org.springframework.context.annotation.Import;

@Configuration
@ComponentScan
@EnableAspectJAutoProxy
@Import({Audience2.class})/*@Aspect可以生效,相當於Configuration類作用,都是配置類*/
public class AppConfig {

}
結果和示例同等效果
 環繞通知(around advice)
示例3:我們使用一個環繞通知來代替之前多個 不同的前置通知和後置通知
package com.dxz.aop.demo7;

import org.aspectj.lang.ProceedingJoinPoint;
import org.aspectj.lang.annotation.AfterReturning;
import org.aspectj.lang.annotation.Around;
import org.aspectj.lang.annotation.Aspect;
import org.aspectj.lang.annotation.Before;
import org.aspectj.lang.annotation.Pointcut;
import org.springframework.context.annotation.Configuration;

@Aspect
@Configuration
public class Audience3 {

    @Pointcut("execution(** com.dxz.aop.demo7.Performance.perform(..))") //定義命名額切點
    public void performance() {
    }

    @Around("performance()") //環繞通知方法
    public void watchPerformance(ProceedingJoinPoint jp) {
        try {
            System.out.println("silence cell phones");
            System.out.println("taking seats");
            jp.proceed();
            System.out.println("CLAP CLAP CLAP!");
            System.out.println("demanding a refund");
        } catch (Throwable e) {
            e.printStackTrace();
        }
    }
}
package com.dxz.aop.demo7;

import org.springframework.context.annotation.ComponentScan;
import org.springframework.context.annotation.Configuration;
import org.springframework.context.annotation.EnableAspectJAutoProxy;
import org.springframework.context.annotation.Import;

@Configuration
@ComponentScan
@EnableAspectJAutoProxy
@Import({Audience3.class})/*@Aspect可以生效,相當於Configuration類作用,都是配置類*/
public class AppConfig {

}
其它不變,執行結果同上

對於Introduction這個詞,個人認為理解成引入是最合適的,其目標是對於一個已有的類引入新的介面(有人可能會問:有什麼用呢?簡單的說,你可以把當前物件轉型成另一個物件,那麼很顯然,你就可以呼叫另一個物件的方法了),看一個例子就全明白了。
假設已經有一個UserService類提供了儲存User物件的服務,但是現在想增加對User進行驗證的功能,只對通過驗證的User提供儲存服務,在不修改UserService類程式碼的前提下就可以通過Introduction來解決。
定義一個名為 Skill 的介面及它的實現類 SkillImpl。我們將要把 SkillImpl 的getSkill()方法新增到其他的類例項
package com.dxz.aop.demo8;

public interface Person {
    public void sayIdentification();
}
package com.dxz.aop.demo8;

import org.springframework.stereotype.Component;

@Component
public class Student implements Person {

    public void sayIdentification() {
        System.out.println("hello world!");

    }

}
附加的功能
package com.dxz.aop.demo8;

import org.springframework.stereotype.Component;

@Component
public interface Skill {
    void getSkill(String skill);
}

package com.dxz.aop.demo8;

import org.springframework.stereotype.Component;

@Component
public class SkillImpl implements Skill {

    public void getSkill(String skill) {
        System.out.println(skill);
    }

}
SpringAop 配置類
package com.dxz.aop.demo8;

import org.aspectj.lang.annotation.Aspect;
import org.aspectj.lang.annotation.DeclareParents;
import org.springframework.stereotype.Component;

@Component
@Aspect
public class AopConfig {

    // “...demo8.Perso”後面的 “+” 號,表示只要是Person及其子類都可以新增新的方法
    @DeclareParents(value = "com.dxz.aop.demo8.Person+", defaultImpl = SkillImpl.class)
    public Skill skill;
}
SpringConfig 配置類
package com.dxz.aop.demo8;

import org.springframework.context.annotation.ComponentScan;
import org.springframework.context.annotation.Configuration;
import org.springframework.context.annotation.EnableAspectJAutoProxy;

@ComponentScan
@Configuration
@EnableAspectJAutoProxy
public class SpringConfig {
}
Test
package com.dxz.aop.demo8;

import org.junit.Test;
import org.junit.runner.RunWith;
import org.springframework.beans.factory.annotation.Autowired;
import org.springframework.test.context.ContextConfiguration;
import org.springframework.test.context.junit4.SpringJUnit4ClassRunner;

@RunWith(SpringJUnit4ClassRunner.class)
@ContextConfiguration(classes = SpringConfig.class)
public class AopTest {

    @Autowired
    private Student student;

    @Test
    public void test(){
        Skill skill = (Skill)student; // 通過型別轉換,student物件就擁有了SkillImp 類的方法
        skill.getSkill("我會英語");
        student.sayIdentification();
    }
}
結果:

相關推薦
spring AOP 之三:使用@AspectJ定義切入點
@AspectJ相關文章 使用註解來建立切面是AspectJ 5所引入的關鍵特性。AspectJ 5之前,編寫AspectJ切面需要學 習一種Java語言的擴充套件,但是AspectJ面向註解的模型可以非常簡便地通過少量註解把任意類 轉變為切面。 AspectJ提供了五個註解來定義通知,如表4
spring AOP 之四:@AspectJ切入點識別符號語法詳解
@AspectJ相關文章 Spring AOP支援的AspectJ切入點指示符(用來指示切入點表示式目的),在Spring AOP中目前只有執行方法這一個連線點(因為Spring基於動態代理,所以Spring只支援方法連線點。這與一些其他的AOP框架是不同的,例如AspectJ和JBoss,
spring AOP 之二:@AspectJ註解的3種配置
@AspectJ相關文章 與 AspectJ 相同的是,Spring AOP 同樣需要對目標類進行增強,也就是生成新的 AOP 代理類;與 AspectJ 不同的是,Spring AOP 無需使用任何特殊命令對 Java 原始碼進行編譯,它採用執行時動態地、在記憶體中臨時生成“代理類”的方式
spring security起步三:自定義登入配置與form-login屬性詳解
在上一篇部落格spring security起步二:自定義登入頁中我們實現瞭如何自定義登入頁,但是還存在很多問題: 1.spring security如何對登入請求進行攔截 2.登入成功後如何跳轉 3.登入失敗後如何跳轉 form-login屬性詳解
彈窗之三:自定義Dialog
第一步: 給Dialog設定一個風格主題 (基本都是用這個主題)無邊框全透明背景: res/values/styles: <!--自定義dialog背景全透明無邊框theme --> <style name="MyDi
android中的對話方塊之三:自定義對話方塊
首先看下效果圖 下面講一下具體的實現: 1.修改系統預設的Dialog樣式(風格、主題) 2.自定義Dialog佈局檔案 3.可以自己封裝一個類,繼承自Dialog或者直接使用Dialog類來實現,為了方便以後重複使用,建議自己封裝一個Dialog類 ==
Spring系列之三:SpringBean的單例構造和多例構造(Maven Idea)
在使用Spring的Ioc容器建立物件會使用到單例構造或多例構造;單例構造:整個程式只有一個物件多例構造:程式中有類例項的多個物件,物件之間互相獨立首先在Test包下面建立一個User類,原始碼如下;package com.lydetails.ssm.Test; public
自定義spring boot starter三部曲之三:原始碼分析spring.factories載入過程
本文是《自定義spring boot starter三部曲》系列的終篇,前文中我們開發了一個starter並做了驗證,發現關鍵點在於spring.factories的自動載入能力,讓應用只要依賴starter的jar包即可,今天我們來分析Spring和Spring boot原始碼,瞭解s
Spring原理學習系列之三:Spring AOP原理(從原始碼層面分析)-------上部
引言 本文是Spring原理分析的第三篇博文,主要闡述Spring AOP相關概念,同時從原始碼層面分析AOP實現原理。對於AOP原理的理解有利於加深對Spring框架的深入理解。同時我也希望可以探究Spring框架在處理AOP的解決思路,學習框架的時候,有時候
Https系列之三:讓服務器同時支持http、https,基於spring boot
signed 默認 gfs proc idl clas 兩種方法 .... gpg Https系列會在下面幾篇文章中分別作介紹: 一:https的簡單介紹及SSL證書的生成二:https的SSL證書在服務器端的部署,基於tomcat,spring boot三:讓服務器同時
SDS趨勢之三:開源軟件定義存儲
sds 開源存儲 大家都知道IT圈有個非常著名的曲線圖,就是Gartner的新興技術成熟度曲線(Hype Cycle),昨天看了一下Gartner 2016的存儲成熟曲線圖,今天給大家簡單聊聊,多多指教。:) 廢話不多說,直接上圖先簡單說說這個曲線圖,成熟曲線圖將每種技術的優點與Gartner所期望其
spring boot 系列之三:spring boot 整合JdbcTemplate
closed com context boot pin pan url wired ace 前面兩篇文章我們講了兩件事情: 通過一個簡單實例進行spring boot 入門 修改spring boot 默認的服務端口號和默認context path 這篇文章我們來看下怎
Spring(十九):Spring AOP(三):切面的優先級
表達 對象 技術分享 方法 多個 getname exp 訪問 ioc容器 背景: 1)指定切面優先級示例:有的時候需要對一個方法指定多個切面,而這多個切面有時又需要按照不同順序執行,因此,切面執行優先級別指定功能就變得很實用。 2)重復使用切入點表達式:上一篇文章中,
Spring Aop的三個註解:@Around,@Before,@After
如果 aop 被調用 調用 pri npoi 能說 說明 其中 最近抽時間看了一些aop。好像翻譯叫做切片技術。大概也能說明白是什麽意思。 其中,有三個註解需要註意,分別是@Around,@Before,@After。 其中 @Around進行切片捕捉,可以捕捉到joinp
Spring Boot 系統之三:Spring Boot 整合JdbcTemplate
前面兩篇文章我們講了兩件事情: 通過一個簡單例項進行Spring Boot 入門 修改Spring Boot 預設的服務埠號和預設context path 這篇文章我們來看下怎麼通過JdbcTemplate進行資料的持久化。 一、程式碼實現 1、修改pom.xml檔案
java基礎(五):spring aop 之 @aspect
Aspectj切入點語法定義 例如定義切入點表示式 execution(* com.sample.service.impl….(…)) 一:execution()是最常用的切點函式,其語法如下所示: pointcut 宣告"切入點", 整個表示式可以分為五個部分
Spring原始碼解析之三(自定義標籤的解析)
自定義標籤的解析 1、概述:通過前面的文章我們分析了預設標籤的解析,我們先回顧下自定義標籤解析所使用的方法 /** * Parse the elements at the root level in the document: * "import", "alias", "bean".
探析Spring AOP(三):Spring AOP的底層實現原理
一、前言 前面第一篇我們講到了AOP的概念和使用,第二篇也講到了 AOP的實現機制,在第一篇,講到了joinpoint,pointcut,aspect,weave等AOP的核心概念,接下來我們詳解分析他們的實現原理! 在動態代理 和 CGLIB 的支
Spring AOP之AspectJ的註解方式使用
需要匯入的jar包,請看上一篇部落格。 註解: 如果使用註解進行aop開發,必須進行aspectj自動代理 <aop:aspectj-autoproxy> 通知註解 @Before 前置 @AfterReturning 後置
10、SSM框架-Spring AOP之基於註解的宣告式AspectJ(10)
spring除了支援Schema方式配置AOP,還支援註解方式:使用@AspectJ風格的切面宣告。匯入需要的包:aspectjweaver.jar、aopalliance-1.0.jar 一、基本使用方法 1.1、啟用對@AspectJ的支援 Sprin