
Spring Cloud 宣告式服務呼叫 Feign
一、簡介
在上一篇中,我們介紹註冊中心Eureka,但是沒有服務註冊和服務呼叫,服務註冊和服務呼叫本來應該在上一章就應該給出例子的,但是我覺得還是和Feign一起講比較好,因為在實際專案中,都是使用宣告式呼叫服務。而不會在客服端和服務端儲存2份相同的model和api定義。Feign在RestTemplate的基礎上對其封裝,由它來幫助我們定義和實現依賴服務介面的定義。Spring Cloud Feign 基於Netflix Feign 實現的,整理Spring Cloud Ribbon 與 Spring Cloud Hystrix,並且實現了宣告式的Web服務客戶端定義方式。
二、實踐
在上一節中,我繼續新增工程模組,最後的模組如下:

首先我們需要建一個工程,名為hello-service-api 在工程主要定義對外提供的model 和api。服務的提供方和服務的消費方都要依賴該工程jar,這樣我們就可以只維護一份model 和api定義。在該例子中主要如下結構

非常簡單,只有1個HelloServieRemoteApi 介面定義和User物件。
@RequestMapping("/hello-service-remote")
public interface HelloServiceRemoteApi {

    @RequestMapping(value = "/hello1", method = RequestMethod.GET)
    String hello(@RequestParam("name") String name);

    @RequestMapping(value = "/hello2", method = RequestMethod.GET)
    User hello(@RequestHeader("name") String name,@RequestHeader("age") Integer age);


    @RequestMapping(value = "/hello3", method = RequestMethod.POST)
    String hello(@RequestBody User user);

}
在上面的介面定義中,我們非常的清晰,在介面上面我們主對映為/hello-service-remote,個人感覺已介面的名字通過“-”這樣可以非常的區分不同的介面路徑,防止多介面時發生重複。接下來具體方法的上面可以定義於方法名一樣的路徑對映,我這裡已 /hello1,/hello2,/hello3為主。
public class User implements Serializable {
    private static final long serialVersionUID = -7233238826463139634L;

    private Long id;

    private String name;

    private Integer age;

    public User() {
    }

    public User(String name, Integer age) {
        this.name = name;
        this.age = age;
    }

    public Long getId() {
        return id;
    }

    public void setId(Long id) {
        this.id = id;
    }

    public String getName() {
        return name;
    }

    public void setName(String name) {
        this.name = name;
    }

    public Integer getAge() {
        return age;
    }

    public void setAge(Integer age) {
        this.age = age;
    }

    @Override
    public String toString() {
        return "User{" +
                "name='" + name + '\'' +
                ", age=" + age +
                '}';
    }
}
上面就是簡單的一個User物件。
從上面的介面中發現,該api工程需要引入spring-web包。所以它的pom.xml如下:
<?xml version="1.0" encoding="UTF-8"?>
<project xmlns="http://maven.apache.org/POM/4.0.0"
         xmlns:xsi="http://www.w3.org/2001/XMLSchema-instance"
         xsi:schemaLocation="http://maven.apache.org/POM/4.0.0 http://maven.apache.org/xsd/maven-4.0.0.xsd">
    <modelVersion>4.0.0</modelVersion>

    <artifactId>hello-service-api</artifactId>
    <version>1.0-SNAPSHOT</version>
    <groupId>com.qee.hello</groupId>

    <dependencies>
        <dependency>
            <groupId>org.springframework</groupId>
            <artifactId>spring-web</artifactId>
            <version>4.2.9.RELEASE</version>
        </dependency>
    </dependencies>
</project>
從上面的pom.xml定義中,我們知道hello-service-api並不整合父工程micro-service-integration。一般作為api提供的工程jar,依賴越少越好。
接下來我們需要建立一個提供者工程,我們把它命名為hello-service-compose。該工程也是標準的Spring Boot工程。具體的目錄如下:
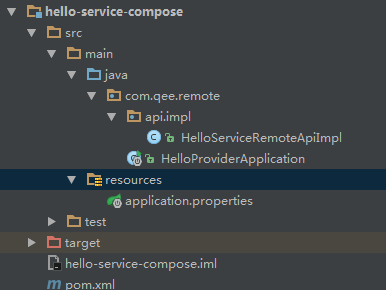
在工程中我們有一個剛才hello-service-api介面定義的實現。程式碼如下:
@RestController
public class HelloServiceRemoteApiImpl implements HelloServiceRemoteApi {

    @Override
    public String hello(@RequestParam("name") String name) {
        return "hello " + name;
    }

    @Override
    public User hello(@RequestHeader("name") String name, @RequestHeader("age") Integer age) {
        try {
            name= URLDecoder.decode(name,"UTF-8");
        } catch (UnsupportedEncodingException e) {
            e.printStackTrace();
        }
        return new User(name, age);
    }

    @Override
    public String hello(@RequestBody User user) {
        if (user == null) {
            return "未知";
        }
        return user.toString();
    }
}
因為是測試工程,所以它沒有複雜的業務邏輯。接下來就是HelloProviderApplication的啟動main.
package com.qee.remote;

import org.springframework.boot.SpringApplication;
import org.springframework.boot.autoconfigure.SpringBootApplication;
import org.springframework.cloud.client.discovery.EnableDiscoveryClient;


@EnableDiscoveryClient
@SpringBootApplication
public class HelloProviderApplication {

    public static void main(String[] args) {
        SpringApplication.run(HelloProviderApplication.class, args);
    }
}
在上面有2個註解,第一個 SpringBootApplication 就是Spring Boot 啟動註解,EnableDiscoveryClient 該註解會把RestController修飾的類註冊到註冊中心去。
接下來我們來看下application.properties
server.port=8885

spring.application.name=hello-service-compose


eureka.instance.hostname=register.center.com

eureka.instance.server.port=8881


#預設的註冊域
eureka.client.serviceUrl.defaultZone=http://${eureka.instance.hostname}:${eureka.instance.server.port}/eureka/


#控制檯彩色輸出
spring.output.ansi.enabled=ALWAYS
從上面資訊我們知道,改工程啟動埠為8885,註冊中心地址為register.center.com:8881。
接下來我們檢視一下該工程的pom.xml定義
<?xml version="1.0" encoding="UTF-8"?>
<project xmlns="http://maven.apache.org/POM/4.0.0"
         xmlns:xsi="http://www.w3.org/2001/XMLSchema-instance"
         xsi:schemaLocation="http://maven.apache.org/POM/4.0.0 http://maven.apache.org/xsd/maven-4.0.0.xsd">
    <parent>
        <artifactId>micro-service-integration</artifactId>
        <groupId>spring.cloud</groupId>
        <version>1.0-SNAPSHOT</version>
    </parent>
    <modelVersion>4.0.0</modelVersion>

    <artifactId>hello-service-compose</artifactId>

    <properties>
        <project.build.sourceEncoding>UTF-8</project.build.sourceEncoding>
        <project.reporting.outputEncoding>UTF-8</project.reporting.outputEncoding>
    </properties>

    <dependencies>
        <dependency>
            <groupId>com.qee.hello</groupId>
            <artifactId>hello-service-api</artifactId>
            <version>1.0-SNAPSHOT</version>
        </dependency>

        <dependency>
            <groupId>org.springframework.boot</groupId>
            <artifactId>spring-boot-starter-web</artifactId>
        </dependency>

        <dependency>
            <groupId>org.springframework.cloud</groupId>
            <artifactId>spring-cloud-starter-eureka</artifactId>
        </dependency>

        <dependency>
            <groupId>org.springframework.cloud</groupId>
            <artifactId>spring-cloud-starter-ribbon</artifactId>
        </dependency>

        <dependency>
            <groupId>org.springframework.boot</groupId>
            <artifactId>spring-boot-starter-actuator</artifactId>
        </dependency>

    </dependencies>
</project>
從pom.xml檔案中知道該工程依賴了web,euraka,ribbon,actuator,hello-service-api 包。其中euraka為服務註冊和發現包,ribbon為服務呼叫負載均衡包,actuator為工程元資訊檢測包。還有我們自己定義的hello-service-api包。
在上面的簡單配置和編寫後,我們就可以啟動工程把該HelloServiceRemoteApi註冊到註冊中心去了。
現在有了服務介面定義包和服務提供工程,現在我們編寫一下服務呼叫工程。命名為hello-service-web。該工程的目錄結構如下:

首先我們來看下HelloBackgroundService 這個介面。
@FeignClient(value = "hello-service-compose")
public interface HelloBackgroundService extends HelloServiceRemoteApi{
}
非常的簡單,主要繼承我們之前編輯的HelloServiceRemoteApi,並且在上面打上FeignClient註解,該註解指定服務名來繫結服務。該註解同時會使服務呼叫具有負載均衡的能力。
接下來我們來看下HelloController類
@RestController
public class HelloController {

    @Autowired
    private HelloBackgroundService helloBackgroundService;

    @RequestMapping("/hello")
    public Map<String,Object> hello(){
        Map<String,Object> ret = new HashMap<String, Object>();
        StringBuffer sb = new StringBuffer();
        String s1 = helloBackgroundService.hello("張三");
        sb.append(s1).append("\n");
        User user = null;
        try {
            user = helloBackgroundService.hello(URLEncoder.encode("李四", "UTF-8"), 30);
        } catch (UnsupportedEncodingException e) {
            e.printStackTrace();
        }
        sb.append(user.toString()).append("\n");
        String s3 = helloBackgroundService.hello(new User("王五", 19));
        sb.append(s3).append("\n");
        ret.put("show",sb.toString());
        return ret;
    }
}
從上面得知我們,我們就可以呼叫之前的我們編寫的HelloBackgroundService了。接下來我們檢視一下啟動類HelloConsumerApp
package com.qee;

import feign.Logger;
import org.springframework.boot.SpringApplication;
import org.springframework.boot.autoconfigure.SpringBootApplication;
import org.springframework.cloud.client.discovery.EnableDiscoveryClient;
import org.springframework.cloud.netflix.feign.EnableFeignClients;
import org.springframework.context.annotation.Bean;


@EnableFeignClients
@EnableDiscoveryClient
@SpringBootApplication
public class HelloConsumerApp {

    @Bean
    Logger.Level feginLoggerLevel(){
        return Logger.Level.FULL;
    }

    public static void main(String[] args) {
        SpringApplication.run(HelloConsumerApp.class, args);
    }
}
在該啟動了中又多了一個註解EnableFeignClients ,該註解開啟Spring Cloud Feign的支援。接著我們來檢視一下application.properties
server.port=8887

spring.application.name=hello-service-web


eureka.instance.hostname=register.center.com

eureka.instance.server.port=8881


#預設的註冊域
eureka.client.serviceUrl.defaultZone=http://${eureka.instance.hostname}:${eureka.instance.server.port}/eureka/

#開啟請求壓縮功能
feign.compression.request.enabled=true

#開啟響應壓縮功能
feign.compression.response.enabled=true

#指定壓縮請求資料型別
feign.compression.request.mime-types=text/xml;application/xml;application/json

#如果傳輸超過該位元組,就對其進行壓縮
feign.compression.request.min-request-size=2048

#控制檯彩色輸出
spring.output.ansi.enabled=ALWAYS


#日誌配置,該介面的日誌級別
logging.level.com.qee.service.HelloBackgroundService=DEBUG
從上面的註釋中,我們已經可以知道具體的配置引數的作用,這裡就不詳細介紹了。從上面的配置和編寫我們可以知道,該工程需要如下的依賴包,pom.xml檔案如下
<?xml version="1.0" encoding="UTF-8"?>
<project xmlns="http://maven.apache.org/POM/4.0.0"
         xmlns:xsi="http://www.w3.org/2001/XMLSchema-instance"
         xsi:schemaLocation="http://maven.apache.org/POM/4.0.0 http://maven.apache.org/xsd/maven-4.0.0.xsd">
    <parent>
        <artifactId>micro-service-integration</artifactId>
        <groupId>spring.cloud</groupId>
        <version>1.0-SNAPSHOT</version>
    </parent>
    <modelVersion>4.0.0</modelVersion>

    <artifactId>hello-service-web</artifactId>

    <properties>
        <project.build.sourceEncoding>UTF-8</project.build.sourceEncoding>
        <project.reporting.outputEncoding>UTF-8</project.reporting.outputEncoding>
    </properties>

    <dependencies>
        <dependency>
            <groupId>com.qee.hello</groupId>
            <artifactId>hello-service-api</artifactId>
            <version>1.0-SNAPSHOT</version>
        </dependency>

        <dependency>
            <groupId>org.springframework.boot</groupId>
            <artifactId>spring-boot-starter-web</artifactId>
        </dependency>

        <dependency>
            <groupId>org.springframework.cloud</groupId>
            <artifactId>spring-cloud-starter-eureka</artifactId>
        </dependency>

        <dependency>
            <groupId>org.springframework.cloud</groupId>
            <artifactId>spring-cloud-starter-ribbon</artifactId>
        </dependency>

        <dependency>
            <groupId>org.springframework.cloud</groupId>
            <artifactId>spring-cloud-starter-feign</artifactId>
        </dependency>

        <dependency>
            <groupId>org.springframework.boot</groupId>
            <artifactId>spring-boot-starter-actuator</artifactId>
        </dependency>

    </dependencies>
</project>
該服務消費端,比服務提供方多了一個jar依賴,就是feign。該jar的作用就是提供宣告式的服務呼叫。到這裡我們本章的內容大致結束,最後我們來執行這幾個工程。檢視如下結果:
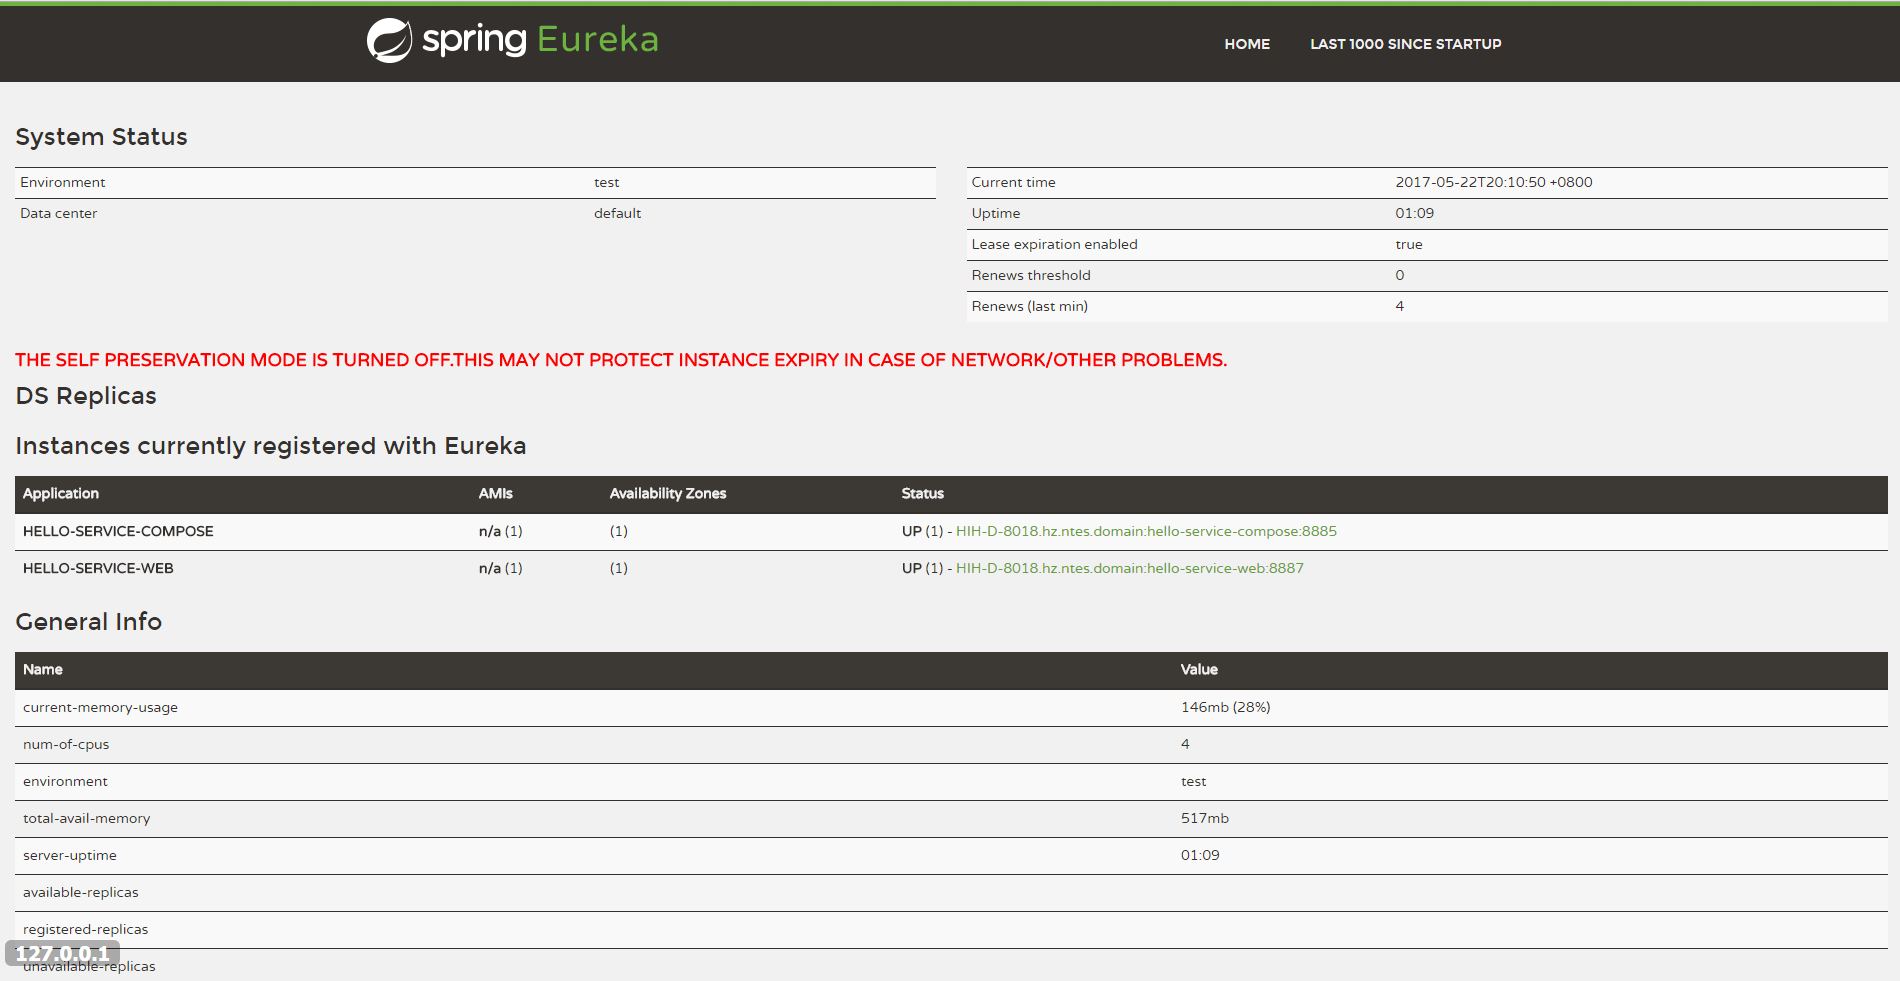
從上面我們可以看到2個工程hello-service-compose 和hello-service-web都已經註冊到註冊中心eureka上了。接下來看一下呼叫結果:

到這裡服務註冊中心啟動,服務註冊,服務消費大致都已完成,之後會向大家一起學習服務呼叫的負載均衡Ribbon和服務容錯保護Hystrix.
相關推薦
Spring Cloud 宣告式服務呼叫 Feign
一、簡介 在上一篇中,我們介紹註冊中心Eureka,但是沒有服務註冊和服務呼叫,服務註冊和服務呼叫本來應該在上一章就應該給出例子的,但是我覺得還是和Feign一起講比較好,因為在實際專案中,都是使用宣告式呼叫服務。而不會在客服端和服務端儲存2份相同的model和api定義。Feign在RestTemplat
Spring Cloud中宣告式服務呼叫Feign (11)
轉自 https://blog.csdn.net/u012702547/article/details/77823434 這個系列我感覺真的太好了,可以一步一步的瞭解spring cloud 的搭建以及更深層次的東西,對想學這門技術的朋友真的入門特別的快,感謝這位大哥的分享,我也會持續的
宣告式服務呼叫Feign
Feign介紹 Feign是Netflix公司開源的輕量級rest客戶端,使用Feign可以非常方便的實現Http 客戶端。Spring Cloud引入.Feign並且集成了Ribbon實現客戶端負載均衡呼叫。 Feign 整合測試 1、在客戶端新增依賴,所需依賴如下
SpringCloud宣告式服務呼叫Feign
1.建立一個SpringBoot工程,這裡命名為feign-consumer,然後在pom檔案中新增依賴: <dependencies> ..... <dependency>
springcloud系列—Feign—第4章-1: 宣告式服務呼叫 Feign
資料參考:《Spring Cloud 微服務實戰》 目錄 Spring Cloud Feign入門 第一步:建立普通Spring Boot工程 第二步:新增依賴 第三步:添加註解 第四步:宣告服務 第五步:Controller中呼叫服務 第六步:屬性配置 測試
SpringCloud 原始碼系列(6)—— 宣告式服務呼叫 Feign
SpringCloud 原始碼系列(1)—— 註冊中心 Eureka(上) SpringCloud 原始碼系列(2)—— 註冊中心 Eureka(中) SpringCloud 原始碼系列(3)—— 註冊中心 Eureka(下) Sp
Spring Cloud Feign(宣告式服務呼叫)(1)
Spring Cloud Feign它基於Netflix Feign實現,整合了Spring Cloud Ribbon與Spring Cloud Hystrix,除了提供這兩者的強大功能,它還提供了一種宣告式的Web服務客戶端定義方式。 1.下面首先建立一個Spring Boot基礎工程取名
Spring Cloud Feign(宣告式服務呼叫)(2)
繼承特性 1.首先新建個工程,名為hello-service-api。因為要用到Spring MVC的註解所以要要加鎖spring-boot-web的依賴,具體如下: <?xml version="1.0" encoding="UTF-8"?> <project xml
Spring Cloud 微服務實戰 第六章 宣告式服務呼叫:Spring Cloud Feign
本章介紹的是Spring Cloud Feign ,它是基於Netfix Feign 實現 ,整合了Spring Cloud Ribbon 與 Spring Cloud Hystrix, 除了提供這兩者的強大功能之外,還提供了一種宣告式的web服務客戶端定義方式。
spring cloud 宣告式rest客戶端feign呼叫遠端http服務
在Spring Cloud Netflix棧中,各個微服務都是以HTTP介面的形式暴露自身服務的,因此在呼叫遠端服務時就必須使用HTTP客戶端。Feign就是Spring Cloud提供的一種宣告式REST客戶端。可以通過Feign訪問呼叫遠端微服務提供的REST介面。現在我們就用Feign來呼叫S
第六章 宣告式服務呼叫: Spring Cloud Feign
我們在使用 Spring Cloud Ribbon 時, 通常都會利用它對 RestTemplate 的請求攔截來實現對依賴服務的介面呼叫, 而 RestTemplate 已經實現了對 HTTP 請求的封裝處理, 形成了一套模板化的呼叫方法。在之前的例子中,我們只是簡單介紹了 RestTemplate 呼
spring cloud 入門系列五:使用Feign 實現宣告式服務呼叫
一、Spring Cloud Feign概念引入通過前面的隨筆,我們瞭解如何通過Spring Cloud ribbon進行負責均衡,如何通過Spring Cloud Hystrix進行服務斷路保護,兩者作為基礎工具類框架應用在各種基礎設施類微服務和業務類微服務中,並且成對存在,那麼有沒有更高層的封裝,將兩者的
06.Spring Cloud學習筆記之宣告式服務呼叫元件Feign
前言 Spring Cloud Feign基於Netflix Feign實現,整合了Spring Cloud Ribbon與Spring Cloud Hystrix,除了提供這兩者的強大功能外,還提供了一種宣告式的Web服務客戶端定義方式,我們可以做到使用HT
Spring Cloud Feign 宣告式服務呼叫
目錄 一、Feign是什麼? 二、Feign的快速搭建 三、Feign的幾種姿態 引數繫結 繼承特性 四、其他配置 Ribb
Spring Cloud 微服務資料獲取Fegin-- 宣告式服務呼叫
一.介紹 Feign是一個宣告式的偽Http客戶端,它使得寫Http客戶端變得更簡單。使用Feign,只需要建立一個介面並用註解的方式來配置它。 Feign具有可插拔的註解特性,包括Feign 註解和JAX-RS註解
03.Spring Cloud OpenFeign宣告式服務呼叫
Spring Cloud OpenFeign Spring Cloud OpenFeign宣告式服務呼叫 一、體驗demo 1.Eureka Server 2.新建客戶端 3.新建消費服務客戶端
Spring Cloud Eureka 分散式開發之服務註冊中心、負載均衡、宣告式服務呼叫實現
介紹 本示例主要介紹 Spring Cloud 系列中的 Eureka,使你能快速上手負載均衡、宣告式服務、服務註冊中心等 Eureka Server Eureka 是 Netflix 的子模組,它是一個基於 REST 的服務,用於定位服務,以實現雲端中間層服務發現和故障轉移。 服務註冊和發現對於微服務架
zuul動態路由整合hystrix實現熔斷保護並整合feign實現宣告式服務呼叫
上一篇中。將userService提供服務的返回時間延遲4000ms。導致feign在呼叫時候出發熔斷。直接返回fallback回撥。 這一篇中加入zuul實現動態路由功能。並加入ZuulFilter的前置過濾功能。zuul整合hystrix預設在早期版本是開啟的。但在後期 版本就關閉了自動
SpringCloud學習 - Feign宣告式服務呼叫客戶端//介面方式
Feign宣告式服務呼叫客戶端//介面方式 書籤: 1、小小例子 2、Get多個請求引數處理 小小例子 新建專案:eureka-consumer-feign pom核心配置: <dependency&
SpringCloud學習筆記(3):使用Feign實現宣告式服務呼叫
簡介 Feign是一個宣告式的Web Service客戶端,它簡化了Web服務客戶端的編寫操作,相對於Ribbon+RestTemplate的方式,開發者只需通過簡單的介面和註解來呼叫HTTP API。它支援Spring MVC註解和JAX-RS註解,還支援可插拔式的編碼器和解碼器。整合了Eureka,Rib