
SpringBoot+Maven多模組專案(建立、依賴、打包可執行jar包部署測試)完整流程
開發環境:IDEA,
SprngBoot 2.0.4,
Maven 2.19.1
工程結構:
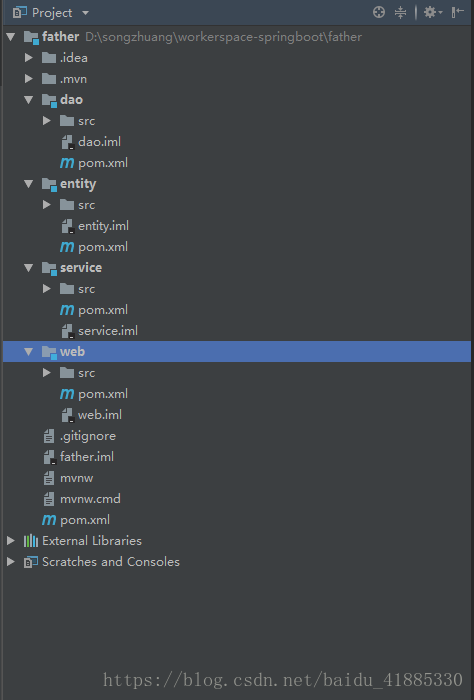
父工程father
子模組 dao (用於持久化資料跟資料庫互動)
子模組 entity (實體類)
子模組 service (處理業務邏輯)
子模組 web (頁面互動接收、傳遞資料,唯一有啟動類的模組)
關係: web依賴 service、dao、entity
service依賴 dao、entity
dao依賴 entity
entity誰都不依賴,獨立的
這裡我用比較常見的工程結構舉例說明,有些公司的專案可能會把模組分的很細,或者會有兩個程式入口,也就是兩個可以啟動的模組!這個我在文章最後會做說明!縷清了思路其實沒那麼複雜!
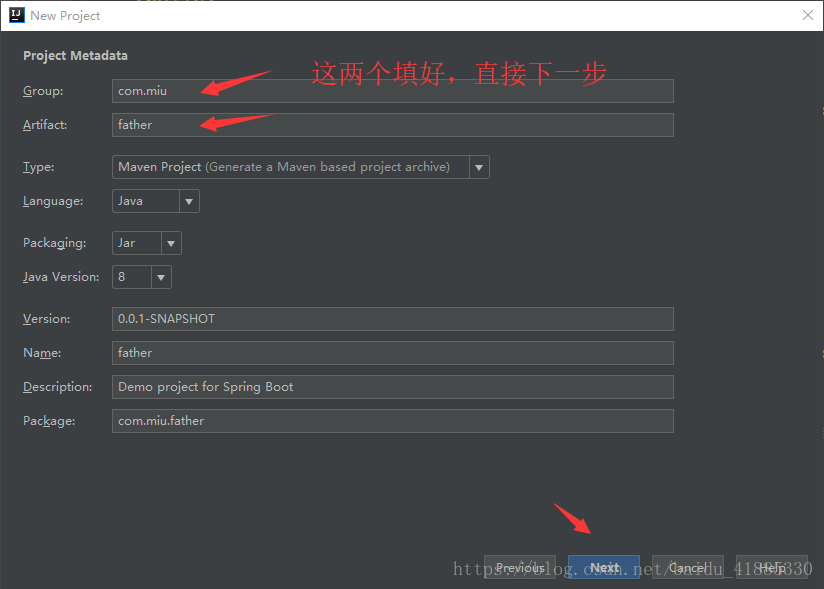
一,建立Maven多模組專案
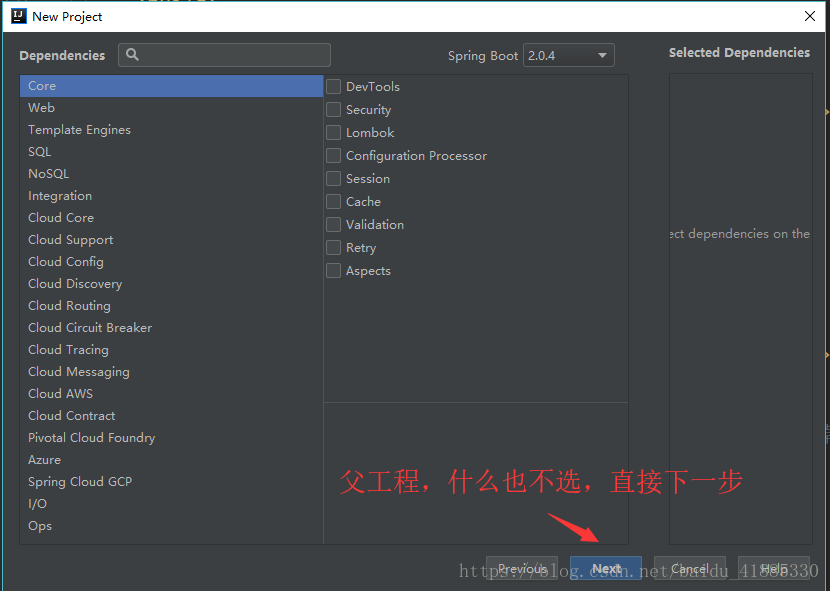
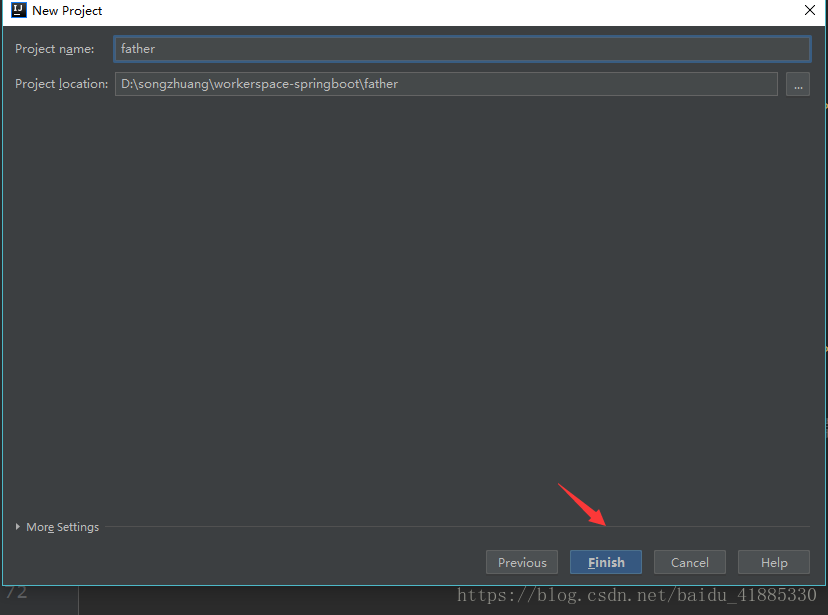
先建立外層父工程 File →new →project 選擇Spring Initializr Next下一步到以下頁面
工程結構如下
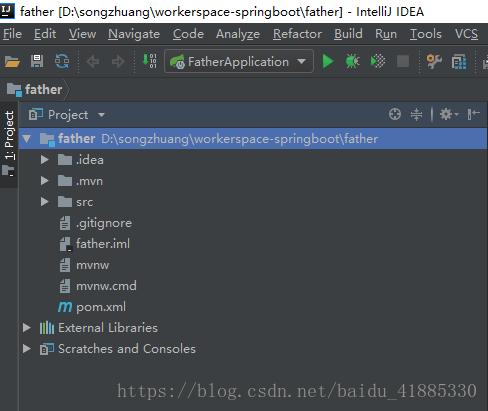
接下來,把src整個刪掉,父工程不需要,因為父工程你就當它只有一個外殼就完了
接下來建立子模組 工程上右鍵 → new → Module 選擇Spring Initaializr 下一步

重複以上動作,建立dao模組,service模組,web模組
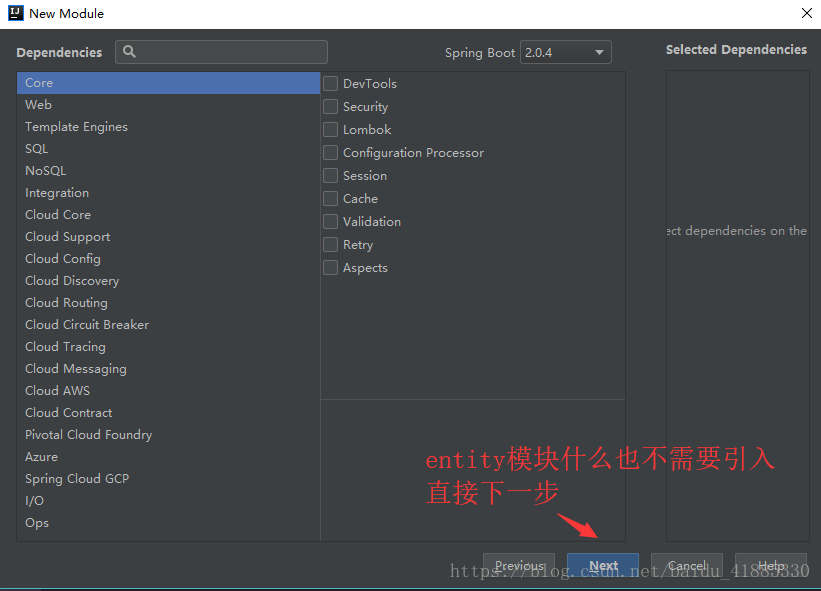
service模組和entity模組一樣什麼都不需要引入
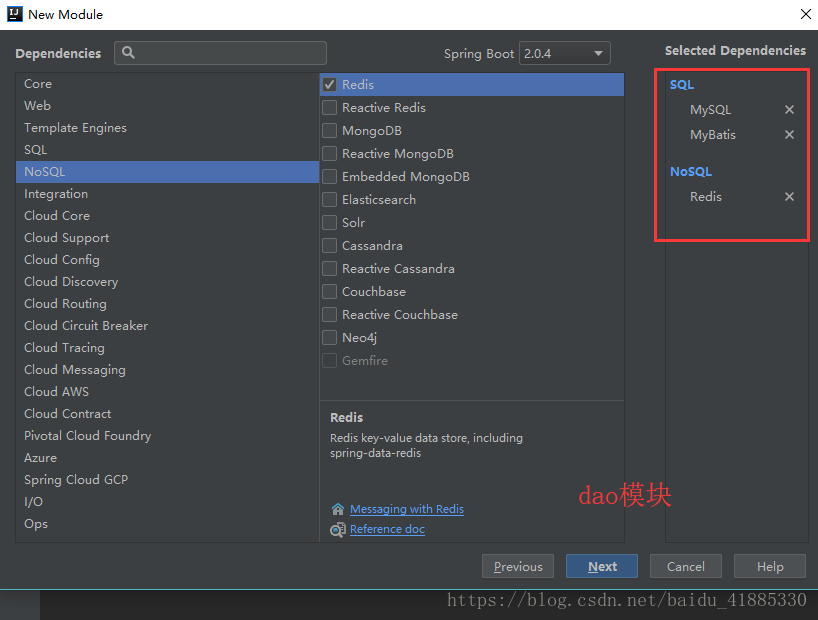
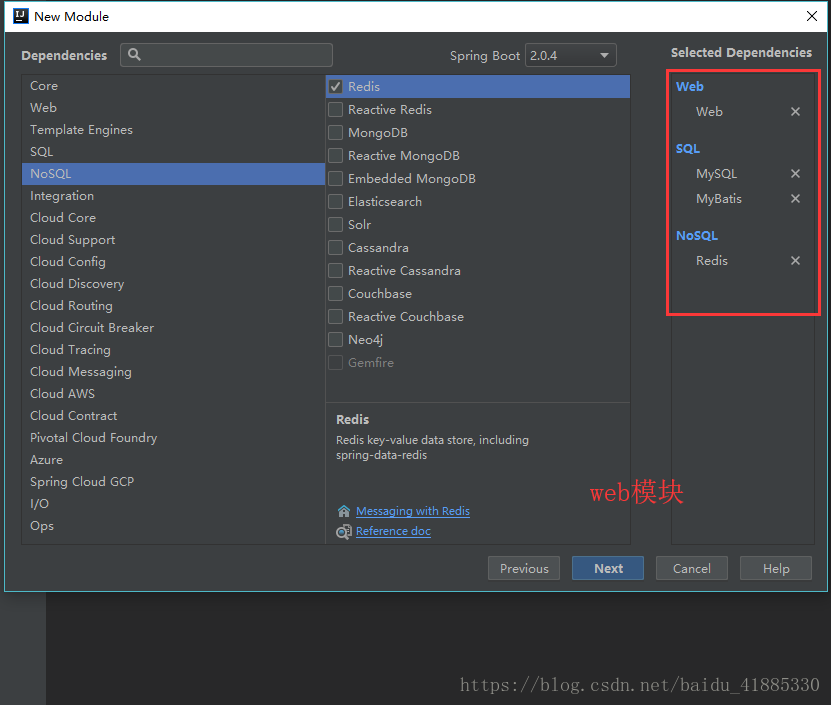
dao模組和web模組可以根據實際需求選擇引入mysql,mybatis,redis,web這些,我把我的貼出來
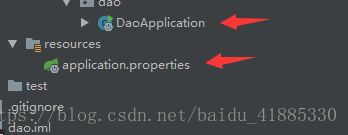
刪除每個子模組中沒用的檔案,.mvn、.gitignore、daoiml、mvnw、mvnw.cmd檔案只留下pom.xml
刪除除了web模組以外其它模組中的Applicatin啟動項,和resources目錄下的application.properties配置檔案
以上動作操作完成以後如果你發現你的子模組變成了資料夾,沒關係,找到Maven Projects重新整理一下就好了

整理過後的專案結構是這樣的
以上專案的基本結構就完成了,接下來建立各自依賴
二、依賴關係
開啟父pom.xml修改打包方式jar為pom,注意:build內容也需要做替換,因為預設的spring-boot-maven-plugin這種方式,等到後期打包的時候他會一直提示你,你引入的依賴不存在!程式碼如下
<?xml version="1.0" encoding="UTF-8"?>
<project xmlns="http://maven.apache.org/POM/4.0.0" xmlns:xsi="http://www.w3.org/2001/XMLSchema-instance"
         xsi:schemaLocation="http://maven.apache.org/POM/4.0.0 http://maven.apache.org/xsd/maven-4.0.0.xsd">
    <modelVersion>4.0.0</modelVersion>
    <!--父pom.xml-->
    <groupId>com.miu</groupId>
    <artifactId>father</artifactId>
    <version>0.0.1-SNAPSHOT</version>
    <packaging>pom</packaging>

    <name>father</name>
    <description>Demo project for Spring Boot</description>

    <parent>
        <groupId>org.springframework.boot</groupId>
        <artifactId>spring-boot-starter-parent</artifactId>
        <version>2.0.4.RELEASE</version>
        <relativePath/> <!-- lookup parent from repository -->
    </parent>

    <properties>
        <project.build.sourceEncoding>UTF-8</project.build.sourceEncoding>
        <project.reporting.outputEncoding>UTF-8</project.reporting.outputEncoding>
        <java.version>1.8</java.version>
    </properties>

    <!--宣告你有四個兒子 -->
    <modules>
        <module>entity</module>
        <module>dao</module>
        <module>service</module>
        <module>web</module>
    </modules>

    <dependencies>
        <dependency>
            <groupId>org.springframework.boot</groupId>
            <artifactId>spring-boot-starter</artifactId>
        </dependency>

        <dependency>
            <groupId>org.springframework.boot</groupId>
            <artifactId>spring-boot-starter-test</artifactId>
            <scope>test</scope>
        </dependency>
    </dependencies>

    <build>
        <plugins>
            <plugin>
                <groupId>org.apache.maven.plugins</groupId>
                <artifactId>maven-compiler-plugin</artifactId>
                <version>3.1</version>
                <configuration>
                    <source>${java.version}</source>
                    <target>${java.version}</target>
                </configuration>
            </plugin>
            <plugin>
                <groupId>org.apache.maven.plugins</groupId>
                <artifactId>maven-surefire-plugin</artifactId>
                <version>2.19.1</version>
                <configuration>
                    <skipTests>true</skipTests>    <!--預設關掉單元測試 -->
                </configuration>
            </plugin>
        </plugins>
    </build>

</project>
這裡有個坑需要注意,dao、service、entity這三個模組的pom.xml檔案中不需要build 內容,直接幹掉
entity 的 pom.xml 內容
<?xml version="1.0" encoding="UTF-8"?>
<project xmlns="http://maven.apache.org/POM/4.0.0" xmlns:xsi="http://www.w3.org/2001/XMLSchema-instance"
         xsi:schemaLocation="http://maven.apache.org/POM/4.0.0 http://maven.apache.org/xsd/maven-4.0.0.xsd">
    <modelVersion>4.0.0</modelVersion>
    <groupId>com.miu</groupId>
    <artifactId>entity</artifactId>
    <version>0.0.1-SNAPSHOT</version>
    <packaging>jar</packaging>
    <name>entity</name>
    <description>Demo project for Spring Boot</description>
    <!--宣告父模組-->
    <parent>
        <groupId>com.miu</groupId>
        <artifactId>father</artifactId>
        <version>0.0.1-SNAPSHOT</version>
        <relativePath>../pom.xml</relativePath>
    </parent>
    <properties>
        <project.build.sourceEncoding>UTF-8</project.build.sourceEncoding>
        <project.reporting.outputEncoding>UTF-8</project.reporting.outputEncoding>
        <java.version>1.8</java.version>
    </properties>
    <dependencies>
        <dependency>
            <groupId>org.springframework.boot</groupId>
            <artifactId>spring-boot-starter</artifactId>
        </dependency>
        <dependency>
            <groupId>org.springframework.boot</groupId>
            <artifactId>spring-boot-starter-test</artifactId>
            <scope>test</scope>
        </dependency>
    </dependencies>
</project>
dao 的 pom.xml 內容
<?xml version="1.0" encoding="UTF-8"?>
<project xmlns="http://maven.apache.org/POM/4.0.0" xmlns:xsi="http://www.w3.org/2001/XMLSchema-instance"
         xsi:schemaLocation="http://maven.apache.org/POM/4.0.0 http://maven.apache.org/xsd/maven-4.0.0.xsd">
    <modelVersion>4.0.0</modelVersion>
    <!--dao 模組 pom.xml-->
    <groupId>com.miu</groupId>
    <artifactId>dao</artifactId>
    <version>0.0.1-SNAPSHOT</version>
    <packaging>jar</packaging>
    <name>dao</name>
    <description>Demo project for Spring Boot</description>
    <!--宣告父模組-->
    <parent>
        <groupId>com.miu</groupId>
        <artifactId>father</artifactId>
        <version>0.0.1-SNAPSHOT</version>
        <relativePath>../pom.xml</relativePath>
    </parent>
    <properties>
        <project.build.sourceEncoding>UTF-8</project.build.sourceEncoding>
        <project.reporting.outputEncoding>UTF-8</project.reporting.outputEncoding>
        <java.version>1.8</java.version>
    </properties>
    <dependencies>
        <dependency>
            <groupId>org.springframework.boot</groupId>
            <artifactId>spring-boot-starter-data-redis</artifactId>
        </dependency>
        <dependency>
            <groupId>org.mybatis.spring.boot</groupId>
            <artifactId>mybatis-spring-boot-starter</artifactId>
            <version>1.3.2</version>
        </dependency>
        <dependency>
            <groupId>mysql</groupId>
            <artifactId>mysql-connector-java</artifactId>
            <scope>runtime</scope>
        </dependency>
        <dependency>
            <groupId>org.springframework.boot</groupId>
            <artifactId>spring-boot-starter-test</artifactId>
            <scope>test</scope>
        </dependency>
        <!--dao 模組 引入entity模組-->
        <dependency>
            <groupId>com.miu</groupId>
            <artifactId>entity</artifactId>
            <version>0.0.1-SNAPSHOT</version>
        </dependency>
    </dependencies>
</project>
service 模組的 pom.xml 內容
<?xml version="1.0" encoding="UTF-8"?>
<project xmlns="http://maven.apache.org/POM/4.0.0" xmlns:xsi="http://www.w3.org/2001/XMLSchema-instance"
         xsi:schemaLocation="http://maven.apache.org/POM/4.0.0 http://maven.apache.org/xsd/maven-4.0.0.xsd">
    <modelVersion>4.0.0</modelVersion>

    <groupId>com.miu</groupId>
    <artifactId>service</artifactId>
    <version>0.0.1-SNAPSHOT</version>
    <packaging>jar</packaging>

    <name>service</name>
    <description>Demo project for Spring Boot</description>
    <!--宣告父模組-->
    <parent>
        <groupId>com.miu</groupId>
        <artifactId>father</artifactId>
        <version>0.0.1-SNAPSHOT</version>
        <relativePath>../pom.xml</relativePath>
    </parent>
    <properties>
        <project.build.sourceEncoding>UTF-8</project.build.sourceEncoding>
        <project.reporting.outputEncoding>UTF-8</project.reporting.outputEncoding>
        <java.version>1.8</java.version>
    </properties>
    <dependencies>
        <dependency>
            <groupId>org.springframework.boot</groupId>
            <artifactId>spring-boot-starter</artifactId>
        </dependency>
        <dependency>
            <groupId>org.springframework.boot</groupId>
            <artifactId>spring-boot-starter-test</artifactId>
            <scope>test</scope>
        </dependency>
        <!--service模組 引入entity模組-->
        <dependency>
            <groupId>com.miu</groupId>
            <artifactId>entity</artifactId>
            <version>0.0.1-SNAPSHOT</version>
        </dependency>
        <!--service模組 引入dao模組-->
        <dependency>
            <groupId>com.miu</groupId>
            <artifactId>dao</artifactId>
            <version>0.0.1-SNAPSHOT</version>
        </dependency>
    </dependencies>
</project>
web模組的 pom.xml 內容
注意build部分,因為web模組作為程式的入口啟動,所以它需要打包,並且要指定Main Class
<?xml version="1.0" encoding="UTF-8"?>
<project xmlns="http://maven.apache.org/POM/4.0.0" xmlns:xsi="http://www.w3.org/2001/XMLSchema-instance"
         xsi:schemaLocation="http://maven.apache.org/POM/4.0.0 http://maven.apache.org/xsd/maven-4.0.0.xsd">
    <modelVersion>4.0.0</modelVersion>
    <groupId>com.miu</groupId>
    <artifactId>web</artifactId>
    <version>0.0.1-SNAPSHOT</version>
    <packaging>jar</packaging>
    <name>web</name>
    <description>Demo project for Spring Boot</description>
    <!--宣告父模組-->
    <parent>
        <groupId>com.miu</groupId>
        <artifactId>father</artifactId>
        <version>0.0.1-SNAPSHOT</version>
        <relativePath>../pom.xml</relativePath>
    </parent>
    <properties>
        <project.build.sourceEncoding>UTF-8</project.build.sourceEncoding>
        <project.reporting.outputEncoding>UTF-8</project.reporting.outputEncoding>
        <java.version>1.8</java.version>
    </properties>
    <dependencies>
        <dependency>
            <groupId>org.springframework.boot</groupId>
            <artifactId>spring-boot-starter-data-redis</artifactId>
        </dependency>
        <dependency>
            <groupId>org.springframework.boot</groupId>
            <artifactId>spring-boot-starter-web</artifactId>
        </dependency>
        <dependency>
            <groupId>org.mybatis.spring.boot</groupId>
            <artifactId>mybatis-spring-boot-starter</artifactId>
            <version>1.3.2</version>
        </dependency>
        <dependency>
            <groupId>mysql</groupId>
            <artifactId>mysql-connector-java</artifactId>
            <scope>runtime</scope>
        </dependency>
        <dependency>
            <groupId>org.springframework.boot</groupId>
            <artifactId>spring-boot-starter-test</artifactId>
            <scope>test</scope>
        </dependency>
        <!--web模組 引入entity模組-->
        <dependency>
            <groupId>com.miu</groupId>
            <artifactId>entity</artifactId>
            <version>0.0.1-SNAPSHOT</version>
        </dependency>
        <!--web模組 引入service模組-->
        <dependency>
            <groupId>com.miu</groupId>
            <artifactId>service</artifactId>
            <version>0.0.1-SNAPSHOT</version>
        </dependency>
        <!--web模組 引入dao模組-->
        <dependency>
            <groupId>com.miu</groupId>
            <artifactId>dao</artifactId>
            <version>0.0.1-SNAPSHOT</version>
        </dependency>
    </dependencies>
    <build>
        <plugins>
            <plugin>
                <groupId>org.springframework.boot</groupId>
                <artifactId>spring-boot-maven-plugin</artifactId>
                <configuration>
                    <!-- 指定該Main Class為全域性的唯一入口 -->
                    <mainClass>com.miu.web.WebApplication</mainClass>
                    <layout>ZIP</layout>
                </configuration>
                <executions>
                    <execution>
                        <goals>
                            <goal>repackage</goal><!--可以把依賴的包都打包到生成的Jar包中-->
                        </goals>
                    </execution>
                </executions>
            </plugin>
        </plugins>
    </build>
</project>
到此為止所有的依賴全部完成!接下來就是測試!這裡只用簡單的測試來實驗!
三、程式碼測試
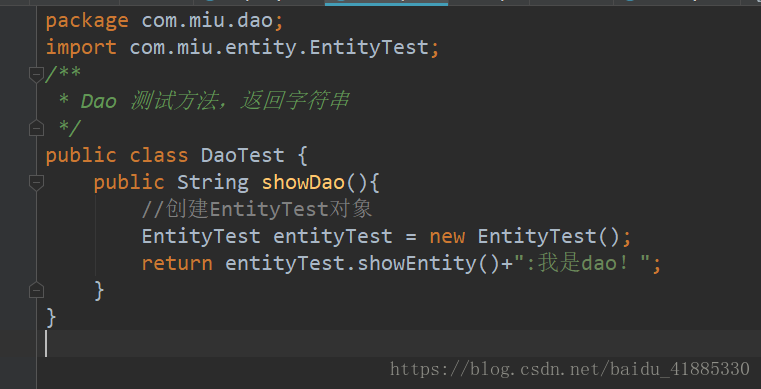
entity模組中建立 EntiyTest類

dao模組中建立 DaoTest類
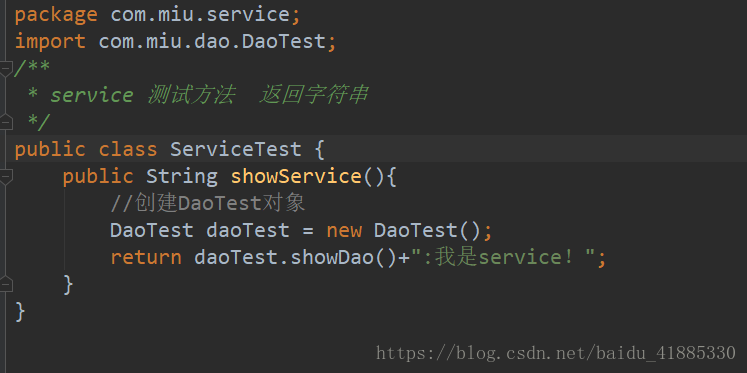
service模組中建立ServiceTest類
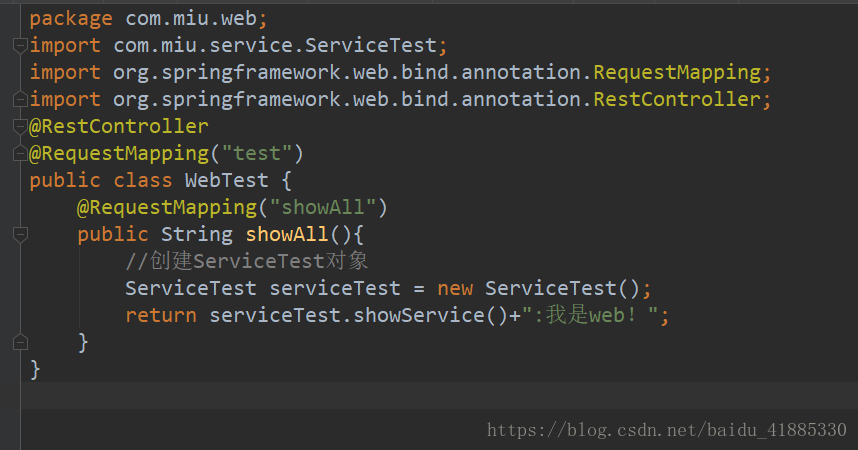
Web模組中建立WebTest類
最後把web模組中的application.properties檔案補充一下就OK了,因為引入了mysql,redis等配置,所以資料來源是要配的,不然執行起來會報錯找不到資料來源!
server.port=8080
#-----------------------------------資料庫配置----------------------------------------
spring.datasource.driver-class-name=com.mysql.jdbc.Driver
spring.datasource.url=jdbc:mysql://127.0.0.1:3306/test?characterEncoding=utf8
spring.datasource.username=root
spring.datasource.password=123
#------------------------------------redis配置---------------------------------------
spring.redis.database=0
spring.redis.host=127.0.0.1
spring.redis.port=6379
spring.redis.password=
spring.redis.jedis.pool.max-active=8
spring.redis.jedis.pool.max-idle=8
spring.redis.jedis.pool.max-wait=-1ms
spring.redis.jedis.pool.min-idle=0
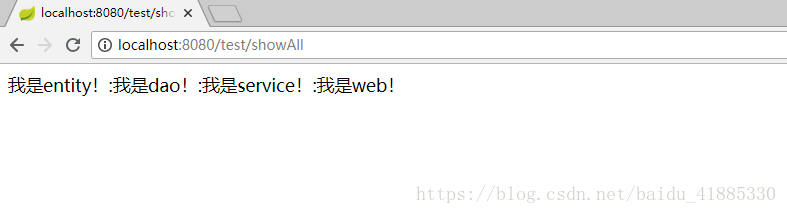
spring.redis.timeout=10000ms一切準備就緒,開始執行web模組下的啟動類進行測試
四、打包可執行jar
看到上面的頁面就證明模組之間的依賴沒有問題,呼叫正常,我這裡是用簡單的建立物件的這種方式來操作的,實際開發並不是這種操作,大部分都是通過 @Autowired 註解 來實現的注入,這裡我就不做演示了,只要模組之間呼叫沒問題,剩下的就是鋪程式碼的事了,接下來還有最後一個打包問題,為什麼要囉嗦那麼多還要說打包問題呢,因為我建議在專案架構之初,除了搭框架以外,最好是在最開始的時候就測試一下打包,尤其是這種多模組專案之間各種依賴的這種工程的打包,如果等你程式碼寫的鋪天蓋地的時候你在去想怎麼打包,到時候有你頭疼的!如果你是按照我本章的流程一步步下來的話,那麼你完全不用擔心打包問題,因為所有的pom.xml有已經配置好了,只需要動手執行 package打包動作就行了,第一次打包不需要clean,記住以後每次打包之前clean一下,關於為什麼打jar包,不打war包這個問題,還有其它會遇到的問題,在文章最後會做說明!
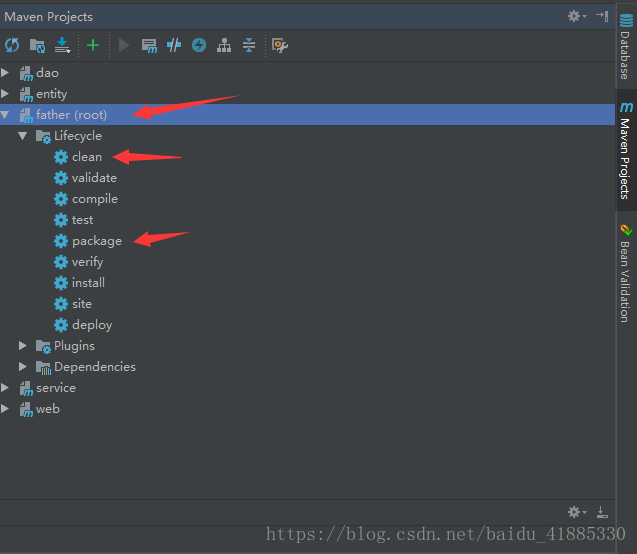
雙擊執行package,看到BUILD SUCCESS 就證明打包成功了,如此簡單?告訴你就是這麼簡單,前提是你的每一個模組下的pom.xml要配置好,誰需要打包,誰不需要打包,誰依賴誰,父工程是否聲明瞭子模組,子模組是否聲明瞭父工程是誰,這些是重點!

接下來去找你工程目錄,web資料夾下的target資料夾,剛才打包好的jar檔案,就放在這裡了
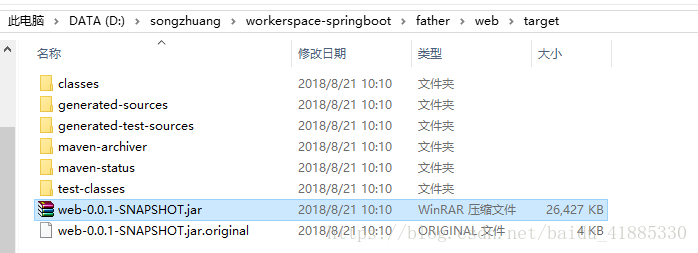
然後我把這個jar檔案上傳到我的測試伺服器,使用 java -jar web-0.0.1-SNAPSHOT.jar 命令來測試執行打包的可執行jar檔案到底行不行!

執行成功,輸入我測試伺服器地址測試也沒問題,到此為止全部搞定

聚合工程舉一個簡單的例子,
整個工程你就當作一個公司,父工程(退休了什麼也不幹)只需要宣告有幾個兒子(子模組)就完事了,
子模組web宣告父工程是誰,就當他是大兒子,公司他管事,pom.xml檔案需要打包,需要build配置,需要其它三個兄弟幫助
其它子模組宣告父工程是誰,之間關係都是兄弟,不需要打包,哪裡需要去哪裡!
在此我說一下重點和需要注意的地方!
1.父pom.xml 打包方式,jar要更改為pom,build 需要更改
2.不需要打包的模組pom.xml檔案中不要寫<build>,全刪掉,例如有些工程中的common模組,utils模組,entity模組,service模 塊都不需要打包
3.宣告父工程時,填寫父工程位置<relativePath>../pom.xml</relativePath>
4.關於applicatin.properties配置檔案,只需要在啟動的模組中配置就可以了,
5.關於打包為什麼打包jar包,不打war包,打war包目的是war包可以執行在tomcat下,但是SpringBoot是內建tomcat,如果你打war包,前提是幹掉內建的tomcat,然後才能打包,各種麻煩,直接打包可執行jar包,使用java -jar 命令就可以完美的執行起來很方便!
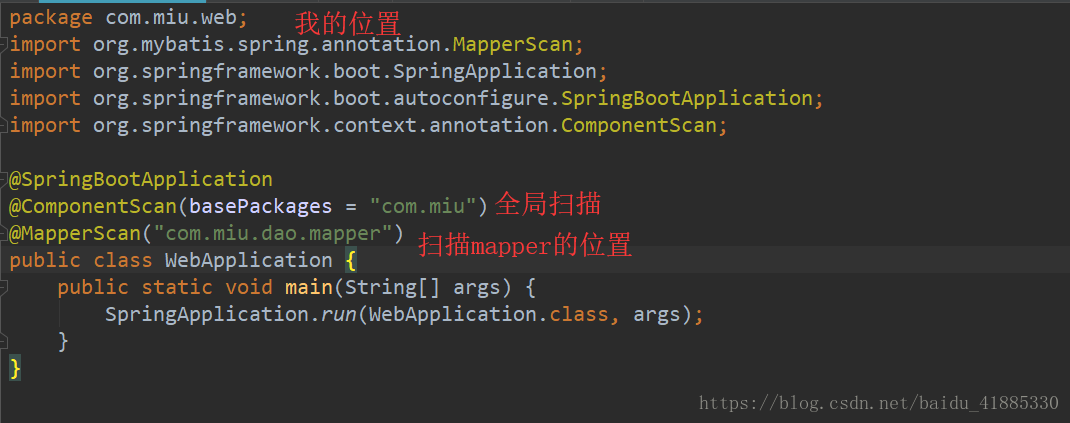
6.真實開發中使用@Autowired 註解 來實現注入,而不是new物件這種方式,所以可能會產生注入以後報錯,是因為你的啟動類上沒有配置掃描,使用
@ComponentScan(basePackages = "你的路徑")註解來解決,如果你使用的持久層是Mybatis,那麼你的mapper也需要掃描,在啟動類上使用
@MapperScan("你的mapper檔案地址")註解來解決,算了還是貼個圖片吧
不羅嗦了,就到這裡吧,一個文章寫了兩個小時可見我的良苦用心,(關鍵是我被這個多模組打包問題困擾了好長時間,網上各種找解決辦法,說的天花亂墜,狗屁不通,服的五體投地)
相關推薦
SpringBoot+Maven多模組專案(建立、依賴、打包可執行jar包部署測試)完整流程
開發環境:IDEA, SprngBoot 2.0.4, Maven 2.19.1 工程結構: 父工程father
Springboot整合dubbo構建maven多模組專案(一)- 專案建立和pom.xml中jar包配置
以前一直用Spring作為容器構建專案,但是看到Spring官網一直在推Springboot,最重要的是Springboot確實避免自己尋找多個jar包(大多數情況下,可能自己都不記得該引入哪些jar包)和jar包之間衝突的問題,同時省掉了在整合其他框架時候
Springboot整合dubbo構建maven多模組專案(四)
在中,我們配置了一個dubbo專案,包含三個模組springboot-dubbo-api、springboot-dubbo-server和springboot-dubbo-client,並且在springboot-dubbo-server和springboot-dubbo-c
SpringBoot+Maven 多模組專案的構建、執行、打包實戰
專案使用的工具: IntelliJ IDEA JDK 1.8 apache-maven-3.3.9 專案的目錄: 主專案 springboot-multi 子模組 entity、dao、service、web 一、使用IDEA建立一個Spring
Springboot+Maven多模組開發 (一)初始化工程(新建第一個web工程)
學習Springboot+maven多模組開發筆記。 首先建立一個空專案,新建一個pom檔案,該pom檔案是整個工程的parent pom。 pom檔案內容如下: <pre name="code" class="html"><?xml version
STS(Eclipse)構建Maven多模組專案(水平結構和樹形結構)
在配置完Java開發環境和MAVEN後,我們來建立專案 STS(Eclipse)下載 請到官網http://spring.io/tools/sts/all/ 下載STS最新版 然後放到G盤,然後解壓到當前 G:\sts-bundle\
maven打包可執行jar包
version 打開 print cto tid directory tor group XML 創建一個文件夾haha,裏面包含三項 Haha.java Main.java pom.xml pom.xml <?xml version="1.0"
maven外掛打包可執行jar包到docker
pom.xml檔案新增docker外掛 <build> <plugins> <!-- docker的maven外掛,官網:https://github.com/spotify/docker-maven-plugin --> &l
spring boot maven打包可執行jar包
普通打包之後在程式目錄執行,或者編寫bat執行時會提示“沒有主清單屬性”,這是因為並沒有找到main()方法,需要我們指明告訴java程式 我bat中的程式碼 @echo off title mytitle java -jar ysl-ts-web-base-1.0-SNAPSHOT.jar pause
利用MAVEN打包可執行jar包,包括依賴的第三方包
看下專案pom.xml的配置,首先要配置maven-jar-plugin,把自己的程式碼編譯打包成jar檔案,然後配置maven-assembly-plugin,把整個專案打包成一個釋出包。 Xml程式碼 收藏程式碼 <build> <pl
maven 打包可執行jar包
Maven可以使用mvn package指令對專案進行打包,如果使用Java -jar xxx.jar執行執行jar檔案,會出現"no main manifest attribute, in xxx.jar"(沒有設定Main-Class)、ClassNotFou
maven 打包可執行jar包的坑
寫作背景:首先是從20天的年假回來,新年的第一個任務是將使用者行為系統自動化。需要將Java專案打包成一個可執行的jar包,讓shell指令碼定時執行。 我一直習慣於用maven的maven install打包,在打包之前maven clean清理。於是,my
Maven如何打包可執行jar包
假設我有一個maven專案叫:hello-world 新建一個HelloWorld類: package com.dylan.mvnbook.helloworld; public class HelloWorld { public String sayHello() {
Maven 如何打包可執行jar包
目標 解決可執行jar包的打包問題;上一篇文章我們介紹了mvn package可以打包,那麼如果是一個可執行的jar包,該如何打包呢? 可以執行jar 擁有函式入口(public
SpringBoot建立maven多模組專案
SpringBoot建立maven多模組專案 專案結構 該專案名稱為springboot-maven-multi,由springboot-maven-multi、user-dao、user-domain、user-service、user-web個模組組成,其中spring
(一) Eclipse建立Maven多模組專案
在eclipse下構建maven專案,該專案由多個子模組組成。 1.建立一個父專案 NEW –>project–>maven–>maven Project,點選下一步,進入new
基於maven使用IDEA搭建和部署SpringBoot多模組專案(Multi-Module)
What matters in life is not what happens to you but what you remember and how you remember it. 生命中真正重要的不是你遭遇了什麼,而是你記住了哪些事,又是如
SpringBoot 多模組專案(module)Service自動注入(@Autowired)空指標錯誤解決
報錯資訊,這個我是截了上一部分,為了省空間下部分我就用...代替了。 java.lang.NullPointerException at com.jd.impl.UploadServiceImpl.uploadBlock(UploadServiceImpl.java:39)
springboot的maven多模組專案架構微服務搭建--跳過springmvc單一專案直接構建多模組並衍化為微服務專案
總想對微服務架構做一個小小的總結,不知如何下手,最近覺得還是從搭建微服務的過程來入手,對於springboot的maven專案從構建多模組架構進而衍化為常用的微服務架構來做個記錄吧。 首先,建立多個springboot專案,專案結構如圖: 裁剪後如右側 建立完成後,先解釋一下:s
springboot的maven多模組專案架構微服務搭建——依賴方式的多模組演化為微服務專案
在上一篇依賴方式多模組的基礎上對專案進行改造。主要改造user-service專案,service要配置mapper。mybatis及資料庫相關的東西,後面的介面消費方user就不再需要了 注意:以下程式碼是在不同場所的機器上寫的,資料庫什麼的會有不同,結構也會有不同,最終的程式碼會以其中一個傳遞到本人gi