
Ant之build.xml配置詳解
前言
國內關於build.xml的配置資料太零散了,實在是受不了,故而將自己的筆記整理成博文,方便大家查閱和理解。
build.xml配置引數
構建檔案預設叫build.xml,其有很多配置引數。
project
每個構建檔案都有一個project標籤,有以下屬性:
- default:表示預設的執行目標,這個屬性是必須的。
- basedir:表示專案的基準目錄。
- name:表示專案名。
- description:表示專案的描述。
如下:

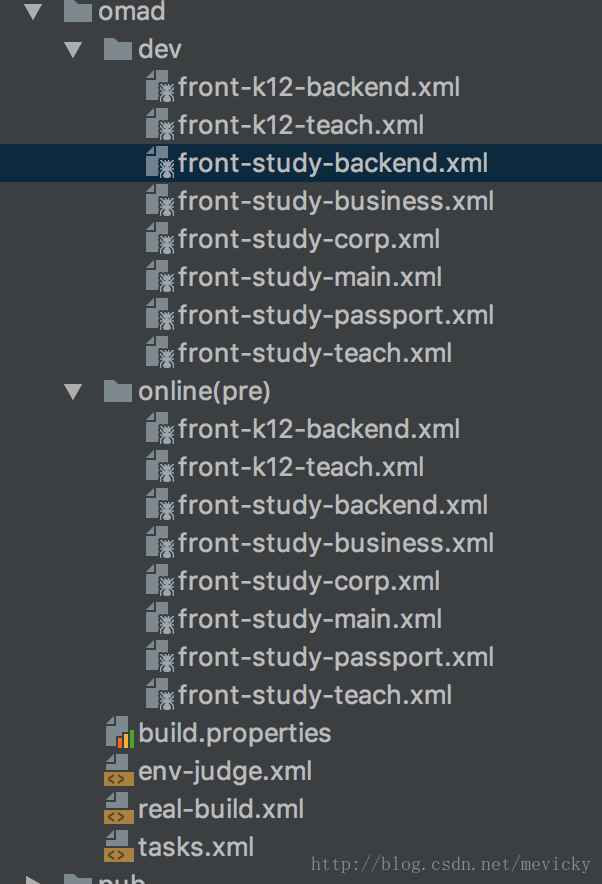
每個專案對應一個構建檔案,但是如果專案比較複雜,業務線比較多,則有可能對應很多個構建檔案,比如:
這時我們需要注意,每個構建檔案都需要以project標籤包含起來
property
類似於常量,可以供給build.xml中的其他標籤使用。有兩個特點:
- 大小寫敏感
- 不可改變,誰先設定,之後的都不能改變。
該標籤可以與多個屬性配合使用。
- name和value: <property name="module_name" value="admin"/>
後面直接使用即可: <echo message="begin nej-build ${module_name}..."/>
- name和refid: <property name="srcpath" refid="dao.compile.classpath"/>
其中的dao.compile.classpath在別的地方進行了定義。當然,也可以通過直接引用的方式:
<property name="baseline.dir" value="${ob_baseline.dir}"/> - name和location:
<property name="srcdir" location="src"/> 將srcdir的值設定為當前檔案路徑/src。
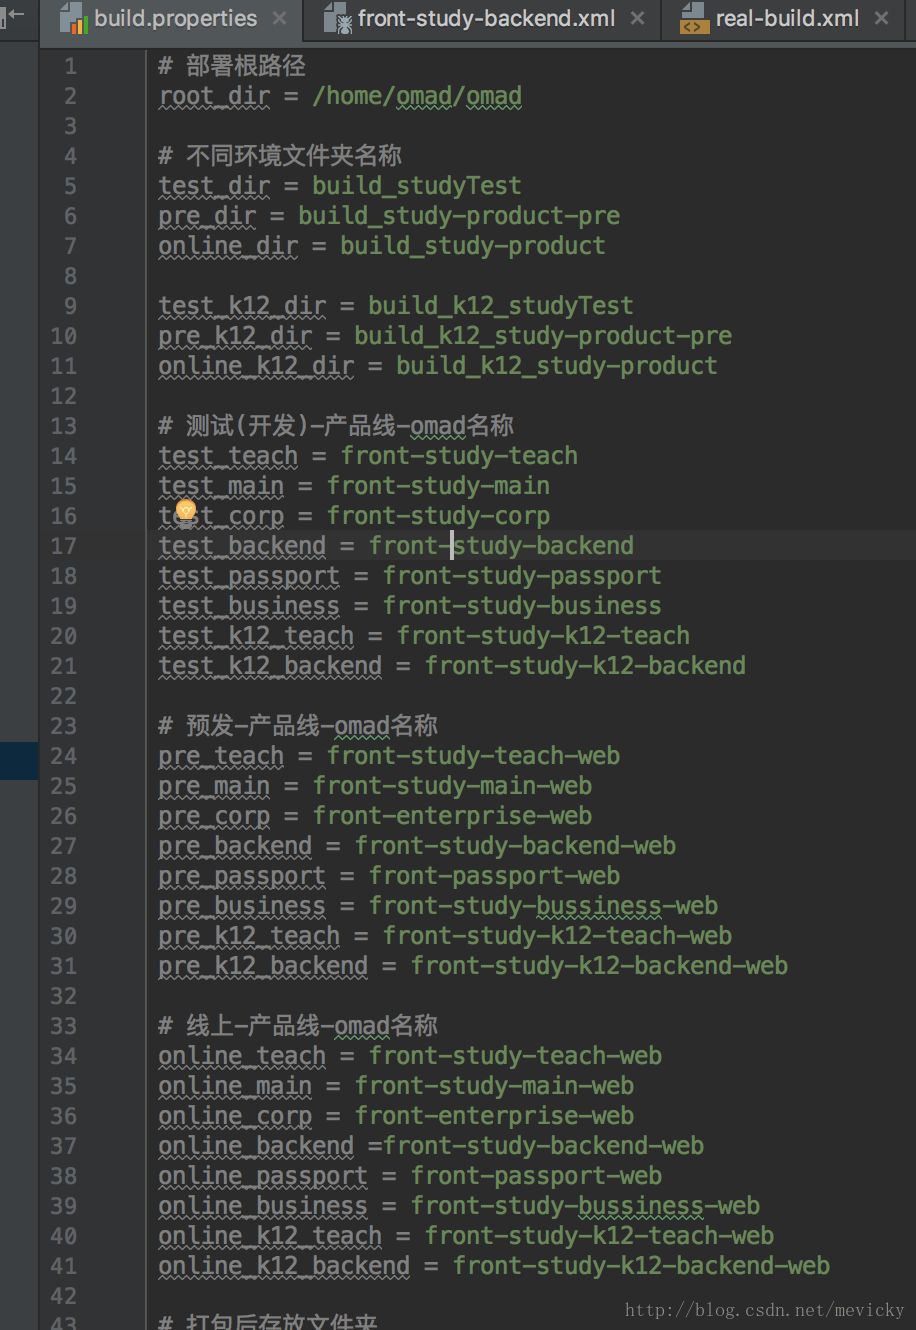
- file:
<property file="./omad/build.properties"/> 匯入相對檔案中的所有變數,這裡的build.properties專門用來存放各種變數,示例如下:
- url:
<property url="http://www.mysite.com/bla/props/foo.properties"/>
匯入對應檔案的屬性 - environment:
<property environment="env"/>
設定系統的環境變數字首為env。比如<property name="tomcat.home" value="${env.CATALINA_HOME}"/>
將系統的tomcat安裝目錄設定到tomcat.home屬性中。
import
引入別的xml檔案,提高複用性:
<import file="./env-judge.xml"/>
<import file="./tasks.xml"/>- 1
- 2
甚至可以批量匹配:
<copy todir="${basedir}/src/html/${html.dir}" overwrite="true" includeEmptyDirs="true">
    <fileset dir="${basedir}/lib">
        <include name="module-*/**" />
    </fileset>
</copy>- 1
- 2
- 3
- 4
- 5
target
任務,一個project標籤下有一個或多個target標籤,代表任務,任務間可以存在依賴關係。有如下屬性:
- name:用於標識,這個是必須的
- depends:用來指定所依賴的任務。
<!-- 初始化任務 -->
<target name="init">
    <echo message="  init ${init}   ..."/>
</target>

<!-- 編譯 -->
<target name="compile" depends="init">
    <delete dir="${classes.dir}" />
    <mkdir dir="${classes.dir}" />
    <javac srcdir="${src.dir}" destdir="${classes.dir}">
        <classpath refid="master-classpath" />
    </javac>
</target> - 1
- 2
- 3
- 4
- 5
- 6
- 7
- 8
- 9
- 10
- 11
- 12
- 13
- if:當屬性設定時才執行該任務。
<target name="sync_module_k12_teach" if="${is_k12_teach}">
    <antcall target="sync_module_item">
        <param name="html.dir" value="org"/>
    </antcall>
</target>

<target name="sync_module_backend" if="${is_backend}">
    <antcall target="sync_module_item">
        <param name="html.dir" value="admin"/>
    </antcall>
</target>

<target name="sync_module_k12_backend" if="${is_k12_backend}">
    <antcall target="sync_module_item">
        <param name="html.dir" value="admin"/>
    </antcall>
</target>- 1
- 2
- 3
- 4
- 5
- 6
- 7
- 8
- 9
- 10
- 11
- 12
- 13
- 14
- 15
- 16
- 17
通過判斷變數是否存在,執行不同的任務。
- unless:當屬性未設定時才執行。
- description:任務描述。
echo
控制檯顯示
<echo message="begin clean res/module-xx、component-xx、res-base..."/>- 1
delete
刪除檔案或檔案目錄,有如下屬性
- file:刪除檔案
- dir:刪除目錄
- includeEmptyDirs:值得是否刪除空目錄,預設是true
- failonerror:報錯是否停止,預設是true
- verbose:是否列出刪除的檔案,預設是false
示例如下:
<!--clean other dir-->
    <target name="clean_other_dir">
        <echo message="begin clean_other_dir..."/>
        <delete dir="${basedir}/${compress.dir}"/>
        <delete dir="${basedir}/pub"/>
        <echo message="begin clean html module-xx..."/>
        <delete includeemptydirs="true">
            <fileset dir="${basedir}/src/html" >
                <include name="**/module-*/**"/>
            </fileset>
        </delete>
        <echo message="begin clean res/module-xx、component-xx、res-base..."/>
        <delete includeemptydirs="true">
            <fileset dir="${basedir}/res" >
                <include name="module-*/**"/>
                <include name="component-*/**"/>
                <include name="res-base/**"/>
            </fileset>
        </delete>
</target>- 1
- 2
- 3
- 4
- 5
- 6
- 7
- 8
- 9
- 10
- 11
- 12
- 13
- 14
- 15
- 16
- 17
- 18
- 19
- 20
mkdir
建立一個目錄
<mkdir dir=”${class.root}”/>- 1
copy
拷貝檔案或檔案目錄,屬性如下:
- file:表示原始檔。
- tofile:表示目標檔案。
- todir:表示目標目錄。
- overwrite:是否覆蓋目標檔案,預設為false。
- includeEmptyDirs:是否拷貝空目錄,預設為true。
- failonerror:如目標沒有發現是否自動停止,預設值true。
- verbose:是否顯示詳細資訊,預設值false。
示例:
<target name="cp">
    <copy todir="${compress.dir}" overwrite="true">
         <fileset dir="${ob_baseline.dir}">
            <include name="pub/" />
            <include name="res/" />
            <include name="mail_template/" />
         </fileset>
    </copy>
</target>- 1
- 2
- 3
- 4
- 5
- 6
- 7
- 8
- 9
fileset
檔案集標籤,通常與任務結合來使用,例如上面的copy的demo中,通過將fileset定義的檔案路徑下的檔案,拷貝到todir指定的路徑中。
也可以用於批量刪除:
<delete includeemptydirs="true">
    <fileset dir="${basedir}/src/html" >
        <include name="**/module-*/**"/>
    </fileset>
</delete>
<echo message="begin clean res/module-xx、component-xx、res-base..."/>
<delete includeemptydirs="true">
    <fileset dir="${basedir}/res" >
        <include name="module-*/**"/>
        <include name="component-*/**"/>
        <include name="res-base/**"/>
    </fileset>
</delete>- 1
- 2
- 3
- 4
- 5
- 6
- 7
- 8
- 9
- 10
- 11
- 12
- 13
也就是說,但凡遇到檔案集操作,都需要用到fileset標籤。
exec
用來執行系統命令,或者指定環境的命令。
比如:
<target name="test">
    <exec executable="cmd.exe">
        <arg line="/c dir"/>
    </exec>
</target>- 1
- 2
- 3
- 4
- 5
開啟命名行,並轉到c盤執行dir命令。
能夠執行系統命令,就相當於可以執行各種環境比如node、gulp、bower等等:
<!--build style-->
<target name="build_style">
    <echo message="begin build_style..."/>
    <exec dir="." executable="gulp" failonerror="true">
        <arg line="scss"/>
    </exec>
</target>

<!--bower cache clean if必須是${]才是判斷true,false, 否則只要有設定值即可執行-->
<target name="bower_cache_clean" if="${is_bower_cache_clean}">
    <echo message="begin bower_cache_clean ..."/>
    <exec dir="." executable="bower" failonerror="true">
        <arg line="cache clean" />
    </exec>
</target>- 1
- 2
- 3
- 4
- 5
- 6
- 7
- 8
- 9
- 10
- 11
- 12
- 13
- 14
- 15
antcall
執行某個定義的任務。
<target name="sync_module_teach" if="${is_teach}">
    <antcall target="sync_module_item">
        <param name="html.dir" value="org"/>
    </antcall>
</target>- 1
- 2
- 3
- 4
- 5
執行sync_module_item任務,並設定引數html.dir的值為org。
該任務定義如下:
<target name="sync_module_item">
    <echo message="begin sync_module ${html.dir}..."/>
    <copy todir="${basedir}/src/html/${html.dir}" overwrite="true" includeEmptyDirs="true">
        <fileset dir="${basedir}/lib">
            <include name="module-*/**" />
        </fileset>
    </copy>
</target>- 1
- 2
- 3
- 4
- 5
- 6
- 7
- 8
或者更為簡單的表達:
<target name="deploy">
    <echo message="begin auto deploy......"/>
    <antcall target="clean"/>
    <antcall target="bower_install"/>
    <antcall target="cnpm_install"/>
    <antcall target="sync_module"/>
    <antcall target="build_style"/>
    <antcall target="nej_build" />
    <antcall target="cp"/>
</target>- 1
- 2
- 3
- 4
- 5
- 6
- 7
- 8
- 9
- 10
parallel
並行執行多個子任務。
<parallel failonany="true">
    <antcall target="sync_module_corp"/>
    <antcall target="sync_module_main"/>
    <antcall target="sync_module_teach"/>
    <antcall target="sync_module_backend"/>
    <antcall target="sync_module_passport"/>
    <antcall target="sync_module_business"/>
    <antcall target="sync_module_k12_teach"/>
    <antcall target="sync_module_k12_backend"/>

    <antcall target="build_style"/>
</parallel>- 1
- 2
- 3
- 4
- 5
- 6
- 7
- 8
- 9
- 10
- 11
- 12
通過failonany控制如果一個失敗,則不執行。通過並行執行,來提升效能,降低構建花費的時間。
regexp
用於正則的定義的使用,可以與matches結合使用。
比如,定義正則:
<regexp id="regexp_env_test" pattern="^${root_dir}/(${test_dir}|${test_k12_dir})/.+"/>
<regexp id="regexp_env_pre" pattern="^${root_dir}/(${pre_dir}|${pre_k12_dir})/.+"/>- 1
- 2
通過pattern指定正則內容,通過id標識。
在需要匹配的時候,使用之:
<condition property="is_test">
    <matches string="${basedir}">
        <regexp refid="regexp_env_test"/>
    </matches>
</condition>- 1
- 2
- 3
- 4
- 5
condition
用來判斷,如果包含的內容符合條件,則將property指定的屬性設定為true,否則為false。
比如上面的例子中,就是將basedir變數的值和regexp_env_test對應的正則匹配,如果正確,就將is_test設定為true,然後後面的流程再去判斷。
與之配合的標籤有很多,下面一一介紹:
- istrue,isfalse:斷言
<condition property="is_test_backend">
    <and>
        <istrue value="${is_test}"/>
        <istrue value="${is_backend}"/>
    </and>
</condition>- 1
- 2
- 3
- 4
- 5
- 6
只有is_test和is_backend變數的值均為true,is_test_backend的值才為true。
- and:邏輯與,需要都滿足條件才行,如上例所述。
- not:邏輯非,反過來的結果。
- or,xor:邏輯或和邏輯異或。
- isset:指定屬性是否存在:
<condition property="scondition">
    <!--如果屬性name不存在則返回false-->
    <isset property="name"/>
</condition>- 1
- 2
- 3
- 4
- equils:指定屬性是否相等:
<condition property="scondition">
    <!--如果arg1的值與arg2的值相等返回true,否則為false-->
    <equals arg1="${name}" arg2="this is name"/>
</condition>- 1
- 2
- 3
- 4
- filesmatch:指定檔案是否相等:
<condition property="scondition">
    <!--如果file1所代表的檔案與file2所代表的檔案相等返回true,否則為false-->
    <filesmatch file1="testfile1.txt" file2="testfile2.txt"/>
</condition>
相關推薦
Ant之build.xml配置詳解
前言 國內關於build.xml的配置資料太零散了,實在是受不了,故而將自己的筆記整理成博文,方便大家查閱和理解。 build.xml配置引數 構建檔案預設叫build.xml,其有很多配置引數。 project 每個構建檔案都有一個project標籤,有以下屬性:
maven之setting.xml 配置詳解
檔案存放位置 全域性配置: ${M2_HOME}/conf/settings.xml 使用者配置: ${user.home}/.m2/settings.xml note:使用者配置優先於全域性配置。${user.home} 和和所有其他系統屬性只能在3.0+版本上
Ant之build.xml詳解
Ant的概念 可能有些讀者並不連線什麼是Ant以及入可使用它,但只要使用通過Linux系統得讀者,應該知道make這個命令。當編譯Linux核心及一些軟體的源程式時,經常要用這個命令。Make命令其實就是一個專案管理工具,而Ant所實現功能與此類似。像make,gnumake
Ant之build.xml詳解(有例項)
Ant的概念 可能有些讀者並不連線什麼是Ant以及入可使用它,但只要使用通過Linux系統得讀者,應該知道make這個命令。當編譯Linux核心及一些軟體的源程式時,經常要用這個命令。Make命令其實就是一個專案管理工具,而Ant所實現功能與此類似。像make,gnumake和nmake這些編譯工具都有一
Ant之build.xml詳解---可用
Ant的概念 :在Eclipse中使用Ant Ant是Java平臺下非常棒的批處理命令執行程式,能非常方便地自動完成編譯,測試,打包,部署等等一系列任務,大大提高開發效率。 Ant和make命令很像。當編譯Linux核心及一些軟體的源程式時,經常要用這個命令。Make命令其
Web.xml配置詳解之context-param
ltr 完成 數據庫 數據 鍵值對 art str htm 方法 轉自:http://blog.csdn.net/liaoxiaohua1981/article/details/6759206 格式定義: [html] view plaincopy
Web.xml配置詳解之context-param,listener
格式定義: [html] view plain copy <c
Mybatis關聯查詢之一對多XML配置詳解
但是有些地方沒有解釋詳細,自己研究了一會,決定將之詳細化 首先是有兩張表,頭行結構。相當於是一張老師表一張學生表。 邏輯結構就是一個老師有多個學生,我們在查詢的時候想要的結果是查出所有的老師的
mybatis之mybatis-config.xml 配置詳解
<?xml version="1.0" encoding="UTF-8" ?> <!DOCTYPE configuration PUBLIC "-//mybatis.org//DTD Config 3.0//EN" "http://mybatis.org/dtd/mybatis-3-con
ant build.xml教程詳解
Ant是一個Apache基金會下的跨平臺的構件工具,它可以實現專案的自動構建和部署等功能。在本文中,主要讓讀者熟悉怎樣將Ant應用到Java專案中,讓它簡化構建和部署操作。 一.安裝與配置 下載地址:http://ant.apache.org/,在本文中下載的是1.7
Java eclipse下 Ant build.xml例項詳解 附完整專案原始碼
在有eclipse整合環境下ant其實不是很重要,但有些專案需要用到,另外通過eclipse來學習和理解ant是個很好的途徑,所以寫他demo總結下要點,希望能夠幫到大家。 一、本人測試環境eclipse3.6已自動集成了ant環境, 所以就不用單獨下載配置ant環境了
setting.xml 配置詳解
校驗 找不到 順序 裁剪 全局 -- mls leg 觸發 文件存放位置 全局配置: ${M2_HOME}/conf/settings.xml 用戶配置: ${user.home}/.m2/settings.xml note:用戶配置優先於全局配置。${user.home}
web.xml配置詳解
知識 其他 location 參數 pin systems doctype doc clu web.xml配置詳解 引文: 對於一個J2EE領域的程序員而言,基本上每天都會和web應用打交道。 什麽是web應用?最簡單的web應用什麽樣?給你一個web應用你該從何入手
Android之build.prop屬性詳解
lin logs generated reg dconf hostname product att make 註:本篇文章是基於MSD648項目(AndroidTV)的prop進行說明。 Android版本:4.4.4 內核版本:3.10.86 1.生成build.
tomcat中server.xml配置詳解
連接超時 兩個 數據大小 value soc 訪客 ace sed 器) Tomcat Server的結構圖如下:該文件描述了如何啟動Tomcat Server。 <Server port="8005" shutdown="SHUTDOWN"> &
tomcat中server.xml配置詳解(轉載)(一)
重要 lis 結構 更多 tle 處理請求 服務器端 sta 設置 轉載自:https://www.cnblogs.com/starhu/p/5599773.html tomcat中server.xml配置詳解 Tomcat Server的結構圖如下:(該文件描述了如何
tomcat中server.xml配置詳解(轉載)(二)
lin power servlet容器 secure redirect tar 屬性 限制 man 轉載自:https://www.cnblogs.com/starhu/p/5599773.html 一:<Connector>元素 由Connector接口定義.
Java學習02-web.xml配置詳解
log 用戶授權 相對 lte 聯合 page int config 定制 <?xml version="1.0" encoding="UTF-8"?> <web-app xmlns:xsi="http://www.w3.org/2001/XMLSche
Mysql之my.cnf配置詳解
線程池 ext 自動刪除 statement arr 網絡 決定 而不是 amp Mysql之my.cnf配置詳解 mysql5.6的版本有400多個變量可以配置,可以通過下列命令獲得mysql> show variables; 配置文件參數如下: #客戶端設置,即
Spring 入門 web.xml配置詳解
.net .html tle spring tail pri .com http https Spring 入門 web.xml配置詳解 https://www.cnblogs.com/cczz_11/p/4363314.html https://blog.csdn.ne