
Git基礎篇之遠端倉庫的基本操作以及如何給github的ReadMe檔案新增圖片
先給大家介紹個我自己總結的第一次如何上傳程式碼到github點選開啟連結,簡單介紹了初次使用的一些操作步驟,公司用的是SVN,但是多學點知識總是好的,萬一以後遇到了呢。和SVN一樣,和其他人合作開發專案的時候,就是操作拉取倉庫的資料,管理倉庫,分享工作進度,下面簡單介紹下基礎操作。
1.檢視當前的遠端倉庫
要檢視當前配置有哪些遠端倉庫,可以用git remote指令,他會列出每個遠端倉庫的名字。當clone完一個專案之後
至少能看到一個預設的origin的遠端倉庫,這個是Git預設的倉庫
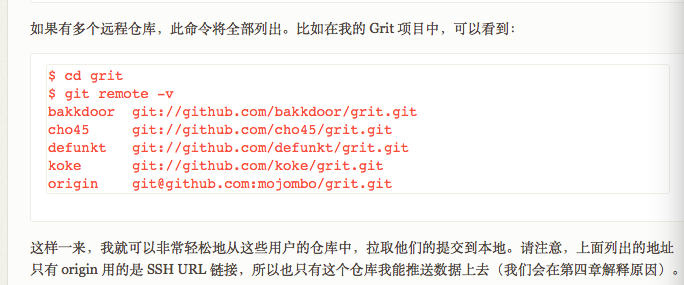
MKJINGdeMac-mini:~ mkjing$ cd ~/Desktop

MKJINGdeMac-mini:Desktop mkjing$ git clone https://github.com/DeftMKJ/BlogTestDemo

Cloning into 'BlogTestDemo'...

remote: Counting objects: 3, done.

remote: Total 3 (delta 0), reused 3 (delta 0), pack-reused 0

Unpacking objects: 100% (3/3), done.

Checking connectivity... done.

MKJINGdeMac-mini:Desktop mkjing$ cd BlogTestDemo/

MKJINGdeMac-mini:BlogTestDemo mkjing$ git remote

origin(倉庫名稱預設的)
可以在加-v(verbose) 能列出詳細資訊
MKJINGdeMac-mini:BlogTestDemo mkjing$ git remote -v

originhttps://github.com/DeftMKJ/BlogTestDemo (fetch)

originhttps://github.com/DeftMKJ/BlogTestDemo (push)
截個網上的別人專案的圖片
2.新增遠端倉庫
執行 git remote add [shortname] [url]

MKJINGdeMac-mini:BlogTestDemo mkjing$ git remote add mikejing https://github.com/DeftMKJ/BlogTestDemo

MKJINGdeMac-mini:BlogTestDemo mkjing$ git remote -v

mikejinghttps://github.com/DeftMKJ/BlogTestDemo (fetch)

mikejinghttps://github.com/DeftMKJ/BlogTestDemo (push)

origin https://github.com/DeftMKJ/BlogTestDemo (fetch)

origin https://github.com/DeftMKJ/BlogTestDemo (push)
3.抓取遠端倉庫 資料
執行git fetch [倉庫名字]
此命令會到遠端倉庫中拉取所有本地倉庫中還沒有的資料。執行完成之後,你就可以訪問遠端倉庫中所有分支,或者將某個分支合併到本地。
如果是clone了一個倉庫,該命令預設會把遠端倉庫歸於origin名下,因此git fetch origin 會抓取距離上次抓取別人更新的所有內容。注意的是,fetch只是將遠端倉庫中的所有資料拉倒本地倉庫,但是不會自動合併,如果需要的話需要手動合併。在日常工作中,我們只需要操作git pull,講更新的資料拉下來,然後自動合併到原生代碼就可以了
4.推送資料到遠端倉庫
git push origin master
專案進行到一個階段,要同別人分享目前的成果,可以將本地倉庫中的資料推送到遠端倉庫。實現這個任務的命令很
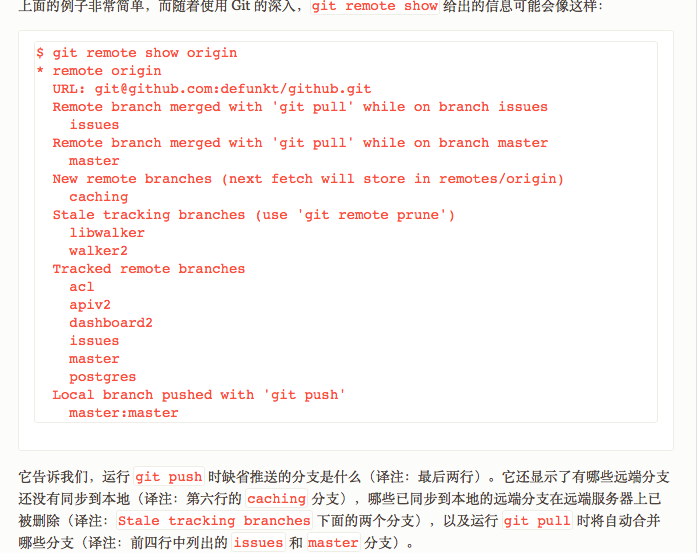
5.檢視遠端倉庫資訊
git remote show [name]
MKJINGdeMac-mini:BlogTestDemo mkjing$ git remote show origin

* remote origin

  Fetch URL: https://github.com/DeftMKJ/BlogTestDemo

  Push  URL: https://github.com/DeftMKJ/BlogTestDemo

  HEAD branch: master

  Remote branch:

    master tracked

  Local branch configured for 'git pull':

    master merges with remote master

  Local ref configured for 'git push':

    master pushes to master (up to date)
上面還給出了資訊,如果你在master分支,你可以直接使用git pull來抓取資料更新本地
看下網上覆雜的例子
6.遠端倉庫的重新命名
在新版 Git 中可以用git remote rename 命令修改某個遠端倉庫在本地的簡稱
MKJINGdeMac-mini:BlogTestDemo mkjing$ git remote rename origin chengjingjiao

MKJINGdeMac-mini:BlogTestDemo mkjing$ git remote show

chengjingjiao

mikejing
7.遠端倉庫的刪除
如果碰到遠端倉庫伺服器遷移或者原來的映象不在了,又或者那個分支不在貢獻程式碼了
執行 git remote rm [shortname]來移除倉庫
舉個例子
如果我們把剛才建立的github倉庫給刪除了,那麼再進行push的時候會提示錯誤
因此,本地的倉庫也就不能再進行push了,如果需要push到另一個倉庫去,那麼首先要把倉庫給remove掉,不然一直會報錯,然後再進行git init git add等一系列操作
MKJINGdeMac-mini:BlogTestDemo mkjing$ git push -u mikejing master

remote: Repository not found.

fatal: repository 'https://github.com/DeftMKJ/BlogTestDemo/' not found
再執行git remote -v就什麼都沒有了
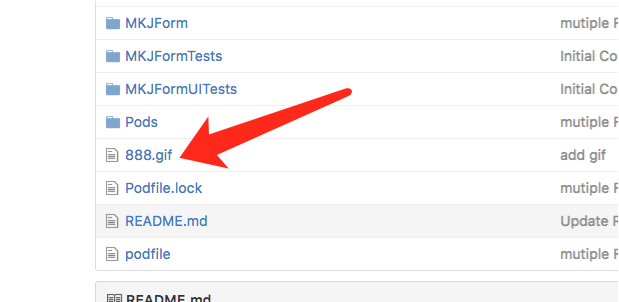
8.如何給github上的ReadMe檔案上新增gif圖片
首先我們clone已有的工程到本地,然後把我們的gif圖片新增進工程後
1.git add .

2.git commit -m “註釋”

3.git push -u origin master
然後開啟剛才我們push進去的圖片
把裡面連結複製出來,再進入ReadMe編輯(markDown編輯器)
複製下面這段話到編輯器
把括號裡面的地址替換成我們需要的訪問的地址就行了,這裡也可以是網路地址,我們直接拿的是工程裡面檔案的地址這樣的話我們就不會存在載入不出來的問題了。
還可以新增表情符號
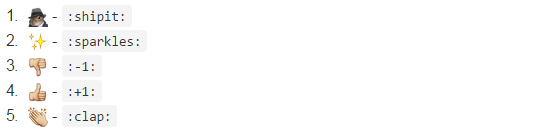
大家可以自己試試
附上一個git和github的學習文件