
Android自定義View-仿華為手機管家病毒查殺類似於雷達掃描動畫效果
阿新 • • 發佈:2019-01-08
最近在使用華為手機管家病毒查殺時有一個類似雷達掃描的動畫,發現該動畫旋轉軸未對準圓心,如下圖:

這樣不仔細看,看不出來,咱們放大看一下,放大後如下:
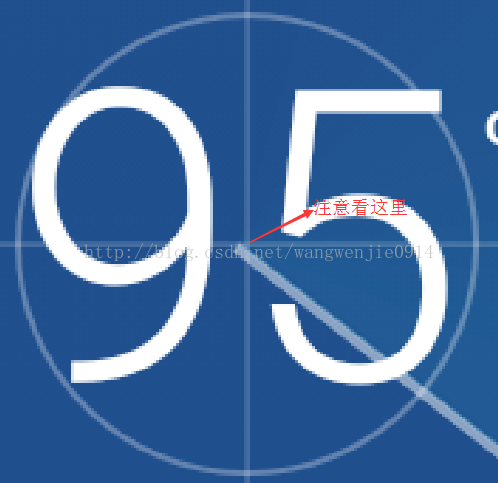
現在我們可以清楚看到這個問題,於是想自己實現一把,好了,為了便於理解,這裡就按照動畫所見內容依次展開來說。
先簡單的分析一下這裡的元素,主要有3個園,三條直線,一個漸變扇形,一個漸變圓弧,知道這些以後,我們就可以開始進行程式碼編寫了,那麼首先定義一下所需要的畫筆,畫布及一些資料
到這裡我們的準備工作都做完了,接下來就進行繪製了,我重寫了onDraw方法,我們看一下onDraw方法裡面的操作:
好了,最終整體程式碼如下:
這樣不仔細看,看不出來,咱們放大看一下,放大後如下:
現在我們可以清楚看到這個問題,於是想自己實現一把,好了,為了便於理解,這裡就按照動畫所見內容依次展開來說。
先簡單的分析一下這裡的元素,主要有3個園,三條直線,一個漸變扇形,一個漸變圓弧,知道這些以後,我們就可以開始進行程式碼編寫了,那麼首先定義一下所需要的畫筆,畫布及一些資料
//初始化畫筆
private void initPaint() {
        mPaintCircleOrLine = new Paint();
        mPaintCircleOrLine.setStrokeWidth(2);
        mPaintCircleOrLine.setAntiAlias(true);
        mPaintCircleOrLine.setStyle(Paint.Style.STROKE);
        mPaintCircleOrLine.setColor(getResources().getColor(R.color.colorCircleOrLine));


        mPaintArc1 = new Paint();
        mPaintArc1.setStyle(Paint.Style.FILL);
        mPaintArc1.setAntiAlias(true);


        mPaintArc2 = new Paint();
        mPaintArc2.setStrokeWidth(4);
        mPaintArc2.setStyle(Paint.Style.STROKE);
        mPaintArc2.setAntiAlias(true);
        mPaintArc2.setColor(getResources().getColor(R.color.colorArcBorder));


        mPaintLine = new Paint();
        mPaintLine.setStrokeWidth(4);
        mPaintLine.setStyle(Paint.Style.STROKE);
        mPaintLine.setAntiAlias(true);
        mPaintLine.setColor(getResources().getColor(R.color.colorLine));


    }
注意這裡畫園和十字直線使用的同一個畫筆的樣式,如果你需要不同的樣式,可以分開定義。初始化操作完成了之後,就是給變數賦值,我選擇在onSizeChange()方法裡面對變數進行賦值,程式碼如下:
    @Override
    protected void onSizeChanged(int w, int h, int oldw, int oldh) {
        super.onSizeChanged(w, h, oldw, oldh);


        mWidth = getWidth();
        mHeight = getHeight();
        mRectF = new RectF(getPaddingLeft(), getPaddingTop(), mWidth-getPaddingRight(), mHeight-getPaddingBottom());
        SweepGradient sweepGradient1 = new SweepGradient(mWidth / 2, mHeight / 2,
                new int[]{Color.TRANSPARENT, getResources().getColor(R.color.colorArc)}, new float[]{0.8f, 1f});
        mPaintArc1.setShader(sweepGradient1);


        SweepGradient sweepGradient2 = new SweepGradient(mWidth / 2, mHeight / 2,
                Color.TRANSPARENT, getResources().getColor(R.color.colorArcBorder));
        mPaintArc2.setShader(sweepGradient2);
        Log.i("wang", String.format("width:%s, height:%s", mWidth, mHeight));


    }
到這裡我們的準備工作都做完了,接下來就進行繪製了,我重寫了onDraw方法,我們看一下onDraw方法裡面的操作:
這裡面有畫園,畫直線,畫扇形,畫圓弧,所以可以發現,我們所看到的效果,都是在onDraw方法裡面實現的,我們具體看看每一個方法:@Override protected void onDraw(Canvas canvas) { super.onDraw(canvas); Log.i("ScanView", "onDraw()"); canvasCircle(canvas); canvasLine(canvas); //根據matrix中設定角度,不斷繪製shader,呈現出一種扇形掃描效果 if(threadRunning) { canvas.concat(matrix); canvasArc(canvas); } }
private void canvasCircle(Canvas canvas) {
canvas.drawCircle(mWidth / 2, mHeight / 2, (mWidth - getPaddingLeft() - getPaddingRight()) / 6, mPaintCircleOrLine);
canvas.drawCircle(mWidth / 2, mHeight / 2, (mWidth - getPaddingLeft() - getPaddingRight()) / 3, mPaintCircleOrLine);
canvas.drawCircle(mWidth / 2, mHeight / 2, (mWidth - getPaddingLeft() - getPaddingRight()) / 2, mPaintCircleOrLine);
}
private void canvasLine(Canvas canvas) {
canvas.drawLine(getPaddingLeft(), mHeight/2, mWidth - getPaddingRight(), mHeight/2, mPaintCircleOrLine);
canvas.drawLine(mWidth/2, getPaddingTop(), mWidth/2, mHeight - getPaddingBottom(), mPaintCircleOrLine);
}
private void canvasArc(Canvas canvas) {
canvas.drawArc(mRectF, 0, 180, true, mPaintArc1);
canvas.drawArc(mRectF, 0, 180, false, mPaintArc2);
canvas.drawLine(getPaddingLeft()-2, mHeight/2, mWidth/2, mHeight/2, mPaintLine);
}這樣就繪製了整個UI,接下來實現動畫效果,就可以實現整體的效果。
這裡實現動畫的時候,用到了Matrix這個東西,使用Matrix可以實現強大的圖形動畫,包位移、旋轉、縮放、透明等效果,定義一執行緒,通過Matrix旋轉操作實現動畫,程式碼如下:protected class ScanThread extends Thread {
private ScanView view;
public ScanThread(ScanView view) {
// TODO Auto-generated constructor stub
this.view = view;
}
@Override
public void run() {
Log.i("ScanView", "run()");
// TODO Auto-generated method stub
while (threadRunning) {
view.post(new Runnable() {
public void run() {
start = start + 1;
matrix = new Matrix();
matrix.preRotate(start, mWidth/2, mWidth/2);
view.invalidate();
}
});
try {
Thread.sleep(5);
} catch (InterruptedException e) {
e.printStackTrace();
}
}
}
}好了,最終整體程式碼如下:
package com.wwj.custom.scan.view;
import android.content.Context;
import android.graphics.Canvas;
import android.graphics.Color;
import android.graphics.Matrix;
import android.graphics.Paint;
import android.graphics.RectF;
import android.graphics.SweepGradient;
import android.util.AttributeSet;
import android.util.Log;
import android.view.View;
/**
* Created by Administrator on 2017/4/25.
*/
public class ScanView extends View {
private Paint mPaintCircleOrLine, mPaintArc1, mPaintArc2, mPaintLine;
private float mWidth, mHeight;
private RectF mRectF;
private Matrix matrix;
//旋轉效果起始角度
private int start = 0;
private boolean threadRunning = false;
private ScanThread mThread;
public ScanView(Context context) {
super(context);
initPaint();
}
public ScanView(Context context, AttributeSet attrs) {
super(context, attrs);
initPaint();
}
private void initPaint() {
mPaintCircleOrLine = new Paint();
mPaintCircleOrLine.setStrokeWidth(2);
mPaintCircleOrLine.setAntiAlias(true);
mPaintCircleOrLine.setStyle(Paint.Style.STROKE);
mPaintCircleOrLine.setColor(getResources().getColor(R.color.colorCircleOrLine));
mPaintArc1 = new Paint();
mPaintArc1.setStyle(Paint.Style.FILL);
mPaintArc1.setAntiAlias(true);
mPaintArc2 = new Paint();
mPaintArc2.setStrokeWidth(4);
mPaintArc2.setStyle(Paint.Style.STROKE);
mPaintArc2.setAntiAlias(true);
mPaintArc2.setColor(getResources().getColor(R.color.colorArcBorder));
mPaintLine = new Paint();
mPaintLine.setStrokeWidth(4);
mPaintLine.setStyle(Paint.Style.STROKE);
mPaintLine.setAntiAlias(true);
mPaintLine.setColor(getResources().getColor(R.color.colorLine));
}
@Override
protected void onSizeChanged(int w, int h, int oldw, int oldh) {
super.onSizeChanged(w, h, oldw, oldh);
mWidth = getWidth();
mHeight = getHeight();
mRectF = new RectF(getPaddingLeft(), getPaddingTop(), mWidth-getPaddingRight(), mHeight-getPaddingBottom());
SweepGradient sweepGradient1 = new SweepGradient(mWidth / 2, mHeight / 2,
new int[]{Color.TRANSPARENT, getResources().getColor(R.color.colorArc)}, new float[]{0.8f, 1f});
mPaintArc1.setShader(sweepGradient1);
SweepGradient sweepGradient2 = new SweepGradient(mWidth / 2, mHeight / 2,
Color.TRANSPARENT, getResources().getColor(R.color.colorArcBorder));
mPaintArc2.setShader(sweepGradient2);
Log.i("wang", String.format("width:%s, height:%s", mWidth, mHeight));
}
@Override
    protected void onDraw(Canvas canvas) {
        super.onDraw(canvas);
        Log.i("ScanView", "onDraw()");
        canvasCircle(canvas);
        canvasLine(canvas);
        //根據matrix中設定角度,不斷繪製shader,呈現出一種扇形掃描效果
        if(threadRunning) {
            canvas.concat(matrix);
            canvasArc(canvas);
        }
    }
private void canvasCircle(Canvas canvas) {
        canvas.drawCircle(mWidth / 2, mHeight / 2, (mWidth - getPaddingLeft() - getPaddingRight()) / 6, mPaintCircleOrLine);
        canvas.drawCircle(mWidth / 2, mHeight / 2, (mWidth - getPaddingLeft() - getPaddingRight()) / 3, mPaintCircleOrLine);
        canvas.drawCircle(mWidth / 2, mHeight / 2, (mWidth - getPaddingLeft() - getPaddingRight()) / 2, mPaintCircleOrLine);
    }


    private void canvasLine(Canvas canvas) {
        canvas.drawLine(getPaddingLeft(), mHeight/2, mWidth - getPaddingRight(), mHeight/2, mPaintCircleOrLine);
        canvas.drawLine(mWidth/2, getPaddingTop(), mWidth/2, mHeight - getPaddingBottom(), mPaintCircleOrLine);
    }


    private void canvasArc(Canvas canvas) {
        canvas.drawArc(mRectF, 0, 180, true, mPaintArc1);
        canvas.drawArc(mRectF, 0, 180, false, mPaintArc2);
        canvas.drawLine(getPaddingLeft()-2, mHeight/2, mWidth/2, mHeight/2, mPaintLine);
    }
public void start() {
mThread = new ScanThread(this);
mThread.start();
threadRunning = true;
}
public void stop() {
threadRunning = false;
invalidate();
}
protected class ScanThread extends Thread {


        private ScanView view;


        public ScanThread(ScanView view) {
            // TODO Auto-generated constructor stub
            this.view = view;
        }


        @Override
        public void run() {
            Log.i("ScanView", "run()");
            // TODO Auto-generated method stub
            while (threadRunning) {
                view.post(new Runnable() {
                    public void run() {
                        start = start + 1;
                        matrix = new Matrix();
                        matrix.preRotate(start, mWidth/2, mWidth/2);
                        view.invalidate();


                    }
                });
                try {
                    Thread.sleep(5);
                } catch (InterruptedException e) {
                    e.printStackTrace();
                }
            }
        }
    }
}github地址:https://github.com/wjwang0914/CustomScanView
現在才開始寫部落格,歡迎大家一起學習,討論,期待我們一起進步。