
RPC入門總結(七)Thrift+Zookeeper實現服務治理
一、Thrift的弊端
Thrift(或者說所有的純粹的RPC框架都存在)的一大弊端是其靜態性。
由於Thrift使用IDL定義RCP 呼叫介面,實現跨語言性。那麼一旦當業務發生變化後需要重新定義介面時Thrift無法保證高可用,而且Thrift不提供對多節點的可用性保證。
二、服務治理的概念
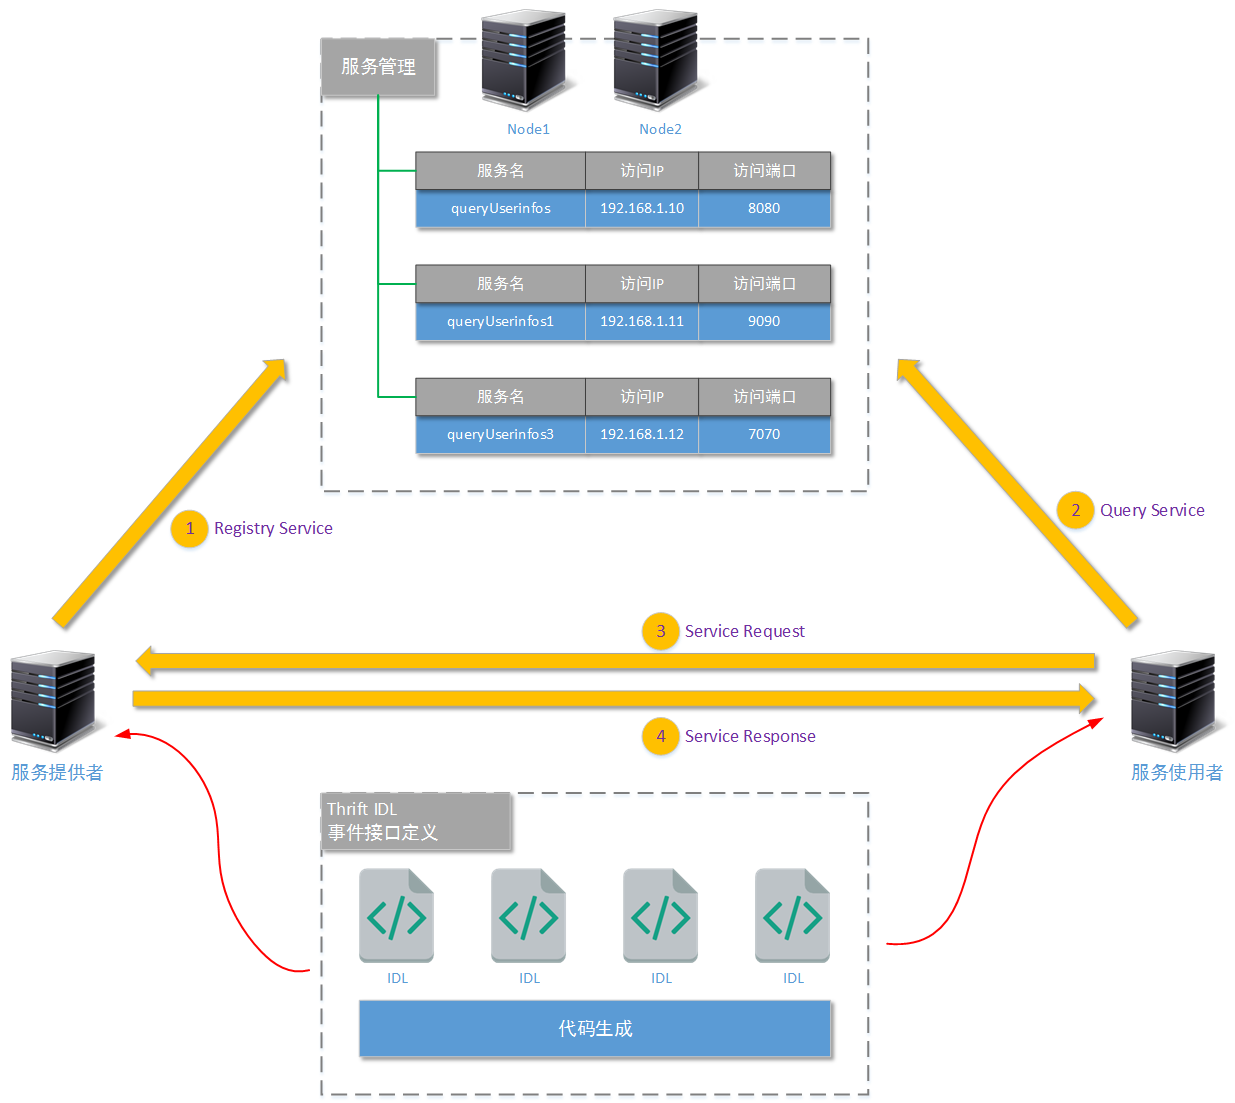
服務治理主要為了解決RPC框架的問題而提出,主要基於服務化的思想。即在眾多系統的RPC通訊的上層再架一層專門進行RPC通訊的協調管理,稱之為服務治理框架。

1. 當服務提供者能夠向外部系統提供呼叫服務時(無論這個呼叫服務是基於RPC的還是基於Http的,一般來說前者居多),它會首先向“服務管理元件”註冊這個服務,包括服務名、訪問許可權、優先順序、版本、引數、真實訪路徑、有效時間
2. 當某一個服務使用者需要呼叫服務時,首先會向“服務管理元件”詢問服務的基本資訊。當然“服務管理元件”還會驗證服務使用者是否有許可權進行呼叫、是否符合呼叫的前置條件等等過濾。最終“服務管理元件”將真實的服務提供者所在位置返回給服務使用者。
3. 服務使用者拿到真實服務提供者的基本資訊、呼叫許可權後,再向真實的服務提供者發出呼叫請求,進行正式的業務呼叫過程。
在服務治理的思想中,包含幾個重要元素:
1. 服務管理元件:這個元件是“服務治理”的核心元件,您的服務治理框架有多強大,主要取決於您的服務管理元件功能有多強大。它至少具有的功能包括:服務註冊管理、訪問路由;另外,它還可以具有:服務版本管理、服務優先順序管理、訪問許可權管理、請求數量限制、連通性管理、註冊服務叢集、節點容錯、事件訂閱-釋出、狀態監控,等等功能。
2. 服務提供者(服務生產者):即服務的具體實現,然後按照服務治理框架特定的規範釋出到服務管理元件中。這意味著什麼呢?這意味著,服務提供者不一定按照RPC呼叫的方式釋出服務,而是按照整個服務治理框架所規定的方式進行釋出(如果服務治理框架要求服務提供者以RPC呼叫的形式進行釋出,那麼服務提供者就必須以RPC呼叫的形式進行釋出;如果服務治理框架要求服務提供者以Http介面的形式進行釋出,那麼服務提供者就必須以Http介面的形式進行釋出,但後者這種情況一般不會出現)。
3. 服務使用者(服務消費者):即呼叫這個服務的使用者,呼叫者首先到服務管理元件中查詢具體的服務所在的位置;服務管理元件收到查詢請求後,將向它返回具體的服務所在位置
三、服務治理框架的設計
設計一個服務治理框架需要實現服務治理的兩個重要元件:服務管理元件和服務提供者,結構圖如下:
1. 服務管理元件
麼按照Zookeeper的這些工作特點,我們對“服務描述格式”的結構進行了如下圖所示的設計:
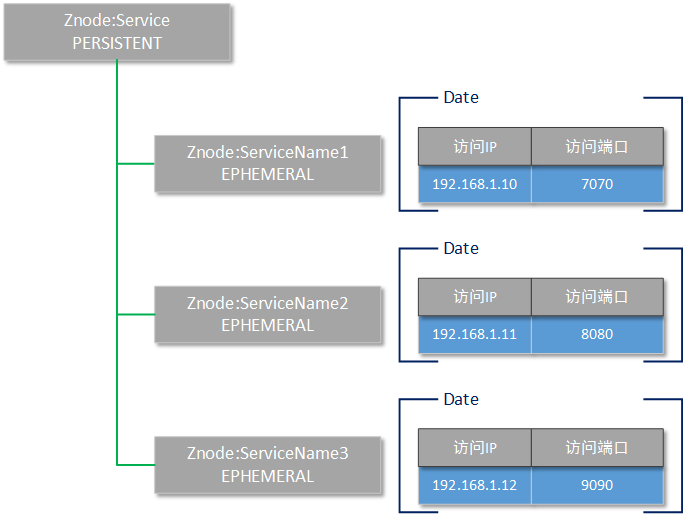
Zookeeper的根目錄名字叫做Service,這是一個持久化的znode節點,並且不需要儲存任何資料。
當某一個服務提供者啟動後,它將連線到Zookeeper叢集,並且在Service目錄下,建立一個以提供的服務名為znode名稱的臨時節點(例如上圖所示的znode,分別叫做ServiceName1、ServiceName2、ServiceName3)。
每一個Service的子級znode都使用JSON格式儲存兩個資訊,分別是這個服務的真實訪問路徑和訪問埠。
這樣一來,當某一個服務提供者由於某些原因不能再提供服務,並且斷掉和zookeeper的連線後,它所註冊的服務就會消失。通過zookeeper的通知機制(或者等待客戶端的下一次詢問),客戶端就會知道已經沒有某一個服務了。
對於服務呼叫者(服務使用者)而言,實際上並不是每一次呼叫服務前,都需要請求zookeeper詢問訪問地址。而是隻需要詢問一次,如果找到相關的服務,則記錄到本地;待到下一次請求時,直接尋找本地的歷史記錄即可。
2. Thrift
在我們這個自行設計的服務治理框架中,要解決的重要問題,就是保證做到新增一個服務時,不需要重新改變IDL定義,不需要重新生成程式碼。
這個問題主要的解決思路就是將Apache Thrift的介面定義進行泛化,即這個介面不呼叫具體的業務,而只給出呼叫者需要呼叫的介面名稱(包括引數),然後在伺服器端,以反射的進行具體服務的呼叫。IDL檔案進行如下的定義:
# 這個結構體定義了服務呼叫者的請求資訊
struct Request {
    # 傳遞的引數資訊,使用格式進行表示
    1:required binary paramJSON;
    # 服務呼叫者請求的服務名,使用serviceName屬性進行傳遞
    2:required string serviceName
}

# 這個結構體,定義了服務提供者的返回資訊
struct Reponse {
    # RESCODE 是處理狀態程式碼,是一個列舉型別。例如RESCODE._200表示處理成功
    1:required  RESCODE responeCode;
    # 返回的處理結果,同樣使用JSON格式進行描述
    2:required  binary responseJSON;
}

# 異常描述定義,當服務提供者處理過程出現異常時,向服務呼叫者返回
exception ServiceException {
    # EXCCODE 是異常程式碼,也是一個列舉型別。
    # 例如EXCCODE.PARAMNOTFOUND表示需要的請求引數沒有找到
    1:required EXCCODE exceptionCode;
    # 異常的描述資訊,使用字串進行描述
    2:required string exceptionMess;
}

# 這個列舉結構,描述各種服務提供者的響應程式碼
enum RESCODE {
    _200=200;
    _500=500;
    _400=400;
}

# 這個列舉結構,描述各種服務提供者的異常種類
enum EXCCODE {
    PARAMNOTFOUND = 2001;
    SERVICENOTFOUND = 2002;
}

# 這是經過泛化後的Apache Thrift介面
service DIYFrameworkService {
    Reponse send(1:required Request request) throws (1:required ServiceException e);
}
3. 服務提供者
要說清楚整個“服務治理”框架的設計思路,最主要的還是說清楚服務提供者的設計思路。因為基本上所有業務過程、事件監聽呼叫,都發生在服務提供者這一端。對於服務呼叫者來說,最主要的就是兩步呼叫過程:
1. 查詢zookeeper服務管理器,找到要呼叫的服務地址,
2. 請求具體服務;
1. 服務提供者設計
下圖表達了服務提供者的軟體結構設計思路:
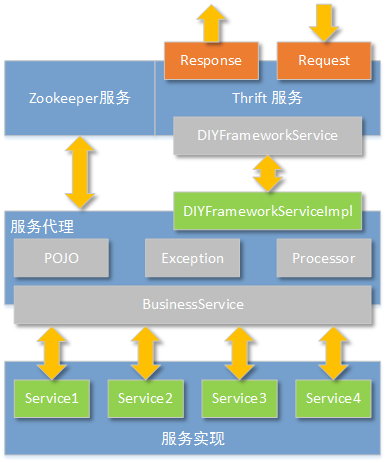
從上圖可以看到,整個服務端的設計分為三層:
1. 最外層由Zookeeper客戶端和Apache Thrift服務構成。Zookeeper客戶端用於向Zookeeper服務叢集註冊“提供的服務”;Apache Thrift用於接受服務呼叫者的請求,並按照格式響應處理結果。
2. 由於我們定義的Apache Thrift介面(DIYFrameworkService)已經被泛化,所以具體的業務處理不能由Apache Thrift的實現(DIYFrameworkServiceImpl)來處理。由於這個原因,那麼在服務端的設計中,就必須有一個服務代理層,這個服務代理層最重要的功能,就是根據Thrift收到的請求引數,決定呼叫哪個真實服務。
3. 根據軟體功能需求的要求,具體的服務實現可以有多個。在設計中我們規定,所有的具體業務實現者,必須實現BusinessService介面中的handle方法。並且返回的型別都必須繼承AbstractPojo。
2. 功能邊界確認
我們目前介紹的示例如果要應用到實際工作中,那麼還需要按照讀者自己的業務特點進行調整、修改甚至是重新設計。對於這個示例提供的功能來說,我們提供一些簡單的,具有代表意義的就可以了:
1. zookeeper服務:服務提供者的zookeeper客戶端只負責連線到zookeeper服務叢集,並且向zookeeper服務叢集註冊“服務提供者所提供的服務”。註冊zookeeper時所依據的目錄結構見上文中zookeeper目錄結構設計的介紹。為了處理簡單,zookeeper服務並不考慮效能問題,無需監聽zookeeper叢集上任何目錄結構的變化事件,也無需將遠端zookeeper叢集上的目錄結構快取到本地。設計的目錄結構也無需考慮一個服務由多個服務節點同時提供服務的情況。也無需考慮訪問許可權、訪問優先順序的問題。
2. Apache Thrift服務:服務提供者的Apache Thrift只負責提供遠端RPC呼叫的監聽服務。而且IDL的設計也很簡單(參見上文中對IDL定義格式的介紹),只要的開發語言採用JAVA,無需生成多語言的程式碼。採用阻塞同步的網路通訊模式,無需考慮Apache Thrift的效能問題。
3. 服務代理:在正式的生產環境中,實際上服務代理層需要負責的工作是最多的。例如它要對服務請求者的令牌環進行判斷,以便確定服務是否過期;要對請求者的許可權進行驗證;要管理具體的服務實現的註冊,以便向zookeeper客戶端告知註冊情況;要決定具體執行哪一個服務實現,等等工作。但是為了讓示例簡潔,服務代理層只提供一個簡單的註冊管理和具體服務實現的呼叫。
服務實現在整個例項程式碼中,我們只提供一個服務:實現BusinessService服務層介面(business.impl.QueryUserDetailServiceImpl),查詢使用者詳細資訊的服務。並且向服務代理層註冊這個服務為:”queryUserDetailService” -> “business.impl.QueryUserDetailServiceImpl”
四、服務治理框架的具體實現
1. 服務端主程式
服務端主程式的類名:processor.MainProcessor,它負責在服務端啟動Apache Thrift並且在服務監聽啟動成功後,連線到zookeeper,註冊這個服務的基本資訊。
這裡要注意一下,Apache Thrift的服務監聽是阻塞式的,所以processor.MainProcessor的Apache Thrift操作應該另起執行緒進行(processor.MainProcessor.StartServerThread),並且通過執行緒間的鎖定操作,保證zookeeper的連線一定是在Apache
Thrift成功啟動後才進行。
package processor;

import java.io.IOException;
import java.util.Set;
import java.util.concurrent.Executors;

import net.sf.json.JSONObject;

import org.apache.commons.logging.Log;
import org.apache.commons.logging.LogFactory;
import org.apache.log4j.BasicConfigurator;
import org.apache.thrift.TProcessor;
import org.apache.thrift.protocol.TBinaryProtocol;
import org.apache.thrift.protocol.TProtocol;
import org.apache.thrift.server.ServerContext;
import org.apache.thrift.server.TServerEventHandler;
import org.apache.thrift.server.TThreadPoolServer;
import org.apache.thrift.server.TThreadPoolServer.Args;
import org.apache.thrift.transport.TServerSocket;
import org.apache.thrift.transport.TTransport;
import org.apache.thrift.transport.TTransportException;
import org.apache.zookeeper.CreateMode;
import org.apache.zookeeper.KeeperException;
import org.apache.zookeeper.WatchedEvent;
import org.apache.zookeeper.Watcher;
import org.apache.zookeeper.ZooKeeper;
import org.apache.zookeeper.ZooDefs.Ids;
import org.apache.zookeeper.data.Stat;

import business.BusinessServicesMapping;
import thrift.iface.DIYFrameworkService;
import thrift.iface.DIYFrameworkService.Iface;

public class MainProcessor {
    static {
        BasicConfigurator.configure();
    }

    /**
     * 日誌
     */
    private static final Log LOGGER = LogFactory.getLog(MainProcessor.class);

    private static final Integer SERVER_PORT = 8090;

    /**
     * 專門用於鎖定以保證這個主執行緒不退出的一個object物件
     */
    private static final Object WAIT_OBJECT = new Object();

    /**
     * 標記apache thrift是否啟動成功了
     * 只有apache thrift啟動成功了,才需要連線到zk
     */
    private boolean isthriftStart = false;

    public static void main(String[] args) {
        /*
         * 主程式要做的事情:
         *
         * 1、啟動thrift服務。並且服務呼叫者的請求
         * 2、連線到zk,並向zk註冊自己提供的服務名稱,告知zk真實的訪問地址、訪問埠
         * (向zk註冊的服務,儲存在BusinessServicesMapping這個類的K-V常量中)
         * */

        //1、========啟動thrift服務
        MainProcessor mainProcessor = new MainProcessor();
        mainProcessor.startServer();

        // 一直等待,apache thrift啟動完成
        synchronized (mainProcessor) {
            try {
                while(!mainProcessor.isthriftStart) {
                    mainProcessor.wait();
                }
            } catch (InterruptedException e) {
                MainProcessor.LOGGER.error(e);
                System.exit(-1);
            }
        }

        //2、========連線到zk
        try {
            mainProcessor.connectZk();
        } catch (IOException | KeeperException | InterruptedException e) {
            MainProcessor.LOGGER.error(e);
            System.exit(-1);
        }

        // 這個wait在業務層面,沒有任何意義。只是為了保證這個守護執行緒不會退出
        synchronized (MainProcessor.WAIT_OBJECT) {
            try {
                MainProcessor.WAIT_OBJECT.wait();
            } catch (InterruptedException e) {
                MainProcessor.LOGGER.error(e);
                System.exit(-1);
            }
        }
    }

    /**
     * 這個私有方法用於連線到zk上,並且註冊相關服務
     * @throws IOException
     * @throws InterruptedException
     * @throws KeeperException
     */
    private void connectZk() throws IOException, KeeperException, InterruptedException {
        // 讀取這個服務提供者,需要在zk上註冊的服務
        Set<String> serviceNames = BusinessServicesMapping.SERVICES_MAPPING.keySet();
        // 如果沒有任何服務需要註冊到zk,那麼這個服務提供者就沒有繼續註冊的必要了
        if(serviceNames == null || serviceNames.isEmpty()) {
            return;
        }

        // 預設的監聽器
        MyDefaultWatcher defaultWatcher = new MyDefaultWatcher();
        // 連線到zk伺服器叢集,新增預設的watcher監聽
        ZooKeeper zk = new ZooKeeper("192.168.61.128:2181", 120000, defaultWatcher);

        //建立一個父級節點Service
        Stat pathStat = null;
        try {
            pathStat = zk.exists("/Service", defaultWatcher);
            //如果條件成立,說明節點不存在(只需要判斷一個節點的存在性即可)
            //建立的這個節點是一個“永久狀態”的節點
            if(pathStat == null) {
                zk.create("/Service", "".getBytes(), Ids.OPEN_ACL_UNSAFE, CreateMode.PERSISTENT);
            }
        } catch(Exception e) {
            System.exit(-1);
        }

        // 開始新增子級節點,每一個子級節點都表示一個這個服務提供者提供的業務服務
        for (String serviceName : serviceNames) {
            JSONObject nodeData = new JSONObject();
            nodeData.put("ip", "127.0.0.1");
            nodeData.put("port", MainProcessor.SERVER_PORT);
            zk.create("/Service/" + serviceName, nodeData.toString().getBytes(), Ids.OPEN_ACL_UNSAFE, CreateMode.EPHEMERAL);
        }

        //執行到這裡,說明所有的service都啟動完成了
        MainProcessor.LOGGER.info("===================所有service都啟動完成了,主執行緒開始啟動===================");
    }

    /**
     * 這個私有方法用於開啟Apache thrift服務端,並進行持續監聽
     * @throws TTransportException
     */
    private void startServer() {
        Thread startServerThread = new Thread(new StartServerThread());
        startServerThread.start();
    }

    private class StartServerThread implements Runnable {
        @Override
        public void run() {
            MainProcessor.LOGGER.info("看到這句就說明thrift服務端準備工作 ....");

            // 服務執行控制器(只要是排程服務的具體實現該如何執行)
            TProcessor tprocessor = new DIYFrameworkService.Processor<Iface>(new DIYFrameworkServiceImpl());

            // 基於阻塞式同步IO模型的Thrift服務,正式生產環境不建議用這個
            TServerSocket serverTransport = null;
            try {
                serverTransport = new TServerSocket(MainProcessor.SERVER_PORT);
            } catch (TTransportException e) {
                MainProcessor.LOGGER.error(e);
                System.exit(-1);
            }

            // 為這個伺服器設定對應的IO網路模型、設定使用的訊息格式封裝、設定執行緒池引數
            Args tArgs = new Args(serverTransport);
            tArgs.processor(tprocessor);
            tArgs.protocolFactory(new TBinaryProtocol.Factory());
            tArgs.executorService(Executors.newFixedThreadPool(100));

            // 啟動這個thrift服務
            TThreadPoolServer server = new TThreadPoolServer(tArgs);
            server.setServerEventHandler(new StartServerEventHandler());
            server.serve();
        }
    }

    /**
     * 為這個TThreadPoolServer物件,設定是一個事件處理器。
     * 以便在TThreadPoolServer正式開始監聽服務請求前,通知mainProcessor:
     * “Apache Thrift已經成功啟動了”
     * @author yinwenjie
     *
     */
    private class StartServerEventHandler implements TServerEventHandler {
        @Override
        public void preServe() {
            /*
             * 需要實現這個方法,以便在服務啟動成功後,
             * 通知mainProcessor: “Apache Thrift已經成功啟動了”
             * */
            MainProcessor.this.isthriftStart = true;
            synchronized (MainProcessor.this) {
                MainProcessor.this.notify();
            }
        }

        /* (non-Javadoc)
         * @see org.apache.thrift.server.TServerEventHandler#createContext(org.apache.thrift.protocol.TProtocol, org.apache.thrift.protocol.TProtocol)
         */
        @Override
        public ServerContext createContext(TProtocol input, TProtocol output) {
            /*
             * 無需實現
             * */
            return null;
        }

        @Override
        public void deleteContext(ServerContext serverContext, TProtocol input, TProtocol output) {
            /*
             * 無需實現
             * */
        }

        @Override
        public void processContext(ServerContext serverContext, TTransport inputTransport, TTransport outputTransport) {
            /*
             * 無需實現
             * */
        }
    }

    /**
     * 這是預設的watcher,什麼也沒有,也不需要有什麼<br>
     * 因為按照功能需求,伺服器端並不需要監控zk上的任何目錄變化事件
     * @author yinwenjie
     */
    private class MyDefaultWatcher implements Watcher {
        public void process(WatchedEvent event) {

        }
    }
}服務端具體實現的程式碼很簡單,就是在IDL指令碼生成了java程式碼後,對DIYFrameworkService介面進行的實現。
package processor;

import java.nio.ByteBuffer;

import net.sf.json.JSONObject;

import org.apache.commons.lang.StringUtils;
import org.apache.commons.logging.Log;
import org.apache.commons.logging.LogFactory;
import org.apache.thrift.TException;

import business.BusinessService;
import business.BusinessServicesMapping;
import business.exception.BizException;
import business.exception.ResponseCode;
import business.pojo.AbstractPojo;
import business.pojo.BusinessResponsePojo;
import business.pojo.DescPojo;
import thrift.iface.DIYFrameworkService.Iface;
import thrift.iface.EXCCODE;
import thrift.iface.RESCODE;
import thrift.iface.Reponse;
import thrift.iface.Request;
import thrift.iface.ServiceException;
import utils.JSONUtils;

/**
 * IDL檔案中,我們定義的唯一服務介面DIYFrameworkService.Iface的唯一實現
 * @author yinwenjie
 *
 */
public class DIYFrameworkServiceImpl implements Iface {

    /**
     * 日誌
     */
    public static final Log LOGGER = LogFactory.getLog(DIYFrameworkServiceImpl.class);

    /* (non-Javadoc)
     * @see thrift.iface.DIYFrameworkService.Iface#send(thrift.iface.Request)
     */
    @SuppressWarnings("unchecked")
    @Override
    public Reponse send(Request request) throws ServiceException, TException {
        /*
         * 由於MainProcessor中,在Apache Thrift 服務端啟動時已經加入了執行緒池,所以這裡就不需要再使用執行緒池了
         * 這個服務方法的實現,需要做以下事情:
         *
         * 1、根據request中,描述的具體服務名稱,在配置資訊中查詢具體的服務類
         * 2、使用java的反射機制,呼叫具體的服務類(BusinessService介面的實現類)。
         * 3、根據具體的業務處理結構,構造Reponse物件,並進行返回
         * */

        //1、===================
        String serviceName = request.getServiceName();
        String className = BusinessServicesMapping.SERVICES_MAPPING.get(serviceName);
        //未發現服務
        if(StringUtils.isEmpty(className)) {
            return this.buildErrorReponse("無效的服務" , null);
        }

        //2、===================
        // 首先得到以json為描述格式的請求引數資訊
        JSONObject paramJSON = null;
        try {
            byte [] paramJSON_bytes = request.getParamJSON();
            if(paramJSON_bytes != null && paramJSON_bytes.length > 0) {
                String paramJSON_string = new String(paramJSON_bytes);
                paramJSON = JSONObject.fromObject(paramJSON_string);
            }
        } catch(Exception e) {
            DIYFrameworkServiceImpl.LOGGER.error(e);
            // 向呼叫者丟擲異常
            throw new ServiceException(EXCCODE.PARAMNOTFOUND, e.getMessage());
        }

        // 試圖進行反射
        BusinessService<AbstractPojo> businessServiceInstance = null;
        try {
            businessServiceInstance = (BusinessService<AbstractPojo>)Class.forName(className).newInstance();
        } catch (Exception e) {
            DIYFrameworkServiceImpl.LOGGER.error(e);
            // 向呼叫者丟擲異常
            throw new ServiceException(EXCCODE.SERVICENOTFOUND, e.getMessage());
        }

        // 進行呼叫
        AbstractPojo returnPojo = null;
        try {
            returnPojo = businessServiceInstance.handle(paramJSON);
        } catch (BizException e) {
            DIYFrameworkServiceImpl.LOGGER.error(e);
            return this.buildErrorReponse(e.getMessage() , e.getResponseCode());
        }

        // 構造處理成功情況下的返回資訊
        BusinessResponsePojo responsePojo = new BusinessResponsePojo();
        responsePojo.setData(returnPojo);
        DescPojo descPojo = new DescPojo("", ResponseCode._200);
        responsePojo.setDesc(descPojo);

        // 生成json
        String returnString = JSONUtils.toString(responsePojo);
        byte[] returnBytes = returnString.getBytes();
        ByteBuffer returnByteBuffer = ByteBuffer.allocate(returnBytes.length);
        returnByteBuffer.put(returnBytes);
        returnByteBuffer.flip();

        // 構造response
        Reponse reponse = new Reponse(RESCODE._200, returnByteBuffer);
        return reponse;
    }

    /**
     * 這個私有方法,用於構造“Thrift中錯誤的返回資訊”
     * @param erroe_mess
     * @return
     */
    private Reponse buildErrorReponse(String erroe_mess , ResponseCode responseCode) {
        // 構造返回資訊
        BusinessResponsePojo responsePojo = new BusinessResponsePojo();
        responsePojo.setData(null);
        DescPojo descPojo = new DescPojo(erroe_mess, responseCode == null?ResponseCode._504:responseCode);
        responsePojo.setDesc(descPojo);

        // 儲存byteBuffer;
        String responseJSON = JSONUtils.toString(responsePojo);
        byte[] responseJSON_bytes = responseJSON.getBytes();
        ByteBuffer byteBuffer = ByteBuffer.allocate(responseJSON_bytes.length);
        byteBuffer.put(byteBuffer);
        byteBuffer.flip();

        Reponse reponse = new Reponse(RESCODE._500, byteBuffer);
        return reponse;
    }
}客戶端有兩件事情需要做:連線到zookeeper查詢註冊的服務該如何訪問;然後向真實的服務提供者發起請求。程式碼如下:
package client;

import java.nio.ByteBuffer;
import java.util.List;

import net.sf.json.JSONObject;

import org.apache.commons.lang.StringUtils;
import org.apache.commons.logging.Log;
import org.apache.commons.logging.LogFactory;
import org.apache.log4j.BasicConfigurator;
import org.apache.thrift.protocol.TBinaryProtocol;
import org.apache.thrift.protocol.TProtocol;
import org.apache.thrift.transport.TSocket;
import org.apache.zookeeper.CreateMode;
import org.apache.zookeeper.WatchedEvent;
import org.apache.zookeeper.Watcher;
import org.apache.zookeeper.ZooKeeper;
import org.apache.zookeeper.ZooDefs.Ids;
import org.apache.zookeeper.data.Stat;

import thrift.iface.DIYFrameworkService.Client;
import thrift.iface.Reponse;
import thrift.iface.Request;
import utils.JSONUtils;

public class ThriftClient {
    /**
     * 日誌
     */
    private static final Log LOGGER = LogFactory.getLog(ThriftClient.class);

    private static final String SERVCENAME = "queryUserDetailService";

    static {
        BasicConfigurator.configure();
    }

    public static final void main(String[] main) throws Exception {
        /*
         * 服務治理框架的客戶端示例,要做以下事情:
         *
         * 1、連線到zk,查詢當前zk下提供的服務列表中是否有自己需要的服務名稱(queryUserDetailService)
         * 2、如果沒有找到需要的服務名稱,則客戶端終止工作
         * 3、如果找到了服務,則通過服務給出的ip,port,基於Thrift進行正式請求
         * (這時,和zookeeper是否斷開,關係就不大了)
         * */
        // 1、===========================
        // 預設的監聽器
        ClientDefaultWatcher defaultWatcher = new ClientDefaultWatcher();
        // 連線到zk伺服器叢集,新增預設的watcher監聽
        ZooKeeper zk = new ZooKeeper("192.168.61.128:2181", 120000, defaultWatcher);

        /*
         * 為什麼客戶端連線上來以後,也可能建立一個Service根目錄呢?
         * 因為正式的環境下,不能保證客戶端一點就在伺服器端全部準備好的情況下,再來做呼叫請求
         * */
        Stat pathStat = null;
        try {
            pathStat = zk.exists("/Service", defaultWatcher);
            //如果條件成立,說明節點不存在(只需要判斷一個節點的存在性即可)
            //建立的這個節點是一個“永久狀態”的節點
            if(pathStat == null) {
                zk.create("/Service", "".getBytes(), Ids.OPEN_ACL_UNSAFE, CreateMode.PERSISTENT);
            }
        } catch(Exception e) {
            System.exit(-1);
        }

        // 2、===========================
        //獲取服務列表(不需要做任何的事件監聽,所以第二個引數可以為false)
        List<String> serviceList = zk.getChildren("/Service", false);
        if(serviceList == null || serviceList.isEmpty()) {
            ThriftClient.LOGGER.info("未發現相關服務,客戶端退出");
            return;
        }

        //然後檢視要找尋的服務是否在存在
        boolean isFound = false;
        byte[] data;
        for (String serviceName : serviceList) {
            if(StringUtils.equals(serviceName, ThriftClient.SERVCENAME)) {
                isFound = true;
                break;
            }
        }
        if(!isFound) {
            ThriftClient.LOGGER.info("未發現相關服務,客戶端退出");
            return;
        } else {
            data = zk.getData("/Service/" + ThriftClient.SERVCENAME, false, null);
        }

        /*
         * 執行到這裡,zk的工作就完成了,接下來zk是否斷開,就不重要了
         * */
        zk.close();
        if(data == null || data.length == 0) {
            ThriftClient.LOGGER.info("未發現有效的服務端地址,客戶端退出");
            return;
        }
        // 得到伺服器地值說明
        JSONObject serverTargetJSON = null;
        String serverIp;
        String serverPort;
        try {
            serverTargetJSON = JSONObject.fromObject(new String(data));
            serverIp = serverTargetJSON.getString("ip");
            serverPort = serverTargetJSON.getString("port");
        } catch(Exception e) {
            ThriftClient.LOGGER.error(e);
            return;
        }

        //3、===========================
        TSocket transport = new TSocket(serverIp, Integer.parseInt(serverPort));
        TProtocol protocol = new TBinaryProtocol(transport);
        // 準備呼叫引數
        JSONObject jsonParam = new JSONObject();
        jsonParam.put("username", "yinwenjie");
        byte[] params = jsonParam.toString().getBytes();
        ByteBuffer buffer = ByteBuffer.allocate(params.length);
        buffer.put(params);
        buffer.flip();
        Request request = new Request(buffer, ThriftClient.SERVCENAME);

        // 開始呼叫
        Client client = new Client(protocol);
        // 準備傳輸
        transport.open();
        // 正式呼叫介面
        Reponse reponse = client.send(request);
        byte[] responseBytes = reponse.getResponseJSON();
        // 一定要記住關閉
        transport.close();

        // 將返回資訊顯示出來
        ThriftClient.LOGGER.info("respinse value = " + new String(responseBytes));
    }
}

/**
 * 這是預設的watcher,什麼也沒有,也不需要有什麼<br>
 * 因為按照功能需求,客戶端並不需要監控zk上的任何目錄變化事件
 * @author yinwenjie
 */
class ClientDefaultWatcher implements Watcher {
    public void process(WatchedEvent event) {

    }
}