
Android自定義View之導航欄(Fragment實現)
阿新 • • 發佈:2019-01-05
安卓輕量級底部導航欄
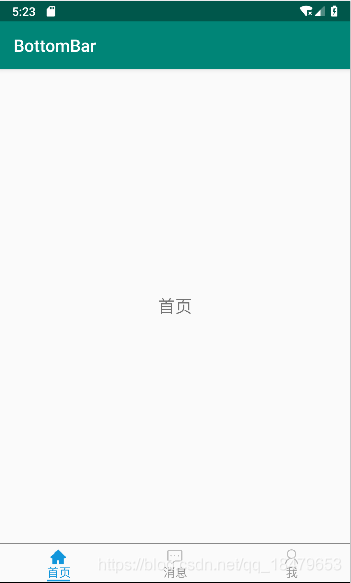
目前安卓開發中常常會用到底部導航欄這個控制元件,但是自己從零開始做一個又太麻煩。因此,我封裝了一個底部導航欄,同時,也做了一些修改,用於頂部也十分合適。下面是示例圖:
使用方法:
1.新增依賴
首先,在build.gradle檔案下加入 maven {url ‘https://jitpack.io’}
allprojects {
	repositories {
		google()
		jcenter()
		maven {url "https://jitpack.io"}
	}
}
然後在dependencies下加入依賴
implementation 'com.github.EHENJOOM:BottomBar:1.0.0' 2.在佈局檔案中新增frameLayout和導航欄
<RelativeLayout xmlns:android="http://schemas.android.com/apk/res/android"
android:layout_width="match_parent"
android:layout_height="match_parent">
<FrameLayout
android:id="@+id/fragment_container"
android:layout_above="@+id/bottombar"
android: FrameLayout是用來顯示fragment內容的。
3.在java程式碼中新增導航欄item,同時建立各個item對應的類
BottomBar bottomBar=findViewById(R.id.bottombar);
bottombar.setContainer(R.id.fragment_container)
    .addItem(Home.class,"首頁",homeicon_before,homeicon_after)
    .addItem(Message.class,"訊息",messageicon_before,messageicon_after)
    .addItem(Me.class,"我",meicon_before,meicon_after)
    .create();
在java程式碼裡首先要呼叫setContainer()方法設定farmeLayout,然後新增導航欄的item,然後呼叫設定屬性的各個api,最後一定要呼叫create()方法建立。
注意:此Activity要繼承AppCompatActivity才能執行,否則程式會崩潰。關於這點,後續會更新版本來支援其他Activity。
另:如果需要設定成沒有圖示的導航欄,只需把icon的寬高設定為0即可。
4.在item對應的類檔案裡設定佈局
由於使用的是frameLayout,因此item對應的類檔案裡不能繼承Activity,要繼承Fragment才行。
public class Home extends Fragment {

    @Nullable
    @Override
    public View onCreateView(LayoutInflater inflater, @Nullable ViewGroup container, @Nullable Bundle savedInstanceState){
        View view=inflater.inflate(R.layout.homelayout_fragment,container,false);
        // 如果需要例項化控制元件,在這裡例項化。
        TextView textView=view.findViewById(R.id.textView);
        textView.setText("首頁");
        return view;
    }

    @Override
    public void onActivityCreated(Bundle savedInstanceState){
        super.onActivityCreated(savedInstanceState);
        // Fragment裡的控制元件監聽事件在這裡面實現
    }
}
5.設定BottomBar的屬性
在java程式碼裡設定屬性
| api名稱 | api作用 |
|---|---|
| setTitleBeforeAndAfterColor(int,int) | 設定文字選中前後的顏色 |
| setTitleSize(int) | 設定文字大小(預設dp為單位) |
| setIconWidth(int) | 設定圖示的寬度 |
| setIconHeight(int) | 設定圖示的高 |
| setTitleIconMargin(int) | 設定文字與圖示的間隙 |
| setFirstChecked(int) | 設定預設選中的item(預設為0) |
| isShowAboveBoundary(boolean) | 設定是否顯示上方分界線(預設顯示) |
| isShowBottomBoundary(boolean) | 設定是否顯示下方分界線(預設不顯示) |
| isShowAboveClue(boolean) | 設定是否顯示上方選中提示線(預設不顯示) |
| isShowBottomClue(boolean) | 設定是否顯示下方選中提示線(預設顯示) |
| setAboveClueHeight(int) | 設定上方提示線的粗細 |
| setBottomClueHeight(int) | 設定下方提示線的粗細 |
| setBoundaryColor(int) | 設定分界線的顏色(預設黑色) |
java程式碼:
bottombar.setTitleSize(14)
    .setFirstChecked(2)
    .isShowAboveClue(true)
或者在xml標籤裡設定屬性
要使用這些屬性,首先要加入名稱空間
xmlns:app="http://schemas.android.com/apk/res-auto"
| 標籤名 | 對應屬性 |
|---|---|
| titleBeforeColor | 文字選中前的顏色 |
| titleAfterColor | 文字選中後的顏色 |
| titleSize | 文字大小(預設dp為單位) |
| iconWidth | 圖示的寬度 |
| iconHeight | 設定圖示的高 |
| titleIconMargin | 文字與圖示的間隙 |
| firstChecked | 預設選中的item |
| isShowAboveBoundary | 是否顯示上方分界線(預設顯示) |
| isShowBottomBoundary | 是否顯示下方分界線(預設不顯示) |
| isShowAboveClue | 是否顯示上方選中提示線(預設不顯示) |
| isShowBottomClue | 是否顯示下方選中提示線(預設顯示) |
| aboveClueHeight | 上方提示線的粗細 |
| bottomClueHeight | 下方提示線的粗細 |
| boundaryColor | 分界線的顏色(預設黑色) |
佈局檔案:
<com.example.bottombar.BottomBar
       xmlns:app="http://schemas.android.com/apk/res-auto"
       android:id="@+id/bottombar"
       android:layout_width="match_parent"
       android:layout_height="45dp"

       app:titleSize="14"
       app:isShowAboveClue="true"
       app:aboveClueHeight="6"/>
另:item選中時的提示線會根據文字長度自動適配。
附上github地址:點選下載原始碼
後續會更新版本,謝謝大家的支援。