
[Web前端]使用paho MQTT.javascript來連線百度IOT(天工物接入)
對於MQTT相信搞物聯網的話,已經不是很陌生了。MQTT是基於TCP長連線下的,它的報文比較小,非常適合於物聯網嵌入式裝置使用。對於詳細的MQTT協議可以參考網上其他文章,這裡推薦一個github上的中文協議手冊
在專案開發中,嵌入式端已經實現了MQTT對接百度天工物聯(後期再寫一篇paho.mqtt.embedded-c的移植教程),但是苦於沒有一個web端控制。在網上也尋找過方案,包括用後端PHPMQTT實現,ASP.net也有對於的MQTT庫。但是沒有一個簡單的快速實現方法,如果會一點html+javascript的話,我再想,是不是能用前端的技術來實現一個簡單的MQTT。按這個思路去網上搜尋,還真有相關的庫。
1 - MQTT.js
MQTT.js is a client library for the MQTT protocol, written in JavaScript for node.js and the browser.
2 - Paho
Paho的庫做的比較全,支援一下語言。

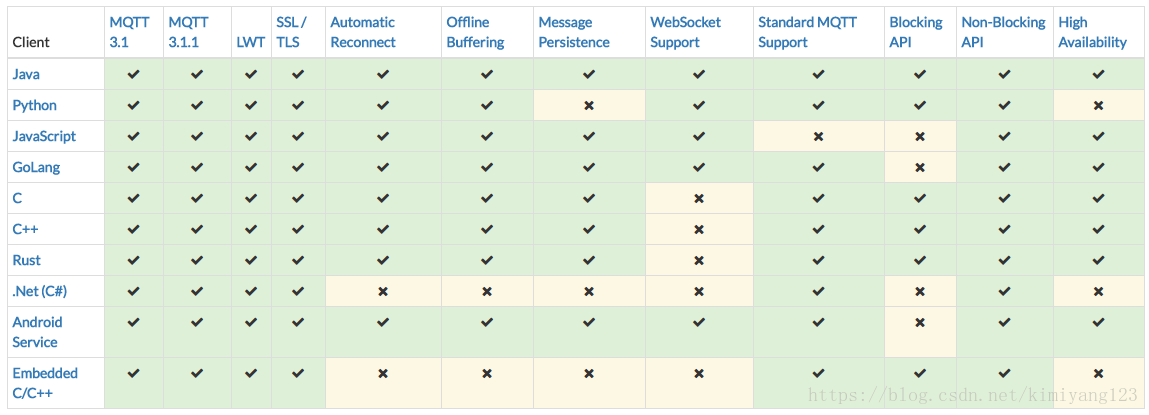
上表中看到,Paho有一個JavaScript的支援,居然我前面的STM32開發板中用的是Paho的Embedded版本移植,那就想嘗試下Paho的JavaScript吧,好在前幾年也自學過一些javascript語法。
在網上找了下,關於Paho MQTT.js去對接百度天工物聯的資料比較少,索性將自己的摸索過程記錄下來。
MQTT系統結構
本文的目的是 實現通過網頁實時控制裝置端的一個LED燈。
本文主要講述的內容是在已實現物聯網裝置的基礎上,設計web頁面實現網頁和嵌入式物聯網裝置的資料通訊。整個系統結構如下:

裝置端啟動後,連線百度IOT伺服器,並訂閱一個主題【mytopic01】。web頁面端啟動後,根據使用者設定的百度IOt的賬號密碼進行連線,並在頁面中新增2個button,用於推送主題訊息。
開源庫列表
html頁面設計
這裡只講究功能,頁面的美化就不考慮了,有能力的同學可以用Bootstrap對頁面進行精心排版和美化
新建 index.html
<!doctype html>
<html lang="en">

<head>
    <title>Paho MQTT.js </title>
    <!-- Required meta tags -->
    <meta charset="utf-8">
    <meta name="viewport" content="width=device-width, initial-scale=1, shrink-to-fit=no">

    <!-- Bootstrap CSS -->
    <link rel="stylesheet" href="https://stackpath.bootstrapcdn.com/bootstrap/4.1.2/css/bootstrap.min.css" integrity="sha384-Smlep5jCw/wG7hdkwQ/Z5nLIefveQRIY9nfy6xoR1uRYBtpZgI6339F5dgvm/e9B"
        crossorigin="anonymous">

    <!-- 引用MQTT的CDN -->
    <script src="https://cdnjs.cloudflare.com/ajax/libs/paho-mqtt/1.0.1/mqttws31.js" type="text/javascript"></script>

</head>

<body>

    <div class="container">
        <div class="row">
            <div class="col">
            </div>
            <h1>Paho MQTT.js Test!</h1>
            <div class="col">
            </div>
        </div>
        <div class="row">
            <div class="col-md">

            </div>
            <div class="col-md-5">
                <div class="card border-success">
                    <div class="card-img-top"><img class="" src="https://timgsa.baidu.com/timg?image&quality=80&size=b9999_10000&sec=1534998931421&di=9c27aaeef01a83dd530a40f7b06aae1f&imgtype=0&src=http%3A%2F%2Fpic.58pic.com%2F58pic%2F15%2F53%2F67%2F93a58PICrhF_1024.png"
                            width="50px" height="50px" alt=""></div>

                    <div class="card-body">
                        <h4 class="card-title">LED control</h4>
                        <p class="card-text">
                            <button type="button" class="btn btn-primary" onclick='publish("ON");'>開燈</button>
                            <button type="button" class="btn btn-seconday" onclick='publish("OFF");'>關燈</button>
                        </p>
                    </div>
                </div>
            </div>
            <div class="col-md">

            </div>

        </div>
    </div>

    <!-- 相關業務程式碼 -->
    <script src="utility_paho.js"></script>

</body>

</html>
這是一個簡單的HTML頁面,添加了2個Button。關於MQTT 通訊的相關程式碼在 `utility_paho.js` 檔案內。
JS程式碼設計
新建 utility_paho.js 檔案
var passWord = "baidu IOT 的裝置例項密碼";
var username = "裝置例項使用者名稱";
var hostname = "XXXXX.mqtt.iot.gz.baidubce.com";  //替換成的你百度例項地址
var port = "8884";    //使用WSS協議的介面地址
var clientId = makeid();

var connected = false;

var client = new Paho.MQTT.Client(hostname, Number(port), "/mqtt", clientId);

logMessage("INFO", "Connecting to Server: [Host: ", hostname, ", Port: ", port, ", Path: ", client.path, ", ID: ", clientId, "]");

// set callback handlers
client.onConnectionLost = onConnectionLost;
client.onMessageArrived = onMessageArrived;
//  client.onConnected = onConnected;

var options = {
    invocationContext: { host: hostname, port: port, clientId: clientId },
    timeout: 5,
    keepAliveInterval: 60,
    cleanSession: true,
    useSSL: true,
    //reconnect: true,
    onSuccess: onConnect,
    onFailure: onFail,
    mqttVersion: 4
};

options.userName = username;
options.password = passWord;

client.connect(options);

function subscribe() {
    var topic = "mytopic01";
    var qos = 0;
    logMessage("INFO", "Subscribing to: [Topic: ", topic, ", QoS: ", qos, "]");
    client.subscribe(topic, { qos: Number(qos) });
}


function publish(ledState) {
    var topic = "mytopic01";
    var qos = 0;
    var message = ledState;
    var retain = false;

    message = "{\"LED\":\"" + message + "\"} ";

    logMessage("INFO", "Publishing Message: [Topic: ", topic, ", Payload: ", message, ", QoS: ", qos, ", Retain: ", retain, "]");
    message = new Paho.MQTT.Message(message);
    message.destinationName = topic;
    message.qos = Number(qos);
    message.retained = retain;
    client.send(message);
}


function disconnect() {
    logMessage("INFO", "Disconnecting from Server.");
    client.disconnect();
}


// called when the client loses its connection
function onConnectionLost(responseObject) {
    if (responseObject.errorCode !== 0) {
        logMessage("INFO", "Connection Lost. [Error Message: ", responseObject.errorMessage, "]");
    }
    connected = false;
}

// called when a message arrives
function onMessageArrived(message) {
    logMessage("INFO", "Message Recieved: [Topic: ", message.destinationName, ", Payload: ", message.payloadString, ", QoS: ", message.qos, ", Retained: ", message.retained, ", Duplicate: ", message.duplicate, "]");

}


// called when the client connects
function onConnect(context) {
    // Once a connection has been made, make a subscription and send a message.
    var connectionString = context.invocationContext.host + ":" + context.invocationContext.port + context.invocationContext.path;
    logMessage("INFO", "Connection Success ", "[URI: ", connectionString, ", ID: ", context.invocationContext.clientId, "]");

    connected = true;

}


function onConnected(reconnect, uri) {
    // Once a connection has been made, make a subscription and send a message.
    logMessage("INFO", "Client Has now connected: [Reconnected: ", reconnect, ", URI: ", uri, "]");
    connected = true;

}

function onFail(context) {
    logMessage("ERROR", "Failed to connect. [Error Message: ", context.errorMessage, "]");

    connected = false;

}


function makeid() {
    var text = "";
    var possible = "ABCDEFGHIJKLMNOPQRSTUVWXYZabcdefghijklmnopqrstuvwxyz0123456789";

    for (var i = 0; i < 15; i++)
        text += possible.charAt(Math.floor(Math.random() * possible.length));

    return text;
}


function logMessage(type, ...content) {

    var date = new Date();
    var timeString = date.toUTCString();
    var logMessage = timeString + " - " + type + " - " + content.join("");

    if (type === "INFO") {
        console.info(logMessage);
    } else if (type === "ERROR") {
        console.error(logMessage);
    } else {
        console.log(logMessage);
    }
}
對於Paho 相關API介面函式的使用,可以參考以上相關文件說明
執行頁面
將以上的 index.html 和 utility_paho.js 放在同一目錄下,使用瀏覽器(推薦chrome)開啟index.html即可看到畫面.

對於百度天工物聯的例項新增和設定,請自行百度學習。
幾個坑點
在實驗過程中,本人也掉過接個坑,現總結下。
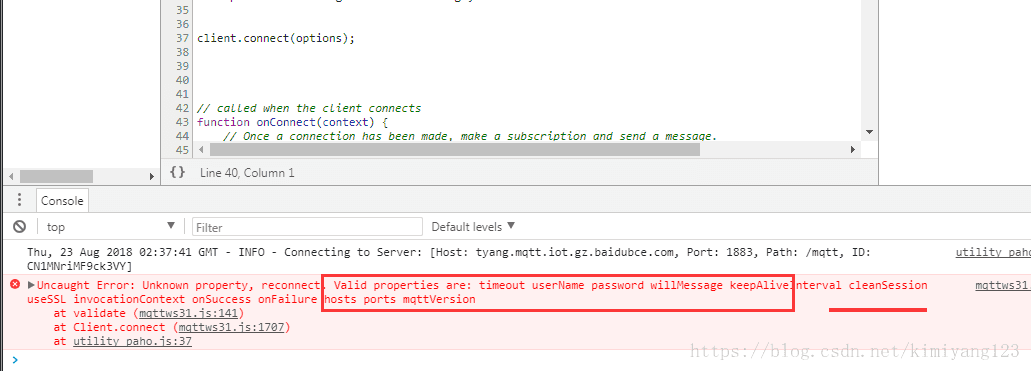
1. client.connect(options); 方法的 options引數名稱必須要和文件中正確,不能有多餘貨錯誤引數,否者會出現如下錯誤:
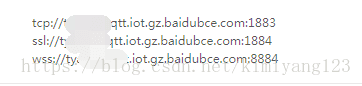
2. paho javascript版本是使用WS協議通訊的,所有不能使用百度天工的tcp埠了。使用如下圖片中的第三個,並使用SSL (useSSL : true)
這一點也要感謝 QQ群好友 明寶(23072790XX) 的提醒,對於一個搞嵌入式硬體的,一開始還真不知道paho 的javascript 版本使用的ws協議介面,一直在1883埠下試來試去一直報錯。
var options = {
    invocationContext: { host: hostname, port: port, clientId: clientId },
    timeout: 5,
    keepAliveInterval: 60,
    cleanSession: true,
    useSSL: true,
    onSuccess: onConnect,
    onFailure: onFail,
    mqttVersion: 4
};