
PopUpWindow使用詳解(一)——基本使用
前言:不要嫌前進的慢,只要一直在前進就好。
相關文章:
有同學講到想要知道PopUpWindow的知識,這裡就給大家講一講PopUpWindow的基本用法和原理吧。這段時間部落格可能會更新比較慢,因為你懂的 !!-_- ,往左看公告,嘿嘿。
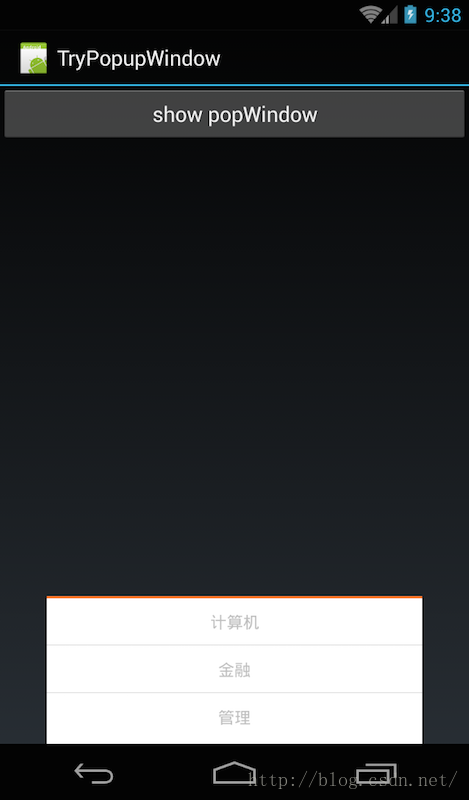
先看一下我們要做的效果:
這個效果很容易理解:當點選btn時,在底部彈出PopupWindow,然後點選各個item彈出對應toast。
一、概述
1、PopupWindow與AlertDialog的區別
最關鍵的區別是AlertDialog不能指定顯示位置,只能預設顯示在螢幕最中間(當然也可以通過設定WindowManager引數來改變位置)。而PopupWindow是可以指定顯示位置的,隨便哪個位置都可以,更加靈活。有關Dialog的相關知識,大家可以參考我的系列部落格:
2、PopupWindow的相關函式
(1)、建構函式:
//方法一:
public PopupWindow (Context context)
//方法二:
public PopupWindow(View contentView)
//方法三:
public PopupWindow(View contentView, int width, int height)
//方法四:
public PopupWindow(View contentView, int width, int height, boolean focusable)所以,如果使用方法一來構造PopupWindow,那完整的構造程式碼應該是這樣的:
有關為什麼一定要設定width和height的原因,我們後面會講,這裡說一下為什麼樣強制設定contentView;很簡單的原因是因為PopupWindow沒有預設佈局,它不會像AlertDialog那樣只setTitle,就能彈出來一個框。PopupWindow是沒有預設佈局的,它的佈局只有通過我們自己設定才行。由於方法三中,含有了這三個必備條件,不用單獨設定contentview或者width、height,所以構造方法三是用的最多的一個構造方法。View contentView = LayoutInflater.from(MainActivity.this).inflate(R.layout.popuplayout, null); PopupWindwo popWnd = PopupWindow (context); popWnd.setContentView(contentView); popWnd.setWidth(ViewGroup.LayoutParams.WRAP_CONTENT); popWnd.setHeight(ViewGroup.LayoutParams.WRAP_CONTENT);
最後,方法四中的focusable變數不是必須的,有關它的方法和意義,我們會在下一篇中細講。
(2)顯示函式
顯示函式主要使用下面三個:
//相對某個控制元件的位置(正左下方),無偏移
showAsDropDown(View anchor):
//相對某個控制元件的位置,有偏移;xoff表示x軸的偏移,正值表示向左,負值表示向右;yoff表示相對y軸的偏移,正值是向下,負值是向上;
showAsDropDown(View anchor, int xoff, int yoff):
//相對於父控制元件的位置(例如正中央Gravity.CENTER,下方Gravity.BOTTOM等),可以設定偏移或無偏移
showAtLocation(View parent, int gravity, int x, int y):1、顯示在某個指定控制元件的下方
showAsDropDown(View anchor):
showAsDropDown(View anchor, int xoff, int yoff);
2、指定父檢視,顯示在父控制元件的某個位置(Gravity.TOP,Gravity.RIGHT等)
showAtLocation(View parent, int gravity, int x, int y);
(3)、其它函式
public void dismiss()
//另外幾個函式,這裡不講其意義,下篇細講
public void setFocusable(boolean focusable)
public void setTouchable(boolean touchable)
public void setOutsideTouchable(boolean touchable)
public void setBackgroundDrawable(Drawable background)好了,廢話不多說了,我們就做一個上面的例子來看一下。
二、簡單示例(showAtLocation顯示窗體)
在這個例子中,我們實現兩個功能,彈出popupWindow和Item點選響應1、主佈局(main.xml)
從效果圖中也可以看到主佈局只有一個button,什麼都沒有,所以它的佈局程式碼哪下:
<?xml version="1.0" encoding="utf-8"?>
<LinearLayout xmlns:android="http://schemas.android.com/apk/res/android"
              android:orientation="vertical"
              android:layout_width="fill_parent"
              android:layout_height="fill_parent">
    <Button
            android:id="@+id/btn"
            android:layout_width="fill_parent"
            android:layout_height="wrap_content"
            android:text="show popWindow"/>
</LinearLayout>
2、PopupWindow佈局(popuplayout.xml)
在概述中,我們提到了,必須為PopupWindow設定佈局,從效果圖中,我也可以看到它的佈局有三個item,中間用橫線分開。所以這裡佈局使用Listview應該更合適,但為了減輕程式碼難度,我們直接使用TextView和分隔線來代替,程式碼如下:
<?xml version="1.0" encoding="utf-8"?>

<LinearLayout
        xmlns:android="http://schemas.android.com/apk/res/android"
        android:layout_width="fill_parent"
        android:layout_height="wrap_content"
        android:background="#ffffff"
        android:orientation="vertical"
        android:paddingBottom="2dp">
    <View
            android:layout_width="match_parent"
            android:layout_height="2.25dp"
            android:background="#fa7829"
            android:layout_alignParentTop="true"/>

    <TextView
            android:id="@+id/pop_computer"
            android:layout_width="match_parent"
            android:layout_height="wrap_content"
            style="@style/pop_text_style"
            android:text="計算機"/>

    <View
            android:layout_width="match_parent"
            android:layout_height="1dp"
            android:background="@drawable/list_line"/>

    <TextView
            android:id="@+id/pop_financial"
            android:layout_width="match_parent"
            android:layout_height="wrap_content"
            style="@style/pop_text_style"
            android:text="金融"/>

    <View
            android:layout_width="match_parent"
            android:layout_height="1dp"
            android:background="@drawable/list_line"/>

    <TextView
            android:id="@+id/pop_manage"
            android:layout_width="match_parent"
            android:layout_height="wrap_content"
            style="@style/pop_text_style"
            android:text="管理"/>

    <View
            android:layout_width="match_parent"
            android:layout_height="1dp"/>

</LinearLayout>
3、MainActivity程式碼
先貼出來完整程式碼,然後再逐步講解:public class MainActivity extends Activity implements View.OnClickListener{
private PopupWindow mPopWindow;
@Override
public void onCreate(Bundle savedInstanceState) {
    super.onCreate(savedInstanceState);
    setContentView(R.layout.main);

    Button btn = (Button) findViewById(R.id.btn);
    btn.setOnClickListener(new View.OnClickListener() {
        @Override
        public void onClick(View v) {
            showPopupWindow();
        }
    });
}
private void showPopupWindow() {
//設定contentView
View contentView = LayoutInflater.from(MainActivity.this).inflate(R.layout.popuplayout, null);
mPopWindow = new PopupWindow(contentView,
LayoutParams.WRAP_CONTENT, LayoutParams.WRAP_CONTENT, true);
mPopWindow.setContentView(contentView);
//設定各個控制元件的點選響應
TextView tv1 = (TextView)contentView.findViewById(R.id.pop_computer);
TextView tv2 = (TextView)contentView.findViewById(R.id.pop_financial);
TextView tv3 = (TextView)contentView.findViewById(R.id.pop_manage);
tv1.setOnClickListener(this);
tv2.setOnClickListener(this);
tv3.setOnClickListener(this);
//顯示PopupWindow
View rootview = LayoutInflater.from(MainActivity.this).inflate(R.layout.main, null);
mPopWindow.showAtLocation(rootview, Gravity.BOTTOM, 0, 0);
}
@Override
public void onClick(View v) {
int id = v.getId();
switch (id){
case R.id.pop_computer:{
Toast.makeText(this,"clicked computer",Toast.LENGTH_SHORT).show();
mPopWindow.dismiss();
}
break;
case R.id.pop_financial:{
Toast.makeText(this,"clicked financial",Toast.LENGTH_SHORT).show();
mPopWindow.dismiss();
}
break;
case R.id.pop_manage:{
Toast.makeText(this,"clicked manage",Toast.LENGTH_SHORT).show();
mPopWindow.dismiss();
}
break;
}
}
}
(1)首先看OnCreate()
在OnCreate()中只做了一個操作,當點選Button時,顯示窗體:public void onCreate(Bundle savedInstanceState) {
super.onCreate(savedInstanceState);
setContentView(R.layout.main);
Button btn = (Button) findViewById(R.id.btn);
btn.setOnClickListener(new View.OnClickListener() {
@Override
public void onClick(View v) {
showPopupWindow();
}
});
}(2)、顯示PopupWindow
下面是有關窗體操作的程式碼:private void showPopupWindow() {
//設定contentView
View contentView = LayoutInflater.from(MainActivity.this).inflate(R.layout.popuplayout, null);
mPopWindow = new PopupWindow(contentView,
LayoutParams.WRAP_CONTENT, LayoutParams.WRAP_CONTENT, true);
//設定各個控制元件的點選響應
TextView tv1 = (TextView)contentView.findViewById(R.id.pop_computer);
TextView tv2 = (TextView)contentView.findViewById(R.id.pop_financial);
TextView tv3 = (TextView)contentView.findViewById(R.id.pop_manage);
tv1.setOnClickListener(this);
tv2.setOnClickListener(this);
tv3.setOnClickListener(this);
//顯示PopupWindow
View rootview = LayoutInflater.from(MainActivity.this).inflate(R.layout.main, null);
mPopWindow.showAtLocation(rootview, Gravity.BOTTOM, 0, 0);
}第一部分:設定ContentView
View contentView = LayoutInflater.from(MainActivity.this).inflate(R.layout.popuplayout, null);
mPopWindow = new PopupWindow(contentView,LayoutParams.WRAP_CONTENT, LayoutParams.WRAP_CONTENT, true);這裡 要注意一個問題:在這個建構函式裡,我們傳進去了width和height全部都是WRAP_CONTENT;而在R.layout.popuplayou的根佈局中,我們定義的width和height程式碼是:layout_width="fill_parent",layout_height="wrap_content";原始碼如下:
<?xml version="1.0" encoding="utf-8"?>

<LinearLayout
        xmlns:android="http://schemas.android.com/apk/res/android"
        android:layout_width="fill_parent"
        android:layout_height="wrap_content"
        android:background="#ffffff"
        android:orientation="vertical"
        android:paddingBottom="2dp">

        ………………
</LinearLayout> 從效果圖中來看,明顯PopupWindow寬度並沒有全屏,顯然是按程式碼中的佈局為準。
這說明了:
**如果在程式碼中重新設定了popupWindow的寬和高,那就以程式碼中所設定為準。**(至於原因,下篇會講)
第二部分:設定各個控制元件的點選響應
TextView tv1 = (TextView)contentView.findViewById(R.id.pop_computer);
TextView tv2 = (TextView)contentView.findViewById(R.id.pop_financial);
TextView tv3 = (TextView)contentView.findViewById(R.id.pop_manage);
tv1.setOnClickListener(this);
tv2.setOnClickListener(this);
tv3.setOnClickListener(this);TextView tv1 = (TextView)findViewById(R.id.pop_computer);有關響應,就沒什麼好講的了,因為我們在類頂部派生了View.OnClickListener,所以在OnClick函式中,直接處理即可,程式碼如下:(在點選不同的Item時,一邊彈出不同的toast,一邊將PopupWindow隱藏掉)
@Override
public void onClick(View v) {
    int id = v.getId();
    switch (id){
        case R.id.pop_computer:{
            Toast.makeText(this,"clicked computer",Toast.LENGTH_SHORT).show();
            mPopWindow.dismiss();
        }
        break;
        case R.id.pop_financial:{
            Toast.makeText(this,"clicked financial",Toast.LENGTH_SHORT).show();
            mPopWindow.dismiss();
        }
        break;
        case R.id.pop_manage:{
            Toast.makeText(this,"clicked manage",Toast.LENGTH_SHORT).show();
            mPopWindow.dismiss();
        }
        break;
    }
}View rootview = LayoutInflater.from(MainActivity.this).inflate(R.layout.main, null);
mPopWindow.showAtLocation(rootview, Gravity.BOTTOM, 0, 0);由於,我們要將mPopWindow放在整個螢幕的最低部,所以我們將R.layout.main做為它的父容器。將其顯示在BOTTOM的位置。
到這裡,有關PopupWindow的顯示及其中控制元件響應基本都講完了,下面,我們就講講showAsDropDown顯示窗體的用法。
原始碼在文章底部給出三、另一示例(showAsDropDown顯示窗體)
大家先看下面這個效果圖: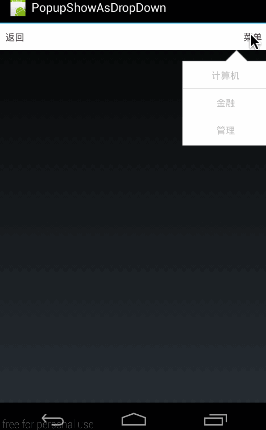
這個效果圖演示的是,在點選標題欄右方的“選單”按鈕時,在其下方顯示一個自定義的選單列表。
1、同樣,我們先看看主佈局程式碼(main.xml)
<?xml version="1.0" encoding="utf-8"?>
<LinearLayout xmlns:android="http://schemas.android.com/apk/res/android"
              android:orientation="vertical"
              android:layout_width="fill_parent"
              android:layout_height="fill_parent">

    <RelativeLayout android:layout_width="fill_parent"
                    android:layout_height="wrap_content"
                    android:background="#ffffff">

        <TextView android:layout_width="wrap_content"
                  android:layout_height="wrap_content"
                  android:layout_alignParentLeft="true"
                  android:textColor="#50484b"
                  android:padding="10dp"
                  android:text="返回"/>

        <TextView
                android:id="@+id/menu"
                android:layout_width="wrap_content"
                android:layout_height="wrap_content"
                android:layout_alignParentRight="true"
                android:textColor="#50484b"
                android:padding="10dp"
                android:text="選單"/>

    </RelativeLayout>
</LinearLayout>2、PopupWindow佈局程式碼(popuplayout.xml)
這部分佈局也不難,只得利用純程式碼硬生成一個列表的佈局。在實際專案中,大家應該使用listview來動態生成列表,這樣生成的popupWindow就是可以複用的了。有關佈局就不再多講,跟上面的佈局基本一樣,只是換了背景。<?xml version="1.0" encoding="utf-8"?>
<LinearLayout
xmlns:android="http://schemas.android.com/apk/res/android"
android:layout_width="fill_parent"
android:layout_height="wrap_content"
android:background="@drawable/pop_bg"
android:orientation="vertical"
android:paddingBottom="2dp">
<TextView
android:id="@+id/pop_computer"
android:layout_width="wrap_content"
android:layout_height="wrap_content"
style="@style/pop_text_style"
android:text="計算機"/>
<View
android:layout_width="match_parent"
android:layout_height="1dp"
android:background="@drawable/list_line"/>
<TextView
android:id="@+id/pop_financial"
android:layout_width="wrap_content"
android:layout_height="wrap_content"
style="@style/pop_text_style"
android:text="金融"/>
<View
android:layout_width="match_parent"
android:layout_height="1dp"
android:background="@drawable/list_line"/>
<TextView
android:id="@+id/pop_manage"
android:layout_width="wrap_content"
android:layout_height="wrap_content"
style="@style/pop_text_style"
android:text="管理"/>
<View
android:layout_width="match_parent"
android:layout_height="1dp"/>
</LinearLayout>3、MainActivity程式碼
同樣是先貼出來完整程式碼,然後再細講。public class MainActivity extends Activity implements View.OnClickListener{
private PopupWindow mPopWindow;
private TextView mMenuTv;
@Override
public void onCreate(Bundle savedInstanceState) {
super.onCreate(savedInstanceState);
setContentView(R.layout.main);
mMenuTv = (TextView)findViewById(R.id.menu);
mMenuTv.setOnClickListener(new View.OnClickListener() {
@Override
public void onClick(View v) {
showPopupWindow();
}
});
}
private void showPopupWindow() {
    View contentView = LayoutInflater.from(MainActivity.this).inflate(R.layout.popuplayout, null);
    mPopWindow = new PopupWindow(contentView);
    mPopWindow.setWidth(ViewGroup.LayoutParams.WRAP_CONTENT);
    mPopWindow.setHeight(ViewGroup.LayoutParams.WRAP_CONTENT);

    TextView tv1 = (TextView)contentView.findViewById(R.id.pop_computer);
    TextView tv2 = (TextView)contentView.findViewById(R.id.pop_financial);
    TextView tv3 = (TextView)contentView.findViewById(R.id.pop_manage);
    tv1.setOnClickListener(this);
    tv2.setOnClickListener(this);
    tv3.setOnClickListener(this);

    mPopWindow.showAsDropDown(mMenuTv);
}
@Override
public void onClick(View v) {
int id = v.getId();
switch (id){
case R.id.pop_computer:{
Toast.makeText(this, "clicked computer", Toast.LENGTH_SHORT).show();
mPopWindow.dismiss();
}
break;
case R.id.pop_financial:{
Toast.makeText(this,"clicked financial",Toast.LENGTH_SHORT).show();
mPopWindow.dismiss();
}
break;
case R.id.pop_manage:{
Toast.makeText(this,"clicked manage",Toast.LENGTH_SHORT).show();
mPopWindow.dismiss();
}
break;
}
}
}private void showPopupWindow() {
View contentView = LayoutInflater.from(MainActivity.this).inflate(R.layout.popuplayout, null);
mPopWindow = new PopupWindow(contentView);
mPopWindow.setWidth(ViewGroup.LayoutParams.WRAP_CONTENT);
mPopWindow.setHeight(ViewGroup.LayoutParams.WRAP_CONTENT);
TextView tv1 = (TextView)contentView.findViewById(R.id.pop_computer);
TextView tv2 = (TextView)contentView.findViewById(R.id.pop_financial);
TextView tv3 = (TextView)contentView.findViewById(R.id.pop_manage);
tv1.setOnClickListener(this);
tv2.setOnClickListener(this);
tv3.setOnClickListener(this);
mPopWindow.showAsDropDown(mMenuTv);
}View contentView = LayoutInflater.from(MainActivity.this).inflate(R.layout.popuplayout, null);
mPopWindow = new PopupWindow(contentView);
mPopWindow.setWidth(ViewGroup.LayoutParams.WRAP_CONTENT);
mPopWindow.setHeight(ViewGroup.LayoutParams.WRAP_CONTENT);mPopWindow.showAsDropDown(mMenuTv);好了,這部分示例也講完了,下面我們就在這個示例上升級一個功能:講講怎麼在彈出PopupWindow的同時利用陰影把背景全部給遮罩起來。
原始碼在文章底部給出
四、提高:為選單新增陰影
這部分的效果圖是下面這樣的: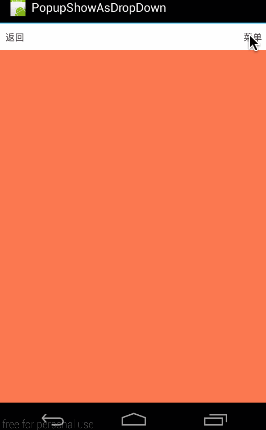
從效果圖中可以看出,這部分是上一個示例的升級版,就是在點出PopupWindow的同時,把背景用半透明黑色遮罩住,像彈出AlertDialog一樣的效果。下面就來看看這個效果是怎麼實現的吧。
1、PopupWindow佈局(popuplayout.xml)
其實原理很簡單,使PopupWindow的介面充滿全屏,而實際的列表菜單只是其中的一個子佈局即可,所以此時的PopupWindow的佈局程式碼如下:<?xml version="1.0" encoding="utf-8"?>
<RelativeLayout
xmlns:android="http://schemas.android.com/apk/res/android"
android:layout_width="fill_parent"
android:layout_height="fill_parent"
android:background="#66000000">
<LinearLayout
android:layout_width="wrap_content"
android:layout_height="wrap_content"
android:background="@drawable/pop_bg"
android:orientation="vertical"
android:paddingBottom="2dp"
android:layout_alignParentRight="true">
<TextView
android:id="@+id/pop_computer"
android:layout_width="wrap_content"
android:layout_height="wrap_content"
style="@style/pop_text_style"
android:text="計算機"/>
<View
android:layout_width="match_parent"
android:layout_height="1dp"
android:background="@drawable/list_line"/>
<TextView
android:id="@+id/pop_financial"
android:layout_width="wrap_content"
android:layout_height="wrap_content"
style="@style/pop_text_style"
android:text="金融"/>
<View
android:layout_width="match_parent"
android:layout_height="1dp"
android:background="@drawable/list_line"/>
<TextView
android:id="@+id/pop_manage"
android:layout_width="wrap_content"
android:layout_height="wrap_content"
style="@style/pop_text_style"
android:text="管理"/>
<View
android:layout_width="match_parent"
android:layout_height="1dp"/>
</LinearLayout>
</RelativeLayout>這樣要非常注意的是,根佈局RelativeLayout設定的android:layout_width和android:layout_height是無意義的,因為我們會通過程式碼重新設定:
private void showPopupWindow() {
    View contentView = LayoutInflater.from(MainActivity.this).inflate(R.layout.popuplayout, null);
    mPopWindow = new PopupWindow(contentView);
    mPopWindow.setWidth(ViewGroup.LayoutParams.FILL_PARENT);
    mPopWindow.setHeight(ViewGroup.LayoutParams.FILL_PARENT);

    ………………//設定各控制元件點選響應

    mPopWindow.showAsDropDown(mMenuTv);

}下篇,我們將會解答這個問題。
好啦,這個示例關鍵部分講完了,其它的大家就看原始碼吧。
原始碼在文章底部給出
五、為PopupWindow新增動畫
先看看效果: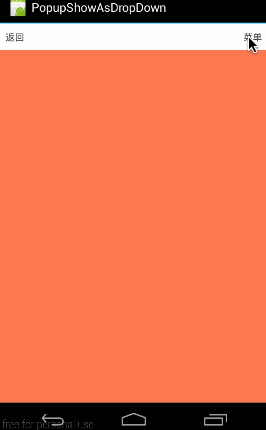
為PopupWindow新增動畫並不難,只需要使用一個函式即可:
//設定動畫所對應的style
mPopWindow.setAnimationStyle(R.style.contextMenuAnim);1、生成動畫對應的style
(1)、進入時的動畫:(context_menu_enter.xml)
<?xml version="1.0" encoding="utf-8"?>
<set xmlns:android="http://schemas.android.com/apk/res/android">

    <translate
        android:duration="@android:integer/config_shortAnimTime"
        android:fromXDelta="0"
        android:fromYDelta="100%p"
        android:interpolator="@android:anim/accelerate_decelerate_interpolator"
        android:toXDelta="0"
        android:toYDelta="0"/>

</set>(2)、退出時動畫(context_menu_exit.xml)
<?xml version="1.0" encoding="utf-8"?>
<set xmlns:android="http://schemas.android.com/apk/res/android" >

    <translate
        android:duration="@android:integer/config_shortAnimTime"
        android:fromXDelta="0"
        android:fromYDelta="0"
        android:interpolator="@android:anim/accelerate_decelerate_interpolator"
        android:toXDelta="0"
        android:toYDelta="100%p" />

</set>(3)、最後,生成對應的style---contextMenuAnim
<style name="contextMenuAnim" parent="@android:style/Animation.Activity">
    <item name="android:windowEnterAnimation">@anim/context_menu_enter</item>
    <item name="android:windowExitAnimation">@anim/context_menu_exit</item>
</style>2、使用AnimationStyle
使用時非常簡單,直接將對應的style通過setAnimationStyle設定進PopupWindow例項即可,程式碼如下,難度不大,不再細講。private void showPopupWindow() {
View contentView = LayoutInflater.from(MainActivity.this).inflate(R.layout.popuplayout, null);
mPopWindow = new PopupWindow(contentView);
mPopWindow.setWidth(ViewGroup.LayoutParams.FILL_PARENT);
mPopWindow.setHeight(ViewGroup.LayoutParams.FILL_PARENT);
………………//設定各子項點選響應
mPopWindow.setAnimationStyle(R.style.contextMenuAnim);
mPopWindow.showAsDropDown(mMenuTv);
}原始碼內容:
1、《PopshowAtLocation》:第二部分:簡單示例(showAtLocation顯示窗體)對應原始碼
2、《PopupShowAsDropDown》:第三部分:另一示例(showAsDropDown顯示窗體) 對應原始碼
3、《PopDropDownBg》:第四部分:提高:為選單新增陰影 對應原始碼
4、《PopupAnim》:第五部分:為PopupWindow新增動畫 對應原始碼
如果本文有幫到你,記得加關注哦