
Activity啟動流程原始碼分析(應用中)
在移動應用開發中,Android四大元件之一Activity是最常用的。很多介面,如:閃屏、主介面、次功能介面等都需要Activity來作為主要的載體;介面與介面之間,即不同的Activity之間也都存在跳轉切換,弄懂這其中跳轉切換原理,將有助於我們更好的理解Android中Activity之間的互動邏輯,從而更好的開發Android應用。本篇博文將會重點介紹Android應用中的Activity的啟動流程。
在開始介紹之前,我們需要了解一些概念,如:
- ActivityThread: 應用的啟動入口類,當應用啟動,會首先執行其main方法,開啟主執行緒訊息迴圈機制。
- ApplicationThread:ActivityThread的內部類,主要與系統程序AMS通訊,從而對應用程序的具體Activity操作進行管理。
- Instrumentation: ActivityThread的屬性變數,主要輔助ActivityThread類呼叫Activity的生命週期相關方法。
- ActivityManagerService(AMS): Activity管理系統服務類,主要是對所有的Activity進行管理。
- ActivityStack: Activity任務棧,AMS的屬性變數,AMS中Activtiy的實際管理者。
一、Activity啟動流程
Activity啟動流程圖:
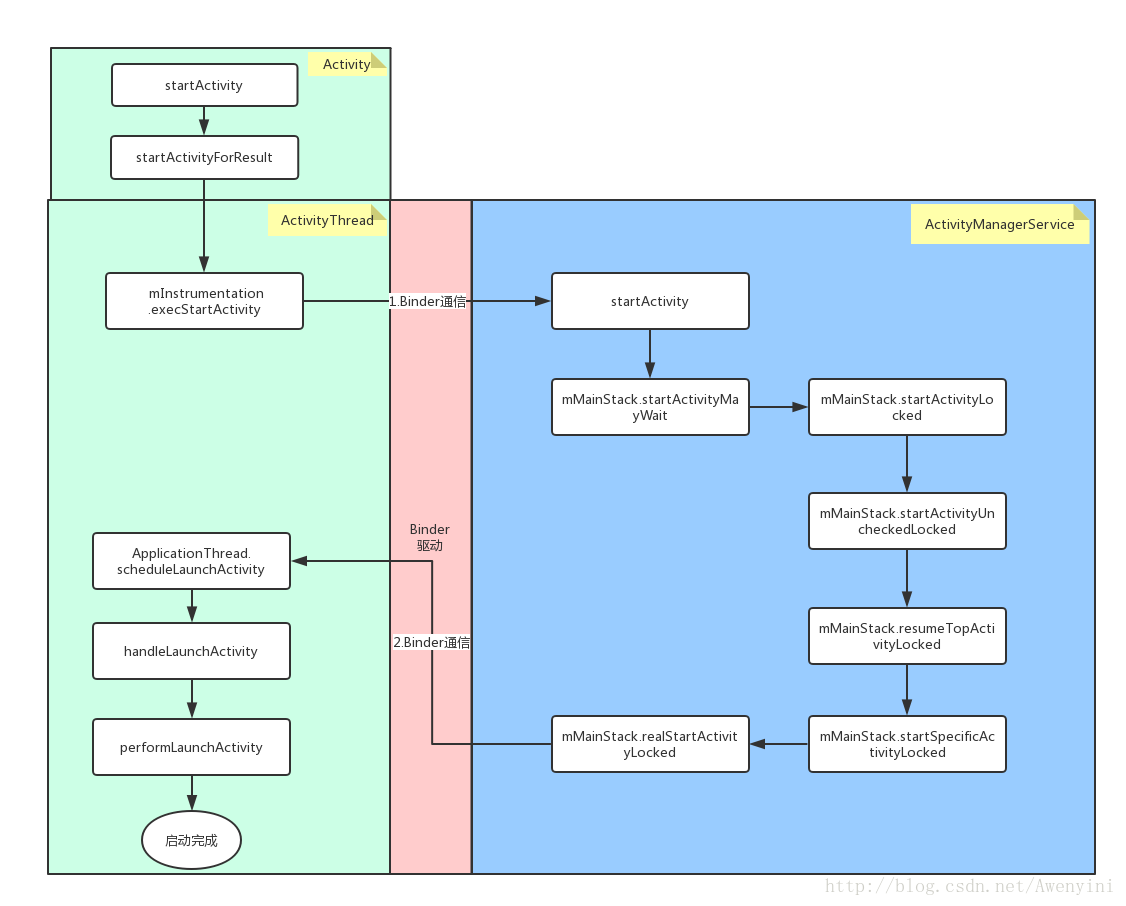
此流程圖,主要是根據Android原始碼中程式碼執行順序來梳理的。淺綠色部分為應用程序,淺藍色部分為系統服務程序,兩個程序間通過Binder驅動來進行通訊,第一次Binder通訊主要的類有:ActivityManagerService(AMS),ActivityManagerNative(AMN),ActivityManagerProxy(AMP);第二次Binder通訊主要的類有:ApplicationThread(AT),ApplicationThreadNative(ATN),ApplicationThreadProxy(ATP)。
二、Activity啟動流程原始碼分析
根據上面流程圖,下面讓我們一起來看看原始碼,首先從Activity的startActivity開始:
@Override
public void startActivity(Intent intent) {
startActivity(intent, null);
}
@Override
public void startActivity(Intent intent, Bundle options) {
if (options != null) {
startActivityForResult(intent, -1 在Activity原始碼中,startActivity之後都會呼叫startActivityForResult;在註釋1處,當mParent為空時,會直接呼叫Instrumentation中的execStartActivity方法,當mParent不為空時,呼叫mParent.startActivityFromChild方法。通過跟蹤查詢發現,mParent也是Activity,在Activity attach的時候會初始化,從ActivityRecord中獲得值。我們繼續來看看startActivityFromChild方法
    public void startActivityFromChild(Activity child, Intent intent,
            int requestCode) {
        startActivityFromChild(child, intent, requestCode, null);
    }

    public void startActivityFromChild(Activity child, Intent intent,
            int requestCode, Bundle options) {
        Instrumentation.ActivityResult ar =
            mInstrumentation.execStartActivity(
                this, mMainThread.getApplicationThread(), mToken, child,
                intent, requestCode, options);
        if (ar != null) {
            mMainThread.sendActivityResult(
                mToken, child.mEmbeddedID, requestCode,
                ar.getResultCode(), ar.getResultData());
        }
    }
由此發現,startActivityForResult之後都呼叫了Instrumentation中的execStartActivity方法。我們繼續來看看execStartActivity方法:
    public ActivityResult execStartActivity(
            Context who, IBinder contextThread, IBinder token, Activity target,
            Intent intent, int requestCode, Bundle options) {
        IApplicationThread whoThread = (IApplicationThread) contextThread;
        ......
        try {
            intent.setAllowFds(false);
            intent.migrateExtraStreamToClipData();
            //核心程式碼
            int result = ActivityManagerNative.getDefault()
                .startActivity(whoThread, intent,
                        intent.resolveTypeIfNeeded(who.getContentResolver()),
                        token, target != null ? target.mEmbeddedID : null,
                        requestCode, 0, null, null, options);
            checkStartActivityResult(result, intent);
        } catch (RemoteException e) {
        }
        return null;
    }
這裡主要是呼叫了ActivityManagerNative.getDefault()中的startActivity(…)方法,這裡就涉及到Binder的一次跨程序通訊,通過跨程序通訊呼叫了ActivityManagerService中的startActivity方法。具體Binder怎麼跨程序通訊的,我已寫過文章 Android跨程序通訊方式(IPC)解析,想了解的同學,可以點選看看。下面我們繼續來看看AMS中的startActivity方法:
    public final int startActivity(IApplicationThread caller,
            Intent intent, String resolvedType, IBinder resultTo,
            String resultWho, int requestCode, int startFlags,
            String profileFile, ParcelFileDescriptor profileFd, Bundle options) {
        enforceNotIsolatedCaller("startActivity");
        ......
        return mMainStack.startActivityMayWait(caller, -1, intent, resolvedType,
                resultTo, resultWho, requestCode, startFlags, profileFile, profileFd,
                null, null, options, userId);
    }
在AMS的startActivity方法中,又呼叫ActivityStack中的startActivityMayWait()方法,我們再來看看ActivityStack的原始碼:
 final int startActivityMayWait(IApplicationThread caller, int callingUid,
            Intent intent, String resolvedType, IBinder resultTo,
            String resultWho, int requestCode, int startFlags, String profileFile,
            ParcelFileDescriptor profileFd, WaitResult outResult, Configuration config,
            Bundle options, int userId) {

            ......

            //核心程式碼
            int res = startActivityLocked(caller, intent, resolvedType,
                    aInfo, resultTo, resultWho, requestCode, callingPid, callingUid,
                    startFlags, options, componentSpecified, null);

           ......

           return res;
        }
    }
我們這裡主要分析啟動流程,所以省略掉部分細節。讓我們繼續看ActivityStack中的startActivityLocked()方法
  final int startActivityLocked(IApplicationThread caller,
            Intent intent, String resolvedType, ActivityInfo aInfo, IBinder resultTo,
            String resultWho, int requestCode,
            int callingPid, int callingUid, int startFlags, Bundle options,
            boolean componentSpecified, ActivityRecord[] outActivity) {

        ......

        //建立一個新的ActivityRecord
        ActivityRecord r = new ActivityRecord(mService, this, callerApp, callingUid,
                intent, resolvedType, aInfo, mService.mConfiguration,
                resultRecord, resultWho, requestCode, componentSpecified);
        ......

        err = startActivityUncheckedLocked(r, sourceRecord,
                startFlags, true, options);
         ......
        return err;
    }
同上,也省略的部分細節。我們繼續
    final int startActivityUncheckedLocked(ActivityRecord r,
            ActivityRecord sourceRecord, int startFlags, boolean doResume,
            Bundle options) {
       ......

        if (sourceRecord == null) {
            if ((launchFlags&Intent.FLAG_ACTIVITY_NEW_TASK) == 0) {
                launchFlags |= Intent.FLAG_ACTIVITY_NEW_TASK;
            }
        } else if (sourceRecord.launchMode == ActivityInfo.LAUNCH_SINGLE_INSTANCE) {
            launchFlags |= Intent.FLAG_ACTIVITY_NEW_TASK;
        } else if (r.launchMode == ActivityInfo.LAUNCH_SINGLE_INSTANCE
                || r.launchMode == ActivityInfo.LAUNCH_SINGLE_TASK) {
            launchFlags |= Intent.FLAG_ACTIVITY_NEW_TASK;
        }

        ......//省略程式碼:Activity四種啟動模式standard,singleTop,singleTask,singleInstance的判斷

        if (sourceRecord != null) {
           .......
           if (!addingToTask &&(launchFlags&Intent.FLAG_ACTIVITY_REORDER_TO_FRONT) != 0) {
                // In this case, we are launching an activity in our own task
                // that may already be running somewhere in the history, and
                // we want to shuffle it to the front of the stack if so.

                int where = findActivityInHistoryLocked(r, sourceRecord.task.taskId);
                if (where >= 0) {
                    ActivityRecord top = moveActivityToFrontLocked(where);
                    logStartActivity(EventLogTags.AM_NEW_INTENT, r, top.task);
                    top.updateOptionsLocked(options);
                    top.deliverNewIntentLocked(callingUid, r.intent);
                    if (doResume) {
                        resumeTopActivityLocked(null);//核心程式碼
                    }
                    return ActivityManager.START_DELIVERED_TO_TOP;
                }
            }
            // An existing activity is starting this new activity, so we want
            // to keep the new one in the same task as the one that is starting
            // it.
            r.setTask(sourceRecord.task, sourceRecord.thumbHolder, false);
            if (DEBUG_TASKS) Slog.v(TAG, "Starting new activity " + r
                    + " in existing task " + r.task);

        } else {
          ......
        }
        ......
        return ActivityManager.START_SUCCESS;
    }
在startActivityUncheckedLocked()方法中,主要針對Activity的啟動模式進行了檢測判斷,從而啟動Activity。我們知道,Activity有四種啟動模式,分別為standard,singleTop,singleTask和singleInstance,但這裡我們主要是分析Activity的啟動流程,所以具體啟動模式的判斷邏輯細節,這裡就不展開分析了。我們主要來看一下,把Activity啟動放到棧頂的方法resumeTopActivityLocked()
  final boolean resumeTopActivityLocked(ActivityRecord prev) {
        return resumeTopActivityLocked(prev, null);
    }

    final boolean resumeTopActivityLocked(ActivityRecord prev, Bundle options) {

        //找到一個棧頂的未finish的Activity的ActivityRecord
        ActivityRecord next = topRunningActivityLocked(null);

        ......

        if (next == null) {//棧頂無Activity,直接啟動Launcher
            if (mMainStack) {
                ActivityOptions.abort(options);
                return mService.startHomeActivityLocked(0);
            }
        }

        ......

        //如果Activity所在的程序已經存在
        if (next.app != null && next.app.thread != null) {
           ......

            try {
                .......
                //重新顯示Activity
                if (next.newIntents != null) {
                    next.app.thread.scheduleNewIntent(next.newIntents, next.appToken);
                }

                EventLog.writeEvent(EventLogTags.AM_RESUME_ACTIVITY,
                        System.identityHashCode(next),
                        next.task.taskId, next.shortComponentName);

                next.sleeping = false;
                showAskCompatModeDialogLocked(next);
                next.app.pendingUiClean = true;
                //執行Activity onResume方法
                next.app.thread.scheduleResumeActivity(next.appToken,
                        mService.isNextTransitionForward());

                checkReadyForSleepLocked();

            } catch (Exception e) {

                //如果啟動異常,就重啟Activity
                if (DEBUG_STATES) Slog.v(TAG, "Resume failed; resetting state to "
                        + lastState + ": " + next);
                next.state = lastState;
                mResumedActivity = lastResumedActivity;
                Slog.i(TAG, "Restarting because process died: " + next);
                if (!next.hasBeenLaunched) {
                    next.hasBeenLaunched = true;
                } else {
                    if (SHOW_APP_STARTING_PREVIEW && mMainStack) {
                        mService.mWindowManager.setAppStartingWindow(
                                next.appToken, next.packageName, next.theme,
                                mService.compatibilityInfoForPackageLocked(
                                        next.info.applicationInfo),
                                next.nonLocalizedLabel,
                                next.labelRes, next.icon, next.windowFlags,
                                null, true);
                    }
                }
                startSpecificActivityLocked(next, true, false);//核心程式碼,重啟Activity
                return true;
            }

            // From this point on, if something goes wrong there is no way
            // to recover the activity.
            try {
                next.visible = true;
                completeResumeLocked(next);
            } catch (Exception e) {
                // If any exception gets thrown, toss away this
                // activity and try the next one.
                Slog.w(TAG, "Exception thrown during resume of " + next, e);
                requestFinishActivityLocked(next.appToken, Activity.RESULT_CANCELED, null,
                        "resume-exception");
                return true;
            }

            // Didn't need to use the icicle, and it is now out of date.
            if (DEBUG_SAVED_STATE) Slog.i(TAG, "Resumed activity; didn't need icicle of: " + next);
            next.icicle = null;
            next.haveState = false;
            next.stopped = false;

        } else {
            //Activity所在的程序不存在,啟動Activity
            if (!next.hasBeenLaunched) {
                next.hasBeenLaunched = true;
            } else {
                if (SHOW_APP_STARTING_PREVIEW) {
                    mService.mWindowManager.setAppStartingWindow(
                            next.appToken, next.packageName, next.theme,
                            mService.compatibilityInfoForPackageLocked(
                                    next.info.applicationInfo),
                            next.nonLocalizedLabel,
                            next.labelRes, next.icon, next.windowFlags,
                            null, true);
                }
                if (DEBUG_SWITCH) Slog.v(TAG, "Restarting: " + next);
            }
            startSpecificActivityLocked(next, true, true);//啟動Activity
        }

        return true;
    }
通過上面註釋中的分析,在判斷Activity程序之後,就會通過startSpecificActivityLocked()方法來啟動Activity,我們繼續看
 private final void startSpecificActivityLocked(ActivityRecord r,
            boolean andResume, boolean checkConfig) {
        // Is this activity's application already running?
        ProcessRecord app = mService.getProcessRecordLocked(r.processName,
                r.info.applicationInfo.uid);

        if (r.launchTime == 0) {
            r.launchTime = SystemClock.uptimeMillis();
            if (mInitialStartTime == 0) {
                mInitialStartTime = r.launchTime;
            }
        } else if (mInitialStartTime == 0) {
            mInitialStartTime = SystemClock.uptimeMillis();
        }

        if (app != null && app.thread != null) {//Activity所在程序判斷,程序存在時,直接啟動Activity
            try {
                app.addPackage(r.info.packageName);

                realStartActivityLocked(r, app, andResume, checkConfig);//核心程式碼

                return;
            } catch (RemoteException e) {
                Slog.w(TAG, "Exception when starting activity "
                        + r.intent.getComponent().flattenToShortString(), e);
            }

            // If a dead object exception was thrown -- fall through to
            // restart the application.
        }

        mService.startProcessLocked(r.processName, r.info.applicationInfo, true, 0,
                "activity", r.intent.getComponent(), false, false);
    }
在startSpecificActivityLocked()方法中也對Activity的程序是否存在做了判斷,當程序存在時直接呼叫realStartActivityLocked()方法啟動Activity;當Activity的程序不存在時,就會呼叫AMS的startProcessLocked()方法建立程序,這裡其實是Activity的另一種啟動流程,從Laucher啟動,只有從Launcher啟動才會沒有程序,這裡先不做深度分析,後續我們針對Activity的Launcher啟動再寫一篇博文。下面讓我們繼續看realStartActivityLocked()方法:
  final boolean realStartActivityLocked(ActivityRecord r,
            ProcessRecord app, boolean andResume, boolean checkConfig)
            throws RemoteException {

            .......

            app.thread.scheduleLaunchActivity(new Intent(r.intent), r.appToken,
                    System.identityHashCode(r), r.info,
                    new Configuration(mService.mConfiguration),
                    r.compat, r.icicle, results, newIntents, !andResume,
                    mService.isNextTransitionForward(), profileFile, profileFd,
                    profileAutoStop);

           ......

        return true;
    }
這裡主要通過呼叫app.thread.scheduleLaunchActivity(…)方法實現了跨程序通訊,這裡主要實現了流程圖中的第二次Binder跨程序通訊。通過Binder跨程序通訊呼叫了ApplicationThread中的scheduleLaunchActivity(…)方法,具體Binder怎麼跨程序通訊的,我已寫過文章 Android跨程序通訊方式(IPC)解析,想了解的同學,可以點選看看。下面我們繼續來看看ApplicationThread中的scheduleLaunchActivity方法:
  public final void scheduleLaunchActivity(Intent intent, IBinder token, int ident,
                ActivityInfo info, Configuration curConfig, CompatibilityInfo compatInfo,
                Bundle state, List<ResultInfo> pendingResults,
                List<Intent> pendingNewIntents, boolean notResumed, boolean isForward,
                String profileName, ParcelFileDescriptor profileFd, boolean autoStopProfiler) {
            ActivityClientRecord r = new ActivityClientRecord();
            ......

            queueOrSendMessage(H.LAUNCH_ACTIVITY, r);
   }

  public void handleMessage(Message msg) {
            if (DEBUG_MESSAGES) Slog.v(TAG, ">>> handling: " + codeToString(msg.what));
            switch (msg.what) {
                case LAUNCH_ACTIVITY: {
                    Trace.traceBegin(Trace.TRACE_TAG_ACTIVITY_MANAGER, "activityStart");
                    ActivityClientRecord r = (ActivityClientRecord)msg.obj;

                    r.packageInfo = getPackageInfoNoCheck(
                            r.activityInfo.applicationInfo, r.compatInfo);
                    handleLaunchActivity(r, null);//核心程式碼
                    Trace.traceEnd(Trace.TRACE_TAG_ACTIVITY_MANAGER);
                } break;
             .......
           }
}
由上易知,通過Handler訊息迴圈機制,從而執行handleLaunchActivity()方法,我們繼續來看此方法
  private void handleLaunchActivity(ActivityClientRecord r, Intent customIntent) {

        .......

        Activity a = performLaunchActivity(r, customIntent);

        ......
    }

   private Activity performLaunchActivity(ActivityClientRecord r, Intent customIntent) {
        // System.out.println("##### [" + System.currentTimeMillis() + "] ActivityThread.performLaunchActivity(" + r + ")");

        ActivityInfo aInfo = r.activityInfo;
        if (r.packageInfo == null) {
            r.packageInfo = getPackageInfo(aInfo.applicationInfo, r.compatInfo,
                    Context.CONTEXT_INCLUDE_CODE);
        }

        ComponentName component = r.intent.getComponent();
        if (component == null) {
            component = r.intent.resolveActivity(
                mInitialApplication.getPackageManager());
            r.intent.setComponent(component);
        }

        if (r.activityInfo.targetActivity != null) {
            component = new ComponentName(r.activityInfo.packageName,
                    r.activityInfo.targetActivity);
        }

        Activity activity = null;
        try {
            //1.核心程式碼
            java.lang.ClassLoader cl = r.packageInfo.getClassLoader();
            activity = mInstrumentation.newActivity(
                    cl, component.getClassName(), r.intent);
            StrictMode.incrementExpectedActivityCount(activity.getClass());
            r.intent.setExtrasClassLoader(cl);
            if (r.state != null) {
                r.state.setClassLoader(cl);
            }
        } catch (Exception e) {
            if (!mInstrumentation.onException(activity, e)) {
                throw new RuntimeException(
                    "Unable to instantiate activity " + component
                    + ": " + e.toString(), e);
            }
        }

        try {
            Application app = r.packageInfo.makeApplication(false, mInstrumentation);

            if (localLOGV) Slog.v(TAG, "Performing launch of " + r);
            if (localLOGV) Slog.v(
                    TAG, r + ": app=" + app
                    + ", appName=" + app.getPackageName()
                    + ", pkg=" + r.packageInfo.getPackageName()
                    + ", comp=" + r.intent.getComponent().toShortString()
                    + ", dir=" + r.packageInfo.getAppDir());

            if (activity != null) {
                ContextImpl appContext = new ContextImpl();
                appContext.init(r.packageInfo, r.token, this);
                appContext.setOuterContext(activity);
                CharSequence title = r.activityInfo.loadLabel(appContext.getPackageManager());
                Configuration config = new Configuration(mCompatConfiguration);
                if (DEBUG_CONFIGURATION) Slog.v(TAG, "Launching activity "
                        + r.activityInfo.name + " with config " + config);

                //2.核心程式碼
                activity.attach(appContext, this, getInstrumentation(), r.token,
                        r.ident, app, r.intent, r.activityInfo, title, r.parent,
                        r.embeddedID, r.lastNonConfigurationInstances, config);

                if (customIntent != null) {
                    activity.mIntent = customIntent;
                }
                r.lastNonConfigurationInstances = null;
                activity.mStartedActivity = false;
                int theme = r.activityInfo.getThemeResource();
                if (theme != 0) {
                    activity.setTheme(theme);
                }

                activity.mCalled = false;
                //3.核心程式碼
                mInstrumentation.callActivityOnCreate(activity, r.state);

                if (!activity.mCalled) {
                    throw new SuperNotCalledException(
                        "Activity " + r.intent.getComponent().toShortString() +
                        " did not call through to super.onCreate()");
                }
                r.activity = activity;
                r.stopped = true;
                if (!r.activity.mFinished) {
                    activity.performStart();
                    r.stopped = false;
                }

                if (!r.activity.mFinished) {
                    if (r.state != null) {
                        mInstrumentation.callActivityOnRestoreInstanceState(activity, r.state);
                    }
                }

                if (!r.activity.mFinished) {
                    activity.mCalled = false;
                    mInstrumentation.callActivityOnPostCreate(activity, r.state);
                    if (!activity.mCalled) {
                        throw new SuperNotCalledException(
                            "Activity " + r.intent.getComponent().toShortString() +
                            " did not call through to super.onPostCreate()");
                    }
                }
            }
            r.paused = true;

            mActivities.put(r.token, r);

        } catch (SuperNotCalledException e) {
            throw e;

        } catch (Exception e) {
            if (!mInstrumentation.onException(activity, e)) {
                throw new RuntimeException(
                    "Unable to start activity " + component
                    + ": " + e.toString(), e);
            }
        }

        return activity;
    }
註釋1處,通過mInstrumentation.newActivity()方法對Activity進行初始化
    public Activity newActivity(ClassLoader cl, String className,
            Intent intent)
            throws InstantiationException, IllegalAccessException,
            ClassNotFoundException {
        return (Activity)cl.loadClass(className).newInstance();
    }
由上我們知道,主要通過反射機制實現Activity的初始化。再來看註釋2,呼叫了Activity.attach(…)方法
 final void attach(Context context, ActivityThread aThread, Instrumentation instr, IBinder token,
            Application application, Intent intent, ActivityInfo info, CharSequence title,
            Activity parent, String id, NonConfigurationInstances lastNonConfigurationInstances,
            Configuration config) {
        attach(context, aThread, instr, token, 0, application, intent, info, title, parent, id,
            lastNonConfigurationInstances, config);
    }

    final void attach(Context context, ActivityThread aThread,
            Instrumentation instr, IBinder token, int ident,
            Application application, Intent intent, ActivityInfo info,
            CharSequence title, Activity parent, String id,
            NonConfigurationInstances lastNonConfigurationInstances,
            Configuration config) {

        attachBaseContext(context);

        mFragments.attachActivity(this);

        mWindow = PolicyManager.makeNewWindow(this);
        mWindow.setCallback(this);
        mWindow.getLayoutInflater().setPrivateFactory(this);
        if (info.softInputMode != WindowManager.LayoutParams.SOFT_INPUT_STATE_UNSPECIFIED) {
            mWindow.setSoftInputMode(info.softInputMode);
        }
        if (info.uiOptions != 0) {
            mWindow.setUiOptions(info.uiOptions);
        }
        mUiThread = Thread.currentThread();

        mMainThread = aThread;
        mInstrumentation = instr;
        mToken = token;
        mIdent = ident;
        mApplication = application;
        mIntent = intent;
        mComponent = intent.getComponent();
        mActivityInfo = info;
        mTitle = title;
        mParent = parent;
        mEmbeddedID = id;
        mLastNonConfigurationInstances = lastNonConfigurationInstances;

        mWindow.setWindowManager(null, mToken, mComponent.flattenToString(),
                (info.flags & ActivityInfo.FLAG_HARDWARE_ACCELERATED) != 0);
        if (mParent != null) {
            mWindow.setContainer(mParent.getWindow());
        }
        mWindowManager = mWindow.getWindowManager();
        mCurrentConfig = config;
    }
此方法主要就是對Activity進行了初始化,初始化了許多的屬性,具體如上。我們再看註釋3,方法mInstrumentation.callActivityOnCreate(activity, r.state),我們也來看看原始碼
    public void callActivityOnCreate(Activity activity, Bundle icicle) {
        if (mWaitingActivities != null) {
            synchronized (mSync) {
                final int N = mWaitingActivities.size();
                for (int i=0; i<N; i++) {
                    final ActivityWaiter aw = mWaitingActivities.get(i);
                    final Intent intent = aw.intent;
                    if (intent.filterEquals(activity.getIntent())) {
                        aw.activity = activity;
                        mMessageQueue.addIdleHandler(new ActivityGoing(aw));
                    }
                }
            }
        }

        activity.performCreate(icicle);//核心程式碼

        if (mActivityMonitors != null) {
            synchronized (mSync) {
                final int N = mActivityMonitors.size();
                for (int i=0; i<N; i++) {
                    final ActivityMonitor am = mActivityMonitors.get(i);
                    am.match(activity, activity, activity.getIntent());
                }
            }
        }
    }
其實,主要也就是呼叫了Activity的OnCreate()方法,我們繼續來看看
    final void performCreate(Bundle icicle) {
        onCreate(icicle);
        mVisibleFromClient = !mWindow.getWindowStyle().getBoolean(
                com.android.internal.R.styleable.Window_windowNoDisplay, false);
        mFragments.dispatchActivityCreated();
    }
的確如此,最後呼叫了Activity的OnCreate方法,從而就啟動了Activity。好了,到這裡,Activity的啟動流程就說完了。
注:原始碼採用android-4.1.1_r1版本,建議下載原始碼然後自己走一遍流程,這樣更能加深理解。