
手寫mini版Spring IOC容器(一)
通常用Spring,我們都是從DispatchServlet開始的。
這個簡易的IOC容器主要目的就是模擬IOC將生成的bean注入到IOC容器中。
程式碼專案的github地址:https://github.com/harrypitter/CreateSpring.git
簡單類圖:
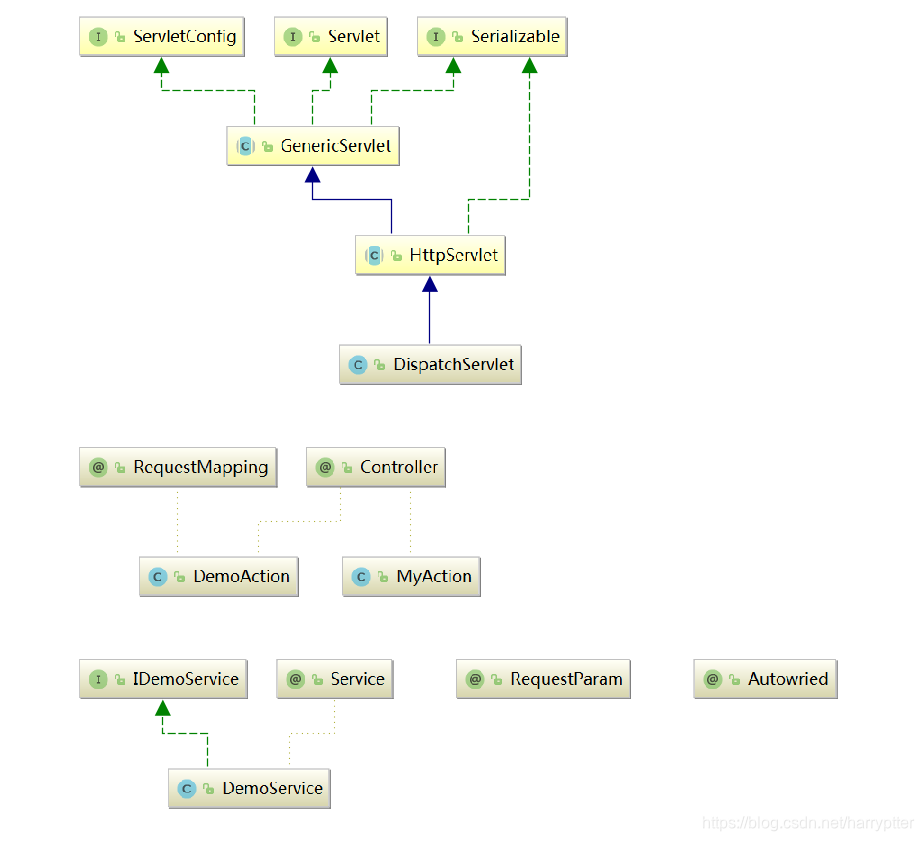
我這邊程式中用了jetty runner外掛來輔助。
這邊需要配置基礎的註解:
Autowired:
package com.praticespring.annotation;

import java.lang.annotation.*;

@Target({ElementType.FIELD})
@Retention(RetentionPolicy.RUNTIME)
@Documented
public @interface Autowried {
    String value() default  "";
}
Controller:
package com.praticespring.annotation;

import java.lang.annotation.*;

@Target({ElementType.TYPE})
@Retention(RetentionPolicy.RUNTIME)
@Documented
public @interface Controller {
    String value() default  "";
}
RequestMapping:
package com.praticespring.annotation;

import java.lang.annotation.*;

@Target({ElementType.TYPE,ElementType.METHOD})
@Retention(RetentionPolicy.RUNTIME)
@Documented
public @interface RequestMapping {
    String value() default  "";
}
RequestParam:
package com.praticespring.annotation;

import java.lang.annotation.*;

@Target({ElementType.PARAMETER})
@Retention(RetentionPolicy.RUNTIME)
@Documented
public @interface RequestParam {
    String value() default  "";
}
Serivice:
package com.praticespring.annotation;

import java.lang.annotation.*;

@Target({ElementType.TYPE})
@Retention(RetentionPolicy.RUNTIME)
@Documented
public @interface Service {
    String value() default  "";
}
這裡引入簡單的MVC呼叫的demoService,暫時沒寫MVC;
介面IDemoService:
package com.praticespring.mvc.service;
public interface IDemoService {

    public String get(String name);

}
對應的DemoService:
package com.praticespring.mvc.service;

import com.praticespring.annotation.Service;

@Service
public class DemoService implements IDemoService {

    public String get(String name) {
        return "My name is " + name;
    }

}
DemoAction:
package com.praticespring.mvc.action;

import com.praticespring.annotation.Autowried;
import com.praticespring.annotation.Controller;
import com.praticespring.annotation.RequestMapping;
import com.praticespring.annotation.RequestParam;
import com.praticespring.mvc.service.IDemoService;

import java.io.IOException;

import javax.servlet.http.HttpServletRequest;
import javax.servlet.http.HttpServletResponse;

@Controller
@RequestMapping("/demo")
public class DemoAction {

    @Autowried
    private IDemoService demoService;

    @RequestMapping("/query.json")
    public void query(HttpServletRequest req,HttpServletResponse resp,
                      @RequestParam("name") String name){
        String result = demoService.get(name);
        System.out.println(result);
//		try {
//			resp.getWriter().write(result);
//		} catch (IOException e) {
//			e.printStackTrace();
//		}
    }

    @RequestMapping("/edit.json")
    public void edit(HttpServletRequest req,HttpServletResponse resp,Integer id){

    }

}
MyAction:
package com.praticespring.mvc.action;

import com.praticespring.annotation.Autowried;
import com.praticespring.annotation.Controller;
import com.praticespring.annotation.RequestMapping;
import com.praticespring.mvc.service.IDemoService;

@Controller
public class MyAction {

    @Autowried
    IDemoService demoService;

    @RequestMapping("/index.html")
    public void query(){

    }

}
然後寫上資源的propoerty檔案:
scanPackage=com.praticespring
templateRoot=layouts
這邊藉助了jetty,需要配置相對應的webdefault.xml和web.xml
因為是基礎配置,這個就不詳細列了,有興趣的話從上面github地址上下載相關程式碼看下。
核心的DispatchServlet類:
package com.praticespring.servlet;
import com.praticespring.annotation.Autowried;
import com.praticespring.annotation.Controller;
import com.praticespring.annotation.Service;
import javax.servlet.ServletConfig;
import javax.servlet.ServletException;
import javax.servlet.http.HttpServlet;
import javax.servlet.http.HttpServletRequest;
import javax.servlet.http.HttpServletResponse;
import java.io.File;
import java.io.IOException;
import java.io.InputStream;
import java.lang.reflect.Field;
import java.net.URL;
import java.util.ArrayList;
import java.util.List;
import java.util.Map;
import java.util.Properties;
import java.util.concurrent.ConcurrentHashMap;
public class DispatchServlet extends HttpServlet {
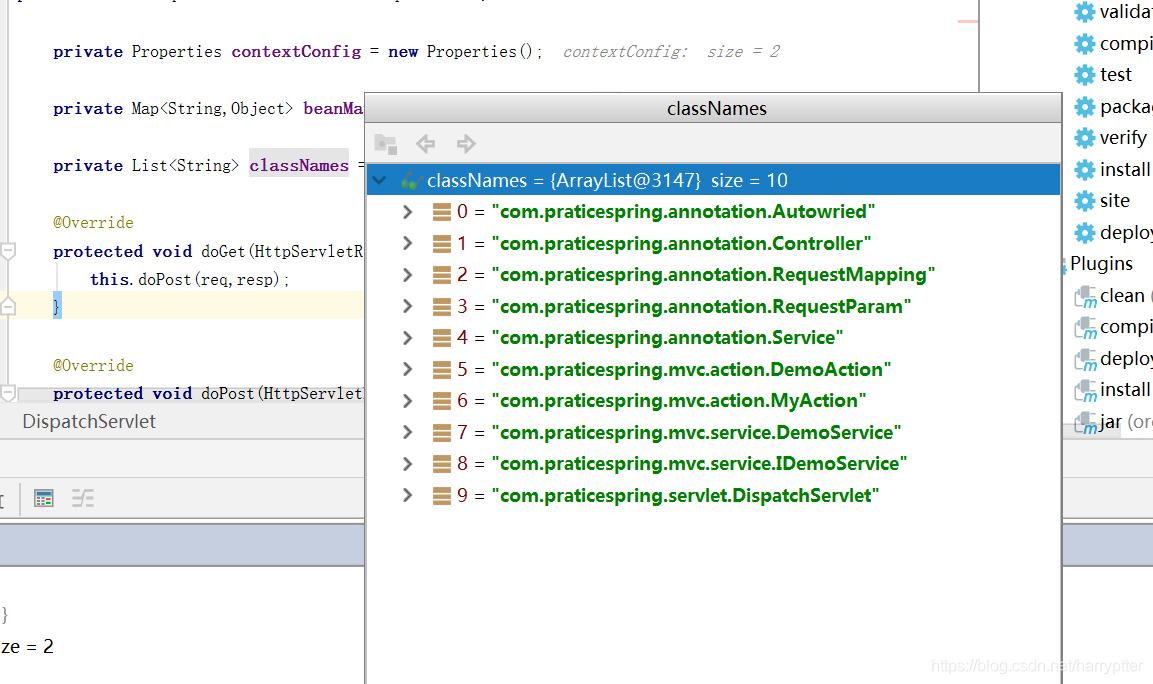
private Properties contextConfig = new Properties();
private Map<String,Object> beanMap = new ConcurrentHashMap<String,Object>();
private List<String> classNames = new ArrayList<String>();
@Override
protected void doGet(HttpServletRequest req, HttpServletResponse resp) throws ServletException, IOException {
this.doPost(req,resp);
}
@Override
protected void doPost(HttpServletRequest req, HttpServletResponse resp) throws ServletException, IOException {
System.out.println("---------- 呼叫doPost ----------");
}
@Override
public void init(ServletConfig config) throws ServletException {
//開始初始化的程序
//定位
doLoadConfig(config.getInitParameter("contextConfigLocation"));
//載入
doScanner(contextConfig.getProperty("scanPackage"));
//註冊
doRegistry();
//自動依賴注入
//在Spring中是通過呼叫getBean方法才出發依賴注入的
doAutowired();
// DemoAction action = (DemoAction)beanMap.get("demoAction");
// action.query(null,null,"Tom");
//如果是SpringMVC會多設計一個HnandlerMapping
//將@RequestMapping中配置的url和一個Method關聯上
//以便於從瀏覽器獲得使用者輸入的url以後,能夠找到具體執行的Method通過反射去呼叫
initHandlerMapping();
}
private void initHandlerMapping() {
}
private void doAutowired() {
if(beanMap.isEmpty()){ return; }
for (Map.Entry<String,Object> entry : beanMap.entrySet()) {
Field[] fields = entry.getValue().getClass().getDeclaredFields();
for (Field field : fields){
if(!field.isAnnotationPresent(Autowried.class)){continue;}
Autowried autowried = field.getAnnotation(Autowried.class);
String beanName = autowried.value().trim();
if("".equals(beanName)){
beanName = field.getType().getName();
}
field.setAccessible(true);
try {
field.set(entry.getValue(),beanMap.get(beanName));
} catch (IllegalAccessException e) {
e.printStackTrace();
}
}
}
}
private void doRegistry() {
if(classNames.isEmpty()){ return;}
try{
for(String className : classNames){
Class<?> clazz = Class.forName(className);
//在Spring中用的多個子方法來處理的
if(clazz.isAnnotationPresent(Controller.class)){
String beanName = lowerFirstCase(clazz.getSimpleName());
//在Spring中在這個階段不是不會直接put instance,這裡put的是BeanDefinition
beanMap.put(beanName,clazz.newInstance());
}else if(clazz.isAnnotationPresent(Service.class)){
Service service = clazz.getAnnotation(Service.class);
//預設用類名首字母注入
//如果自己定義了beanName,那麼優先使用自己定義的beanName
//如果是一個介面,使用介面的型別去自動注入
//在Spring中同樣會分別呼叫不同的方法 autowriedByName autowritedByType
String beanName = service.value();
if("".equals(beanName.trim())){
beanName = lowerFirstCase(clazz.getSimpleName());
}
Object instance = clazz.newInstance();
beanMap.put(beanName,instance);
Class<?>[] interfaces = clazz.getInterfaces();
for (Class<?> i :interfaces){
beanMap.put(i.getName(),instance);
}
}else{
continue;
}
}
}catch (Exception e){
e.printStackTrace();
}
}
private void doScanner(String packageName) {
URL url = this.getClass().getClassLoader().getResource("/" + packageName.replaceAll("\\.","/"));
File classDir = new File(url.getFile());
for (File file : classDir.listFiles()){
if(file.isDirectory()){
doScanner(packageName + "." +file.getName());
}else {
classNames.add(packageName + "." + file.getName().replace(".class",""));
}
}
}
private void doLoadConfig(String location) {
InputStream is = this.getClass().getClassLoader().getResourceAsStream(location.replace("classpath:",""));
try {
contextConfig.load(is);
} catch (IOException e) {
e.printStackTrace();
}finally {
try {
if(null != is){is.close();}
}catch (Exception e){
e.printStackTrace();
}
}
}
private String lowerFirstCase(String str){
char[] strArray = str.toCharArray();
strArray[0]+= 32;
return strArray.toString();
}
}
這個工程主要目的就是手寫這個DispatchServlet類:
IOC的初始過程就是:定位--->載入------>註冊------>依賴注入
首先通過doLoadConfig()方法,定位application.properties檔案裡面的內容,然後通過doScanner掃描制定路徑下的所有檔案內容,再我這個程式裡面就是掃描com.praticespring資料夾下的所有檔案,然後當時檔案的時候就在classNames裡面新增對應的.class類檔名。
掃描完之後,進入 doRegistry()方法,這個方法就是將對應的bean方法(上面程式裡的邏輯是判斷classNames裡面的方法,如果是Service方法和Controller方法,就放入beanMap裡面)放入指定的IOC容器beanMap裡面。
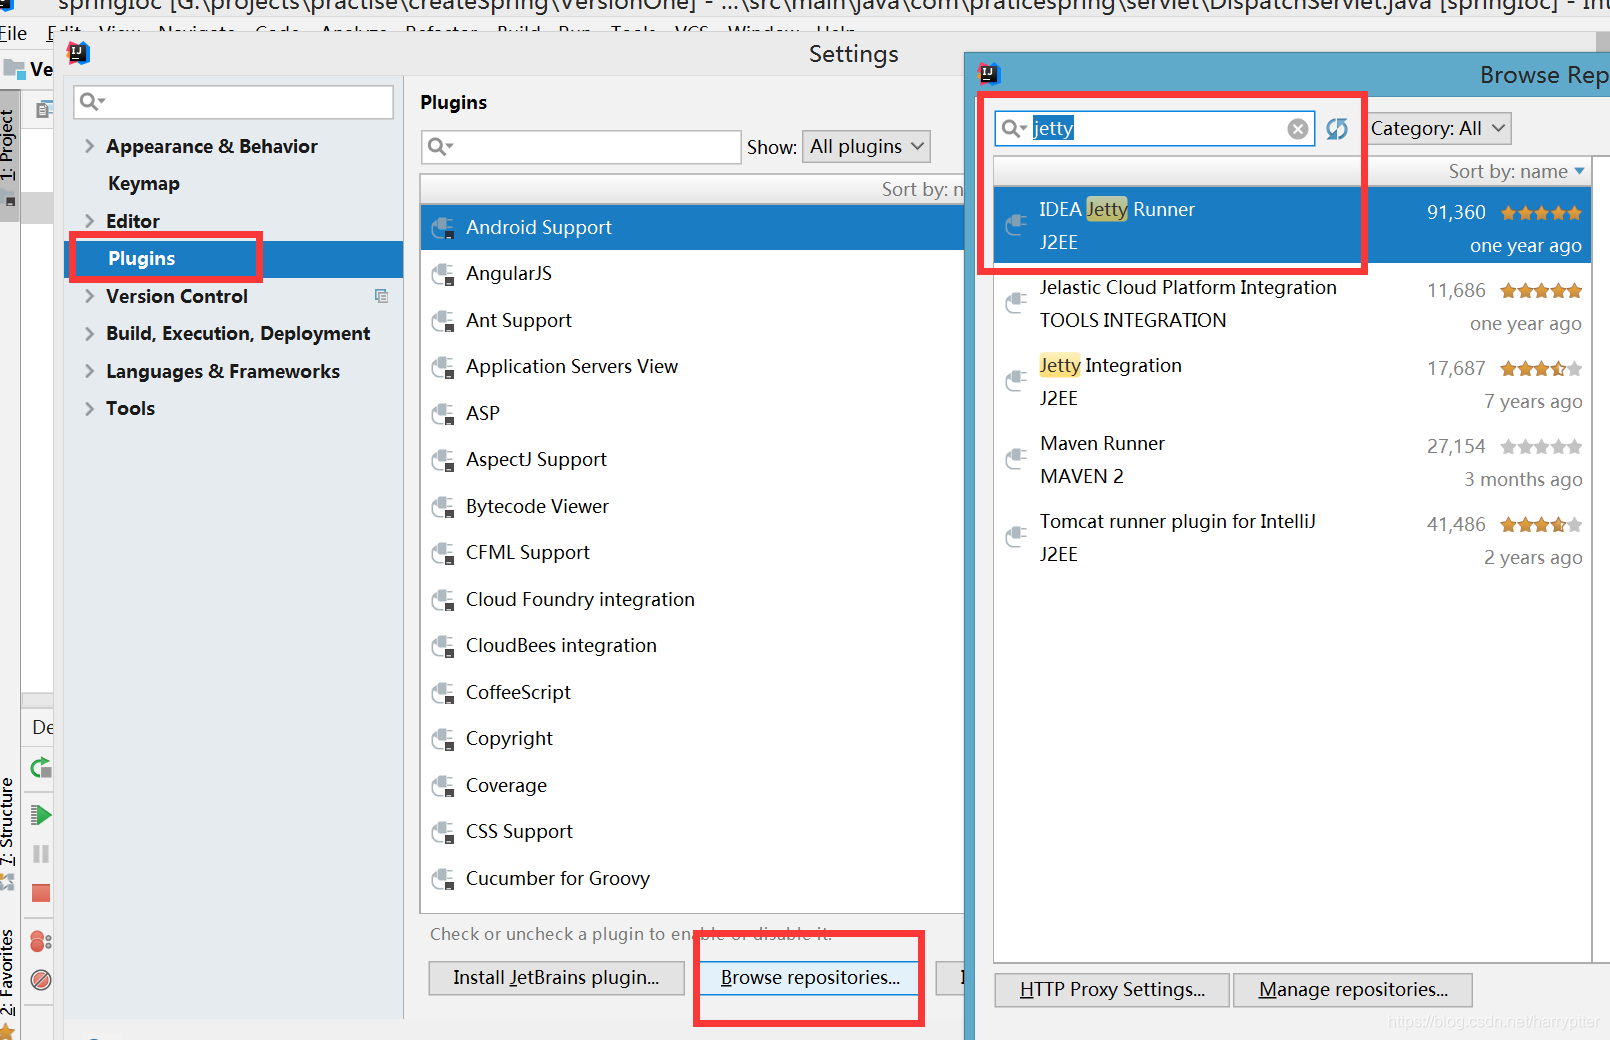
以上就是一件很簡單的IOC的邏輯了。之後會寫一個更詳細的IOC容器。另外,以上的debug藉助了jetty Runner ,在IntellJ IDEA的Setting->Plugins->Browse repositories裡面搜尋jetty runner下載
相對應的配置: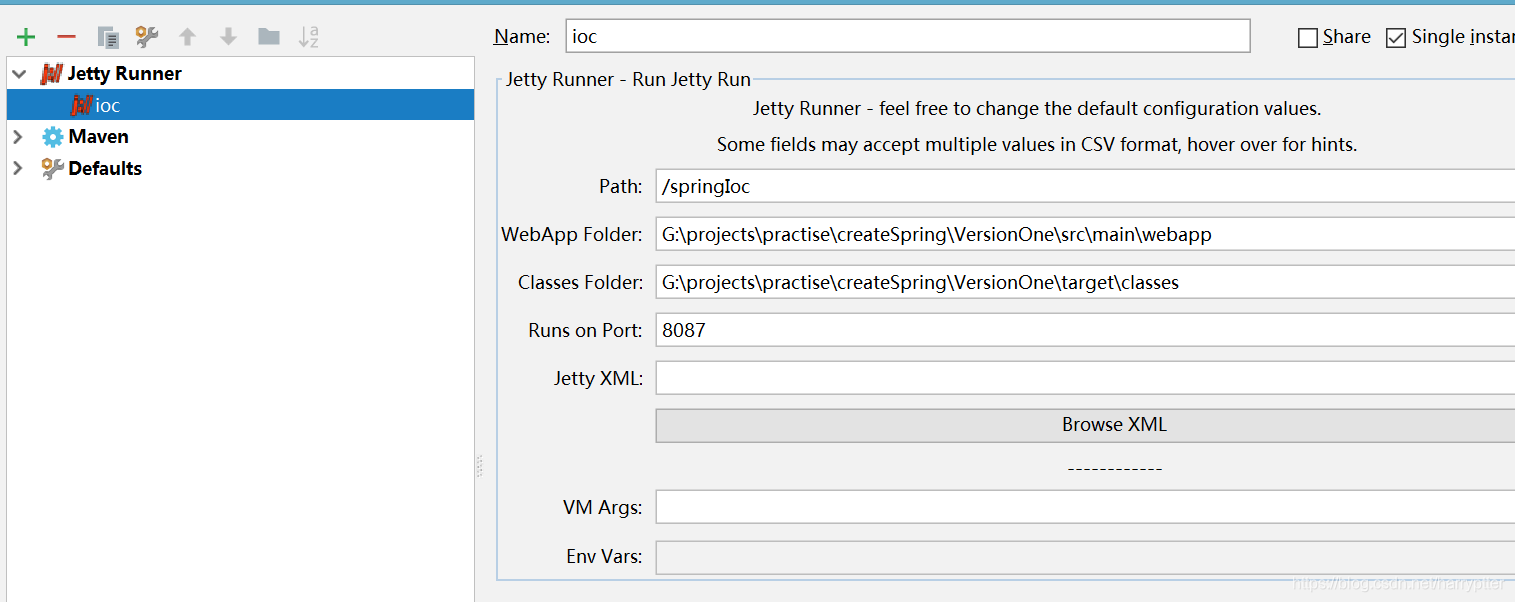
執行的時候是點選idea右側Maven projects:
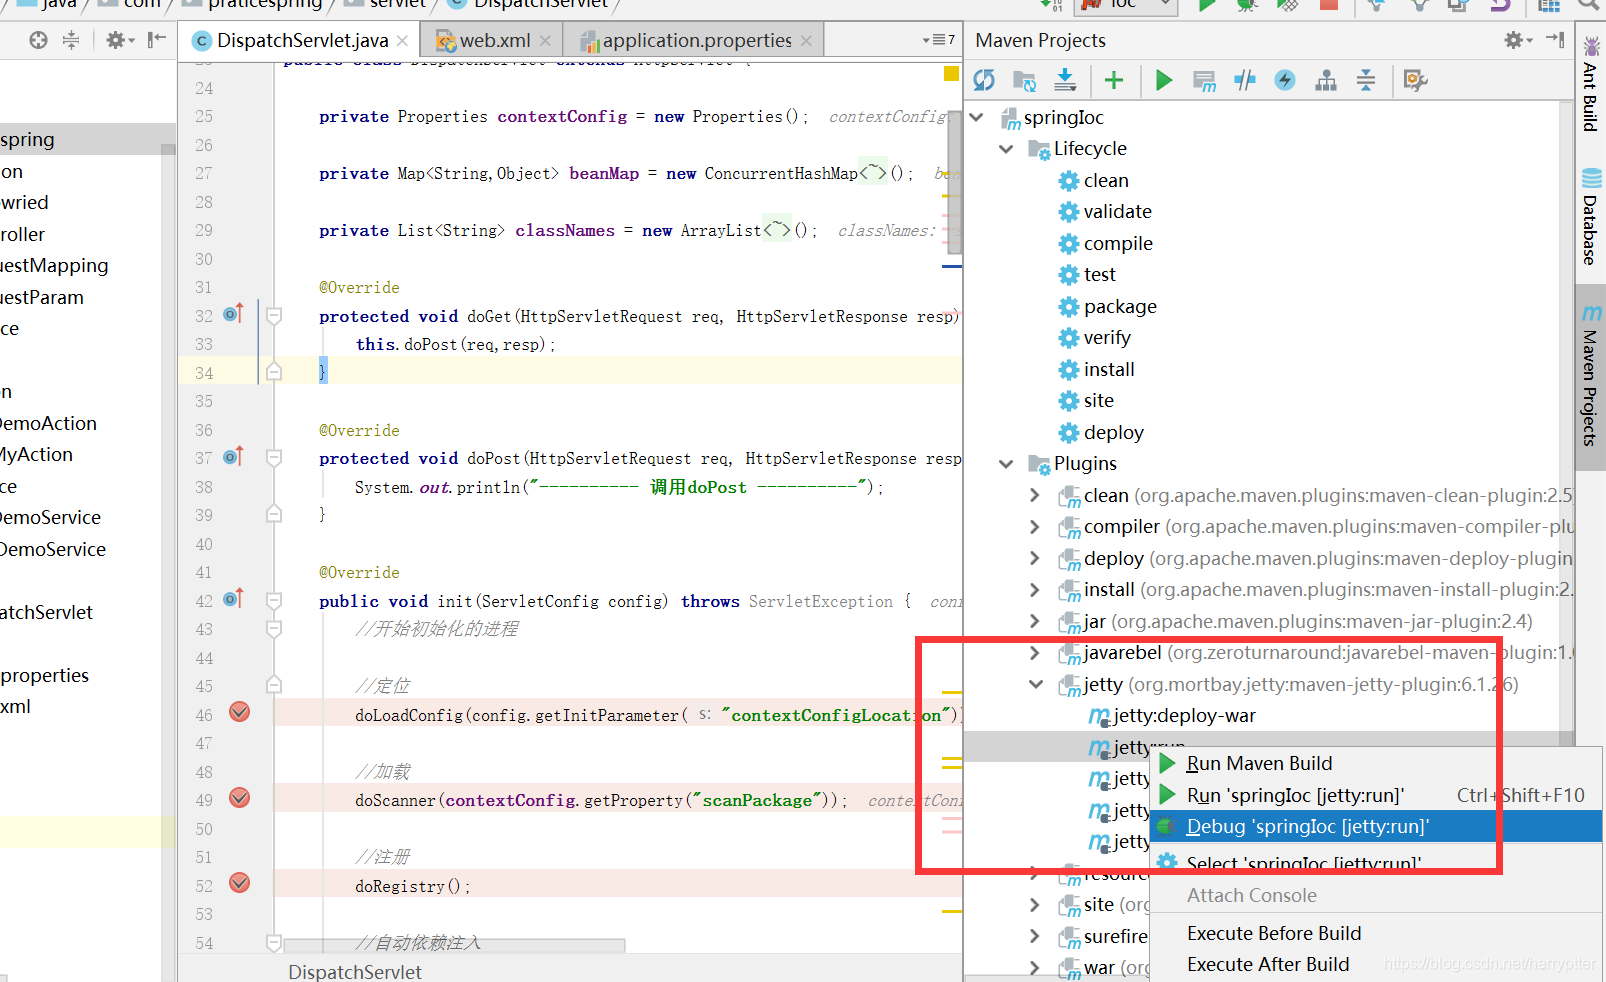
因為主要為了知道IOC的流程,所以用debug模式跑比較好。