
Android應用程式的啟動過程
前言
在Android系統中,Activity和Service是應用程式的核心元件,它們以鬆藕合的方式組合在一起構成了一個完整的應用程式,這得益於應用程式框架層提供了一套完整的機制來協助應用程式啟動這些Activity和Service,以及提供Binder機制幫助它們相互間進行通訊。
在Android系統中,有兩種操作會引發Activity的啟動,一種使用者點選應用程式圖示時,Launcher會為我們啟動應用程式的主Activity;應用程式的預設Activity啟動起來後,它又可以在內部通過呼叫startActvity介面啟動新的Activity,依此類推,每一個Activity都可以在內部啟動新的Activity。通過這種連鎖反應,按需啟動Activity,從而完成應用程式的功能。
這裡,我們通過一個具體的例子來說明如何啟動Android應用程式的Activity。Activity的啟動方式有兩種,一種是顯式的,一種是隱式的,隱式啟動可以使得Activity之間的藕合性更加鬆散,因此,這裡只關注隱式啟動Activity的方法。
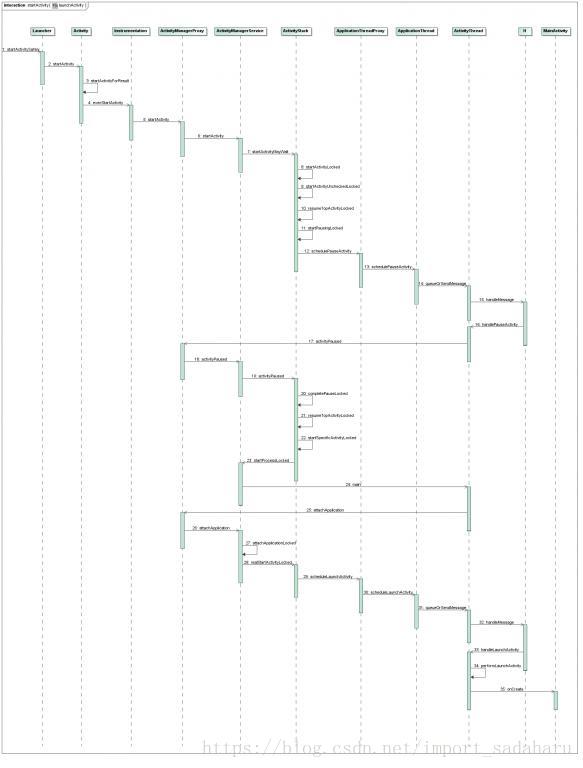
- MainActivity的啟動過程如下圖所示:.
簡要流程
① 點選桌面App圖示,Launcher程序採用Binder IPC向system_server程序發起startActivity請求;

② system_server程序接收到請求後,向zygote程序傳送建立程序的請求;
③ Zygote程序fork出新的子程序,即App程序;
④ App程序,通過Binder IPC向sytem_server程序發起attachApplication請求;
⑤ system_server程序在收到請求後,進行一系列準備工作後,再通過binder IPC向App程序傳送scheduleLaunchActivity請求;
⑥ App程序的binder執行緒(ApplicationThread)在收到請求後,通過handler向主執行緒傳送LAUNCH_ACTIVITY訊息;
⑦ 主執行緒在收到Message後,通過發射機制建立目標Activity,並回調Activity.onCreate()等方法。
⑧ 到此,App便正式啟動,開始進入Activity生命週期,執行完onCreate/onStart/onResume方法,UI渲染結束後便可以看到App的主介面。
具體流程
Step 1. Launcher.startActivitySafely
在Android系統中,應用程式是由Launcher啟動起來的,其實,Launcher本身也是一個應用程式,其它的應用程式安裝後,就會Launcher的介面上出現一個相應的圖示,點選這個圖示時,Launcher就會對應的應用程式啟動起來。
Launcher的原始碼工程在packages/apps/Launcher2目錄下,負責啟動其它應用程式的原始碼實現在src/com/android/launcher2/Launcher.java檔案中:
/**
* Default launcher application.
*/
public final class Launcher extends Activity
		implements View.OnClickListener, OnLongClickListener, LauncherModel.Callbacks, AllAppsView.Watcher {

	......

	/**
	* Launches the intent referred by the clicked shortcut.
	*
	* @param v The view representing the clicked shortcut.
	*/
	public void onClick(View v) {
		Object tag = v.getTag();
		if (tag instanceof ShortcutInfo) {
			// Open shortcut
			final Intent intent = ((ShortcutInfo) tag).intent;
			int[] pos = new int[2];
			v.getLocationOnScreen(pos);
			intent.setSourceBounds(new Rect(pos[0], pos[1],
				pos[0] + v.getWidth(), pos[1] + v.getHeight()));
			startActivitySafely(intent, tag);
		} else if (tag instanceof FolderInfo) {
			......
		} else if (v == mHandleView) {
			......
		}
	}

	void startActivitySafely(Intent intent, Object tag) {
		intent.addFlags(Intent.FLAG_ACTIVITY_NEW_TASK);
		try {
			startActivity(intent);
		} catch (ActivityNotFoundException e) {
			......
		} catch (SecurityException e) {
			......
		}
	}

	......

}
它的預設Activity是MainActivity,這裡是AndroidManifest.xml檔案中配置的:
<activity android:name=".MainActivity"
      android:label="@string/app_name">
       <intent-filter>
        <action android:name="android.intent.action.MAIN" />
        <category android:name="android.intent.category.LAUNCHER" />
    </intent-filter>
</activity>
因此,這裡的intent包含的資訊為:action = “android.intent.action.Main”,category=“android.intent.category.LAUNCHER”, cmp=“shy.luo.activity/.MainActivity”,表示它要啟動的Activity為shy.luo.activity.MainActivity。Intent.FLAG_ACTIVITY_NEW_TASK表示要在一個新的Task中啟動這個Activity,注意,Task是Android系統中的概念,它不同於程序Process的概念。簡單地說,一個Task是一系列Activity的集合,這個集合是以堆疊的形式來組織的,遵循後進先出的原則。事實上,Task是一個非常複雜的概念,有興趣的讀者可以到官網檢視相關的資料。這裡,我們只要知道,這個MainActivity要在一個新的Task中啟動就可以了。
Step 2. Activity.startActivity
在Step 1中,我們看到,Launcher繼承於Activity類,而Activity類實現了startActivity函式,因此,這裡就呼叫了Activity.startActivity函式,它實現在frameworks/base/core/java/android/app/Activity.java檔案中:
public class Activity extends ContextThemeWrapper
		implements LayoutInflater.Factory,
		Window.Callback, KeyEvent.Callback,
		OnCreateContextMenuListener, ComponentCallbacks {

	......

	@Override
	public void startActivity(Intent intent) {
		startActivityForResult(intent, -1);
	}

	......

}
這個函式實現很簡單,它呼叫startActivityForResult來進一步處理,第二個引數傳入-1表示不需要這個Actvity結束後的返回結果。
Step 3. Activity.startActivityForResult
這個函式也是實現在frameworks/base/core/java/android/app/Activity.java檔案中:
public class Activity extends ContextThemeWrapper
		implements LayoutInflater.Factory,
		Window.Callback, KeyEvent.Callback,
		OnCreateContextMenuListener, ComponentCallbacks {

	......

	public void startActivityForResult(Intent intent, int requestCode) {
		if (mParent == null) {
			Instrumentation.ActivityResult ar =
				mInstrumentation.execStartActivity(
				this, mMainThread.getApplicationThread(), mToken, this,
				intent, requestCode);
			......
		} else {
			......
		}


	......

}
這裡的mInstrumentation是Activity類的成員變數,它的型別是Intrumentation,定義在frameworks/base/core/java/android/app/Instrumentation.java檔案中,它用來監控應用程式和系統的互動。
這裡的mMainThread也是Activity類的成員變數,它的型別是ActivityThread,它代表的是應用程式的主執行緒。這裡通過mMainThread.getApplicationThread獲得它裡面的ApplicationThread成員變數,它是一個Binder物件,後面我們會看到,ActivityManagerService會使用它來和ActivityThread來進行程序間通訊。這裡我們需注意的是,這裡的mMainThread代表的是Launcher應用程式執行的程序。
這裡的mToken也是Activity類的成員變數,它是一個Binder物件的遠端介面。
Step 4. Instrumentation.execStartActivity
這個函式定義在frameworks/base/core/java/android/app/Instrumentation.java檔案中:
public class Instrumentation {

	......

	public ActivityResult execStartActivity(
	Context who, IBinder contextThread, IBinder token, Activity target,
	Intent intent, int requestCode) {
		IApplicationThread whoThread = (IApplicationThread) contextThread;
		if (mActivityMonitors != null) {
			......
		}
		try {
			int result = ActivityManagerNative.getDefault()
				.startActivity(whoThread, intent,
				intent.resolveTypeIfNeeded(who.getContentResolver()),
				null, 0, token, target != null ? target.mEmbeddedID : null,
				requestCode, false, false);
			......
		} catch (RemoteException e) {
		}
		return null;
	}

	......

}
這裡的ActivityManagerNative.getDefault返回ActivityManagerService的遠端介面,即ActivityManagerProxy介面。
這裡的intent.resolveTypeIfNeeded返回這個intent的MIME型別,在這個例子中,沒有AndroidManifest.xml設定MainActivity的MIME型別,因此,這裡返回null。
這裡的target不為null,但是target.mEmbddedID為null,我們不用關注。
Step 5. ActivityManagerProxy.startActivity
這個函式定義在frameworks/base/core/java/android/app/ActivityManagerNative.java檔案中:
class ActivityManagerProxy implements IActivityManager
{

	......

	public int startActivity(IApplicationThread caller, Intent intent,
			String resolvedType, Uri[] grantedUriPermissions, int grantedMode,
			IBinder resultTo, String resultWho,
			int requestCode, boolean onlyIfNeeded,
			boolean debug) throws RemoteException {
		Parcel data = Parcel.obtain();
		Parcel reply = Parcel.obtain();
		data.writeInterfaceToken(IActivityManager.descriptor);
		data.writeStrongBinder(caller != null ? caller.asBinder() : null);
		intent.writeToParcel(data, 0);
		data.writeString(resolvedType);
		data.writeTypedArray(grantedUriPermissions, 0);
		data.writeInt(grantedMode);
		data.writeStrongBinder(resultTo);
		data.writeString(resultWho);
		data.writeInt(requestCode);
		data.writeInt(onlyIfNeeded ? 1 : 0);
		data.writeInt(debug ? 1 : 0);
		mRemote.transact(START_ACTIVITY_TRANSACTION, data, reply, 0);
		reply.readException();
		int result = reply.readInt();
		reply.recycle();
		data.recycle();
		return result;
	}

	......

}
這裡的引數比較多,我們先整理一下。從上面的呼叫可以知道,這裡的引數resolvedType、grantedUriPermissions和resultWho均為null;引數caller為ApplicationThread型別的Binder實體;引數resultTo為一個Binder實體的遠端介面,我們先不關注它;引數grantedMode為0,我們也先不關注它;引數requestCode為-1;引數onlyIfNeeded和debug均空false。
Step 6. ActivityManagerService.startActivity
上一步Step 5通過Binder驅動程式就進入到ActivityManagerService的startActivity函式來了,它定義在frameworks/base/services/java/com/android/server/am/ActivityManagerService.java檔案中:
public final class ActivityManagerService extends ActivityManagerNative
		implements Watchdog.Monitor, BatteryStatsImpl.BatteryCallback {

	......

	public final int startActivity(IApplicationThread caller,
			Intent intent, String resolvedType, Uri[] grantedUriPermissions,
			int grantedMode, IBinder resultTo,
			String resultWho, int requestCode, boolean onlyIfNeeded,
			boolean debug) {
		return mMainStack.startActivityMayWait(caller, intent, resolvedType,
			grantedUriPermissions, grantedMode, resultTo, resultWho,
			requestCode, onlyIfNeeded, debug, null, null);
	}


	......

}
這裡只是簡單地將操作轉發給成員變數mMainStack的startActivityMayWait函式,這裡的mMainStack的型別為ActivityStack。
Step 7. ActivityStack.startActivityMayWait
這個函式定義在frameworks/base/services/java/com/android/server/am/ActivityStack.java檔案中:
public class ActivityStack {

	......

	final int startActivityMayWait(IApplicationThread caller,
			Intent intent, String resolvedType, Uri[] grantedUriPermissions,
			int grantedMode, IBinder resultTo,
			String resultWho, int requestCode, boolean onlyIfNeeded,
			boolean debug, WaitResult outResult, Configuration config) {

		......

		boolean componentSpecified = intent.getComponent() != null;

		// Don't modify the client's object!
		intent = new Intent(intent);

		// Collect information about the target of the Intent.
		ActivityInfo aInfo;
		try {
			ResolveInfo rInfo =
				AppGlobals.getPackageManager().resolveIntent(
				intent, resolvedType,
				PackageManager.MATCH_DEFAULT_ONLY
				| ActivityManagerService.STOCK_PM_FLAGS);
			aInfo = rInfo != null ? rInfo.activityInfo : null;
		} catch (RemoteException e) {
			......
		}

		if (aInfo != null) {
			// Store the found target back into the intent, because now that
			// we have it we never want to do this again.  For example, if the
			// user navigates back to this point in the history, we should
			// always restart the exact same activity.
			intent.setComponent(new ComponentName(
				aInfo.applicationInfo.packageName, aInfo.name));
			......
		}

		synchronized (mService) {
			int callingPid;
			int callingUid;
			if (caller == null) {
				......
			} else {
				callingPid = callingUid = -1;
			}

			mConfigWillChange = config != null
				&& mService.mConfiguration.diff(config) != 0;

			......

			if (mMainStack && aInfo != null &&
				(aInfo.applicationInfo.flags&ApplicationInfo.FLAG_CANT_SAVE_STATE) != 0) {

		              ......

			}

			int res = startActivityLocked(caller, intent, resolvedType,
				grantedUriPermissions, grantedMode, aInfo,
				resultTo, resultWho, requestCode, callingPid, callingUid,
				onlyIfNeeded, componentSpecified);

			if (mConfigWillChange && mMainStack) {
				......
			}

			......

			if (outResult != null) {
				......
			}

			return res;
		}

	}

	......

}
注意,從Step 6傳下來的引數outResult和config均為null,此外,表示式(aInfo.applicationInfo.flags&ApplicationInfo.FLAG_CANT_SAVE_STATE) != 0為false,因此,這裡忽略了無關程式碼。
下面語句對引數intent的內容進行解析,得到MainActivity的相關資訊,儲存在aInfo變數中:
 ActivityInfo aInfo;
    try {
	ResolveInfo rInfo =
	AppGlobals.getPackageManager().resolveIntent(
		intent, resolvedType,
		PackageManager.MATCH_DEFAULT_ONLY
		| ActivityManagerService.STOCK_PM_FLAGS);
	aInfo = rInfo != null ? rInfo.activityInfo : null;
    } catch (RemoteException e) {
		......
    }
解析之後,得到的aInfo.applicationInfo.packageName的值為"shy.luo.activity",aInfo.name的值為"shy.luo.activity.MainActivity",這是在這個例項的配置檔案AndroidManifest.xml裡面配置的。
此外,函式開始的地方呼叫intent.getComponent()函式的返回值不為null,因此,這裡的componentSpecified變數為true。
Step 8. ActivityStack.startActivityLocked
這個函式定義在frameworks/base/services/java/com/android/server/am/ActivityStack.java檔案中:
public class ActivityStack {

	......

	final int startActivityLocked(IApplicationThread caller,
		    Intent intent, String resolvedType,
		    Uri[] grantedUriPermissions,
		    int grantedMode, ActivityInfo aInfo, IBinder resultTo,
	            String resultWho, int requestCode,
		    int callingPid, int callingUid, boolean onlyIfNeeded,
		    boolean componentSpecified) {
	        int err = START_SUCCESS;

		ProcessRecord callerApp = null;
		if (caller != null) {
			callerApp = mService.getRecordForAppLocked(caller);
			if (callerApp != null) {
				callingPid = callerApp.pid;
				callingUid = callerApp.info.uid;
			} else {
				......
			}
		}

		......

		ActivityRecord sourceRecord = null;
		ActivityRecord resultRecord = null;
		if (resultTo != null) {
			int index = indexOfTokenLocked(resultTo);

			......

			if (index >= 0) {
				sourceRecord = (ActivityRecord)mHistory.get(index);
				if (requestCode >= 0 && !sourceRecord.finishing) {
					......
				}
			}
		}

		int launchFlags = intent.getFlags();

		if ((launchFlags&Intent.FLAG_ACTIVITY_FORWARD_RESULT) != 0
			&& sourceRecord != null) {
			......
		}

		if (err == START_SUCCESS && intent.getComponent() == null) {
			......
		}

		if (err == START_SUCCESS && aInfo == null) {
			......
		}

		if (err != START_SUCCESS) {
			......
		}

		......

		ActivityRecord r = new ActivityRecord(mService, this, callerApp, callingUid,
			intent, resolvedType, aInfo, mService.mConfiguration,
			resultRecord, resultWho, requestCode, componentSpecified);

		......

		return startActivityUncheckedLocked(r, sourceRecord,
			grantedUriPermissions, grantedMode, onlyIfNeeded, true);
	}


	......

}
從傳進來的引數caller得到呼叫者的程序資訊,並儲存在callerApp變數中,這裡就是Launcher應用程式的程序資訊了。
前面說過,引數resultTo是Launcher這個Activity裡面的一個Binder物件,通過它可以獲得Launcher這個Activity的相關資訊,儲存在sourceRecord變數中。
再接下來,建立即將要啟動的Activity的相關資訊,並儲存在r變數中:
ActivityRecord r = new ActivityRecord(mService, this, callerApp, callingUid,
	intent, resolvedType, aInfo, mService.mConfiguration,
	resultRecord, resultWho, requestCode, componentSpecified);
接著呼叫startActivityUncheckedLocked函式進行下一步操作。
Step 9. ActivityStack.startActivityUncheckedLocked
這個函式定義在frameworks/base/services/java/com/android/server/am/ActivityStack.java檔案中:
 public class ActivityStack {

	......

	final int startActivityUncheckedLocked(ActivityRecord r,
		ActivityRecord sourceRecord, Uri[] grantedUriPermissions,
		int grantedMode, boolean onlyIfNeeded, boolean doResume) {
		final Intent intent = r.intent;
		final int callingUid = r.launchedFromUid;

		int launchFlags = intent.getFlags();

		// We'll invoke onUserLeaving before onPause only if the launching
		// activity did not explicitly state that this is an automated launch.
		mUserLeaving = (launchFlags&Intent.FLAG_ACTIVITY_NO_USER_ACTION) == 0;

		......

		ActivityRecord notTop = (launchFlags&Intent.FLAG_ACTIVITY_PREVIOUS_IS_TOP)
			!= 0 ? r : null;

		// If the onlyIfNeeded flag is set, then we can do this if the activity
		// being launched is the same as the one making the call...  or, as
		// a special case, if we do not know the caller then we count the
		// current top activity as the caller.
		if (onlyI