
Android原始碼解析之(十)-->Launcher啟動流程
上一篇文章中我們講解了關於SystemServer程序相關的知識,我們知道SystemServer程序主要用於啟動系統的各種服務,二者其中就包含了負責啟動Launcher的服務,LauncherAppService。具體更多關於SystenServer的啟動流程可以參見: android原始碼解析之(九)–>SystemServer程序啟動流程
本文我們將講解Launcher相關的知識。Launcher程式就是我們平時看到的桌面程式,它其實也是一個android應用程式,只不過這個應用程式是系統預設第一個啟動的應用程式,這裡我們就簡單的分析一下Launcher應用的啟動流程。
不同的手機廠商定製android作業系統的時候都會更改Launcher的原始碼,我們這裡以android23的原始碼為例大致的分析一下Launcher的啟動流程。
通過前一篇文章我們知道在SystemServer程序的啟動過程中會呼叫其main靜態方法,開始執行整個SystemServer的啟動流程,在其中通過呼叫三個內部方法分別啟動boot service、core service和other service。在呼叫startOtherService方法中就會通過呼叫mActivityManagerService.systemReady()方法,那麼我們看一下其具體實現:
mActivityManagerService.systemReady(new Runnable() {
@Override
public void run() {
/**
* 執行各種SystemService的啟動方法,各種SystemService的systemReady方法... 可以發現這個方法傳遞了一個Runnable引數,裡面執行了各種其他服務的systemReady方法,這裡不是我們關注的重點,我們看一下在ActivityManagerService中systemReady方法的具體實現,方法體比較長,我就不在這裡貼出程式碼了,主要的邏輯就是做一些ActivityManagerService的ready操作
public void systemReady(final Runnable goingCallback) {
... 重點是在這個方法體中呼叫了startHomeActivityLocked方法,看其名字就是說開始執行啟動homeActivity的操作,好了,既然如此,我們再看一下startHomeActivityLocked的具體實現:
boolean startHomeActivityLocked(int userId, String reason) {
        if (mFactoryTest == FactoryTest.FACTORY_TEST_LOW_LEVEL
                && mTopAction == null) {
            // We are running in factory test mode, but unable to find
            // the factory test app, so just sit around displaying the
            // error message and don't try to start anything.
            return false;
        }
        Intent intent = getHomeIntent();
        ActivityInfo aInfo =
            resolveActivityInfo(intent, STOCK_PM_FLAGS, userId);
        if (aInfo != null) {
            intent.setComponent(new ComponentName(
                    aInfo.applicationInfo.packageName, aInfo.name));
            // Don't do this if the home app is currently being
            // instrumented.
            aInfo = new ActivityInfo(aInfo);
            aInfo.applicationInfo = getAppInfoForUser(aInfo.applicationInfo, userId);
            ProcessRecord app = getProcessRecordLocked(aInfo.processName,
                    aInfo.applicationInfo.uid, true);
            if (app == null || app.instrumentationClass == null) {
                intent.setFlags(intent.getFlags() | Intent.FLAG_ACTIVITY_NEW_TASK);
                mStackSupervisor.startHomeActivity(intent, aInfo, reason);
            }
        }

        return true;
    }
首先是呼叫getHomeIntent()方法,看一下getHomeIntent是如何實現構造Intent物件的:
Intent getHomeIntent() {
        Intent intent = new Intent(mTopAction, mTopData != null ? Uri.parse(mTopData) : null);
        intent.setComponent(mTopComponent);
        if (mFactoryTest != FactoryTest.FACTORY_TEST_LOW_LEVEL) {
            intent.addCategory(Intent.CATEGORY_HOME);
        }
        return intent;
    }
可以發現,啟動Launcher的Intent物件中添加了Intent.CATEGORY_HOME常量,這個其實是一個launcher的標誌,一般系統的啟動頁面Activity都會在androidmanifest.xml中配置這個標誌。比如我們在github中的android launcher原始碼中檢視其androidmanifest.xml檔案:
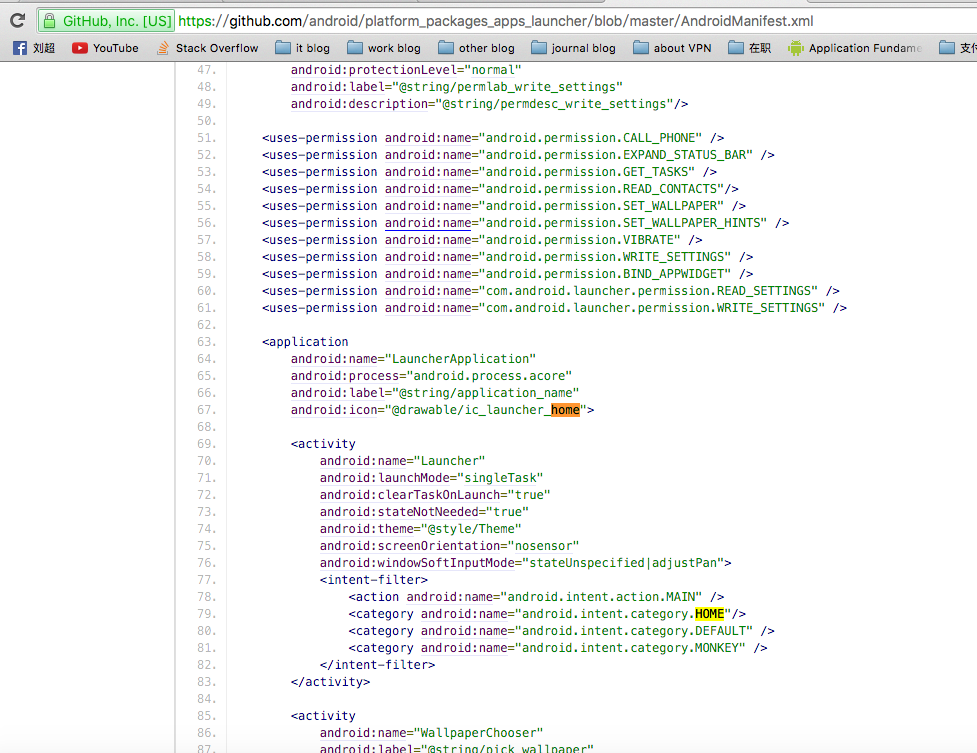
可以發現其Activity的定義intentfilter中就是定義了這樣的category。不同的手機廠商可能會修改Launcher的原始碼,但是這個category一般是不會更改的。
繼續回到我們的startHomeActivityLocked方法,我們發現經過一系列的判斷邏輯之後最後呼叫了mStackSupervisor.startHomeActivity方法,然後我們可以檢視一下該方法的具體實現邏輯:
void startHomeActivity(Intent intent, ActivityInfo aInfo, String reason) {
        moveHomeStackTaskToTop(HOME_ACTIVITY_TYPE, reason);
        startActivityLocked(null /* caller */, intent, null /* resolvedType */, aInfo,
                null /* voiceSession */, null /* voiceInteractor */, null /* resultTo */,
                null /* resultWho */, 0 /* requestCode */, 0 /* callingPid */, 0 /* callingUid */,
                null /* callingPackage */, 0 /* realCallingPid */, 0 /* realCallingUid */,
                0 /* startFlags */, null /* options */, false /* ignoreTargetSecurity */,
                false /* componentSpecified */,
                null /* outActivity */, null /* container */,  null /* inTask */);
        if (inResumeTopActivity) {
            // If we are in resume section already, home activity will be initialized, but not
            // resumed (to avoid recursive resume) and will stay that way until something pokes it
            // again. We need to schedule another resume.
            scheduleResumeTopActivities();
        }
}發現其呼叫的是scheduleResumeTopActivities()方法,這個方法其實是關於Activity的啟動流程的邏輯了,這裡我們不在詳細的說明,關於Activity的啟動流程可以參考我的:Android原始碼解析之(十四)–>Activity啟動流程
因為我們的Launcher啟動的Intent是一個隱士的Intent,所以我們會啟動在androidmanifest.xml中配置了相同catogory的activity,android M中配置的這個catogory就是LauncherActivity。
LauncherActivity繼承與ListActivity,我們看一下其Layout佈局檔案:
<FrameLayout xmlns:android="http://schemas.android.com/apk/res/android"
    android:layout_width="match_parent"
    android:layout_height="match_parent"
    >

    <ListView
        android:id="@android:id/list"
        android:layout_width="match_parent"
        android:layout_height="match_parent"
        />

    <TextView
        android:id="@android:id/empty"
        android:layout_width="match_parent"
        android:layout_height="match_parent"
        android:gravity="center"
        android:text="@string/activity_list_empty"
        android:visibility="gone"
        android:textAppearance="?android:attr/textAppearanceMedium"
        />

</FrameLayout>
可以看到我們現實的桌面其實就是一個ListView控制元件,然後看一下其onCreate方法:
@Override
    protected void onCreate(Bundle icicle) {
        super.onCreate(icicle);

        mPackageManager = getPackageManager();

        if (!mPackageManager.hasSystemFeature(PackageManager.FEATURE_WATCH)) {
            requestWindowFeature(Window.FEATURE_INDETERMINATE_PROGRESS);
            setProgressBarIndeterminateVisibility(true);
        }
        onSetContentView();

        mIconResizer = new IconResizer();

        mIntent = new Intent(getTargetIntent());
        mIntent.setComponent(null);
        mAdapter = new ActivityAdapter(mIconResizer);

        setListAdapter(mAdapter);
        getListView().setTextFilterEnabled(true);

        updateAlertTitle();
        updateButtonText();

        if (!mPackageManager.hasSystemFeature(PackageManager.FEATURE_WATCH)) {
            setProgressBarIndeterminateVisibility(false);
        }
    }
可以看到在LauncherActivity的onCreate方法中初始化了一個PackageManager,其主要作用就是從中查詢出系統所有已經安裝的應用列表,應用包名,應用圖示等資訊。然後將這些資訊注入到Adapter中,這樣就可以將系統應用圖示和名稱顯示出來了。
在系統的回撥方法onListItemClick中
@Override
    protected void onListItemClick(ListView l, View v, int position, long id) {
        Intent intent = intentForPosition(position);
        startActivity(intent);
    }
這也就是為什麼我們點選了某一個應用圖示之後可以啟動某一項應用的原因了,我們看一下這裡的intentForPosition是如何實現的。
protected Intent intentForPosition(int position) {
        ActivityAdapter adapter = (ActivityAdapter) mAdapter;
        return adapter.intentForPosition(position);
    }
這裡又呼叫了adapter的intentForPosition方法:
public Intent intentForPosition(int position) {
            if (mActivitiesList == null) {
                return null;
            }

            Intent intent = new Intent(mIntent);
            ListItem item = mActivitiesList.get(position);
            intent.setClassName(item.packageName, item.className);
            if (item.extras != null) {
                intent.putExtras(item.extras);
            }
            return intent;
        }
可以看到由於adapter的每一項中都儲存了應用的包名可啟動Activity名稱,所以這裡在初始化Intent的時候,直接將這些資訊注入到Intent中,然後呼叫startActivity,就將這些應用啟動了(關於startActivity是如何啟動的下面的文章中我將介紹)。
總結:
Launcher的啟動流程
Zygote程序 –> SystemServer程序 –> startOtherService方法 –> ActivityManagerService的systemReady方法 –> startHomeActivityLocked方法 –> ActivityStackSupervisor的startHomeActivity方法 –> 執行Activity的啟動邏輯,執行scheduleResumeTopActivities()方法。。。。
因為是隱士的啟動Activity,所以啟動的Activity就是在AndroidManifest.xml中配置catogery的值為:
public static final String CATEGORY_HOME = "android.intent.category.HOME";可以發現android M中在androidManifest.xml中配置了這個catogory的activity是LauncherActivity,所以我們就可以將這個Launcher啟動起來了
- LauncherActivity中是以ListView來顯示我們的應用圖示列表的,並且為每個Item儲存了應用的包名和啟動Activity類名,這樣點選某一項應用圖示的時候就可以根據應用包名和啟動Activity名稱啟動我們的App了。