
【OpenStack】OpenStack筆記
宣告:
本部落格歡迎轉發,但請保留原作者資訊!
新浪微博:@孔令賢HW;
內容系本人學習、研究和總結,如有雷同,實屬榮幸!
1. 通用
binary = os.path.basename(inspect.stack()[-1][1]) 這是因為python可以檢視堆疊的內容。所以可以得到壓入棧中的指令碼的名字。比如binary="nova-compute"根據類名動態匯入類:
mod_str, _sep, class_str = import_str.rpartition('.')
try:
	__import__(mod_str)
	return getattr(sys.modules[mod_str], class_str)
except (ImportError, ValueError, AttributeError), exc:
相關元件/專案:
yagi:從AMQP佇列中獲取通知,提供API,通過PubSubHubbub提供訂閱資訊
計費: Dough https://github.com/lzyeval/dough
trystack.org billing https://github.com/trystack/dash_billing
nova-billing https://github.com/griddynamics/nova-billing
主機監控: Nagios, Zabbix and Munin
Climate(component towards resource reservations, capacity leasing project), https://launchpad.net/climate
XCloud: HPC on cloud,http://xlcloud.org/bin/view/Main/
Savanna: this project is to enable users to easily provision and manage Hadoop clusters on OpenStack, https://wiki.openstack.org/wiki/Savanna
Ironic:there will be a driver in Nova that talks to the Ironic API for Bare Metal. 關於Bare Metal的BP和wiki:
https://blueprints.launchpad.net/nova/+spec/baremetal-force-node(for havana) https://wiki.openstack.org/wiki/GeneralBareMetalProvisioningFramework http://www.mirantis.com/blog/bare-metal-provisioning-with-openstack-cloud/(from mirantis)
國際化:
/nova/openstack/common/gettextutils.py
可以使用request和response的gzip 壓縮提高效能
Header Type Name Value
HTTP/1.1 Request Accept-Encoding gzip
HTTP/1.1 Response Content-Encoding gzip 可以使用分頁:

指定版本號,兩種方式:
1. GET /tenants HTTP/1.1
Host: identity.api.openstack.org
Accept: application/vnd.openstack.identity+xml;version=1.1
X-Auth-Token: eaaafd18-0fed-4b3a-81b4-663c99ec1cbb
2. GET /v1.1/tenants HTTP/1.1
Host: identity.api.openstack.org
Accept: application/xml
X-Auth-Token: eaaafd18-0fed-4b3a-81b4-663c99ec1cbb
直接Get http://IP:PORT可以檢視支援的版本號 Get extension是需要版本號的,這就意味著extension在版本之間可能並不通用。
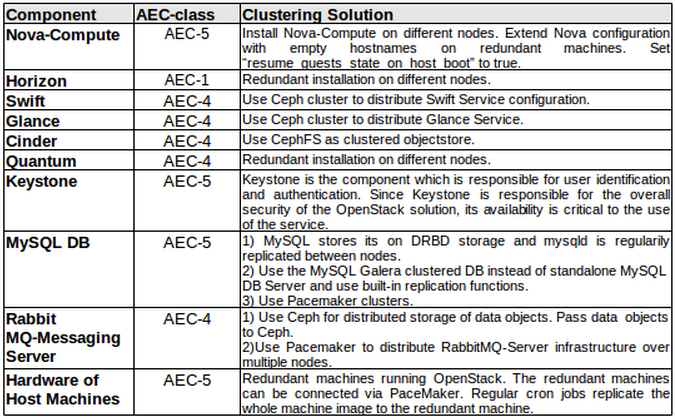
1.1 HA
1. Build OpenStack on top of Corosync and use Pacemaker cluster resource manager to replicate cluster OpenStack services over multiple redundant nodes.
2. For clustering of storage a DRBD block storage solution can be used. DRBD is a software that replicates block storage(hard disks etc.) over multiple nodes.
3. Object storage services can be clustered via Ceph. Ceph is a clustered storage solution which is able to cluster not only block devices but also data objects and filesystems. Obviously Swift Object Store could be made highly available by using Ceph.
4. OpenStack has MySQL as an underlying database system which is used to manage the different OpenStack Services. Instead of using a MySQL standalone database server one could use a MySQL Galera clustered database servers to make MySQL highly available too.
1.2 資料庫的備份和恢復
備份所有資料庫:mysqldump --opt --all-databases > openstack.sql 備份nova資料庫:mysqldump --opt nova > nova.sql 可以很容易新建一個crontab任務:#!/bin/bash
backup_dir="/var/lib/backups/mysql"
filename="${backup_dir}/mysql-`hostname`-`eval date +%Y%m%d`.sql.gz"
# Dump the entire MySQL database
/usr/bin/mysqldump --opt --all-databases | gzip > $filename
# Delete backups older than 7 days
find $backup_dir -ctime +7 -type f -delete2. 測試
To investigate risk probabilities and impacts, we must have a test on what happens to the OpenStack cloud if some components fail. One such test is the “Chaos Monkey” test developed by Netflix. A “Chaos Monkey” is a service which identifies groups of systems in an IT architecture environment and randomly terminates some of the systems. The random termination of some components serves as a test on what happens if some systems in a complex IT environment randomly fail. The risk of component failures in anOpenStack implementation could be tested by using such Chaos Monkey services.By running multiple tests on multiple OpenStack configurations one can easily learn if the current architecture is able to reach the required availabilitylevel or not.
3. 除錯
使用PDB除錯quantum
1. 插入程式碼:
import pdb; pdb.set_trace()
2. 停止服務
3. 手動啟動服務:/usr/bin/quantum-server --config-file /etc/quantum/quantum.conf --log-file /var/log/quantum/server.log
如果是nova,需要修改osapi_compute_workers=1,以防止併發
4. 日誌
Nova(Folsom)(nova/openstack/common/log.py)中定義了:
'%(asctime)s %(levelname)s %(name)s [%(request_id)s] %(instance)s %(message)s'
我一般在配置檔案中如下配置:
logging_default_format_string = '%(asctime)s %(levelname)s [%(name)s %(lineno)d] [%(process)d] %(message)s'
logging_context_format_string= '%(asctime)s %(levelname)s [%(name)s %(lineno)d] [%(process)d] %(message)s'
Quantum(Folsom)配置:
log_format='%(asctime)s %(levelname)s [%(name)s %(lineno)d] [%(process)d] %(message)s'
修改預設日誌檔案迴圈方式:
filelog = logging.handlers.RotatingFileHandler(logpath, maxBytes=10*1024*1024, backupCount=10)
log_root.addHandler(filelog)
檔案中加列印日誌需要先引入logging:
from nova.openstack.common import log as logging
LOG = logging.getLogger(__name__)
列印CONF的配置:
cfg.CONF.log_opt_values(LOG, logging.DEBUG)
rsyslog的使用:
如果系統中的節點過多,登入每一個節點分析日誌就顯得過於繁瑣。所幸的是,Ubuntu預設安裝了rsyslog服務,我們需要做的僅僅是按照需求進行配置即可。
rsyslog客戶端:配置各個元件中use_syslog=True,同時可以配置不同的syslog_log_facility=LOG_LOCAL0
然後在/etc/rsyslog.d/client.conf中配置:*.* @192.168.1.10
意思是把所有的日誌傳送到該伺服器。
rsyslog服務端:在服務端配置/etc/rsyslog.d/server.conf (只處理Nova日誌的示例):
# Enable UDP
$ModLoad imudp
# Listen on 192.168.1.10 only
$UDPServerAddress 192.168.1.10
# Port 514
$UDPServerRun 514

# Create logging templates for nova
$template NovaFile,"/var/log/rsyslog/%HOSTNAME%/nova.log"
$template NovaAll,"/var/log/rsyslog/nova.log"

# Log everything else to syslog.log
$template DynFile,"/var/log/rsyslog/%HOSTNAME%/syslog.log"
*.* ?DynFile

# Log various openstack components to their own individual file
local0.* ?NovaFile
local0.* ?NovaAll
& ~5. Nova
5.1 更新
可以檢視launchpad
5.2 通知機制
配置Nova產生通知(publish notifications to ‘nova’ exchange with routing-key ‘monitor.*’):
--notification_driver=nova.openstack.common.notifier.rabbit_notifier
--notification_topics= ['notifications', ‘monitor’]
為了獲取虛擬機器狀態發生變化的通知, 配置項"notify_on_state_change=vm_state";
為了獲取虛擬機器狀態或任務狀態(task state)發生變化的通知,配置項"notify_on_state_change=vm_and_task_state".
在nova/openstack/common/notifier中已經有幾個實現類
Rackspace開發了一個收集Nova通知的工具:StackTach
5.3 虛擬機器建立
5.3.1 block-device-mapping
若不指定,建立系統卷下載映象,虛擬機器刪除時刪除系統卷;
若指定,命令如下:
nova boot --image <image_id> --flavor 2 --key-name mykey --block-device-mapping vda=<vol_id>:<type>:<size>:<delete-on-terminate> <instance_name>
此時忽略image引數,type是snap或空;size儘量是空;(2013.06.08)G版可以不填--image <id>
一個例子:
nova boot kong2 --flavor 6 --nic port-id=93604ec4-010e-4fa5-a792-33901223313b --key-name mykey --block-device-mapping vda=b66e294e-b997-48c1-9208-817be475e95b:::0
[email protected]:~# nova show kong2
+-------------------------------------+----------------------------------------------------------+
| Property                            | Value                                                    |
+-------------------------------------+----------------------------------------------------------+
| status                              | ACTIVE                                                   |
| updated                             | 2013-06-26T10:01:29Z                                     |
| OS-EXT-STS:task_state               | None                                                     |
| OS-EXT-SRV-ATTR:host                | controller231                                            |
| key_name                            | mykey                                                    |
| image                               | Attempt to boot from volume - no image supplied          |
| hostId                              | 083729f2f8f664fffd4cffb8c3e76615d7abc1e11efc993528dd88b9 |
| OS-EXT-STS:vm_state                 | active                                                   |
| OS-EXT-SRV-ATTR:instance_name       | instance-00000021                                        |
| OS-EXT-SRV-ATTR:hypervisor_hostname | controller231.openstack.org                              |
| flavor                              | kong_flavor (6)                                          |
| id                                  | 8989a10b-5a89-4f87-9b59-83578eabb997                     |
| security_groups                     | [{u'name': u'default'}]                                  |
| user_id                             | f882feb345064e7d9392440a0f397c25                         |
| name                                | kong2                                                    |
| created                             | 2013-06-26T10:00:51Z                                     |
| tenant_id                           | 6fbe9263116a4b68818cf1edce16bc4f                         |
| OS-DCF:diskConfig                   | MANUAL                                                   |
| metadata                            | {}                                                       |
| accessIPv4                          |                                                          |
| accessIPv6                          |                                                          |
| testnet01 network                   | 10.1.1.6                                                 |
| progress                            | 0                                                        |
| OS-EXT-STS:power_state              | 1                                                        |
| OS-EXT-AZ:availability_zone         | nova                                                     |
| config_drive                        |                                                          |
+-------------------------------------+----------------------------------------------------------+
此時,傳遞給nova driver的block_device_info結構體:
{
	'block_device_mapping': [{
		'connection_info': {
			u'driver_volume_type': u'iscsi',
			'serial': u'b66e294e-b997-48c1-9208-817be475e95b',
			u'data': {
				u'target_discovered': False,
				u'target_iqn': u'iqn.2010-10.org.openstack: volume-b66e294e-b997-48c1-9208-817be475e95b',
				u'target_portal': u'192.168.82.231: 3260',
				u'volume_id': u'b66e294e-b997-48c1-9208-817be475e95b',
				u'target_lun': 1,
				u'auth_password': u'jcYpzNiA4ZQ4dyiC26fB',
				u'auth_username': u'CQZto4sC4HKkx57U4WfX',
				u'auth_method': u'CHAP'
			}
		},
		'mount_device': u'vda',
		'delete_on_termination': False
	}],
	'root_device_name': None,
	'ephemerals': [],
	'swap': None
}
在nova-compute中由ComputeManager物件的_setup_block_device_mapping方法處理,會呼叫Cinder的initialize_connection()和attach()。呼叫過程:
cinder-api --(RPC)--> 卷所在主機上的cinder-volume--> driver
initialize_connection方法返回:
connection_info:
{
    'driver_volume_type':'iscsi',
    'data': {
       'target_discovered': False,
       'target_iqn': 'iqn.2010-10.org.openstack:volume-a242e1b2-3f3f-42af-84a3-f41c87e19c2b',
       'target_portal': '182.168.61.24:3260',
       'volume_id': a242e1b2-3f3f-42af-84a3-f41c87e19c2b
    }
}
attach方法:修改資料表volumes的status(in-use)、mountpoint(vda)、attach_status(attached)、instance_uuid欄位
5.3.2 aggregate
相關介面都是管理員介面,最初是用來使用Xen hypervisor resource pools。相關的配置:
在scheduler_default_filters配置項加入AggregateInstanceExtraSpecsFilter
工作流:
$ nova aggregate-create fast-io nova
+----+---------+-------------------+-------+----------+
| Id | Name    | Availability Zone | Hosts | Metadata |
+----+---------+-------------------+-------+----------+
| 1  | fast-io | nova              |       |          |
+----+---------+-------------------+-------+----------+
$ nova aggregate-set-metadata 1 ssd=true(如果value為None,則刪除該key)
+----+---------+-------------------+-------+-------------------+
| Id | Name    | Availability Zone | Hosts | Metadata          |
+----+---------+-------------------+-------+-------------------+
| 1  | fast-io | nova              | []    | {u'ssd': u'true'} |
+----+---------+-------------------+-------+-------------------+
$ nova aggregate-add-host 1 node1(主機必須與aggregate在同一個zone)
+----+---------+-------------------+-----------+-------------------+
| Id | Name    | Availability Zone | Hosts      | Metadata          |
+----+---------+-------------------+------------+-------------------+
| 1  | fast-io | nova              | [u'node1'] | {u'ssd': u'true'} |
+----+---------+-------------------+------------+-------------------+
# nova-manage instance_type set_key --name=<flavor_name>  --key=ssd --value=true,或者使用:
# nova flavor-key 1 set ssd=true
(2013.5.26)G版中,建立aggregate時可以指定zone,此時,zone和aggregate的意義相同,普通使用者可以通過使用zone而使用aggregate。示例:
[email protected]:~/controller# nova aggregate-create my_aggregate my_zone
+----+--------------+-------------------+-------+----------+
| Id | Name         | Availability Zone | Hosts | Metadata |
+----+--------------+-------------------+-------+----------+
| 2  | my_aggregate | my_zone           |       |          |
+----+--------------+-------------------+-------+----------+
[email protected]:~/controller# nova aggregate-details 2
+----+--------------+-------------------+-------+------------------------------------+
| Id | Name | Availability Zone | Hosts | Metadata |
+----+--------------+-------------------+-------+------------------------------------+
| 2 | my_aggregate | my_zone | [] | {u'availability_zone': u'my_zone'} |
+----+--------------+-------------------+-------+------------------------------------+此時,zone只是aggregate的metadata中的選項之一。
5.3.3 指定主機建立
管理員操作
nova boot --image aee1d242-730f-431f-88c1-87630c0f07ba --flavor 1 --availability-zone nova:<host_name> testhost
5.3.4 注入
虛擬機器建立時可以向虛擬機器映象中注入key、password、net、metadata、files內容;
user data:虛擬機器可以通過查詢metadata service或從config-drive獲取user data,比如在虛擬機器內部執行:
$ curl http://169.254.169.254/2009-04-04/user-data
This is some text
$ curl http://169.254.169.254/openstack/2012-08-10/user_data
This is some text
user data和cloud-init則允許配置虛擬機器啟動時的行為,Cloud-init是Canonical的一個開源工程,Utuntu映象中都預裝了cloud-init,與Compute metadata service和Compute config drive相容。cloud-init能夠識別以#!(執行指令碼,相當於寫一個/etc/rc.local指令碼)或#cloud-config(可以與Puppet或Chef配合)開頭的內容。
Config drive:可以傳遞一些內容,虛擬機器啟動時掛載並讀取資訊。比如當DHCP不可用時,可以向config drive傳入網路配置。cloud-init可以自動從config drive獲取資訊,如果映象沒有安裝cloud-init,則需要自定義指令碼掛載config drive,讀取資料,執行任務。
一個複雜的建立虛擬機器示例:
nova boot --config-drive=true --image my-image-name --key-name mykey --flavor 1 --user-data ./my-user-data.txt myinstance --file /etc/network/interfaces=/home/myuser/instance-interfaces --file known_hosts=/home/myuser/.ssh/known_hosts --meta role=webservers
--meta essential=false
所有指定的資訊都可以從config drive獲取。
也可以指定配置項:force_config_drive=true,總是建立config drive
在虛擬機器內部訪問config drive:
# mkdir -p /mnt/config
# mount /dev/disk/by-label/config-2 /mnt/config
如果作業系統沒有使用udev,目錄/dev/disk/by-label可能不存在,可以用:
# blkid -t LABEL="config-2" -odevice
檢視config drive對應的卷標,然後執行:
# mkdir -p /mnt/config
# mount /dev/vdb /mnt/config
config drive中的內容(執行上述建立虛擬機器命令後):
ec2/2009-04-04/meta-data.json
ec2/2009-04-04/user-data
ec2/latest/meta-data.json
ec2/latest/user-data
openstack/2012-08-10/meta_data.json
openstack/2012-08-10/user_data
openstack/content
openstack/content/0000
openstack/content/0001
openstack/latest/meta_data.json
openstack/latest/user_data
ec2開頭的記錄會在將來移除,選擇版本號最高的記錄,如openstack/2012-08-10/meta_data.json檔案內容(與openstack/latest/meta_data.json內容相同):
openstack/2012-08-10/user_data檔案(內容同openstack/latest/user_data)在有--user-data時才會建立,包含引數中傳遞的檔案內容。

(2013.06.27)對於注入的key、userdata等內容的獲取,G版中提供了新的實現方式,可以參見metadata在OpenStack中的使用(一)。(2013.07.23)對於Ubuntu映象,注入SSH有一些限制:
Ubuntu cloud images do not have any ssh HostKey generated inside them
(/etc/ssh/ssh_host_{ecdsa,dsa,rsa}_key). The keys are generated by
cloud-init after it finds a metadata service. Without a metadata service,
they do not get generated. ssh will drop your connections immediately
without HostKeys.
https://lists.launchpad.net/openstack/msg12202.html
5.3.5 request_network(G版)
引數:[(portid), (netid), (netid, ip), ...],其中ip僅支援IPv4.1. 若僅指定port,則更新port的device_id(vmid)和device_owner('compute:zone'),如果同時指定了安全組,會忽略安全組;
2. 否則,建立port,引數:device_id, device_owner, (fixed_ips), network_id, admin_state_up, security_groups, (mac_address,允許虛擬化層提供可用的mac地址)
若使用quantum的securitygroup實現,則在Nova的虛擬機器資料表中securitygroup為空
一個VIF的結構體:
{
	id: XXX,
	address: XXX(mac),
	type: XXX(ovs or bridge or others),
	ovs_interfaceid: XXX(portid or none),
	devname: XXX('tap+portid'),
	network: {
		id: XXX,
		bridge: XXX('br-int' or 'brq+netid'),
		injected: XXX,
		label: XXX,
		tenant_id: XXX,
		should_create_bridge: XXX(true or none),
		subnets: [subnet: {
			cidr: XXX,
			gateway: {
				address: XXX,
				type: 'gateway'
			},
			dhcp_server: XXX,
			dns: [dns: {
				address: XXX,
				type='dns'
			}],
			ips: [ip: {
				address: XXX,
				type: 'fixed',
				floating_ips: {
					address: XXX,
					type='floating'
				}
			}],
			routes: []
		}]
	}
}
5.3.6 Cinder
建立虛擬機器引數中有bdm時,會與Cinder互動。1. initialize_connection(volume, connector)
LVM: 獲取卷的target_portal,target_iqn ,target_lun等資訊
2. attach(volume, instance_uuid, mountpoint)
5.3.7 虛擬機器的卷和映象
版本:Grizzlylibvert driver建立虛擬機器時,會先生成disk_info結構體,大致如下:
'disk_info':
{
	'cdrom_bus':'ide',
	'disk_bus':'virtio',
	'mapping': {
		'root': {
			'bus': 'virtio/ide/xen/...',
			'dev': 'vda1',
			'type': 'disk'
		},
		'disk': {   如果是本地系統卷才有該欄位;如果是後端系統卷啟動,沒有該欄位
			'bus': 'virtio',
			'dev': 'vda1',
			'type': 'disk'
		},
		'disk.local':{  如果規格中有ephemeral
			'bus': 'virtio',
			'dev': 'vda2',
			'type': 'disk'
		},
		'disk.ephX':{ 根據bdm中的ephemerals
			'bus': 'virtio/ide/xen/...',
			'dev': 'XXX',
			'type': 'disk'
		},
		'disk.swap':{  優先從bdm中獲取,其次是規格中
			'bus': 'virtio/ide/xen/...',
			'dev': 'XXX',
			'type': 'disk'
		},
		'/dev/XXX':{  後端卷
			'bus': 'virtio/ide/xen/...',
			'dev': 'XXX',
			'type': 'disk'
		},
                'disk.config':{  如果虛擬機器使用了configdrive
                        'bus': 'virtio',
                        'dev': 'XXX25',
                        'type': 'disk'
                }
	}
}[[email protected] ~]# ll /var/lib/nova/instances/d6bd399f-f374-45c6-840b-01f36181286d/
total 1672
-rw-rw----. 1 qemu qemu 56570 May 7 11:43 console.log
-rw-r--r--. 1 qemu qemu 1769472 May 7 11:45 disk
-rw-r--r--. 1 nova nova 1618 May 7 06:41 libvirt.xmle2fsck -fp diskfile 強制檢查及修復系統
resize2fs diskfile 重新定義檔案系統的大小
如果配置項preallocate_images=space,則呼叫fallocate -n -l root_gb diskfile為虛擬機器系統卷預分配磁碟空間(前提是系統支援fallocate命令) 檔案、密碼等內容的注入,是注入到磁碟目錄下的disk檔案中: VFSGuestFS類依賴於python包-guestfs,否則處理類是VFSLocalFS 2. 如果是後端卷 沒有下載映象的步驟,虛擬機器直接掛載卷。所以後端卷啟動,不支援注入功能。
5.4 Nova中的Quantum
LinuxBridge:libvirt_vif_driver=nova.virt.libvirt.vif.QuantumLinuxBridgeVIFDriverOVS(使用過濾功能):libvirt_vif_driver=nova.virt.libvirt.vif.LibvirtHybirdOVSBridgeDriver
OVS(libvert.version < 0.9.11,不使用過濾):
libvirt_vif_driver=nova.virt.libvirt.vif.LibvirtOpenVswitchDriver
OVS(libvert.version >= 0.9.11,不使用過濾):
libvirt_vif_driver=nova.virt.libvirt.vif.LibvirtOpenVswitchVirtualPortDriver
Nova's LibvirtHybridOVSBridgeDriver (which is recommended to use by default) creates an additional bridge and related interfacces per tap interface.
The reason to create the bridge is to make Nova'security group work. Security group implementation is based on iptables, but iptables rules are not applied when packets are forwarded on OVS bridges. Thus we prepare an extra bridge per VIF to apply iptables rules and ensure security group works.
5.5 F版中的安全組
建立虛擬機器或刪除虛擬機器,會在計算節點上觸發更新安全組的操作(傳入虛擬機器所屬的安全組):nova/compute/api.py中SecurityGroupAPI::trigger_members_refresh()
nova/compute/api.py中SecurityGroupAPI::trigger_handler()
1. 找到虛擬機器所屬安全組可訪問的安全組內的虛擬機器,向這些虛擬機器所在的計算節點發送訊息,refresh_instance_security_rules;
2. 呼叫配置項security_group_handler表示的類的trigger_security_group_members_refresh方法
3. 在計算節點,會重置與虛擬機器關聯的chain規則
增加/刪除安全組規則:
1. 在db中增加/刪除規則記錄;
2. 向每個屬於該安全組內的虛擬機器所在的compute節點發送RPC訊息,refresh_instance_security_rules;
3. ComputeManager進而呼叫ComputeDriver的refresh_instance_security_rules(instance)方法;
4. 在Driver內,以KVM為例,呼叫FirewallDriver的refresh_instance_security_rules,重置與虛擬機器關聯的chain規則;
5.6 Rescue模式
The ability to boot from a rescue image and mount the original virtual machine's disk as a secondary block device, steps:1. VM is marked in rescue mode
2. VM is shutdown
3. a new VM is created with identical network configuration but a new root password
4. the new VM has a rescue image as the primary filesystem and the secondary filesystem would be the original VM's primary filesystem
5.7 關於Resize
While digging into https://bugs.launchpad.net/nova/+bug/1163844 concerning the Hyper-V driver, I noticed the behavior when the disk shrinks is inconsistent across all the hypervisors.libvirt: logs it cannot resize to smaller and just keeps the larger disk
xen: tries to copy contents to a smaller disk, fails if too large
hyperv: always errors out if new disk size is smaller
powervm: silently keeps the larger disk
vmware: (couldn't find where migration code handled resize)
The only mention in the API guide - http://docs.openstack.org/api/openstack-compute/2/content/Resize_Server-d1e3707.html - is "scaling the server up or down."
What is the * expected * behavior here? For metering reasons, my thought is that if the disk cannot be sized down an error should be thrown and that the libvirt and powervm should be modified. One issue with this approach is how we expose to the end-user what happened, I don't believe the ERROR state has any details. Additionally, auto-reverting the resize has the same side effect. I would like to explore standardizing the behavior in Havana, documenting in the API guide, and sync'ing in the hyperivsors.
5.8 nova-scheduler
配置項:scheduler_max_attempts,3;
scheduler_available_filters,系統可用的filter,不一定使用,['nova.scheduler.filters.all_filters'];
scheduler_default_filters,系統使用的filter,必須是可用filter的子集,['RetryFilter','AvailabilityZoneFilter','RamFilter','ComputeFilter','ComputeCapabilitiesFilter','ImagePropertiesFilter'];
nova-scheduler用到了OpenStack中的topic exchange上的共享佇列。可以多程序部署,利用訊息佇列自身特性實現負載均衡。For availability purposes, or for very large or high-schedule frequency installations, you should consider running multiple nova-scheduler services. No special load balancing is required, as the nova-scheduler communicates entirely using the message queue.
5.9 掛卷
對於libvert來說,相關的配置項:libvirt_volume_drivers,對於新的Cinder driver,可能需要為虛擬化平臺提供掛卷的driver。掛卷時,從Cinder返回的connection_info中有" driver_volume_type",根據此項選擇driver,driver中主要實現connect_volume()和disconnect_volume()方法。6. Cinder
6.1 G版更新
檢視launchpad
6.2 知識點
建立卷時,配置項default_volume_type卷的預設型別,可以在availability_zone中指定主機建立卷(管理員介面)。如果是快照建立卷且配置項snapshot_same_host為真,則需要直接向快照原卷所在的主機發送RPC訊息;否則扔給cinder-scheduler處理。
配置項scheduler_driver是cinder-scheduler的driver。scheduler_driver=cinder.scheduler.filter_scheduler.FilterScheduler,這也是預設配置
7. Quantum
啟用IP地址重疊除了設定namespace外,還需配置:allow_overlapping_ips=True7.1 G版更新
檢視launchpad
7.2 dhcp-agent
如果一個network內有subnet的enable_dhcp=True,dhcp agent就會為該network建立dnsmasq程序,同時在該network內建立port,從所有enable_dhcp=True的subnet中分配IPDnsmasq的配置目錄:/var/lib/quantum/dhcp/
(Grizzly)配置項dhcp_agent_notification決定是否向dhcp agent傳送RPC訊息。
7.3 l3-agent
Folsom版,一個l3 agent最多隻能處理一個external network如果use_namespaces=True,則可以處理多個Router;
如果use_namespaces=False,只能處理一個Router(配置項router_id);
7.4 Quantum with Xen and KVM

7.5 Quota
目前(Folsom)所有plugin支援的extension是router和l3,要使用Quota,需要在quantum.conf配置:[QUOTAS]quota_driver = quantum.extensions._quotav2_driver.DbQuotaDriver
在Folsom版本,只有OVS和LinuxBridge支援Quota
Grizzly版本:[QUOTAS]quota_driver = quantum.db.quota_db.DbQuotaDriver
該選項預設是quantum.quota.ConfDriver,從配置檔案讀取。
8. Keystone
8.1 PKI
[signing]#token_format = UUID
certfile = /home/boden/workspaces/openstack/keystone/tests/signing/signing_cert.pem
keyfile = /home/boden/workspaces/openstack/keystone/tests/signing/private_key.pem
ca_certs = /home/boden/workspaces/openstack/keystone/tests/signing/cacert.pem
#key_size = 1024
#valid_days = 3650
#ca_password = None
token_format = PKI
Keystone儲存公鑰和私鑰,可通過介面獲取公鑰資訊;
服務啟動時會向Keystone獲取公鑰;
Keystone將使用者資訊用私鑰加密,然後MD5後返回給使用者作為token;
服務不用每次收到請求都訪問Keystone,直接校驗即可,提高效能;
9. Glance
映象型別:Raw、Machine (kernel/ramdisk outside of image, a.k.a. AMI)、VHD (Hyper-V)、VDI (VirtualBox)、qcow2 (Qemu/KVM)、VMDK (VMWare)、OVF (VMWare, others)、ISO容器型別(Container Format):表示映象檔案是否包含metadata。主要有ovf, ami(aki, ari), bare。 (2013.06.08)Glance在H-1版本增加allowed_direct_url_schemes,允許Nova直接從Glance後端拷貝檔案,此時,image metadata中有direct_url的描述欄位(配置項show_image_direct_url)。review:https://review.openstack.org/#/c/19408/
9.1、映象的狀態
queued映象的ID已經生成,但還沒有開始上傳到Glance.
saving
正在上傳映象資料,當使用帶“x-image-meta-location”頭的“POST /images”註冊映象時,不會出現該狀態,為映象資料已經有一個可用地址。
active
映象可用。
killed
在映象上傳過程中出現錯誤,或映象沒有讀許可權
deleted
映象資訊還在,但映象不再可用。會在一段時間後刪除。
pending_delete
待刪除,映象資料並沒有刪除,這種狀態的映象是可恢復的。
程式碼中下載映象: image_service.download(context, image_id, image_file)
9.2、製作可啟動的映象
方法一:kvm-img/qemu-img create -f raw xp.img 3G
kvm -m 1024 -cdrom winxp.iso -drive file=xp.img,if=virtio,boot=on -fda virtio-win-1.1.16.vfd -boot d -nographic -vnc :9
對於做好的映象,檢視/etc/sysconfig/network-scripts/ifcfg-eth0並刪除HWADDR=行
方法二:
一個虛擬機器只有系統卷,目前僅支援KVM和Xen,需要qemu-img 0.14以上版本,虛擬機器使用qcow2型別的映象,配置檔案中:use_cow_images=true。執行(之前最好在虛擬機器內執行sync):
nova image-create <虛擬機器id> <image name>
然後用nova image-list可以檢視
實際呼叫的是server物件的createImage
9.3、VM建立過程中映象的變化過程

10. 效能
1. 合理設定flavor(線性),防止出現某個資源未充分使用2. 針對租戶數量,合理設定quota
3. 使用overprovision(超分配),可以通過調整scheduler filters使hypervisor上報的資源大於實際的資源
4. 合理規劃節點能力,配置高的節點執行的虛擬機器較多,勢必會增加虛擬機器之間的資源(磁碟,頻寬)競爭,響應變慢
5. 挑選合適的hypervisor。目前新的特性都會在KVM充分的測試,並且最好使用KVM執行Linux虛擬機器,如果只執行Windows,可以考慮Hyper-V
6. hypervisor調優
7. Glance需要足夠的空間,Performance is not critical. The huge space requirement is because many cloud users seem to rely heavily on instance snapshots as a way of cloning and backup
8. For Cinder, it’s all about data accessibility and speed. The volume node needs to provide a high level of IOPS. Can use two NICs /w Bonding/LACP for network reliability and speed and iSCSI optimization.
9. Network. For larger deployments we recommend dedicating each type to a different physical connection.