
Using Google Maps API (v3) with Rails (5.2)
Using Google Maps API (v3) with Rails (5.2)
Step-by-Step Tutorial

In this tutorial we’ll talk about how to use Google Maps API with Rails. We’ll see some examples of using Static API and Javascript API, how to place a marker and how to update the marker position when we change a form input value. And finally how to update the input value by dragging the marker. All of this without using any gems.
Level: beginner
Pre requisites: basic knowledge of Rails and Javascript
Setup Rails
Please confirm that you have rails >= 5.2 installed (so you can use Rails Credentials)
rails -v
Now let’s create a rails App:
rails new gmaps-rails-examplecd gmaps-rails-exampleLet’s continue by creating a basic CRUD App, scaffolding ´Place´:
rails g scaffold Place name:string latitude:decimal longitude:decimal --javascript-engine=js
We have created a Model that holds basic information (name and location) about places, with these fields and types:
- name: string
- latitude: decimal
- longitude: decimal
and the correspondent controller, views, routes and assets.
Coffescript is a great language and much more elegant then javascript, but I find easier to work with javascript because we can find more examples and snippets in the internet. In this case, all of Google Maps API Documentation code examples are in Javascript. So we use the parameter --javascript-engine to tell rails to use Javascript in scaffold.
and now let’s create the database:
rails db:migrate
and populate with some data. Edit db/seeds.rb file and add:
Place.create!([{ "name": "Buckingham Palace", "latitude": "51.501564","longitude": "-0.141944"},{ "name": "Westminster Abbey", "latitude": "51.499581", "longitude": "-0.127309"},{ "name": "Big Ben", "latitude": "51.500792", "longitude": "-0.124613"}])now run:
rails db:seed
start rails server:
rails server
launch in your browser:
and you should see:

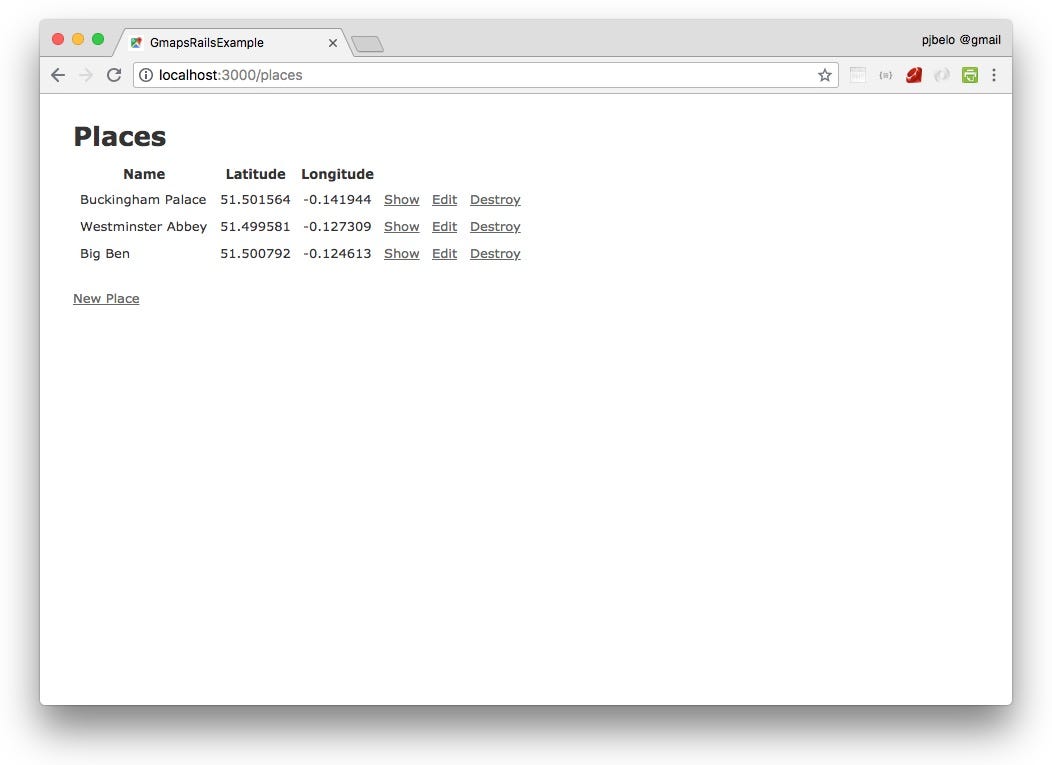
You have deployed an App with CRUD features where you can create, edit and destroy your list of places.
Now let’s add our first map.
To do that you must have an API key or get one: Google Maps API key.
Google Maps API and Rails Credentials
Now we’ll setup rails to use the key. To protect our key let’s use Rails Credentials. For more information about Rails Credentials click here
In terminal run:
rails credentials:edit
Add this line at the end:
google_maps_api_key: INSERT-YOUR-KEY-HERE
Don’t forget to insert your key in the placeholder!!
Great! We are now able to access our key in our Rails app through Rails.application.credentials.google_maps_api_key
Note: If you don’t want to use credentials and have no need to protect your key, you can use your API key string instead.
Using Google Maps Static API
Google says:
“The Maps Static API lets you embed a Google Maps image on your web page without requiring JavaScript or any dynamic page loading. The Maps Static API service creates your map based on URL parameters sent through a standard HTTP request and returns the map as an image you can display on your web page.”
Let’s see how. If necessary, start your rails server: rails server
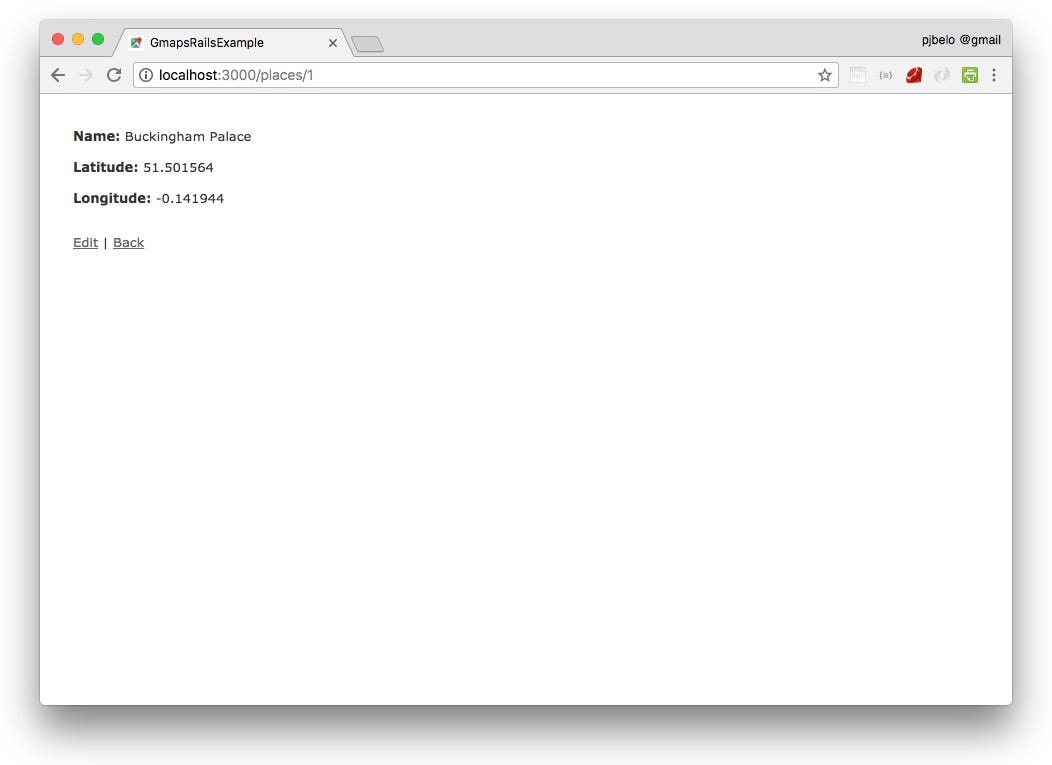
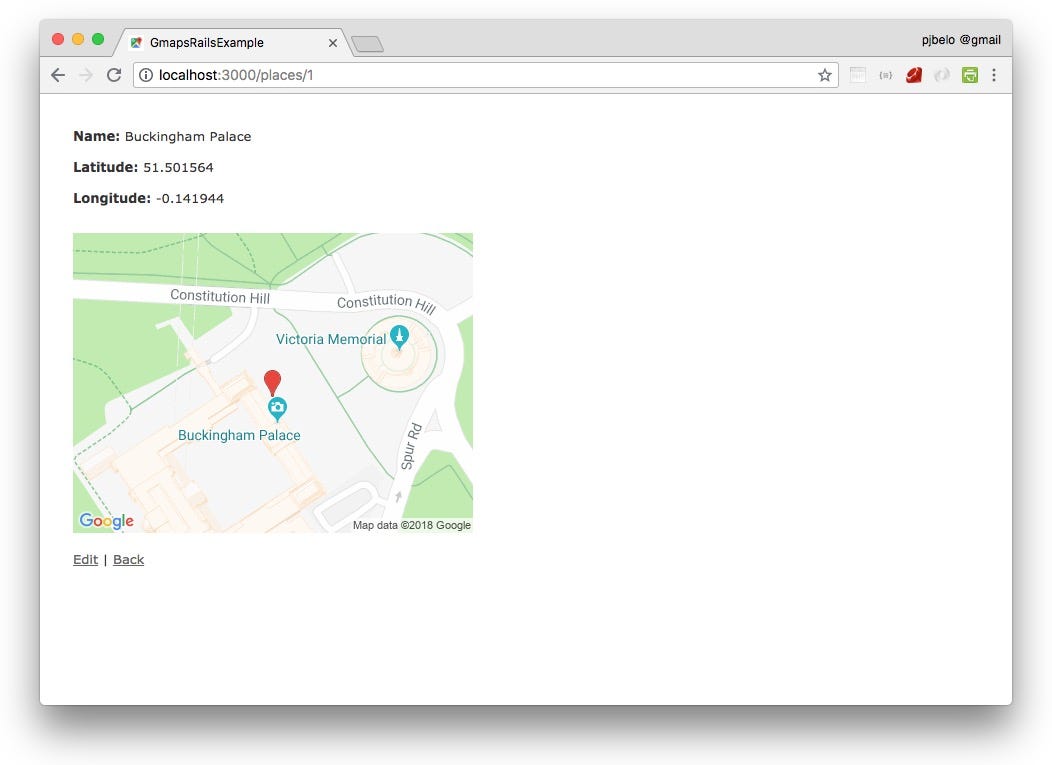
Click “show” on first place (Buckingham Palace). You’ll see this:

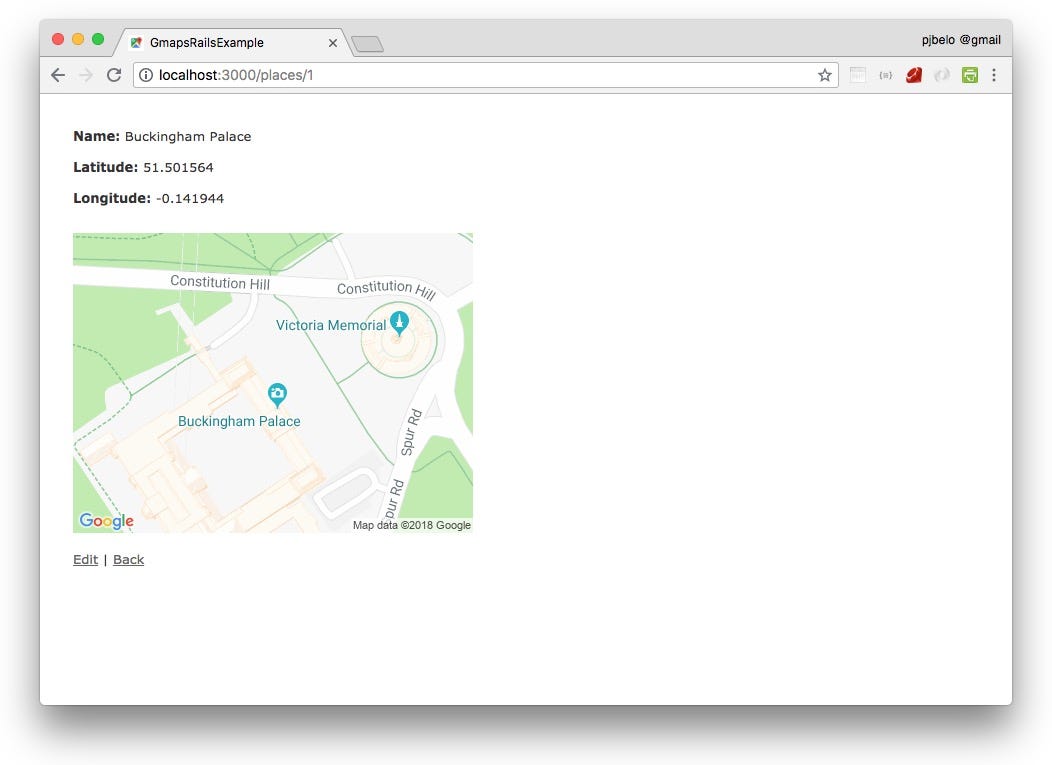
Let’s edit our file app/views/places/show.html.erb and bellow the last field add:
<p><%= image_tag "https://maps.googleapis.com/maps/api/staticmap?zoom=17&size=400x300¢er=#{@place.latitude},#{@place.longitude}&key=#{Rails.application.credentials.google_maps_api_key}", alt: "Map" %></p>Now refresh your page and you should see this map:

in the above code we are passing the following parameters:
zoom — approximate detail is 1: World, 5: Landmass/continent, 10: City, 15: Streets, 20: Buildings
size — width x heigth in pixels
center — where to center the map key — your API key
Pipe symbol (%7C) is used to separate marker properties.
Adding a marker
And now we’ll insert a marker. Replace this part of the code:
<p><%= image_tag "https://maps.googleapis.com/maps/api/staticmap?zoom=17&size=400x300&markers=size:small%7Ccolor:red%7C#{@place.latitude},#{@place.longitude}&key=#{Rails.application.credentials.google_maps_api_key}", alt: "Map" %></p>Here we’ve set the marker size to small and color to red.
Refresh your page and you will get a red marker on the map:

Notice that when we use a marker we don’t need to define the map center. The marker position will be used to center the map.
We must start by inserting the code that loads the api in our page. To do so, edit app/views/layouts/application.html.erb and insert it in the <head>, before 'application' because it must be loaded before our code that will be included trough 'application' manifest.
... <%= javascript_include_tag 'https://maps.googleapis.com/maps/api/js?key='+Rails.application.credentials.google_maps_api_key %> <%= javascript_include_tag 'application', 'data-turbolinks-track': 'reload' %></head>...Now you should delete the static map (keeping it may result in conflict), and insert a <div> where you want the new map to be placed:
app/views/places/show.html.erb
<p> <div id="map"></div></p>And config its size:
app/assets/stylesheets/places.scss
#map { width: 600px; height: 400px;}Now we’ll need to call our javascript function from the view.
Rails makes use of Turbolinks by default. Turbolinks says you must load your javascript code in the of the document. To do this let's create a yield in application.html.erb that will receive code from the selected views.
app/views/layouts/application.html.erb
... <%= yield(:head_tags) %> </head>...Now we can call our javascript function from our view, inserting the script in the <head>of our page by passing a block with provide.
At the top of the view file insert the code:
app/views/places/show.html.erb
<% provide :head_tags do %> <script> document.addEventListener("DOMContentLoaded", function(){ initMap(<%[email protected]%>, <%[email protected]%>) }); </script><% end %>When the DOM content is loaded, the function ‘initMap’ will be called and two parameters will be passed: <%[email protected]%> and <%[email protected]%>.
Now let’s write the javascript code for our first Javascript API Map.
app/assets/javascripts/places.js
function initMap(lat, lng) { var myCoords = new google.maps.LatLng(lat, lng); var mapOptions = { center: myCoords, zoom: 14 }; var map = new google.maps.Map(document.getElementById('map'), mapOptions);}The map will be centered on the coordinates that will be passed to the function and with a level of zoom of 14.
Refresh your page and you should see this:

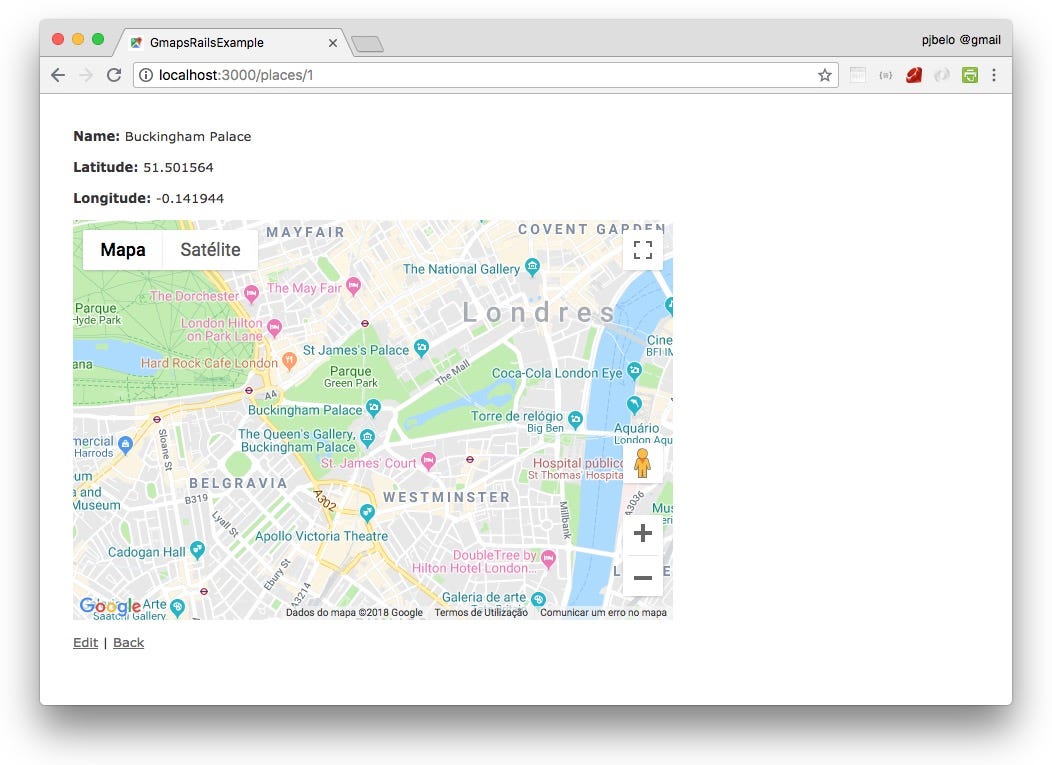
Now we have a dynamic javascript map that we can interact with, zoom in and out, pan, change between roadmap and satellite view, make full screen and even use street view.
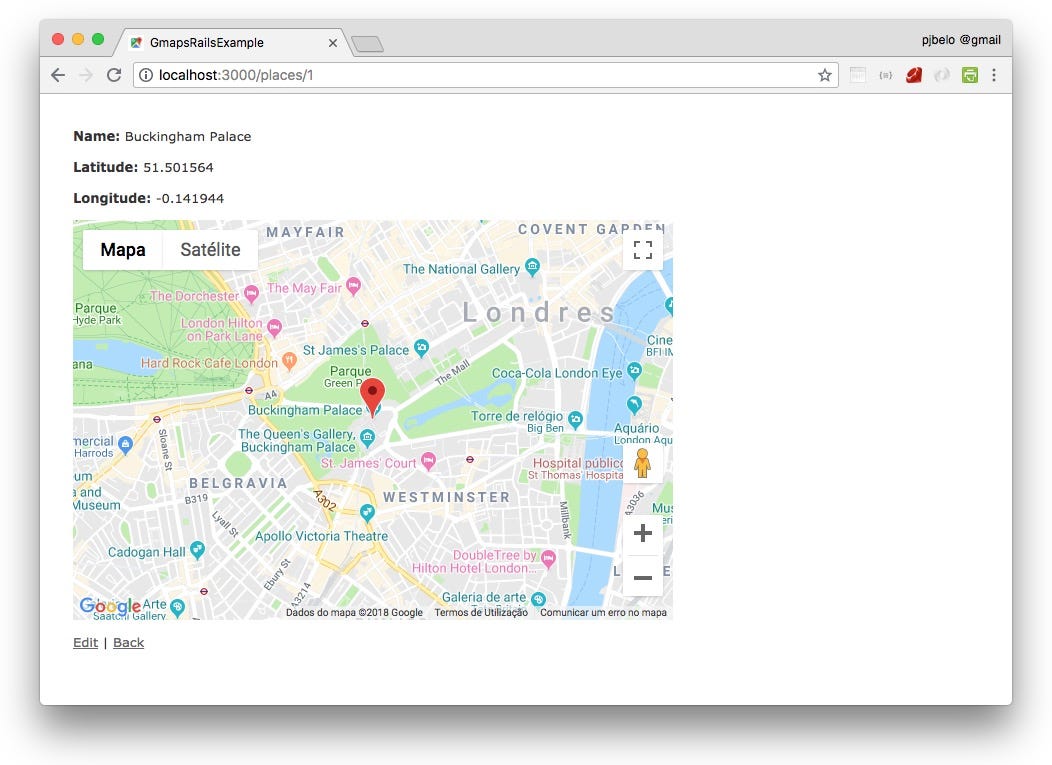
Now let’s insert a marker:
var marker = new google.maps.Marker({ position: myCoords, map: map});The complete function will be:
function initMap(lat, lng) { var myCoords = new google.maps.LatLng(lat, lng); var mapOptions = { center: myCoords, zoom: 14 }; var map = new google.maps.Map(document.getElementById('map'), mapOptions); var marker = new google.maps.Marker({ position: myCoords, map: map });}Refresh your page and you will see:

Now go to homepage, and click ‘show’ on diferent places.
Probably the map will not load. This is because Rails when using Turbolinks does not reload the page.
And because we want to run our function when the page is loaded, we should have a page loading. Other possibilities exist but it is necessary a deeper understanding of Turbolinks, so let’s just force a page reload where we need it.
To do this we must include this script in the <head> of our HTML page:<meta name='turbolinks-visit-control' content='reload'>
So let’s edit our view to look like this:
app/views/places/show.html.erb
<% provide :head_tags do %> <meta name='turbolinks-visit-control' content='reload'> <script> document.addEventListener("DOMContentLoaded", function(){ initMap(<%[email protected]%>, <%[email protected]%>) }); </script><% end %>...Now when you click ‘show’ all maps should appear.
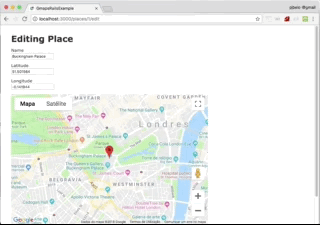
Using Map to get values
When we create a ‘New Place’ or ‘Edit’ an existing one, Rails will use the partial _form.html.erb.
We will create a new map (‘map2’) to interact with this form, that will update the marker when input values change and will change the input values when the marker is dragged.
At the top let’s insert the code to tell Turbolinks to reload the page and the event that will launch initMap2 function after the DOM is loaded.
app/views/places/_form.html.erb
<% provide :head_tags do %> <meta name='turbolinks-visit-control' content='reload'> <script> document.addEventListener("DOMContentLoaded", initMap2); </script><% end %>Notice that here we are not passing parameters to initMap2 function. In this case our function will read the values of the HTML input values.
After the last field and before the submit button insert a <div>:
<p> <div id="map2"></div></p>And config it’s size:.
app/assets/stylesheets/places.scss
#map2 { width: 600px; height: 400px;}In our javascript file let’s create a new function, bellow the existing one.
app/assets/javascripts/places.js
function initMap2() { var lat = document.getElementById('place_latitude').value; var lng = document.getElementById('place_longitude').value; var myCoords = new google.maps.LatLng(lat, lng); var mapOptions = { center: myCoords, zoom: 14 }; var map = new google.maps.Map(document.getElementById('map2'), mapOptions); var marker = new google.maps.Marker({ position: myCoords, animation: google.maps.Animation.DROP, map: map, draggable: true });}This will create a similar map and will insert a marker with animation and that is draggable.
Rails sets the id of the input fields to ‘place_latitude’ and ‘place_longitude’ so we use them to read their values.
Now you can try clicking ‘Edit’ and ‘New Place’ to see the new map and interact with it.
We want the marker to update it’s position if we change the input values, so let’s include this:
// refresh marker position and recenter map on markerfunction refreshMarker(){ var lat = document.getElementById('place_latitude').value; var lng = document.getElementById('place_longitude').value; var myCoords = new google.maps.LatLng(lat, lng); marker.setPosition(myCoords); map.setCenter(marker.getPosition()); }// when input values change call refreshMarkerdocument.getElementById('place_latitude').onchange = refreshMarker;document.getElementById('place_longitude').onchange = refreshMarker;And now the other way. If we drag the marker, the input values should be updated.
Add this:
// when marker is dragged update input valuesmarker.addListener('drag', function() { latlng = marker.getPosition(); newlat=(Math.round(latlng.lat()*1000000))/1000000; newlng=(Math.round(latlng.lng()*1000000))/1000000; document.getElementById('place_latitude').value = newlat; document.getElementById('place_longitude').value = newlng;});// When drag ends, center (pan) the map on the marker positionmarker.addListener('dragend', function() { map.panTo(marker.getPosition()); });So now you get this:

And now a final tweak. If you create a new place the map will be centered at 0,0. This is not very friendly.
So, let’s add a default position. This snippet should be placed at the top of the function, after the variables initialization.
// if not defined create default positionif (!lat || !lng){ lat=51.5; lng=-0.125; document.getElementById('place_latitude').value = lat; document.getElementById('place_longitude').value = lng;}The complete function should look like this:
function initMap2() { var lat = document.getElementById('place_latitude').value; var lng = document.getElementById('place_longitude').value; // if not defined create default position if (!lat || !lng){ lat=51.5; lng=-0.125; document.getElementById('place_latitude').value = lat; document.getElementById('place_longitude').value = lng; } var myCoords = new google.maps.LatLng(lat, lng); var mapOptions = { center: myCoords, zoom: 14 }; var map = new google.maps.Map(document.getElementById('map2'), mapOptions); var marker = new google.maps.Marker({ position: myCoords, animation: google.maps.Animation.DROP, map: map, draggable: true }); // refresh marker position and recenter map on marker function refreshMarker(){ var lat = document.getElementById('place_latitude').value; var lng = document.getElementById('place_longitude').value; var myCoords = new google.maps.LatLng(lat, lng); marker.setPosition(myCoords); map.setCenter(marker.getPosition()); } // when input values change call refreshMarker document.getElementById('place_latitude').onchange = refreshMarker; document.getElementById('place_longitude').onchange = refreshMarker; // when marker is dragged update input values marker.addListener('drag', function() { latlng = marker.getPosition(); newlat=(Math.round(latlng.lat()*1000000))/1000000; newlng=(Math.round(latlng.lng()*1000000))/1000000; document.getElementById('place_latitude').value = newlat; document.getElementById('place_longitude').value = newlng; }); // When drag ends, center (pan) the map on the marker position marker.addListener('dragend', function() { map.panTo(marker.getPosition()); });}I hope that you have enjoyed this reading and that it may be useful to you.
and check the commit history for the different code versions.
Please feel free to contact. I’ll be glad to help if I can :-)
Cheers,
Paulo