
基於“formData批量上傳的多種實現” 的多圖片預覽、上傳的多種實現 formData批量上傳的多種實現
阿新 • • 發佈:2018-12-27
前言
圖片上傳是web專案常見的需求,我基於之前的部落格的程式碼(請戳:formData批量上傳的多種實現)裡的第三種方法實現多圖片的預覽、上傳,並且支援三種方式新增圖片到上傳列表:選擇圖片、複製貼上圖片、滑鼠拖拽圖片,同時支援從上傳列表中移除圖片(點選“X”號)
效果演示
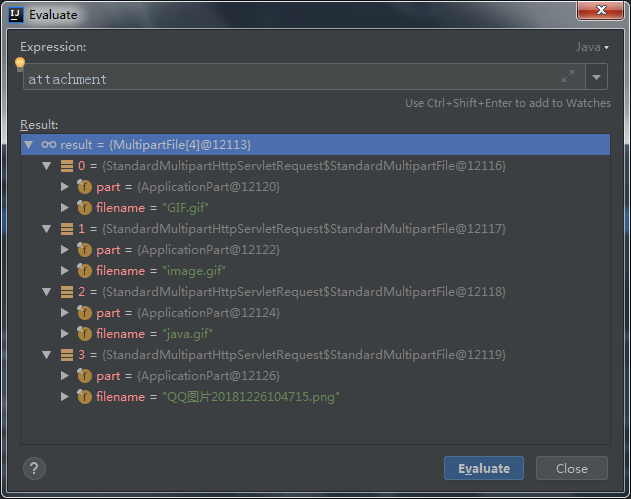
選擇圖片
頁面操作

後臺接參
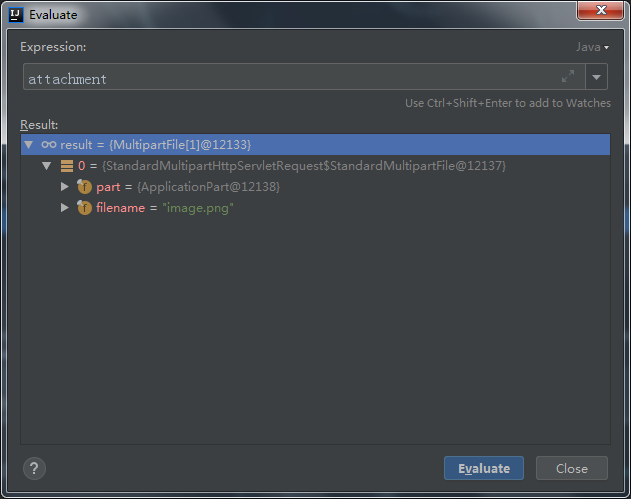
複製貼上
頁面操作,使用Ctrl C、 V 效果也一樣

後臺接參
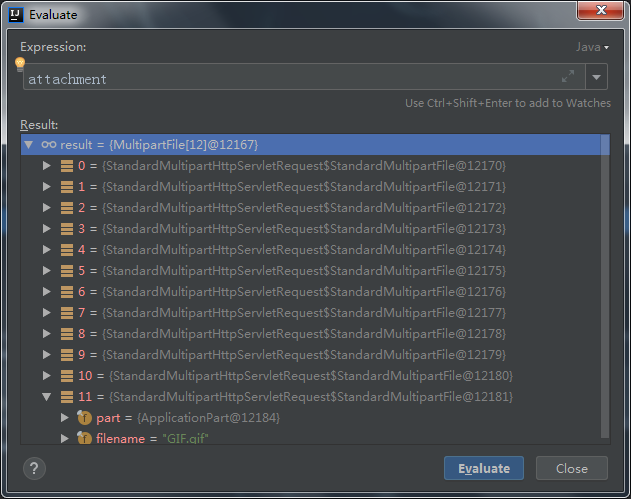
滑鼠拖拽
頁面操作

後臺接參
show the code
程式碼與之前的部落格變化不大,主要是將p標籤換成了img標籤並且調整好樣式,input加入了格式校驗,使用window.URL.createObjectURL進行圖片的預覽等等,更多細節請直接看對比之前的程式碼與現在的程式碼
注:專案用到了bootstrap、layer、thymeleaf,需要先引入相關檔案
css
注意:樣式在父頁面引入
.nav-bar { border-top: 1px solid #9E9E9E; margin: 10px 0 20px; } .nav-bar-title { margin: -13px 0 0 35px; background-color: white; padding: 0 10px; float: left; color: #199ED8; } .images-remove { font-size: 25px; color: red; cursor: pointer; position: relative; right: 0px; top: -15px; } .images-text-img { float: left; height: 100px; width: 100px; border: 1px solid #c2cad8; margin-bottom: 5px; } .images-text-img + i { float: left; line-height: 30px !important; } .input-images { width: 90% !important; padding: 4px 12px !important; } .images-list { border: 1px solid #c2cad8; padding: 10px; width: 400px; height: 355px; overflow: auto; }
imagesUpLoad.html
<!DOCTYPE html>
<html xmlns:th="http://www.thymeleaf.org">
<body>
<div th:fragment="imagesPage(applyId)">
    <div class="nav-bar"><span class="nav-bar-title">圖片上傳</span></div>
    <form th:applyId="${applyId}" class="form-horizontal images-form" enctype="multipart/form-data">
        <div class='form-body'>
            <div class='form-group'>
                <div class="col-md-4">
                    <button type="button" class="btn btn-default images-btn" onclick="Images.appendImagesInput(this)">
                        選擇圖片
                    </button>
                </div>
            </div>
            <div class='form-group'>
                <div contenteditable class="images-list">

                </div>
            </div>
        </div>
    </form>
</div>
</body>
</html>
js
只需執行一次初始化函式即可
        var Images = {
            //初始化
            init:function(){
                Images.removeImagesInputListener();
                Images.pasteImagesListener();
            },
            //上傳圖片
            upload: function (applyId) {
                //終止上傳
                if (!applyId) {
                    layer.msg('images applyid is null');
                    return;
                }
                //新增附件
                var formData = new FormData();
                $("form[applyId='" + applyId + "']").find("input[name='images']").each(function (index, element) {
                    //上傳的時候,先看FileList,在看我們自定義的filess
                    if ($(element).val() || element.filess) {
                        formData.append("images", element.files.length ? element.files[0] : element.filess);
                    }
                });

                //追加applyId到formData
                formData.append("applyId", applyId);

                //執行上傳
                $.ajax({
                    url: ctx + "/upload",
                    type: "post",
                    data: formData,
                    processData: false,
                    contentType: false,
                    success: function (data) {
                        if (checkResult(data)) {
                            console.log('圖片上傳成功:', data);

                        }
                    },
                    error: function (e) {
                        console.log('圖片上傳失敗');
                        throw e;
                    }
                });
            },
            //新增待上傳圖片
            appendImagesInput: function (btn,file) {
                //先追加html,input限制檔案型別 可以直接寫全,或者accept="image/*"
                $(btn).parents('.images-form').find(".images-list").append("<div><input type=\"file\" name=\"images\" class=\"hidden\" accept=\"image/gif,image/jpeg,image/jpg,image/png,image/svg\"/></div>");

                //最新追加的input
                var images = $(btn).parents('.images-form').find(".images-list").find("input[name='images']");

                if(file){
                    var  $input = images[images.length - 1];
                    /*
                        在 HTML 文件中 ,<input type="file"> 標籤是瀏覽器向伺服器傳送選中檔案的。該元素有一個 value 屬性,儲存了使用者指定的檔案的名稱,
                        為安全起見,file-upload 元素的value 屬性是隻讀的,不允許程式設計師修改它的值,並且HTML value 屬性也會被忽略。

                        解決方法:我們定義一個自己的屬性來儲存file,上傳的時候做處理
                     */
                    $input.filess = file;
                    var img = $("<img class='images-text-img' src=\"\"/>");
                    img.attr("src", window.URL.createObjectURL(file));
                    $($input).parent("div").append(img).append("<i class=\"fa fa-times images-remove\"></i>");
                }else {
                    //繫結input的change事件,注意:當我們點選取消或×號時並不觸發,但是無所謂,我們在upload方法進行過濾空的input就可以了
                    images[images.length - 1].onchange = function () {
                        var fileName = $(this).val();
                        if (fileName) {
                            var img = $("<img class='images-text-img' src=\"\"/>");
                            img.attr("src", window.URL.createObjectURL(this.files[0]));
                            $(this).parent("div").append(img).append("<i class=\"fa fa-times images-remove\"></i>");
                        } else {
                            $(this).parent("div").remove();
                        }
                    };

                    //觸發最新的input的click
                    images[images.length - 1].click();
                }
            },
            //刪除待上傳圖片
            removeImagesInputListener: function () {
                $("body").on("click", ".images-remove", function (even) {
                    $(this).parent().remove();
                });
            },
            //新增圖片監聽
            pasteImagesListener: function () {
                //貼上事件
                document.addEventListener('paste', function (event) {
                    if (event.clipboardData || event.originalEvent) {
                        var clipboardData = (event.clipboardData || event.originalEvent.clipboardData);
                        if (clipboardData.items) {
                            paste("paste",clipboardData.items);
                        }
                    }
                });

                //拖拽事件
                document.addEventListener("dragenter", function (e) {
                    e.stopPropagation();
                    e.preventDefault();
                }, false);
                document.addEventListener("dragleave", function (e) {
                    e.stopPropagation();
                    e.preventDefault();
                }, false);
                document.addEventListener("dragover", function (e) {
                    e.stopPropagation();
                    e.preventDefault();
                }, false);
                document.addEventListener("drop", function (e) {
                    e.stopPropagation();
                    e.preventDefault();
                    paste("drop",e.dataTransfer.files);
                }, false);

                var paste = function (type,files) {
                    var items = files, len = items.length, blob = [];
                    for (var i = 0; i < len; i++) {
                        if (items[i].type.indexOf("image") !== -1) {
                            //兩種方式
                            if(type === "paste"){
                                blob.push(items[i].getAsFile());
                            }else if(type === "drop"){
                                blob.push(items[i]);
                            }
                        }
                    }
                    if (blob.length !== 0) {
                        for (var i = 0; i < blob.length; i++) {
                            Images.appendImagesInput($(".images-btn"),blob[i])
                        }
                    }
                }
            }
        };

        //呼叫初始化
        Images.init();
controller
    /**
     * 批量上傳
     */
    @PostMapping("upload")
    public ResultModel<List<AttachmentVo>> upload(MultipartFile[] images, @RequestParam("applyId") String applyId) {
        System.out.println(images.length);
        System.out.println(applyId);
        return null;
    }
父頁面呼叫
直接在需要上傳元件的地方嵌入
<div th:replace="attachment/imagesUpLoad::imagesPage(123456)"></div>
呼叫上傳方法
直接在瀏覽器的控制檯呼叫
Images.upload("123456");
後記
還有一點不夠完美的就是當我的頁面出現多個上傳元件時(情況參考之前部落格了的新需求),通過複製貼上、滑鼠拖拽的方式時,呼叫Images.appendImagesInput追加html不好追加(目前是通過class去找),因為不好找到DOM物件,這裡先暫時滿足頁面只有一個上傳元件的情況,後面再進行升級