
WPF中UserControl的屬性和事件
WPF中自定義控制元件有兩種,一種是繼承自control的自定義控制元件,另一種是繼承自UserControl的使用者控制元件。使用者控制元件可以認為是一系列原生控制元件的集合。本文主要介紹如何建立一個使用者控制元件,以及使用者控制元件的自定義屬性和事件。
一、建立一個使用者控制元件
1、一種是直接建立使用者控制元件工程,這樣會生成DLL,使用時呼叫DLL
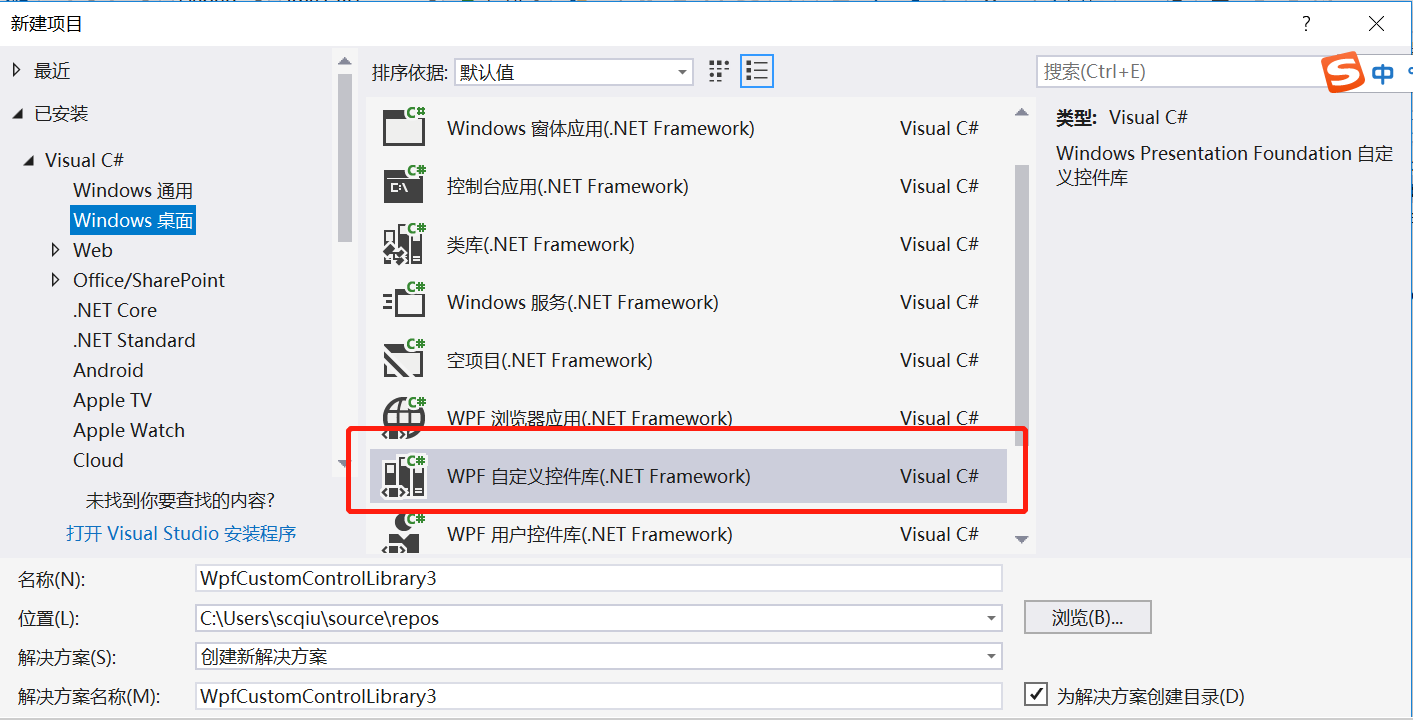
2、在當前工程中直接建立
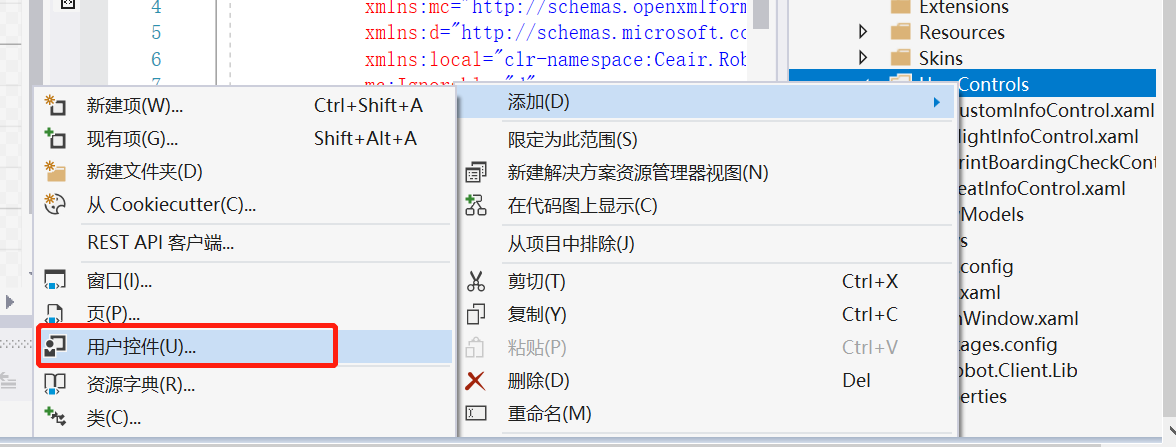
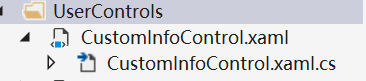
建立之後會生成一個xaml檔案和cs檔案,如下圖
建議使用第二種方法,這樣其他人在使用或修改該控制元件時溯源比較容易。
二、新增自定義屬性
1、首先在xaml檔案中新增需要的原生控制元件,如下:


1 <Grid> 2 <Grid.Background> 3 <ImageBrush ImageSource="View Codepack://siteoforigin:,,,/Resources/man_bg.png"/> 4 </Grid.Background> 5 <Grid.ColumnDefinitions> 6 <ColumnDefinition/> 7 <ColumnDefinition Width="1.6*"/> 8 <ColumnDefinition/> 9 </Grid.ColumnDefinitions> 10 <Grid Grid.Column="1" > 11 <Grid.RowDefinitions> 12 <RowDefinition/> 13 <RowDefinition/> 14 </Grid.RowDefinitions> 15 <TextBlock x:Name="txtName" Grid.Row="0" Style="{StaticResource TextBlockStyleSmall}" Text="{Binding RelativeSource={RelativeSource Mode=FindAncestor,AncestorType={x:Type local:CustomInfoControl}},Path=CustomName}"></TextBlock> 16 <TextBox x:Name="txtCardID" Grid.Row="1" Style="{StaticResource TextBoxStyle}" Text="{Binding RelativeSource={RelativeSource Mode=FindAncestor,AncestorType={x:Type local:CustomInfoControl}},Path=CardID}"></TextBox> 17 </Grid> 18 <Grid Grid.Column="2"> 19 <Grid.ColumnDefinitions> 20 <ColumnDefinition Width="3*"/> 21 <ColumnDefinition/> 22 </Grid.ColumnDefinitions> 23 <Grid.RowDefinitions> 24 <RowDefinition/> 25 <RowDefinition Height="3*"/> 26 </Grid.RowDefinitions> 27 <Image x:Name="imageDelete" Grid.Row="0" Grid.Column="1" 28 Source="pack://siteoforigin:,,,/Resources/deleteSign.png" 29 MouseDown="btnDelete"></Image> 30 <TextBlock x:Name="txtSeatNo" Grid.Row="1" Grid.Column="0" Style="{StaticResource TextBlockStyleBig}" Text="{Binding RelativeSource={RelativeSource Mode=FindAncestor,AncestorType={x:Type local:CustomInfoControl}},Path=SeatNo}"></TextBlock> 31 </Grid> 32 </Grid>
此例中添加了一個兩個TextBlock,一個TextBox,一個 Image.
Text="{Binding RelativeSource={RelativeSource Mode=FindAncestor,AncestorType={x:Type local:CustomInfoControl}},Path=CardID}"對應第二步中的依賴屬性,此句一定要加,否則無法將屬性值繫結到控制元件上。
2、在對應的後臺程式碼中新增依賴屬性
 1 //定義依賴項屬性
 2         public static readonly DependencyProperty CustomNameProperty =
 3             DependencyProperty.Register("CustomName", typeof(string), typeof(CustomInfoControl), new PropertyMetadata(""));
 4         public static readonly DependencyProperty CardIDProperty =
 5             DependencyProperty.Register("CardID", typeof(string), typeof(CustomInfoControl), new PropertyMetadata(""));
 6         public static readonly DependencyProperty SeatNoProperty =
 7             DependencyProperty.Register("SeatNo", typeof(string), typeof(CustomInfoControl), new PropertyMetadata(""));
 8
 9         //宣告屬性
10         /// <summary>
11         /// 旅客姓名.
12         /// </summary>
13         /// <value>
14         /// The name of the custom.
15         /// </value>
16         public string CustomName
17         {
18             get { return (string)GetValue(CustomNameProperty); }
19             set { SetValue(CustomNameProperty, value); }
20         }
21
22         /// <summary>
23         /// 旅客卡號.
24         /// </summary>
25         /// <value>
26         /// The card identifier.
27         /// </value>
28         public string CardID
29         {
30             get { return (string)GetValue(CardIDProperty); }
31             set { SetValue(CardIDProperty, value); }
32         }
33
34         /// <summary>
35         /// 座位號.
36         /// </summary>
37         /// <value>
38         /// The seat no.
39         /// </value>
40         public string SeatNo
41         {
42             get { return (string)GetValue(SeatNoProperty); }
43             set { SetValue(SeatNoProperty, value); }
44         }
View Code
三、新增自定義事件
1、新增自定義事件DeleteInfo
 1 /// <summary>
 2         /// The delete event
 3         /// </summary>
 4         public static readonly RoutedEvent deleteEvent =
 5              EventManager.RegisterRoutedEvent("DeleteInfo", RoutingStrategy.Bubble, typeof(RoutedEventHandler), typeof(CustomInfoControl));
 6
 7         /// <summary>
 8         /// 刪除該控制元件的操作.
 9         /// </summary>
10         public event RoutedEventHandler DeleteInfo
11         {
12             add
13             {
14                 AddHandler(deleteEvent, value);
15             }
16
17             remove
18             {
19                 RemoveHandler(deleteEvent, value);
20             }
21         }
View Code
2、在UserControl中新增自定義事件的呼叫點,本例中點選叉號圖片時,觸發該自定義事件。

 1 /// <summary>
 2         /// 點選刪除按鈕時的事件.
 3         /// </summary>
 4         /// <param name="sender">The sender.</param>
 5         /// <param name="e">The <see cref="MouseButtonEventArgs"/> instance containing the event data.</param>
 6         public void btnDelete(object sender, MouseButtonEventArgs e)
 7         {
 8             RoutedEventArgs args = new RoutedEventArgs(deleteEvent, this);
 9             RaiseEvent(args);
10         }
View Code
四、使用控制元件
1、使用控制元件時,先在xaml中新增呼叫。 xmlns:usercontrols="clr-namespace:Ceair.Robot.Client.UserControls.CustomInfoControl"
2、自定義屬性使用方法如下:
<usercontrols:CustomInfoControl x:Name="customInfoControl" CustomName="張三" CardID="12345" SeatNo="12A"></usercontrols:CustomInfoControl>
或者在後臺程式碼中新增customInfoControl.CustomName = "張三"
3、可以給自定義事件新增操作
customInfoControl.DeleteInfo += new RoutedEventHandler(DeleteCustomInfo);
 public void DeleteCustomInfo(object sender, RoutedEventArgs e)
        {
                //TODO,請新增自定義操作
        }
至此,該控制元件已經可以使用。